Spring Cloud构建微服务架构:Hystrix监控数据聚合
2017-09-13 08:43
996 查看
上一篇我们介绍了使用Hystrix Dashboard来展示Hystrix用于熔断的各项度量指标。通过Hystrix Dashboard,我们可以方便的查看服务实例的综合情况,比如:服务调用次数、服务调用延迟等。但是仅通过Hystrix Dashboard我们只能实现对服务当个实例的数据展现,在生产环境我们的服务是肯定需要做高可用的,那么对于多实例的情况,我们就需要将这些度量指标数据进行聚合。下面,在本篇中,我们就来介绍一下另外一个工具:Turbine。
在开始使用Turbine之前,我们先回顾一下上一篇中实现的架构,如下图所示:
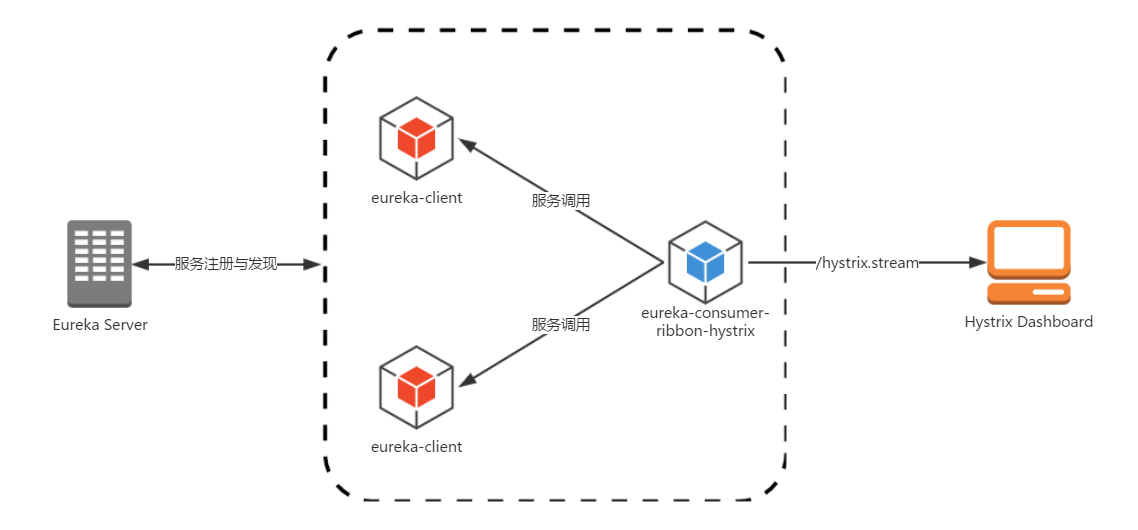
其中,我们构建的内容包括:
eureka-server:服务注册中心
eureka-client:服务提供者
eureka-consumer-ribbon-hystrix:使用ribbon和hystrix实现的服务消费者
hystrix-dashboard:用于展示
下面,我们将在上述架构基础上,引入Turbine来对服务的Hystrix数据进行聚合展示。这里我们将分别介绍两种聚合方式。
具体实现步骤如下:
创建一个标准的Spring Boot工程,命名为:turbine。
编辑pom.xml,具体依赖内容如下:
创建应用主类
在
参数说明
Stream的URL中通过
在完成了上面的内容构建之后,我们来体验一下Turbine对集群的监控能力。分别启动
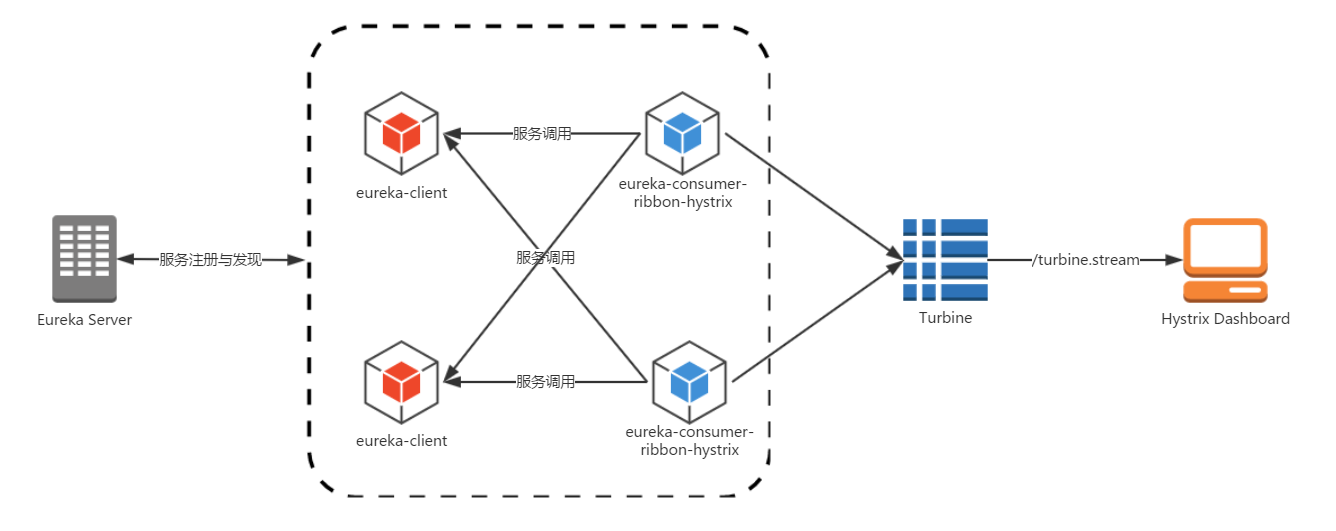
而此时的架构如下图所示:
Spring Cloud在封装Turbine的时候,还实现了基于消息代理的收集实现。所以,我们可以将所有需要收集的监控信息都输出到消息代理中,然后Turbine服务再从消息代理中异步的获取这些监控信息,最后将这些监控信息聚合并输出到Hystrix Dashboard中。通过引入消息代理,我们的Turbine和Hystrix Dashoard实现的监控架构可以改成如下图所示的结构:

从图中我们可以看到,这里多了一个重要元素:RabbitMQ。对于RabbitMQ的安装与基本时候我们可以查看之前的《Spring
Boot中使用RabbitMQ》一文,这里不做过多的说明。下面,我们可以来构建一个新的应用来实现基于消息代理的Turbine聚合服务,具体步骤如下:
创建一个标准的Spring Boot工程,命名为:
编辑
可以看到这里主要引入了
注意:这里我们需要使用Java 8来运行
在应用主类中使用
Stream的配置。
配置
对于Turbine的配置已经完成了,下面我们需要对服务消费者
在完成了上面的配置之后,我们可以继续之前的所有项目(除turbine以外),并通过Hystrix Dashboard开启对
更多Spring Cloud内容请持续关注我的博客更新或在《Spring Cloud微服务实战》中获取。
准备工作
在开始使用Turbine之前,我们先回顾一下上一篇中实现的架构,如下图所示:其中,我们构建的内容包括:
eureka-server:服务注册中心
eureka-client:服务提供者
eureka-consumer-ribbon-hystrix:使用ribbon和hystrix实现的服务消费者
hystrix-dashboard:用于展示
eureka-consumer-ribbon-hystrix服务的Hystrix数据
动手试一试
下面,我们将在上述架构基础上,引入Turbine来对服务的Hystrix数据进行聚合展示。这里我们将分别介绍两种聚合方式。
通过HTTP收集聚合
具体实现步骤如下:创建一个标准的Spring Boot工程,命名为:turbine。
编辑pom.xml,具体依赖内容如下:
| 12345678910111213141516 | <parent> <groupId>org.springframework.cloud</groupId> <artifactId>spring-cloud-starter-parent</artifactId> <version>Dalston.SR1</version> <relativePath /> <!-- lookup parent from repository --></parent><dependencies> <dependency> <groupId>org.springframework.cloud</groupId> <artifactId>spring-cloud-starter-turbine</artifactId> </dependency> <dependency> <groupId>org.springframework.boot</groupId> <artifactId>spring-boot-starter-actuator</artifactId> </dependency></dependencies> |
TurbineApplication,并使用
@EnableTurbine注解开启Turbine。
| 1234567891011 | @Configuration@EnableAutoConfiguration@EnableTurbine@EnableDiscoveryClientpublic class TurbineApplication { public static void main(String[] args) { SpringApplication.run(TurbineApplication.class, args); }} |
application.properties加入eureka和turbine的相关配置,具体如下:
| 12345678910 | spring.application.name=turbineserver.port=8989management.port=8990eureka.client.serviceUrl.defaultZone=http://localhost:1001/eureka/turbine.app-config=eureka-consumer-ribbon-hystrixturbine.cluster-name-expression="default"turbine.combine-host-port=true |
turbine.app-config参数指定了需要收集监控信息的服务名;
turbine.cluster-name-expression参数指定了集群名称为default,当我们服务数量非常多的时候,可以启动多个Turbine服务来构建不同的聚合集群,而该参数可以用来区分这些不同的聚合集群,同时该参数值可以在Hystrix仪表盘中用来定位不同的聚合集群,只需要在Hystrix
Stream的URL中通过
cluster参数来指定;
turbine.combine-host-port参数设置为
true,可以让同一主机上的服务通过主机名与端口号的组合来进行区分,默认情况下会以host来区分不同的服务,这会使得在本地调试的时候,本机上的不同服务聚合成一个服务来统计。
在完成了上面的内容构建之后,我们来体验一下Turbine对集群的监控能力。分别启动
eureka-server、
eureka-client、
eureka-consumer-ribbon-hystrix、
turbine以及
hystrix-dashboard。访问Hystrix
Dashboard,并开启对
http://localhost:8989/turbine.stream`的监控,这时候,我们将看到针对服务`eureka-consumer-ribbon-hystrix`的聚合监控数据。
而此时的架构如下图所示:
通过消息代理收集聚合
Spring Cloud在封装Turbine的时候,还实现了基于消息代理的收集实现。所以,我们可以将所有需要收集的监控信息都输出到消息代理中,然后Turbine服务再从消息代理中异步的获取这些监控信息,最后将这些监控信息聚合并输出到Hystrix Dashboard中。通过引入消息代理,我们的Turbine和Hystrix Dashoard实现的监控架构可以改成如下图所示的结构:从图中我们可以看到,这里多了一个重要元素:RabbitMQ。对于RabbitMQ的安装与基本时候我们可以查看之前的《Spring
Boot中使用RabbitMQ》一文,这里不做过多的说明。下面,我们可以来构建一个新的应用来实现基于消息代理的Turbine聚合服务,具体步骤如下:
创建一个标准的Spring Boot工程,命名为:
turbine-amqp。
编辑
pom.xml,具体依赖内容如下:
| 1234567891011121314151617 | <parent> <groupId>org.springframework.cloud</groupId> <artifactId>spring-cloud-starter-parent</artifactId> <version>Dalston.SR1</version> <relativePath /> <!-- lookup parent from repository --></parent><dependencies> <dependency> <groupId>org.springframework.cloud</groupId> <artifactId>spring-cloud-starter-turbine-amqp</artifactId> </dependency> <dependency> <groupId>org.springframework.boot</groupId> <artifactId>spring-boot-starter-actuator</artifactId> </dependency></dependencies> |
spring-cloud-starter-turbine-amqp依赖,它实际上就是包装了
spring-cloud-starter-turbine-stream和
pring-cloud-starter-stream-rabbit。
注意:这里我们需要使用Java 8来运行
在应用主类中使用
@EnableTurbineStream注解来启用Turbine
Stream的配置。
| 1234567891011 | @Configuration@EnableAutoConfiguration@EnableTurbineStream@EnableDiscoveryClientpublic class TurbineApplication { public static void main(String[] args) { SpringApplication.run(TurbineApplication.class, args); }} |
application.properties文件:
| 123456 | spring.application.name=turbine-amqpserver.port=8989management.port=8990eureka.client.serviceUrl.defaultZone=http://localhost:1001/eureka/ |
eureka-consumer-ribbon-hystrix做一些修改,使其监控信息能够输出到RabbitMQ上。这个修改也非常简单,只需要在
pom.xml中增加对
spring-cloud-netflix-hystrix-amqp依赖,具体如下:
| 1234567 | <dependencies> ... <dependency> <groupId>org.springframework.cloud</groupId> <artifactId>spring-cloud-netflix-hystrix-amqp</artifactId> </dependency></dependencies> |
http://localhost:8989/turbine.stream的监控,我们可以获得如之前实现的同样效果,只是这里我们的监控信息收集时是通过了消息代理异步实现的。
更多Spring Cloud内容请持续关注我的博客更新或在《Spring Cloud微服务实战》中获取。

相关文章推荐
- Spring Cloud构建微服务架构:Hystrix监控数据聚合【Dalston版】
- Spring Cloud架构教程 (二)Hystrix监控数据聚合
- Spring Cloud架构教程 (二)Hystrix监控数据聚合
- Spring Cloud构建微服务架构:Hystrix监控面板
- Spring Cloud架构教程 (二)Hystrix监控数据聚合
- Spring Cloud构建微服务架构-Hystrix断路器
- Spring Cloud构建微服务架构:服务容错保护(Hystrix断路器)【Dalston版】
- Spring Cloud构建微服务架构:服务容错保护(Hystrix依赖隔离)
- Spring Cloud构建微服务架构:服务容错保护(Hystrix依赖隔离)
- Spring Cloud构建微服务架构:服务容错保护(Hystrix依赖隔离)
- Spring Boot + Spring Cloud 构建微服务系统(五):熔断监控面板(Hystrix Dashboard)
- Spring Cloud构建微服务架构-Hystrix断路器
- Spring Cloud构建微服务架构-Hystrix依赖隔离
- Spring Cloud构建微服务架构-Hystrix服务降级
- Spring Cloud构建微服务架构—Hystrix断路器
- Spring Cloud构建微服务架构:服务容错保护(Hystrix服务降级)【Dalston版】
- Spring Cloud构建微服务架构—Hystrix断路器
- Spring Cloud构建微服务架构—Hystrix断路器
- Spring Cloud构建微服务架构:服务容错保护(Hystrix依赖隔离)【Dalston版】