Mybatis三剑客(mybatis-generator、mybatis-plugin、mybatis-pagehelper)介绍、配置及破解
2017-09-08 16:40
513 查看
本文用的是maven,idea15
Mabatis三剑客分别是:mybatis-generator、mybatis-plugin、mybatis-pagehelper
一、mybatis-generator
根据我们的数据库自动生成pojo、dao和xml文件 pojo里面放的是跟数据库字段一一对应的对象、dao层是接口,供service使用,xml是这个dao层接口的实现,sql语句都写在xml里
1.引入mabatis-generator
pom.xml里引入配置<plugin>
<groupId>org.apache.maven.plugins</groupId>
<artifactId>maven-compiler-plugin</artifactId>
<configuration>
<source>1.7</source>
<target>1.7</target>
<encoding>UTF-8</encoding>
<compilerArguments>
<extdirs>${project.basedir}/src/main/webapp/WEB-INF/lib/</extdirs>
</compilerArguments>
</configuration>
</plugin>12
3
4
5
6
7
8
9
10
11
12
引入generatorConfig.xml
generatorConfig.xml
<?xml version="1.0" encoding="UTF-8"?>
<!DOCTYPE generatorConfiguration
PUBLIC "-//mybatis.org//DTD MyBatis Generator Configuration 1.0//EN"
"http://mybatis.org/dtd/mybatis-generator-config_1_0.dtd">

<generatorConfiguration>
<!--导入属性配置-->
<properties resource="datasource.properties"></properties>

<!--指定特定数据库的jdbc驱动jar包的位置-->
<classPathEntry location="${db.driverLocation}"/>

<context id="default" targetRuntime="MyBatis3">

<!-- optional,旨在创建class时,对注释进行控制 -->
<commentGenerator>
<property name="suppressDate" value="true"/>
<property name="suppressAllComments" value="true"/>
</commentGenerator>

<!--jdbc的数据库连接 -->
<jdbcConnection
driverClass="${db.driverClassName}"
connectionURL="${db.url}"
userId="${db.username}"
password="${db.password}">
</jdbcConnection>

<!-- 非必需,类型处理器,在数据库类型和java类型之间的转换控制-->
<javaTypeResolver>
<property name="forceBigDecimals" value="false"/>
</javaTypeResolver>

<!-- Model模型生成器,用来生成含有主键key的类,记录类 以及查询Example类
targetPackage     指定生成的model生成所在的包名
targetProject     指定在该项目下所在的路径
-->
<!--<javaModelGenerator targetPackage="com.mmall.pojo" targetProject=".\src\main\java">-->
<javaModelGenerator targetPackage="com.mmall.pojo" targetProject="./src/main/java">
<!-- 是否允许子包,即targetPackage.schemaName.tableName -->
<property name="enableSubPackages" value="false"/>
<!-- 是否对model添加 构造函数 -->
<property name="constructorBased" value="true"/>
<!-- 是否对类CHAR类型的列的数据进行trim操作 -->
<property name="trimStrings" value="true"/>
<!-- 建立的Model对象是否 不可改变  即生成的Model对象不会有 setter方法,只有构造方法 -->
<property name="immutable" value="false"/>
</javaModelGenerator>

<!--mapper映射文件生成所在的目录 为每一个数据库的表生成对应的SqlMap文件 -->
<!--<sqlMapGenerator targetPackage="mappers" targetProject=".\src\main\resources">-->
<sqlMapGenerator targetPackage="mappers" targetProject="./src/main/resources">
<property name="enableSubPackages" value="false"/>
</sqlMapGenerator>

<!-- 客户端代码,生成易于使用的针对Model对象和XML配置文件 的代码
type="ANNOTATEDMAPPER",生成Java Model 和基于注解的Mapper对象
type="MIXEDMAPPER",生成基于注解的Java Model 和相应的Mapper对象
type="XMLMAPPER",生成SQLMap XML文件和独立的Mapper接口
-->

<!-- targetPackage:mapper接口dao生成的位置 -->
<!--<javaClientGenerator type="XMLMAPPER" targetPackage="com.mmall.dao" targetProject=".\src\main\java">-->
<javaClientGenerator type="XMLMAPPER" targetPackage="com.mmall.dao" targetProject="./src/main/java">
<!-- enableSubPackages:是否让schema作为包的后缀 -->
<property name="enableSubPackages" value="false" />
</javaClientGenerator>

<table tableName="mmall_shipping" domainObjectName="Shipping" enableCountByExample="false" enableUpdateByExample="false" enableDeleteByExample="false" enableSelectByExample="false" selectByExampleQueryId="false"></table>
<table tableName="mmall_cart" domainObjectName="Cart" enableCountByExample="false" enableUpdateByExample="false" enableDeleteByExample="false" enableSelectByExample="false" selectByExampleQueryId="false"></table>
<table tableName="mmall_cart_item" domainObjectName="CartItem" enableCountByExample="false" enableUpdateByExample="false" enableDeleteByExample="false" enableSelectByExample="false" selectByExampleQueryId="false"></table>
<table tableName="mmall_category" domainObjectName="Category" enableCountByExample="false" enableUpdateByExample="false" enableDeleteByExample="false" enableSelectByExample="false" selectByExampleQueryId="false"></table>
<table tableName="mmall_order" domainObjectName="Order" enableCountByExample="false" enableUpdateByExample="false" enableDeleteByExample="false" enableSelectByExample="false" selectByExampleQueryId="false"></table>
<table tableName="mmall_order_item" domainObjectName="OrderItem" enableCountByExample="false" enableUpdateByExample="false" enableDeleteByExample="false" enableSelectByExample="false" selectByExampleQueryId="false"></table>
<table tableName="mmall_pay_info" domainObjectName="PayInfo" enableCountByExample="false" enableUpdateByExample="false" enableDeleteByExample="false" enableSelectByExample="false" selectByExampleQueryId="false"></table>
<table tableName="mmall_product" domainObjectName="Product" enableCountByExample="false" enableUpdateByExample="false" enableDeleteByExample="false" enableSelectByExample="false" selectByExampleQueryId="false">
<columnOverride column="detail" jdbcType="VARCHAR" />
<columnOverride column="sub_images" jdbcType="VARCHAR" />
</table>
<table tableName="mmall_user" domainObjectName="User" enableCountByExample="false" enableUpdateByExample="false" enableDeleteByExample="false" enableSelectByExample="false" selectByExampleQueryId="false"></table>

<!-- mybatis插件的搭建 -->
</context>
</generatorConfiguration>12
3
4
5
6
7
8
9
10
11
12
13
14
15
16
17
18
19
20
21
22
23
24
25
26
27
28
29
30
31
32
33
34
35
36
37
38
39
40
41
42
43
44
45
46
47
48
49
50
51
52
53
54
55
56
57
58
59
60
61
62
63
64
65
66
67
68
69
70
71
72
73
74
75
76
77
78
79
80
81
82
83
84
85
86
87
88
2.新建datasource.properties文件,配置数据库连接信息(这里配置本地数据库)
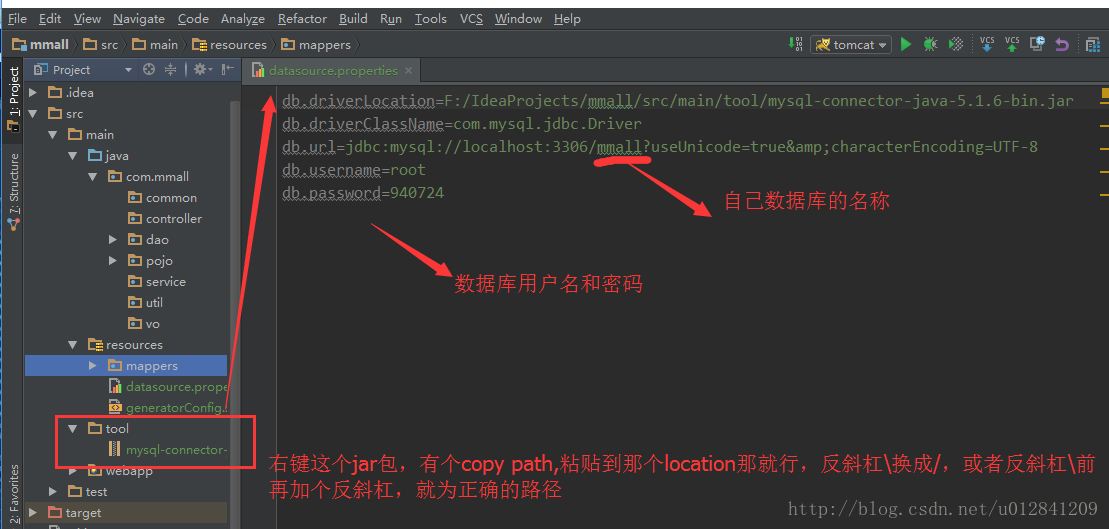
db.driverLocation=F:/IdeaProjects/mmall/src/main/tool/mysql-connector-java-5.1.6-bin.jar
db.driverClassName=com.mysql.jdbc.Driver
db.url=jdbc:mysql://localhost:3306/mmall?useUnicode=true&characterEncoding=UTF-8
db.username=root
db.password=940724
1
2
3
4
5
配置完之后,就点击idea的左下角有个小按钮,把右侧的maven project按钮调出来(右侧已有的请忽略)

点击maven project,并选定插件加载(双击就行)
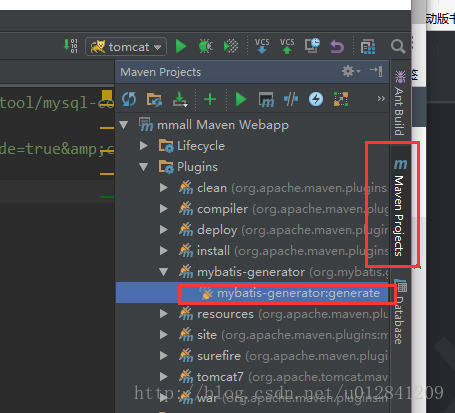
下方的控制台,出现build success就是成功了,就会发现dao的包和pojo包会生成好了接口和数据对象实体类,以及生成一个mapper文件夹,里面存储着数据库里各个实体的xml文件
注意mapper里生成的文件夹,我在创建的时候把时间戳给加里了,如果要完美的用的话,需要把时间戳优化一下
把insert标签下的#{createTime,jdbcType=TIMESTAMP}和#{updateTime,jdbcType=TIMESTAMP}改成now()
把update标签下的#{updateTime,jdbcType=TIMESTAMP}改成now()
这个now()方法是数据库自带的函数,表示现在的时间
二、mybatis-plugin
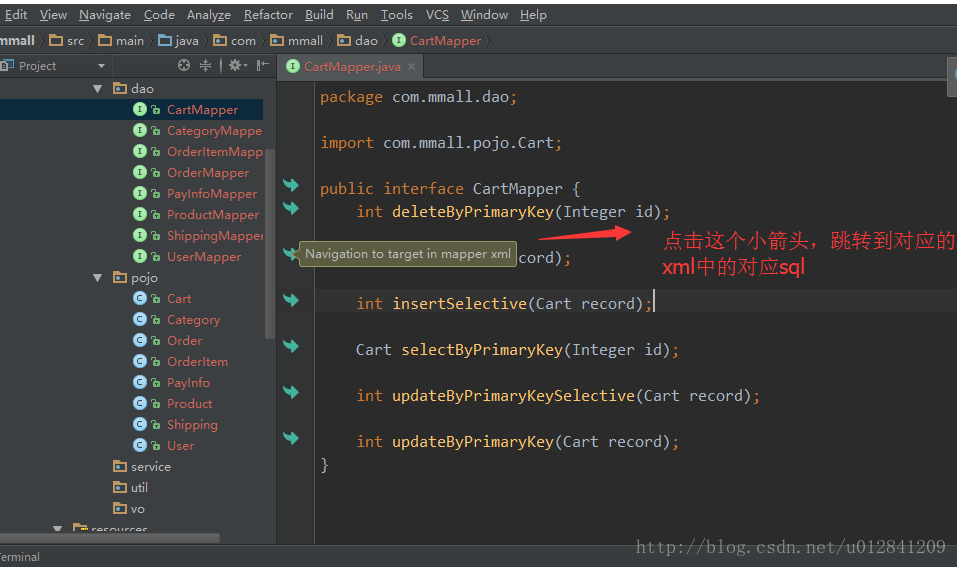
我用的是idea15,如果其他版本不好用的,可以换成idea 15 这是一个能够追踪dao接口和mapper文件里xml的一个插件
提供Mapper接口与配置文件中对应SQL的导航
提供Mapper接口与配置文件中对应SQL的导航
编辑XML文件时自动补全
根据Mapper接口, 使用快捷键生成xml文件及SQL标签
ResultMap中的property支持自动补全,支持级联(属性A.属性B.属性C)
快捷键生成@Param注解
XML中编辑SQL时, 括号自动补全
XML中编辑SQL时, 支持参数自动补全(基于@Param注解识别参数)
自动检查Mapper XML文件中ID冲突
自动检查Mapper XML文件中错误的属性值
支持Find Usage
支持重构从命名
支持别名
自动生成ResultMap属性
快捷键: Option + Enter(Mac) | Alt + Enter(Windows)
效果:点击dao可以追踪到xml,,同理点击xml的sql右边小箭头,可以追踪到dao方法
1、安装插件:
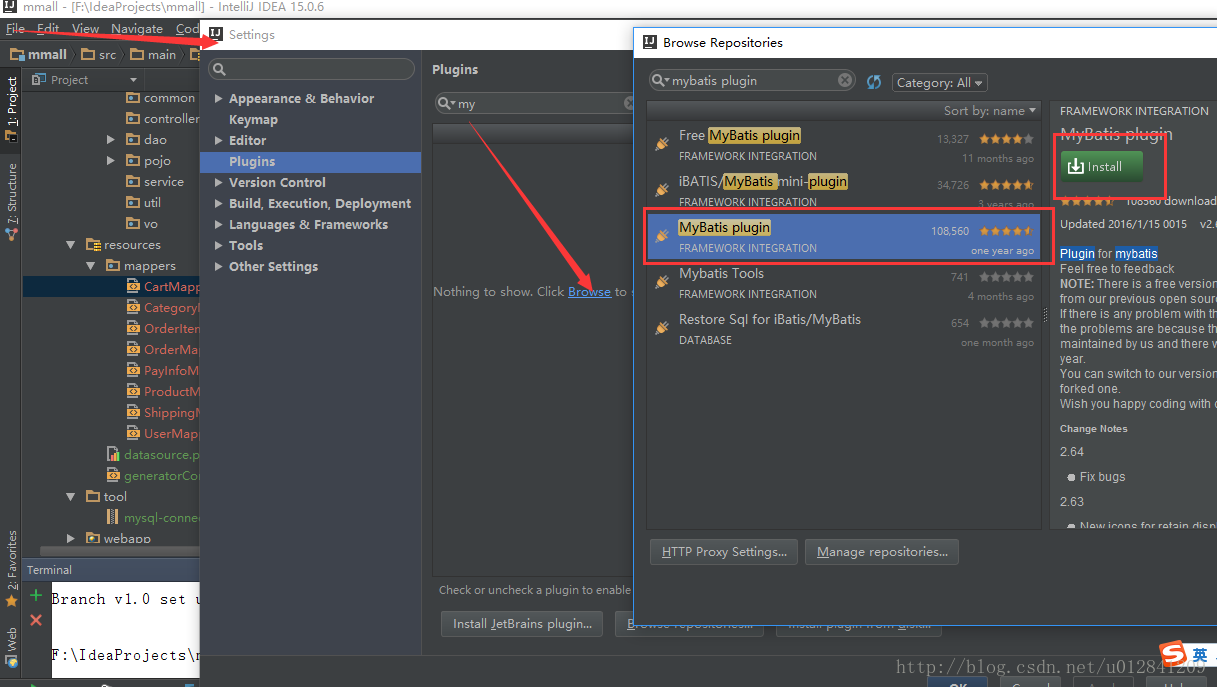
然后重启下idea
2.mybatis-plugin插件破解
到这个网址去 https://github.com/myoss/profile/tree/master/idea/plugin/MybatisPlugin
你看到了一个Git仓库,先clone下来,不会clone的down下来,记住路径
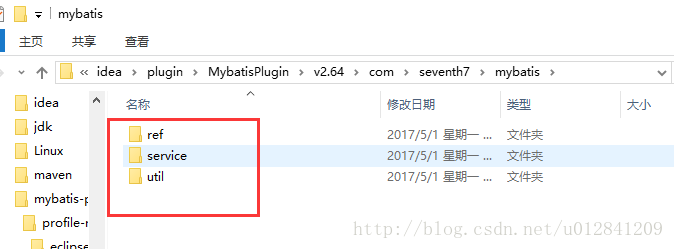
接下来,你看到一堆版本,选择你安装的mybatis_plugin版本号,比如我的是IDEA15版本的,我安装版本就是v2.64,进入v2.64你会看到一个com文件夹,牢牢记住这个文件夹有大作用

点击如图所示的右上角的fork,登录自己的github,登录之后,会发现右边有个绿色的Dowload图标,点击那个就可以下载别人的项目了

(1) windows破解
首先你要找到mybatis_plus.jar的位置,位置一般在这里 C:\Users\youname(你自己的文档).IntelliJIdea\config\plugins\mybatis_plus\lib
用winRAR打开
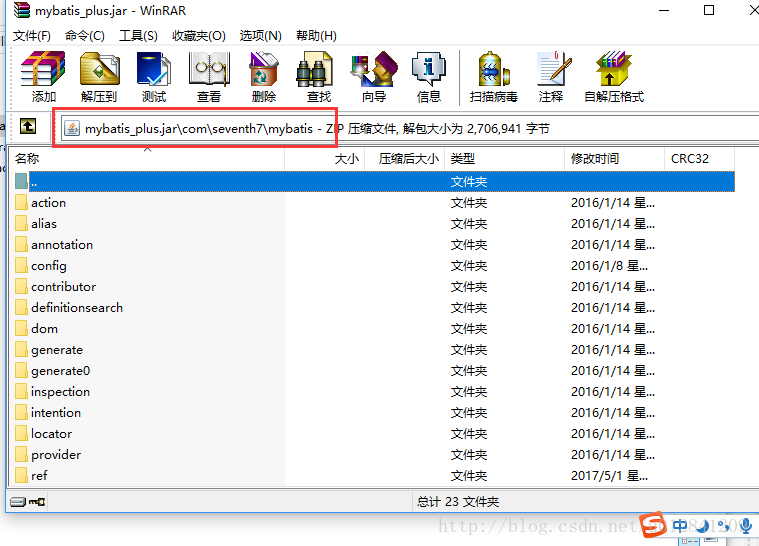
将下载好的破解,与plugin插件压缩包中的文件更换,拖入压缩包,更换就行
重启你的IDEA,完毕,破解搞定
(2)mac破解
使用find命令在你的用户目录下查找mybatis_plus.jar这个文件find ~ -name "mybatis_plus.jar"1
OK,拿到一个地址,然后进去
cd /Users/XXXXX/Library/Application Support/IntelliJIdea15/mybatis_plus/lib1
看到了2个文件
#创建一个文件夹
mkdir m
#进去
cd m
#拷贝到m文件夹中
cp ../mybatis_plus.jar .
#解压jar包
jar xf mybatis_plus.jar
#复制com文件夹到这里   路径根据你情况而定,版本号也根据你情况而定
cp -r ~/Workspace/github/mybatis_plus/idea/plugin/MybatisPlugin/v2.7\~v2.83/com .
#重新打为jar包
jar cf mybatis_plus.jar *
#复制到m的上层目录
cp mybatis_plus.jar ../
1
2
3
4
5
6
7
8
9
10
11
12
13
14
重启你的IDEA,完毕,破解搞定
三、Mybatis-pageHelper
是一个开源的分页插件(如下网址有插件的全介绍) https://github.com/pagehelper/Mybatis-PageHelper
它的原理,是通过spring的AOP来实现的,这个插件能在执行sql的时候,把相关的数据再执行一次
1.pom.xml里添加依赖
<dependency>
<groupId>com.github.pagehelper</groupId>
<artifactId>pagehelper</artifactId>
<version>4.1.0</version>
</dependency>

<dependency>
<groupId>com.github.miemiedev</groupId>
<artifactId>mybatis-paginator</artifactId>
<version>1.2.17</version>
</dependency>

<dependency>
<groupId>com.github.jsqlparser</groupId>
<artifactId>jsqlparser</artifactId>
<version>0.9.4</version>
</dependency>
1
2
3
4
5
6
7
8
9
10
11
12
13
14
15
16
17
2.在spring配置文件里添加配置
<bean id="sqlSessionFactory" class="org.mybatis.spring.SqlSessionFactoryBean">
<property name="dataSource" ref="dataSource"/>
<property name="mapperLocations" value="classpath*:mappers/*Mapper.xml"/>

<!-- 分页插件 -->
<property name="plugins">
<array>
<bean class="com.github.pagehelper.PageHelper">
<property name="properties">
<value>
dialect=mysql
</value>
</property>
</bean>
</array>
</property>

</bean>
1
2
3
4
5
6
7
8
9
10
11
12
13
14
15
16
17
18
注意不同数据库的方言的使用
这样三剑客就都配置OK了

相关文章推荐
- Mybatis三剑客(mybatis-generator、mybatis-plugin、mybatis-pagehelper)介绍、配置及破解
- Spring Boot : 集成mybatis、pagehelper插件、开启事务、druid数据源配置、mybatis-generator(十一)
- Mabatis三剑客分别是:mybatis-generator、mybatis-plugin、mybatis-pagehelper
- 在spring-mybatis.xml 中配置pagehelper
- 对mybatis-generator扩展项目的配置使用介绍
- mybatis分页插件 pagehelper配置pagehelper
- spring-boot 集成mybatis的分页插件PageHelper和Generator (番外)
- mybatis-pagehelper插件配置
- Mybatis三剑客之Mybatis-pagehelper
- Mybatis分页插件PageHelper的配置和简单使用方法(推荐)
- mybatis-pageHelper配置
- MyBatis分页插件-PageHelper的配置与应用
- mybatis pagehelper 5.0.0插件的配置方法
- mybatis-generator-maven-plugin插件自动生成代码的配置方法
- 电商项目(十八)项目初始化(mybatis三剑客之mybatis-generator配置)
- spring-boot 集成mybatis的分页插件PageHelper和Generator (番外)
- idea中mybatis三剑客之mybatis plugin的破解安装讲解以及
- spring-boot 集成mybatis的分页插件PageHelper和Generator
- Springboot+Mybatis+Pagehelper+Aop动态配置Oracle、Mysql数据源
- Mybatis分页插件PageHelper的配置和使用方法