简单总结AssetBundle的打包/解包
2017-08-28 18:18
344 查看
最近参考了各位大神的资源,初步学习了Unity的资源管理模式,包括在编辑器管理(使用AssetDatabase)和在运行时管理(使用Resources和AssetBundle)。在此简单总结运行时用AssetBundle动态打包/解包资源的方法,方便自己回顾。
关于AssetBundle有很多的细节问题,在此先作个笔记,等更多的问题搞清楚了/有了新的理解,再接着补充/修改。
创建编辑器菜单项,用于打包AssetBundle
2
3
4
5
6
7
8
9
10
11
12
13
14
15
16
17
18
19
20
1
2
3
4
5
6
7
8
9
10
11
12
13
14
15
16
17
18
19
20
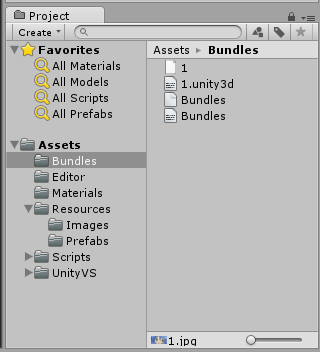
打包成功后,在目标文件夹下多了如下4个文件:
关于制作编辑器菜单项
需要把该脚本放在Editor目录下,建议在Assets根目录下新建“Editor”文件夹。
需要导入UnityEditor文件。
菜单项的类不用继承MonoBehaviour。
需要使用MenuItem特性。
点击菜单项触发的函数是static静态的。
关于打包AssetBundle
assetBundleName : 该资源打入包后的名字,解包时可用该名字访问到该资源。
assetNames : 要被打包的资源当前的相对路径。
打包函数:BuildPipeline.BuildAssetBundles()。
打包函数要求传入AssetBundleBuild[]数组,因为一个AssetBundle压缩包中可以被加入多个资源,可以使用动态数组List来替代(不用指定数组长度),使用集合的Add()方法将资源一个一个加入包中。
关于参数BuildAssetBundleOptions,以前常用的选项BuildAssetBundleOptions.CollectDependencies和BuildAssetBundleOptions.CompleteAssets都已过时,官方文档解释是这两种选项现在都默认会被执行。关于这个参数我没有过多的探究,这里暂时选用了BuildAssetBundleOptions.None。
方法的最后一个参数BuildTarget指定打包到哪个平台下,这里我用PC测试选择BuildTarget.StandaloneWindows64。
打包方法中填的目标文件夹路径如果不存在,该方法不会创建该文件夹,打包失败。
这里只是简单的打包一个资源,没有涉及打包多个资源时,不同资源有共通引用别的资源的问题,学习中。
加载/解包AssetBundle
2
3
4
5
6
7
8
9
10
11
12
13
14
15
16
17
18
19
20
21
22
23
24
25
26
27
28
29
30
31
32
33
34
35
1
2
3
4
5
6
7
8
9
10
11
12
13
14
15
16
17
18
19
20
21
22
23
24
25
26
27
28
29
30
31
32
33
34
35
注意点:
加载AssetBundle压缩包是个异步过程,需要开启协程。
压缩包的获取方式有三种:从远端服务器、手机上本地加载、PC上本地加载。想要在手机上加载本地AssetBundle,需要将所需资源包存放在自创建的名为“StreamingAssets”的文件夹中,该资源才能发布到真机上。参考Streaming
Assets
解AssetBundle包可以使用异步或同步加载方式,前者分帧操作加载稍慢,后者加载更快但可能阻塞主线程。
解压完成后可以通过www.Dispose()方法将原WWW的压缩包镜像文件释放。
关于AssetBundle有很多的细节问题,在此先作个笔记,等更多的问题搞清楚了/有了新的理解,再接着补充/修改。
创建编辑器菜单项,用于打包AssetBundle
using UnityEngine;
using System.Collections;
using System.Collections.Generic; // 需要使用List集合
using UnityEditor; // 创建编辑器菜单项需要导入这个文件

public class CreateMenuItem  { // 不需要继承Mono

[MenuItem("My MenuItem/Build AssetBundle")]
public static void BuildBundle()
{
List<AssetBundleBuild> list = new List<AssetBundleBuild>(); // 多个资源可以打入一个包中,不确定个数时,可用List集合一个一个添加
AssetBundleBuild b = new AssetBundleBuild();
b.assetBundleName = "1.unity3d"; // 用于加载该资源,相当于这个资源在AssetBundleBuild中的ID,因为AssetBundleBuild中可能有多个资源
b.assetNames = new string[] { "Assets/Resources/Images/1.jpg" }; // 这个AssetBundleBuild里包含的哪些资源
list.Add(b);

// 该方法不会自动生成文件夹,所以若指定的文件夹不存在,则打包失败
BuildPipeline.BuildAssetBundles("Assets/Bundles", list.ToArray(), BuildAssetBundleOptions.None, BuildTarget.StandaloneWindows64);
}
}12
3
4
5
6
7
8
9
10
11
12
13
14
15
16
17
18
19
20
1
2
3
4
5
6
7
8
9
10
11
12
13
14
15
16
17
18
19
20
打包成功后,在目标文件夹下多了如下4个文件:
关于制作编辑器菜单项
需要把该脚本放在Editor目录下,建议在Assets根目录下新建“Editor”文件夹。
需要导入UnityEditor文件。
菜单项的类不用继承MonoBehaviour。
需要使用MenuItem特性。
点击菜单项触发的函数是static静态的。
关于打包AssetBundle
assetBundleName : 该资源打入包后的名字,解包时可用该名字访问到该资源。
assetNames : 要被打包的资源当前的相对路径。
打包函数:BuildPipeline.BuildAssetBundles()。
打包函数要求传入AssetBundleBuild[]数组,因为一个AssetBundle压缩包中可以被加入多个资源,可以使用动态数组List来替代(不用指定数组长度),使用集合的Add()方法将资源一个一个加入包中。
关于参数BuildAssetBundleOptions,以前常用的选项BuildAssetBundleOptions.CollectDependencies和BuildAssetBundleOptions.CompleteAssets都已过时,官方文档解释是这两种选项现在都默认会被执行。关于这个参数我没有过多的探究,这里暂时选用了BuildAssetBundleOptions.None。
方法的最后一个参数BuildTarget指定打包到哪个平台下,这里我用PC测试选择BuildTarget.StandaloneWindows64。
打包方法中填的目标文件夹路径如果不存在,该方法不会创建该文件夹,打包失败。
这里只是简单的打包一个资源,没有涉及打包多个资源时,不同资源有共通引用别的资源的问题,学习中。
加载/解包AssetBundle
public class LoadAssetBundle : MonoBehaviour {

void Start () {
StartCoroutine(Load());
}

// 加载AssetBundle压缩包是个异步过程,需要开启协程
IEnumerator Load()
{
// 步骤一:获取AssetBundle压缩包
//  WWW www = new WWW("http://myserver/myBundle.unity3d"); // 从远端服务器下载
//  WWW www = new WWW("File://" + Application.streamingAssetsPath + "1.unity3d"); // 手机上从本机加载
WWW www = new WWW("File:///D:/Unity Projects/Learn Asset Manage/Assets/Bundles/1.unity3d"); // 从PC本机加载,是三个杠
yield return www;

AssetBundle build = www.assetBundle;
Debug.Log(build); // 测试是否非空

// 步骤二:解包获取资源
/*
// 异步加载,分帧操作
AssetBundleRequest request = build.LoadAssetAsync("Assets/Prefabs/airplane.prefab", typeof(GameObject)); // 名字和类型是打包时确定的
yield return request;
GameObject go = request.asset as GameObject;
*/
// 同步加载,速度更快,但可能会阻塞主线程
GameObject go = build.LoadAsset<GameObject>("Assets/Prefabs/airplane.prefab");

Instantiate(go, new Vector3(0, 0, 0), Quaternion.identity);

// 完成后释放原始镜像文件
www.Dispose();
}
}12
3
4
5
6
7
8
9
10
11
12
13
14
15
16
17
18
19
20
21
22
23
24
25
26
27
28
29
30
31
32
33
34
35
1
2
3
4
5
6
7
8
9
10
11
12
13
14
15
16
17
18
19
20
21
22
23
24
25
26
27
28
29
30
31
32
33
34
35
注意点:
加载AssetBundle压缩包是个异步过程,需要开启协程。
压缩包的获取方式有三种:从远端服务器、手机上本地加载、PC上本地加载。想要在手机上加载本地AssetBundle,需要将所需资源包存放在自创建的名为“StreamingAssets”的文件夹中,该资源才能发布到真机上。参考Streaming
Assets
解AssetBundle包可以使用异步或同步加载方式,前者分帧操作加载稍慢,后者加载更快但可能阻塞主线程。
解压完成后可以通过www.Dispose()方法将原WWW的压缩包镜像文件释放。

相关文章推荐
- 简单总结AssetBundle的打包/解包
- Unity3d的AssetBundle打包——AssetBundle Browser(简单实现资源复用)
- Unity5.x shader打包AssetBundle总结
- Unity3d的AssetBundle打包——AssetBundle Browser(简单实现资源复用)
- Unity5.x shader打包AssetBundle总结
- Unity5.x shader打包AssetBundle总结
- Unity3D-使用AssetBundle打包后Load资源时编辑器直接崩溃总结
- Unity5.x shader打包AssetBundle总结
- Unity5 Assetbundle简单使用 及 打包Material文件超大的问题
- 打包Assetbundle并加载
- ResourceManager(七)—— 打包AssetBundle然后从AssetBundle加载资源
- Unity 5 官方打包管理工具 Asset Bundle Manager
- unity assetBundle更新 打包变化
- Unity3d热更新(二):资源打包AssetBundle
- Assetbundle打包
- Unity手游之路<十一>资源打包Assetbundle
- AssetBundle打包基础介绍和相关问题
- unity5.x assetbundle打包和加载
- JavaWeb学习总结(二十七)——jsp简单标签开发案例和打包
- unity-----------------------使用BuildAssetBundle打包