OCR技术——针对特定验证码的识别
2017-08-28 09:41
197 查看
公司实习,师兄要爬公司网站数据进行分析,但每次爬取,都需要验证码,为此,每次爬虫还要手动输入,很困扰。想弄一个验证码识别模块,苦于他太忙,于是就把活丢给了我。
于是,我就在网上找到了OCR技术,这东西比较成熟,而且有效果较好的软件以及接口。
Python版
这里我一开始使用的是python进行测试的,需要安装软件tesseract。网上有的使用3.02版本做演示的,但是在实际使用中发现,这个版本一直把数字“8”识别成“3”,很尴尬。于是尝试了目前最新的3.05版,解决了这个小尴尬。
下面是我针对特定验证码识别的一些操作流程总结。
首先OCR技术识别任何图片格式以及pdf文件中的文字内容都有极佳的效果,如果你的验证码只是出现了比较简单的模糊或者椒盐噪声,文字没有扭曲变化,没有较大的位置变化,没有干扰线的话,基本上直接使用OCR就可以完成验证码识别。而我这次处理的验证码的特点就是有不规则的干扰线,阻碍了OCR的正常识别。
如图:


很显然,这种图直接识别的结果惨不忍睹。
那么如何去噪呢?针对验证码采用一般图像处理的滤波,去噪,其效果有好有坏,但都无法满足所有验证码的情况。因为干扰线是无序生成的。而验证码本身的图片像素就很小,利用图像处理的知识,有时候只会适得其反。
该验证码的图片形式为.gif,位图单通道,而非RGB三通道。通过比较发现,此类验证码字符颜色,与背景色和干扰色都互不相同,可以通过统计颜色的像素点个数,来判断非背景色和非字符颜色的干扰色。实现技术可以参考博文:
python图像主色调(主颜色)提取,在hsv空间k均值迭代实现
代码很详细,调试也很简单,有兴趣的可以试一下,以下是我的统计实验结果:
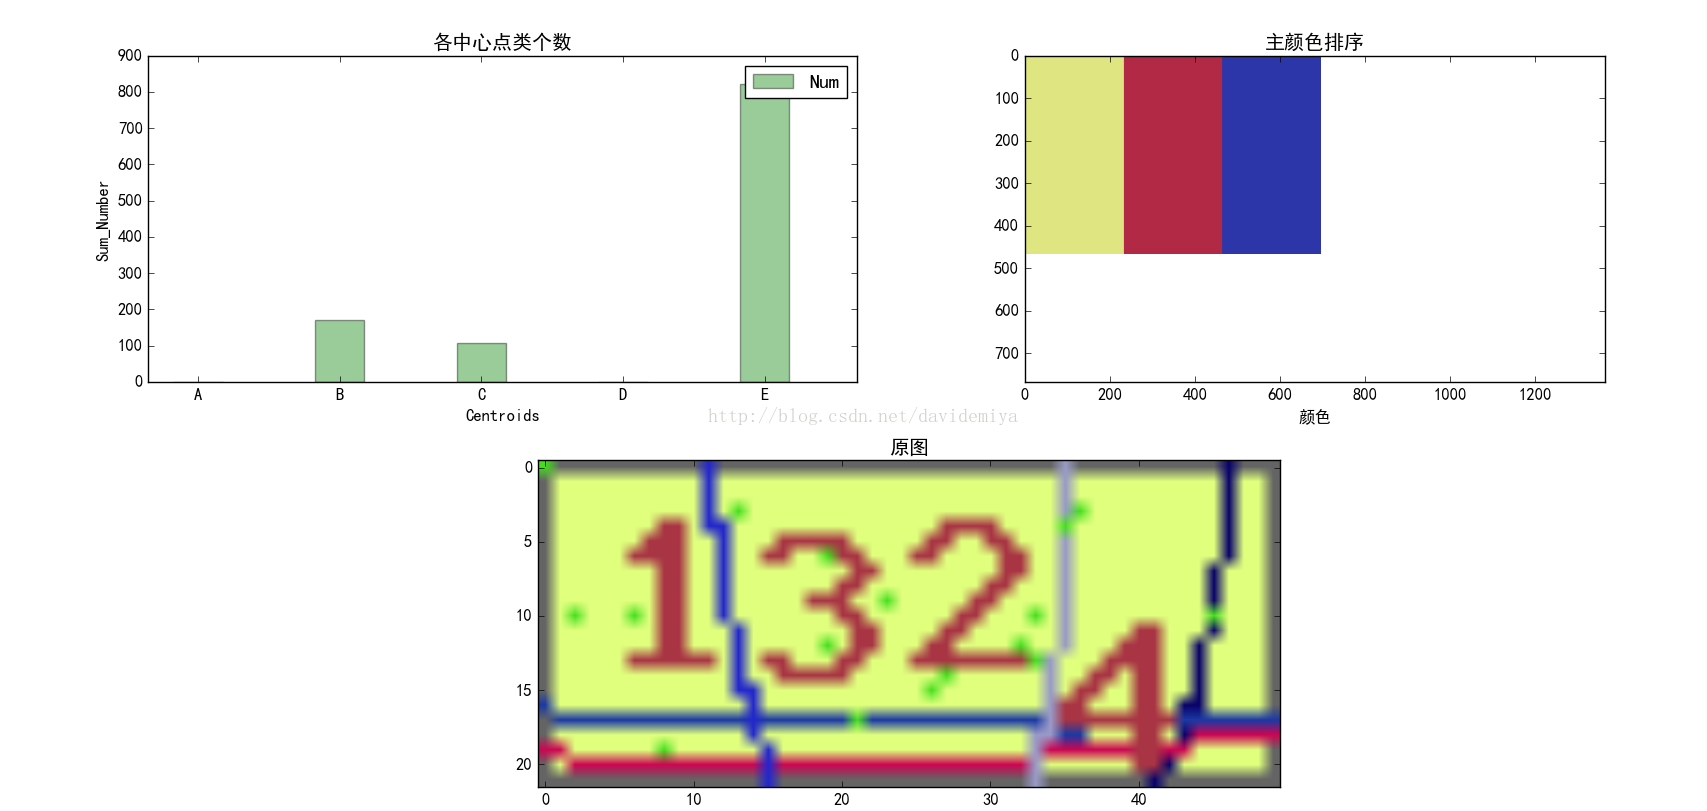
可以发现背景色为主色,而验证码字符颜色次之。那么处理思路就是将不是第一、第二多的像素点颜色全部置为背景色,从而有效地去除干扰。
先定义一个256长度的一维全零数组,每个索引号代表像素值。在统计时,每次遍历图像的一个像素点,该像素点颜色值所对应的索引位置加1。以此类推,最后,会得到一个256长度的数字,不同索引号的数值不同。数值最大的,表示该索引号为背景色像素值,第二大的为验证码颜色像素值,其他全为干扰色。
预处理阶段,进行了剪裁,将验证码图像的边框去除,防止对最后的颜色排序产生影响。因为边框的灰色有时候会比验证码的颜色数量多。处理代码如下:
去噪效果如下:
原图:

去噪图:

二值化:

可以看出,处理之后,效果非常好,用最后二值化的图片来进行OCR识别,准确率几乎是百分之百的。但也需要调节参数 -psm,其中7代表将识别内容当做一行文字处理,10代表将识别内容当做一个字符处理。
OCR验证代码如下:
Java版:
Java版的思路一样,但是Java在图像处理方面没有像Python比较灵活。但是公司需求需要提供Java接口,因此需要重新改版为Java版。在这里就要介绍一下Tesseract专门提供的jar包:tess4j。当然,不使用该jar包,也可以安装Tesseract3.05软件,然后调用命令来实现OCR识别。但是这就需要在服务器上安装软件,进行环境配置,相对而言,有点复杂。如果直接用Java结合tess4j进行开发的话,就不需要这些步骤了,直接调用即可。
下载地址:http://tess4j.sourceforge.net/
Java关于图像的处理,下面直接上代码:其中用了切子图的函数,因为使用tess4j最新的jar包进行识别的时候,发现数字“8”有时候会识别为“3”,但有时候不会,为了避免这种情况发生,就将4个字符分别切开,分别识别,然后将识别结果拼接。获得识别结果。
ImagePreTreat类
/**
* Description:
* Author: chenjiahao
* Creation time: 2017年8月22日 下午5:51:26
* (C) Copyright 2013-2016, Cloud Business Chain Corporation Limited.
* All rights reserved.
*/
package net.sourceforge.tess4j.example;
import java.awt.AWTException;
import java.awt.image.BufferedImage;
import java.awt.image.Raster;
import java.awt.image.WritableRaster;
import java.io.File;
import java.io.FileOutputStream;
import java.io.OutputStream;
import javax.imageio.ImageIO;
import com.sun.image.codec.jpeg.JPEGCodec;
import com.sun.image.codec.jpeg.JPEGImageEncoder;
import com.sun.org.apache.xml.internal.serializer.utils.Utils;
import net.sourceforge.tess4j.ITesseract;
import net.sourceforge.tess4j.Tesseract;
import net.sourceforge.tess4j.TesseractException;
public class ImagePreTreat {
static private String BmpOutput = "./test/temp.bmp";
private String denoisepath = "./test/denoise.bmp";
public String GifInput;
public String getGifInput() {
return GifInput;
}
public void setGifInput(String gifInput) {
GifInput = gifInput;
}
public String[] denoise(String imagepath){
//将gif图像转成bmp图像
try{
new ImagePreTreat().giftoBmp(imagepath);
}catch(Exception e){
e.printStackTrace();
}
File file = new File(BmpOutput);
String []CutPath = new String[4];
try{
BufferedImage image = ImageIO.read(file); //读入图片
int width = image.getWidth(); //获取图片宽度
int height = image.getHeight(); //获取图片高度
image = image.getSubimage(1, 1, width-2, height-2); //剪裁图片,将边框去除
width = image.getWidth();
height = image.getHeight(); //更新长宽
Raster raster = image.getData();
int [] temp = new int[width*height*raster.getNumBands()];
int [] pixels = raster.getPixels(0,0,width,height,temp); //获取图像每个像素点的值
int [] countpixel=new int[256];
//统计每个颜色的数量,并存储在长度为256的数组中,每个数组的索引号代表颜色的值
int tmpindex = 0;
for (int i=0;i<pixels.length;i++) {
tmpindex = pixels[i];
countpixel[tmpindex] += 1;
}
//找到像素最多的颜色。即背景色
int tempmax = 0;
int maxcolor = 0;
for (int i=0;i<countpixel.length;i++){
if (countpixel[i]>tempmax){
tempmax = countpixel[i];
maxcolor = i;
}
}
//找到像素次多的颜色,即验证码字体颜色
int seccolor = 0;
int tempsec = 0;
for (int i=0;i<countpixel.length;i++){
if(i != maxcolor){
if (countpixel[i]>tempsec){
tempsec = countpixel[i];
seccolor = i;
}
}
}
for (int i=0; i<pixels.length;i++){
if(pixels[i]!=maxcolor && pixels[i]!=seccolor){
pixels[i] = 0;
}
}
WritableRaster dstOut = image.getRaster();
dstOut.setPixels(0, 0, width, height, pixels);
image.setData(dstOut);
File outFile2 = new File(denoisepath);
try {
ImageIO.write(image, "bmp", outFile2);
} catch (Exception e) {
e.printStackTrace();
}
CutPath = cutImage(image);
}catch(Exception e){
e.printStackTrace();
}
return CutPath;
}
//gif转bmp
public void giftoBmp(String imagepath) throws Exception
{
try{
OutputStream out = new FileOutputStream(BmpOutput);
ImageIO.write(ImageIO.read(new File(imagepath)),"bmp",out);
out.close();
}catch(Exception e){
e.printStackTrace();
}
}
//切图
public String[] cutImage(BufferedImage image){
String []CutPath = new String[4];
int width = image.getWidth();
int height = image.getHeight();
for (int i =0; i<4; i++){
BufferedImage temp = image.getSubimage(3+i*(width/4-2), 0, width/4-2, height); //切子图
CutPath[i] = "./test/cut"+i+".bmp";
File outFile = new File(CutPath[i]);
try {
ImageIO.write(temp, "bmp", outFile);
} catch (Exception e) {
e.printStackTrace();
}
}
return CutPath;
}
}
TesseractOCR类
/**
* Description:
* Author: chenjiahao
* Creation time: 2017年8月24日 下午2:53:33
* (C) Copyright 2013-2016, Cloud Business Chain Corporation Limited.
* All rights reserved.
*/
package net.sourceforge.tess4j.example;
import java.io.File;
import net.sourceforge.tess4j.*;
public class TesseractOCR {
public String Inputimage;
public String getInputimage() {
return Inputimage;
}
public void setInputimage(String inputimage) {
Inputimage = inputimage;
}
public String Recognize(){
String OCRresult = "";
ImagePreTreat newimage = new ImagePreTreat(); //新建预处理类
newimage.setGifInput(Inputimage); //传递验证码图片地址
String []CutPath = newimage.denoise(newimage.GifInput); //获取子图地址
//子图识别
for(int i=0;i<CutPath.length;i++){
File imageFile = new File(CutPath[i]);
ITesseract instance = new Tesseract(); // JNA Interface Mapping
// ITesseract instance = new Tesseract1(); // JNA Direct Mapping
try {
OCRresult += instance.doOCR(imageFile);
} catch (TesseractException e) {
OCRresult = e.getMessage();
}
}
//识别结果转换
String newresult="";
char []StringArr = OCRresult.toCharArray();
for(int i=0;i<StringArr.length;i++){
if(i%3==0){
newresult += String.valueOf(StringArr[i]);
}
}
return Verify(newresult);
}
//字符修正
public String Verify(String result){
char []StringArr = result.toCharArray();
for (int i=0;i<StringArr.length;i++){
if(StringArr[i]=='°' || StringArr[i]=='o' || StringArr[i]=='O'){
StringArr[i] = '0';
}else if(StringArr[i]=='I'|| StringArr[i]=='l' || StringArr[i]=='U' || StringArr[i]=='L'){
StringArr[i] = '1';
}else if(StringArr[i]=='z' || StringArr[i]=='Z'){
StringArr[i] = '2';
}else if(StringArr[i]=='S' || StringArr[i]=='s'){
StringArr[i] = '8';
}
}
String newresult = "";
for (int i=0;i<StringArr.length;i++){
newresult += String.valueOf(StringArr[i]);
}
return newresult;
}
}
TestOCR类
/**
* Description:
* Author: chenjiahao
* Creation time: 2017年8月24日 下午2:57:37
* (C) Copyright 2013-2016, Cloud Business Chain Corporation Limited.
* All rights reserved.
*/
package net.sourceforge.tess4j.example;
public class TestOCR {
public static void main(String[] args) {
TesseractOCR recognize = new TesseractOCR();
String path = null;
String result = null;
for(int i=51;i<61;i++){
path = "./test/"+i+".gif";
recognize.setInputimage(path);
result = recognize.Recognize();
System.out.print(result+"\n");
}
}
}

于是,我就在网上找到了OCR技术,这东西比较成熟,而且有效果较好的软件以及接口。
Python版
这里我一开始使用的是python进行测试的,需要安装软件tesseract。网上有的使用3.02版本做演示的,但是在实际使用中发现,这个版本一直把数字“8”识别成“3”,很尴尬。于是尝试了目前最新的3.05版,解决了这个小尴尬。
下面是我针对特定验证码识别的一些操作流程总结。
首先OCR技术识别任何图片格式以及pdf文件中的文字内容都有极佳的效果,如果你的验证码只是出现了比较简单的模糊或者椒盐噪声,文字没有扭曲变化,没有较大的位置变化,没有干扰线的话,基本上直接使用OCR就可以完成验证码识别。而我这次处理的验证码的特点就是有不规则的干扰线,阻碍了OCR的正常识别。
如图:
很显然,这种图直接识别的结果惨不忍睹。
那么如何去噪呢?针对验证码采用一般图像处理的滤波,去噪,其效果有好有坏,但都无法满足所有验证码的情况。因为干扰线是无序生成的。而验证码本身的图片像素就很小,利用图像处理的知识,有时候只会适得其反。
该验证码的图片形式为.gif,位图单通道,而非RGB三通道。通过比较发现,此类验证码字符颜色,与背景色和干扰色都互不相同,可以通过统计颜色的像素点个数,来判断非背景色和非字符颜色的干扰色。实现技术可以参考博文:
python图像主色调(主颜色)提取,在hsv空间k均值迭代实现
代码很详细,调试也很简单,有兴趣的可以试一下,以下是我的统计实验结果:可以发现背景色为主色,而验证码字符颜色次之。那么处理思路就是将不是第一、第二多的像素点颜色全部置为背景色,从而有效地去除干扰。
先定义一个256长度的一维全零数组,每个索引号代表像素值。在统计时,每次遍历图像的一个像素点,该像素点颜色值所对应的索引位置加1。以此类推,最后,会得到一个256长度的数字,不同索引号的数值不同。数值最大的,表示该索引号为背景色像素值,第二大的为验证码颜色像素值,其他全为干扰色。
预处理阶段,进行了剪裁,将验证码图像的边框去除,防止对最后的颜色排序产生影响。因为边框的灰色有时候会比验证码的颜色数量多。处理代码如下:
color = np.zeros(256)

def pretreat(image):
w,h = image.size
box = (1, 1, w-1, h-1)
image = image.crop(box)
return image

def findColor(image):
w,h=image.size
data = image
for x in range(w):
for y in range(h):
temp_color = data.getpixel((x,y))
#print temp_color
color[temp_color] += 1.0

sort_color = np.sort(color)
second_color = int(np.argwhere(color==sort_color[254]))
max_color  = int(np.argwhere(color==sort_color[255]))
return max_color,second_color

#denoise
def denoise(image,max_color,second_color):
w,h=image.size
data = image
for x in range(w):
for y in range(h):
if (data.getpixel((x,y)) == max_color | data.getpixel((x,y)) == second_color):
continue
else:
data.putpixel((x,y),max_color)
return data
去噪效果如下:
原图:
去噪图:
二值化:
可以看出,处理之后,效果非常好,用最后二值化的图片来进行OCR识别,准确率几乎是百分之百的。但也需要调节参数 -psm,其中7代表将识别内容当做一行文字处理,10代表将识别内容当做一个字符处理。
OCR验证代码如下:
def  recognize_full(image):  #识别全图
text = image_to_string(image)
text = text.strip()
text = text.upper()
for r in rep:
text = text.replace(r,rep[r])
#out.save(text+'.jpg')
return text
Java版:
Java版的思路一样,但是Java在图像处理方面没有像Python比较灵活。但是公司需求需要提供Java接口,因此需要重新改版为Java版。在这里就要介绍一下Tesseract专门提供的jar包:tess4j。当然,不使用该jar包,也可以安装Tesseract3.05软件,然后调用命令来实现OCR识别。但是这就需要在服务器上安装软件,进行环境配置,相对而言,有点复杂。如果直接用Java结合tess4j进行开发的话,就不需要这些步骤了,直接调用即可。
下载地址:http://tess4j.sourceforge.net/
Java关于图像的处理,下面直接上代码:其中用了切子图的函数,因为使用tess4j最新的jar包进行识别的时候,发现数字“8”有时候会识别为“3”,但有时候不会,为了避免这种情况发生,就将4个字符分别切开,分别识别,然后将识别结果拼接。获得识别结果。
ImagePreTreat类
/**
* Description:
* Author: chenjiahao
* Creation time: 2017年8月22日 下午5:51:26
* (C) Copyright 2013-2016, Cloud Business Chain Corporation Limited.
* All rights reserved.
*/
package net.sourceforge.tess4j.example;
import java.awt.AWTException;
import java.awt.image.BufferedImage;
import java.awt.image.Raster;
import java.awt.image.WritableRaster;
import java.io.File;
import java.io.FileOutputStream;
import java.io.OutputStream;
import javax.imageio.ImageIO;
import com.sun.image.codec.jpeg.JPEGCodec;
import com.sun.image.codec.jpeg.JPEGImageEncoder;
import com.sun.org.apache.xml.internal.serializer.utils.Utils;
import net.sourceforge.tess4j.ITesseract;
import net.sourceforge.tess4j.Tesseract;
import net.sourceforge.tess4j.TesseractException;
public class ImagePreTreat {
static private String BmpOutput = "./test/temp.bmp";
private String denoisepath = "./test/denoise.bmp";
public String GifInput;
public String getGifInput() {
return GifInput;
}
public void setGifInput(String gifInput) {
GifInput = gifInput;
}
public String[] denoise(String imagepath){
//将gif图像转成bmp图像
try{
new ImagePreTreat().giftoBmp(imagepath);
}catch(Exception e){
e.printStackTrace();
}
File file = new File(BmpOutput);
String []CutPath = new String[4];
try{
BufferedImage image = ImageIO.read(file); //读入图片
int width = image.getWidth(); //获取图片宽度
int height = image.getHeight(); //获取图片高度
image = image.getSubimage(1, 1, width-2, height-2); //剪裁图片,将边框去除
width = image.getWidth();
height = image.getHeight(); //更新长宽
Raster raster = image.getData();
int [] temp = new int[width*height*raster.getNumBands()];
int [] pixels = raster.getPixels(0,0,width,height,temp); //获取图像每个像素点的值
int [] countpixel=new int[256];
//统计每个颜色的数量,并存储在长度为256的数组中,每个数组的索引号代表颜色的值
int tmpindex = 0;
for (int i=0;i<pixels.length;i++) {
tmpindex = pixels[i];
countpixel[tmpindex] += 1;
}
//找到像素最多的颜色。即背景色
int tempmax = 0;
int maxcolor = 0;
for (int i=0;i<countpixel.length;i++){
if (countpixel[i]>tempmax){
tempmax = countpixel[i];
maxcolor = i;
}
}
//找到像素次多的颜色,即验证码字体颜色
int seccolor = 0;
int tempsec = 0;
for (int i=0;i<countpixel.length;i++){
if(i != maxcolor){
if (countpixel[i]>tempsec){
tempsec = countpixel[i];
seccolor = i;
}
}
}
for (int i=0; i<pixels.length;i++){
if(pixels[i]!=maxcolor && pixels[i]!=seccolor){
pixels[i] = 0;
}
}
WritableRaster dstOut = image.getRaster();
dstOut.setPixels(0, 0, width, height, pixels);
image.setData(dstOut);
File outFile2 = new File(denoisepath);
try {
ImageIO.write(image, "bmp", outFile2);
} catch (Exception e) {
e.printStackTrace();
}
CutPath = cutImage(image);
}catch(Exception e){
e.printStackTrace();
}
return CutPath;
}
//gif转bmp
public void giftoBmp(String imagepath) throws Exception
{
try{
OutputStream out = new FileOutputStream(BmpOutput);
ImageIO.write(ImageIO.read(new File(imagepath)),"bmp",out);
out.close();
}catch(Exception e){
e.printStackTrace();
}
}
//切图
public String[] cutImage(BufferedImage image){
String []CutPath = new String[4];
int width = image.getWidth();
int height = image.getHeight();
for (int i =0; i<4; i++){
BufferedImage temp = image.getSubimage(3+i*(width/4-2), 0, width/4-2, height); //切子图
CutPath[i] = "./test/cut"+i+".bmp";
File outFile = new File(CutPath[i]);
try {
ImageIO.write(temp, "bmp", outFile);
} catch (Exception e) {
e.printStackTrace();
}
}
return CutPath;
}
}
TesseractOCR类
/**
* Description:
* Author: chenjiahao
* Creation time: 2017年8月24日 下午2:53:33
* (C) Copyright 2013-2016, Cloud Business Chain Corporation Limited.
* All rights reserved.
*/
package net.sourceforge.tess4j.example;
import java.io.File;
import net.sourceforge.tess4j.*;
public class TesseractOCR {
public String Inputimage;
public String getInputimage() {
return Inputimage;
}
public void setInputimage(String inputimage) {
Inputimage = inputimage;
}
public String Recognize(){
String OCRresult = "";
ImagePreTreat newimage = new ImagePreTreat(); //新建预处理类
newimage.setGifInput(Inputimage); //传递验证码图片地址
String []CutPath = newimage.denoise(newimage.GifInput); //获取子图地址
//子图识别
for(int i=0;i<CutPath.length;i++){
File imageFile = new File(CutPath[i]);
ITesseract instance = new Tesseract(); // JNA Interface Mapping
// ITesseract instance = new Tesseract1(); // JNA Direct Mapping
try {
OCRresult += instance.doOCR(imageFile);
} catch (TesseractException e) {
OCRresult = e.getMessage();
}
}
//识别结果转换
String newresult="";
char []StringArr = OCRresult.toCharArray();
for(int i=0;i<StringArr.length;i++){
if(i%3==0){
newresult += String.valueOf(StringArr[i]);
}
}
return Verify(newresult);
}
//字符修正
public String Verify(String result){
char []StringArr = result.toCharArray();
for (int i=0;i<StringArr.length;i++){
if(StringArr[i]=='°' || StringArr[i]=='o' || StringArr[i]=='O'){
StringArr[i] = '0';
}else if(StringArr[i]=='I'|| StringArr[i]=='l' || StringArr[i]=='U' || StringArr[i]=='L'){
StringArr[i] = '1';
}else if(StringArr[i]=='z' || StringArr[i]=='Z'){
StringArr[i] = '2';
}else if(StringArr[i]=='S' || StringArr[i]=='s'){
StringArr[i] = '8';
}
}
String newresult = "";
for (int i=0;i<StringArr.length;i++){
newresult += String.valueOf(StringArr[i]);
}
return newresult;
}
}
TestOCR类
/**
* Description:
* Author: chenjiahao
* Creation time: 2017年8月24日 下午2:57:37
* (C) Copyright 2013-2016, Cloud Business Chain Corporation Limited.
* All rights reserved.
*/
package net.sourceforge.tess4j.example;
public class TestOCR {
public static void main(String[] args) {
TesseractOCR recognize = new TesseractOCR();
String path = null;
String result = null;
for(int i=51;i<61;i++){
path = "./test/"+i+".gif";
recognize.setInputimage(path);
result = recognize.Recognize();
System.out.print(result+"\n");
}
}
}

相关文章推荐
- java整理软件--- Java OCR 图像智能字符识别技术,可识别中文,但是验证码不可以识别...已测识别中文效果很好
- java整理软件--- Java OCR 图像智能字符识别技术,可识别中文,但是验证码不可以识别...已测识别中文效果很好
- 针对安卓APP的 OCR图片识别技术研究与 DEMO
- java整理软件--- Java OCR 图像智能字符识别技术,可识别中文,但是验证码不可以识别...已测识别中文效果很好
- 通过OCR实现对简单验证码的识别技术
- Ocr技术 识别高级验证码
- Ocr技术 识别高级验证码
- 手机OCR识别技术掀起手机应用新高潮
- OCR表格识别—企业应用的技术新秀
- [验证码识别技术]字符验证码杀手--CNN
- 身份证识别识别OCR技术解决方案
- 名片扫一扫识别OCR技术
- 车牌识别技术详解四--二值化找轮廓做分割得样本(车牌分割,验证码分割)
- OCR识别技术,车牌识别流程与重要性
- 验证码识别技术
- Java OCR 图像智能字符识别技术[可识别中文]
- 身份证识别OCR 应用技术及应用行业
- 基于iOS平台的OCR识别技术的分析与研究
- Java OCR tesseract 图像智能字符识别技术 Java代码实现
- Java OCR 图像智能字符识别技术,可识别中文