mysql数据库安装实战(二进制安装)
2017-08-23 20:28
218 查看
1 安装环境准备:
环境:CentOS 6.8 64位
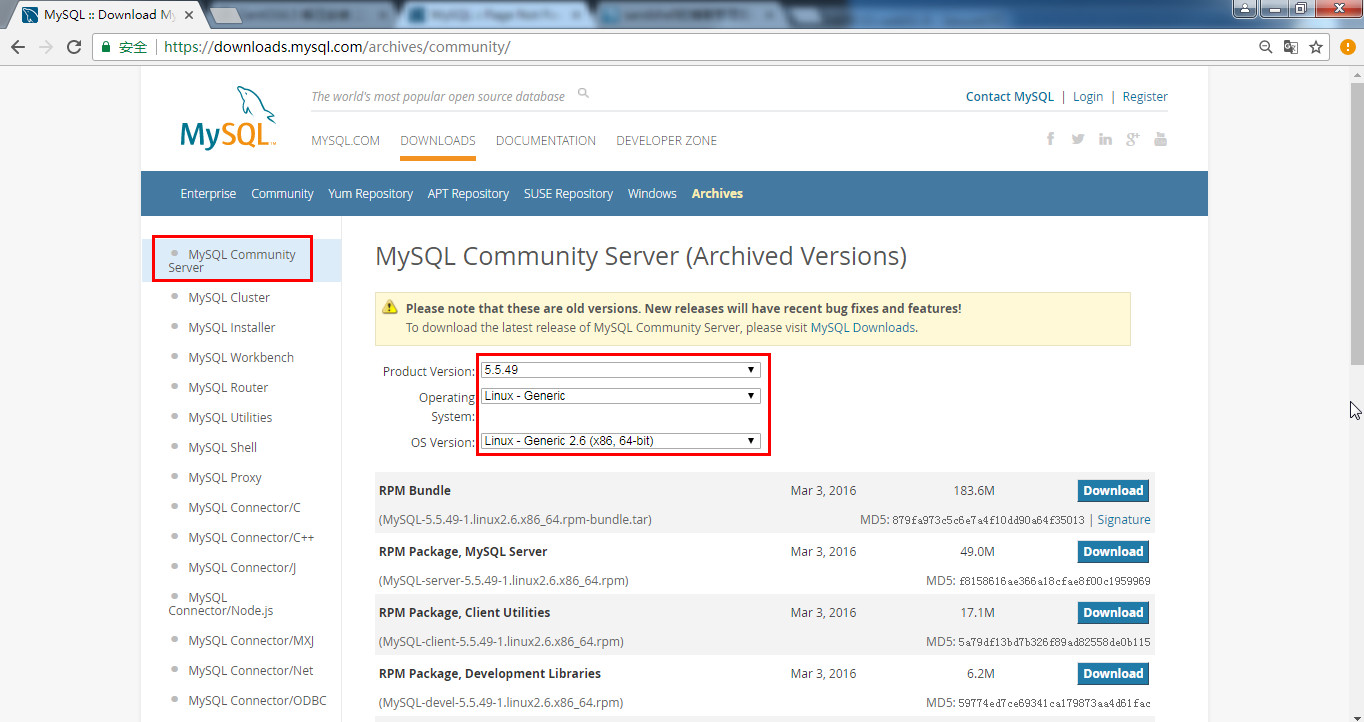
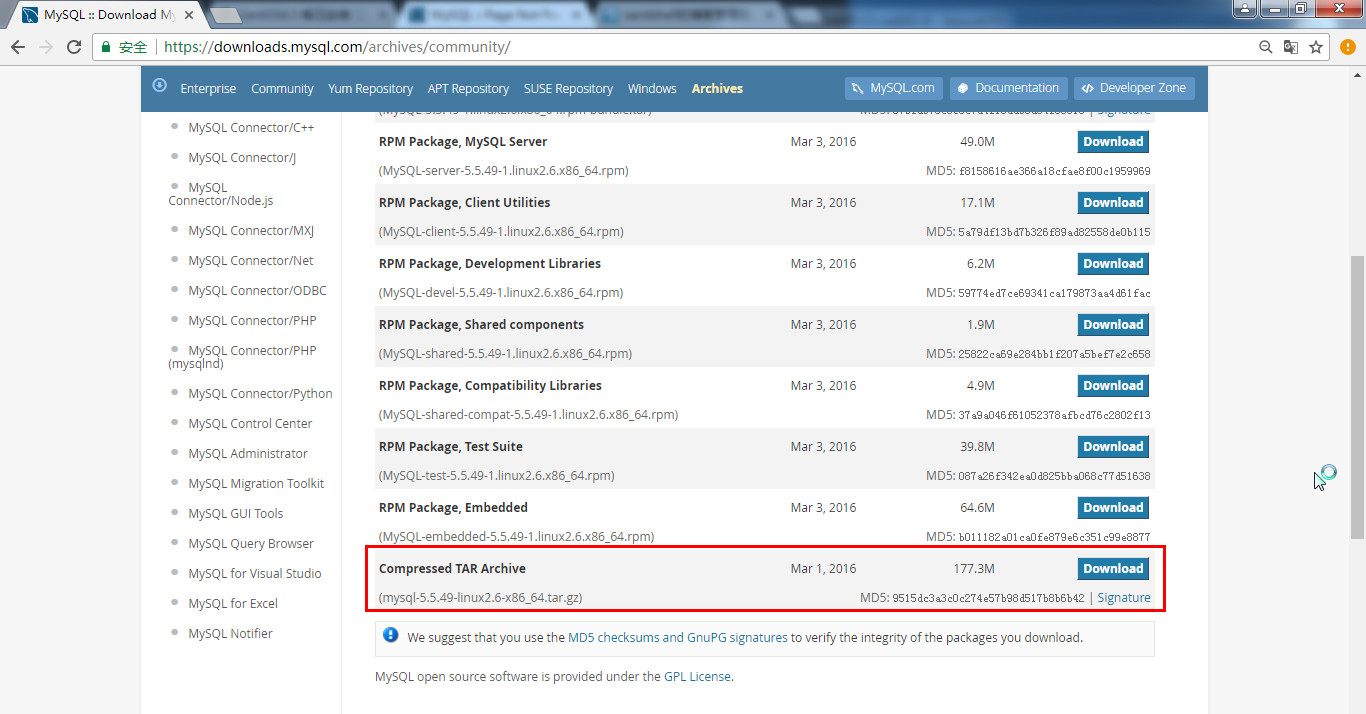
安装二进制分发版 mysql-5.5.49-linux2.6-x86_64.tar.gz
myseql 二进制包下载地址:
https://downloads.mysql.com/archives/community/
http://dev.mysql.com/get/Downloads/MySQL-5.5/mysql-5.5.49-linux2.6-x86_64.tar.gz
上传mysql-5.5.49-linux2.6-x86_64.tar.gz 二进制包到/home/oldboy/tools目录下面
[root@web01 mysql]# ./scripts/mysql_install_db --basedir=/application/mysql/ --datadir=/application/mysql/data/
Installing MySQL system tables...
170823 21:00:53 [Note] /application/mysql//bin/mysqld (mysqld 5.5.49) starting as process 1756 ...
OK
Filling help tables...
170823 21:00:53 [Note] /application/mysql//bin/mysqld (mysqld 5.5.49) starting as process 1763 ...
OK
To start mysqld at boot time you have to copy
support-files/mysql.server to the right place for your system
PLEASE REMEMBER TO SET A PASSWORD FOR THE MySQL root USER !
To do so, start the server, then issue the following commands:
/application/mysql//bin/mysqladmin -u root password 'new-password'
/application/mysql//bin/mysqladmin -u root -h web01 password 'new-password'
Alternatively you can run:
/application/mysql//bin/mysql_secure_installation
which will also give you the option of removing the test
databases and anonymous user created by default. This is
strongly recommended for production servers.
See the manual for more instructions.
You can start the MySQL daemon with:
cd /application/mysql/ ; /application/mysql//bin/mysqld_safe &
You can test the MySQL daemon with mysql-test-run.pl
cd /application/mysql//mysql-test ; perl mysql-test-run.pl
Please report any problems at http://bugs.mysql.com/ 上面的安装就生成内部两个管理库:mysql和performance_schema
总结:

环境:CentOS 6.8 64位
安装二进制分发版 mysql-5.5.49-linux2.6-x86_64.tar.gz
myseql 二进制包下载地址:
https://downloads.mysql.com/archives/community/
http://dev.mysql.com/get/Downloads/MySQL-5.5/mysql-5.5.49-linux2.6-x86_64.tar.gz
上传mysql-5.5.49-linux2.6-x86_64.tar.gz 二进制包到/home/oldboy/tools目录下面
[root@web01 ~]# cd /home/oldboy/tools
[root@web01 tools]# rz -y       #上传mysql-5.5.49-linux2.6-x86_64.tar.gz到当前目录下
[root@web01 tools]# ls -hil
total 179M
261195 -rw-r--r-- 1 root root 178M Aug 23 19:57 mysql-5.5.49-linux2.6-x86_64.tar.gz
261198 drwxr-xr-x 9 1001 1001 4.0K Aug 19 16:11 nginx-1.6.3
261196 -rw-r--r-- 1 root root 787K Apr  8  2015 nginx-1.6.3.tar.gz
创建用户:命令useradd mysql -s /sbin/nologin -M和useradd -s /sbin/nologin mysql -M是一样的。
[root@web01 tools]# useradd -s /sbin/nologin mysql -M
[root@web01 tools]# id mysql
uid=504(mysql) gid=504(mysql) groups=504(mysql)
解压mysql二进制包:
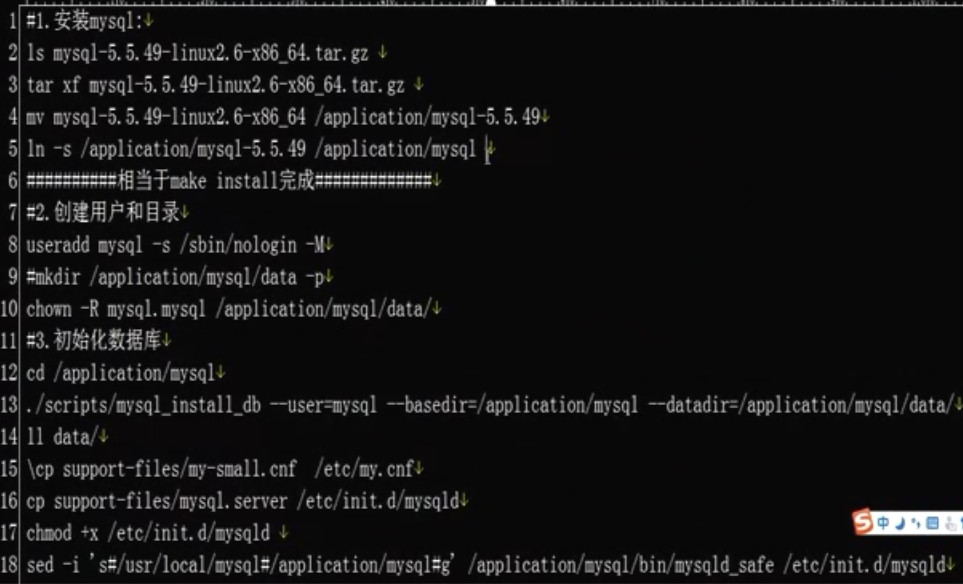
[root@web01 tools]#  tar xf mysql-5.5.49-linux2.6-x86_64.tar.gz
[root@web01 tools]# ls
mysql-5.5.49-linux2.6-x86_64         nginx-1.6.3
mysql-5.5.49-linux2.6-x86_64.tar.gz  nginx-1.6.3.tar.gz
移动mysql
[root@web01 tools]# mv mysql-5.5.49-linux2.6-x86_64 /application/mysql-5.5.49创建软链接
[root@web01 tools]# ln -s /application/mysql-5.5.49/ /application/mysql授权
[root@web01 tools]# cd /application/mysql
[root@web01 mysql]# chown -R mysql.mysql /application/mysql/
[root@web01 mysql]# ls
COPYING         README  data  include  man         scripts  sql-bench
INSTALL-BINARY  bin     docs  lib      mysql-test  share    support-files
安装mysql并指定mysql根路径和数据文件路径
[root@web01 mysql]# ./scripts/mysql_install_db --basedir=/application/mysql/ --datadir=/application/mysql/data/ --user=mysql此步骤操作看到如下两个OK就代表安装完成了。
[root@web01 mysql]# ./scripts/mysql_install_db --basedir=/application/mysql/ --datadir=/application/mysql/data/
Installing MySQL system tables...
170823 21:00:53 [Note] /application/mysql//bin/mysqld (mysqld 5.5.49) starting as process 1756 ...
OK
Filling help tables...
170823 21:00:53 [Note] /application/mysql//bin/mysqld (mysqld 5.5.49) starting as process 1763 ...
OK
To start mysqld at boot time you have to copy
support-files/mysql.server to the right place for your system
PLEASE REMEMBER TO SET A PASSWORD FOR THE MySQL root USER !
To do so, start the server, then issue the following commands:
/application/mysql//bin/mysqladmin -u root password 'new-password'
/application/mysql//bin/mysqladmin -u root -h web01 password 'new-password'
Alternatively you can run:
/application/mysql//bin/mysql_secure_installation
which will also give you the option of removing the test
databases and anonymous user created by default. This is
strongly recommended for production servers.
See the manual for more instructions.
You can start the MySQL daemon with:
cd /application/mysql/ ; /application/mysql//bin/mysqld_safe &
You can test the MySQL daemon with mysql-test-run.pl
cd /application/mysql//mysql-test ; perl mysql-test-run.pl
Please report any problems at http://bugs.mysql.com/ 上面的安装就生成内部两个管理库:mysql和performance_schema
[root@web01 mysql]# ll data/
total 12
drwx------ 2 mysql root  4096 Aug 23 21:00 mysql
drwx------ 2 mysql mysql 4096 Aug 23 21:00 performance_schema
drwxr-xr-x 2 mysql mysql 4096 Aug 23 20:46 test
做个调整
[root@web01 mysql]# cd bin/
[root@web01 bin]# less mysqld_safe
启动文件mysqld_safe默认的路径是/usr/local需要替换成/application/,测试下
[root@web01 bin]# sed 's#/usr/local/#/application/#g' mysqld_safe |grep application
if echo '/application/mysql/share' | grep '^/application/mysql' > /dev/null
relpkgdata=`echo '/application/mysql/share' | sed -e 's,^/application/mysql,,' -e 's,^/,,' -e 's,^,./,'`
relpkgdata='/application/mysql/share'
MY_BASEDIR_VERSION='/application/mysql'
ledir='/application/mysql/bin'
DATADIR=/application/mysql/data
elif test -x /application/mysql/bin/my_print_defaults
print_defaults="/application/mysql/bin/my_print_defaults"
elif test -x /application/mysql/bin/mysql_print_defaults
print_defaults="/application/mysql/bin/mysql_print_defaults"
plugin_dir='/application/mysql/lib/plugin'
测试完成后直接替换
[root@web01 bin]# sed -i 's#/usr/local/#/application/#g' mysqld_safe替换配置文件
[root@web01 mysql]# cp support-files/my-small.cnf /etc/my.cnf
cp: overwrite `/etc/my.cnf'? y
启动mysql,启动命令为/application/mysql/bin/mysqld_safe --user=mysql &
[root@web01 mysql]# /application/mysql/bin/mysqld_safe --user=mysql &
[1] 2185
[root@web01 mysql]# 170823 21:37:36 mysqld_safe Logging to '/application/mysql/data/web01.err'.
170823 21:37:36 mysqld_safe Starting mysqld daemon with databases from /application/mysql/data
^C
查看进程是否生成
[root@web01 mysql]# lsof -i :3306
COMMAND  PID  USER   FD   TYPE DEVICE SIZE/OFF NODE NAME
mysqld  2415 mysql   10u  IPv4  20041      0t0  TCP *:mysql (LISTEN)
优化
[root@web01 mysql]# PATH="/application/mysql/bin:$PATH"
[root@web01 mysql]# which mysql
/application/mysql/bin/mysql
配置mysql命令的全局使用路径:用vim /etc/profile 把export PATH="/application/mysql/bin:$PATH"追加到/etc/profile最后一行
[root@web01 mysql]# tail -1 /etc/profile
export PATH="/application/mysql/bin:$PATH"
使配置生效
[root@web01 mysql]# . /etc/profile已生效
[root@web01 mysql]# echo $PATH
/application/mysql/bin:/application/mysql/bin:/usr/local/sbin:/usr/local/bin:/sbin:/bin:/usr/sbin:/usr/bin:/root/bin
此时输入mysql就直接进来了
[root@web01 mysql]# mysql
Welcome to the MySQL monitor.  Commands end with ; or \g.
Your MySQL connection id is 1
Server version: 5.5.49 MySQL Community Server (GPL)
Copyright (c) 2000, 2016, Oracle and/or its affiliates. All rights reserved.
Oracle is a registered trademark of Oracle Corporation and/or its
affiliates. Other names may be trademarks of their respective
owners.
Type 'help;' or '\h' for help. Type '\c' to clear the current input statement.
mysql>
这就表示成功了,quit退出mysql,再做一个调整
mysql> quit调整如下
[root@web01 mysql]# ll support-files/
total 96
-rwxr-xr-x 1 mysql mysql  1153 Mar  1  2016 binary-configure
-rw-r--r-- 1 mysql mysql  4528 Mar  1  2016 config.huge.ini
-rw-r--r-- 1 mysql mysql  2382 Mar  1  2016 config.medium.ini
-rw-r--r-- 1 mysql mysql  1626 Mar  1  2016 config.small.ini
-rw-r--r-- 1 mysql mysql   773 Mar  1  2016 magic
-rw-r--r-- 1 mysql mysql  4691 Mar  1  2016 my-huge.cnf
-rw-r--r-- 1 mysql mysql 19759 Mar  1  2016 my-innodb-heavy-4G.cnf
-rw-r--r-- 1 mysql mysql  4665 Mar  1  2016 my-large.cnf
-rw-r--r-- 1 mysql mysql  4676 Mar  1  2016 my-medium.cnf
-rw-r--r-- 1 mysql mysql  2840 Mar  1  2016 my-small.cnf
-rwxr-xr-x 1 mysql mysql   839 Mar  1  2016 mysql-log-rotate
-rwxr-xr-x 1 mysql mysql 10880 Mar  1  2016 mysql.server
-rwxr-xr-x 1 mysql mysql  1061 Mar  1  2016 mysqld_multi.server
-rw-r--r-- 1 mysql mysql  1326 Mar  1  2016 ndb-config-2-node.ini
[root@web01 mysql]# sed -i 's#/usr/local/#/application/#g' support-files/mysql.server
[root@web01 mysql]# cp support-files/mysql.server /etc/init.d/mysqld
[root@web01 mysql]# chmod +x /etc/init.d/mysqld
stop mysql服务
[root@web01 mysql]# /etc/init.d/mysqld stop
Shutting down MySQL.170823 21:57:02 mysqld_safe mysqld from pid file /application/mysql/data/web01.pid ended
SUCCESS!
[1]+  Done                    /application/mysql/bin/mysqld_safe --user=mysql
[root@web01 mysql]# lsof -i :3306start mysql服务,出来结果
[root@web01 mysql]# /etc/init.d/mysqld start
Starting MySQL.. SUCCESS!
[root@web01 mysql]# lsof -i :3306
COMMAND  PID  USER   FD   TYPE DEVICE SIZE/OFF NODE NAME
mysqld  2742 mysql   10u  IPv4  20558      0t0  TCP *:mysql (LISTEN)
设置开机自启动
[root@web01 mysql]# chkconfig --add mysqld
[root@web01 mysql]# chkconfig --list mysqld
mysqld          0:off   1:off   2:on    3:on    4:on    5:on    6:off
判断mysql是否安装成功,直接输入mysql能进入mysql界面就说明成功了,如下所示成功安装myslq。
[root@web01 mysql]# mysql
Welcome to the MySQL monitor.  Commands end with ; or \g.
Your MySQL connection id is 1
Server version: 5.5.49 MySQL Community Server (GPL)
Copyright (c) 2000, 2016, Oracle and/or its affiliates. All rights reserved.
Oracle is a registered trademark of Oracle Corporation and/or its
affiliates. Other names may be trademarks of their respective
owners.
Type 'help;' or '\h' for help. Type '\c' to clear the current input statement.
mysql>
总结:

相关文章推荐
- Mysql数据库二进制安装
- 二进制包安装MySQL数据库
- Linux环境安装Mysql数据库的三种方式之一:二进制包方式安装
- Docker实战(十三):Docker安装MySQL数据库
- 二进制方式安装MySQL数据库
- Linux下用普通用户安装mysql数据库(编译好的二进制包安装)
- 二进制方式快速安装MySQL数据库命令集合
- Docker实战(十三):Docker安装MySQL数据库
- mysql数据库三种安装方式(RPM、二进制包、源代码)
- MYSQL数据库多实例的安装配置mysql_multi启停实战
- 二进制方式快速安装MySQL数据库
- mysql二进制包安装与配置实战记录
- 电商项目实战——第一天(环境部署)5MySql数据库安装与配置
- Mysql数据库的二进制安装和基础入门操作
- 实战mysql集群搭建(一)--centos7下二进制安装mysql-5.6
- 二进制方式快速安装MySQL数据库命令集合
- 编译安装MySQL5.1.72实战记录