[设计模式]原型模式
2017-08-22 17:20
162 查看
开始写设计模式系列,希望自己可以坚持下来.
第三篇:原型模式
其中Article类
结果:
上面是最最简易版的原型模式,上面还是有很多问题需要解决,在解决之前我们来看两个知识点:
Coloneable与浅复制与深复制
并且clone()这个未实现的方法是在Object下的
也就是任何的对象都可以通过重写Object的clone()方法来调用.但是这是需要注意的javadoc上写到,也就是说如果没有implement Coloneable而调用 clone()方法是会抛出CloneNotSupportedException异常的.
在调用clone()方法克隆之后我们可以看到他们的内存地址不是一致的,那么通过clone方法和new方法都可以创建一个新的对象(反序列化也可以.),那他们的区别在哪?
new操作符的本意是分配内存。程序执行到new操作符时, 首先去看new操作符后面的类型,因为知道了类型,才能知道要分配多大的内存空间。分配完内存之后,再调用构造函数!填充对象的各个字段,这一步叫做对象的初始化,构造方法返回后,一个对象创建完毕,可以把他的引用(地址)发布到外部,在外部就可以使用这个引用操纵这个对象。
clone在第一步是和new相似的, 都是分配内存,调用clone方法时,分配的内存大小和源对象(即调用clone方法的对象)相同,然后再使用原对象中对应的各个字段,填充新对象的字段, 填充完成之后clone方法返回.一个新的相同的对象被创建,同样把这个新对象的引用发布到外部。
我们知道在java中我们不可能直接操作对象,而是要通过对象的引用来操作,每一个对象的引用都占用着四个字节来记录着所指向的对象的内存地址.
有了引用复制的概念,那么什么是浅复制呢?
我们通过clone()的方式可以达到浅复制的效果,从图中可以看出,通过clone()方式,我们开辟了两块大小相同的内存,他们地址也是不一样的,但是他们持有的article的引用却一样.所以还只是浅复制.也就是说改变newspaper中的article那么newspaper2中的article也将改变.
那怎样才能达到深复制的效果呢?
答案当时是让article类也implement Cloneable接口:
并修改Newspaper里面的clone方法:
需要注意的是在clone过程中,引用类型被clone()只是创建一个新的对象引用,但是还是指向同一对象,基本数据类型被clone()是位克隆,至于String虽然是应用类型但是他是不可变类型,每一次clone都是一次new的操作,所以不用担心String类型深浅复制的问题.还有一个需要注意的点是深复制是相对了,没有绝对的深复制,在使用原型模式的时候复制深度是需要预先考虑的事情.
在clone方法的实现中我们应该根据对象的构造难度来预估应该是使用new还是super.clone()
在账号模块中我们希望开发者只能在账号模块中才能修改账号信息,对于外部属性修改是封闭的,只能通过统一的接口来更改已登录账号信息.
怎样实现呢?
第三篇:原型模式
什么是原型模式
定义:用原型实例指定创建对象的种类,并通过拷贝这些原型创建新的对象.原型模式顾名思义也就是说是有一个样板的,以这个样板为原型.开发者从这个样板对象中复制出一个内部属性一致的对象.原型模式多用于创建复杂的或者构造耗时的对象,因此使用原型模式可以使得应用程序运行更加的高效.经典模式
我们在说原型模式时先简易的实现一下原型模式,假设我们需要打印一份报纸,报纸这东西,总不能每打一份就new一次吧.package top.huyuxin.prototypemodel;
public class Newspaper implements Cloneable {
private int id;//编号
private String title;//标题
private String data;
private Article article;
public Newspaper() {
super();
}
public Newspaper(int id, String title, String data, Article article) {
super();
this.id = id;
this.title = title;
this.data = data;
this.article = article;
}
public int getId() {
return id;
}
public void setId(int id) {
this.id = id;
}
public String getTitle() {
return title;
}
public void setTitle(String title) {
this.title = title;
}
public String getData() {
return data;
}
public void setData(String data) {
this.data = data;
}
public Article getArticle() {
return article;
}
public void setArticle(Article article) {
this.article = article;
}
@Override
protected Object clone() throws CloneNotSupportedException {
return super.clone();
}
public void print() {
System.out.println("Newspaper [id=" + id + ", title=" + title + ", data=" + data + ", article=" + article + "]");
}
}其中Article类
package top.huyuxin.prototypemodel;

public class Article {
private String author;
private String art_title;
private String countent;

public Article() {
super();
}

public Article(String author, String art_title, String countent) {
super();
this.author = author;
this.art_title = art_title;
this.countent = countent;
}

public String getAuthor() {
return author;
}

public void setAuthor(String author) {
this.author = author;
}

public String getArt_title() {
return art_title;
}

public void setArt_title(String art_title) {
this.art_title = art_title;
}

public String getCountent() {
return countent;
}

public void setCountent(String countent) {
this.countent = countent;
}

@Override
public String toString() {
return "Article [author=" + author + ", art_title=" + art_title + ", countent=" + countent + "]";
}
}
结果:
Newspaper [id=1, title=it news, data=0822, article=Article [author=simon, art_title=prototypemodel, countent=good good study!day day up]]
Newspaper [id=1, title=it news, data=0822, article=Article [author=simon, art_title=prototypemodel, countent=good good study!day day up]]
newspaper:top.huyuxin.prototypemodel.Newspaper@642b6fc7
newspaper2:top.huyuxin.prototypemodel.Newspaper@5fb7a531
上面是最最简易版的原型模式,上面还是有很多问题需要解决,在解决之前我们来看两个知识点:
Coloneable与浅复制与深复制
Coloneable
现在说原型模式之前我们先说说Coloneable这个接口,我们知道在java中有Coloneable这个接口用于标识当前对象是否是可克隆的,但是Coloneable这个接口里并没有抽象方法:/*Cloneable接口源代码,JDK1.8*/
public interface Cloneable {
}并且clone()这个未实现的方法是在Object下的
/*Object类中clone()方法的定义*/
protected native Object clone() throws CloneNotSupportedException;
也就是任何的对象都可以通过重写Object的clone()方法来调用.但是这是需要注意的javadoc上写到,也就是说如果没有implement Coloneable而调用 clone()方法是会抛出CloneNotSupportedException异常的.
"Invoking Object's clone method on an instance that does not implement the Cloneable interface results in the exception CloneNotSupportedException being thrown. JDK1.8"
在调用clone()方法克隆之后我们可以看到他们的内存地址不是一致的,那么通过clone方法和new方法都可以创建一个新的对象(反序列化也可以.),那他们的区别在哪?
new操作符的本意是分配内存。程序执行到new操作符时, 首先去看new操作符后面的类型,因为知道了类型,才能知道要分配多大的内存空间。分配完内存之后,再调用构造函数!填充对象的各个字段,这一步叫做对象的初始化,构造方法返回后,一个对象创建完毕,可以把他的引用(地址)发布到外部,在外部就可以使用这个引用操纵这个对象。
clone在第一步是和new相似的, 都是分配内存,调用clone方法时,分配的内存大小和源对象(即调用clone方法的对象)相同,然后再使用原对象中对应的各个字段,填充新对象的字段, 填充完成之后clone方法返回.一个新的相同的对象被创建,同样把这个新对象的引用发布到外部。
浅复制与深复制
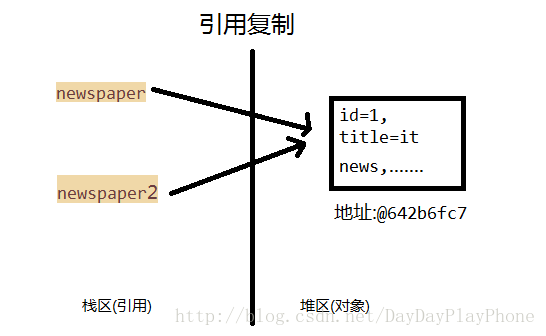
在说明深浅复制之前我们先说一个引用复制,什么是引用复制?Newspaper newspaper=new Newspaper(001, "it news","0822", new Article("simon","prototypemodel","good good study!day day up"));
newspaper.print();
Newspaper newspaper2=newspaper;
newspaper2.print();
System.out.println("newspaper:"+newspaper);
System.out.println("newspaper2:"+newspaper2);我们知道在java中我们不可能直接操作对象,而是要通过对象的引用来操作,每一个对象的引用都占用着四个字节来记录着所指向的对象的内存地址.
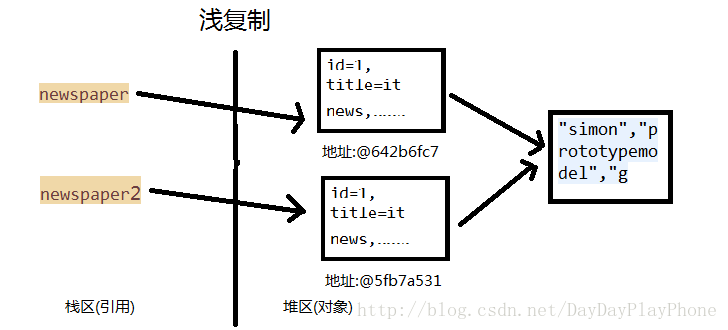
有了引用复制的概念,那么什么是浅复制呢?
Newspaper newspaper=new Newspaper(001, "it news","0822", new Article("simon","prototypemodel","good good study!day day up"));
newspaper.print();
Newspaper newspaper2=(Newspaper) newspaper.clone();
newspaper2.print();

System.out.println("newspaper:"+newspaper);
System.out.println("newspaper2:"+newspaper2);
我们通过clone()的方式可以达到浅复制的效果,从图中可以看出,通过clone()方式,我们开辟了两块大小相同的内存,他们地址也是不一样的,但是他们持有的article的引用却一样.所以还只是浅复制.也就是说改变newspaper中的article那么newspaper2中的article也将改变.
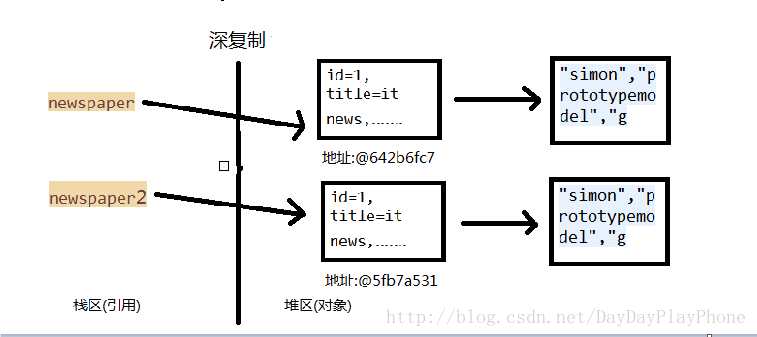
那怎样才能达到深复制的效果呢?
答案当时是让article类也implement Cloneable接口:
package top.huyuxin.prototypemodel;

public class Article implements Cloneable {
private String author;
private String art_title;
private String countent;

public Article() {
super();
}

public Article(String author, String art_title, String countent) {
super();
this.author = author;
this.art_title = art_title;
this.countent = countent;
}

public String getAuthor() {
return author;
}

public void setAuthor(String author) {
this.author = author;
}

public String getArt_title() {
return art_title;
}

public void setArt_title(String art_title) {
this.art_title = art_title;
}

public String getCountent() {
return countent;
}

public void setCountent(String countent) {
this.countent = countent;
}

@Override
protected Object clone() throws CloneNotSupportedException {
return super.clone();
}

@Override
public String toString() {
return "Article [author=" + author + ", art_title=" + art_title + ", countent=" + countent + "]";
}

}
并修改Newspaper里面的clone方法:
@Override
protected Object clone() throws CloneNotSupportedException {
Newspaper news=(Newspaper) super.clone();
news.article=(Article) this.article.clone();
return news;
}
需要注意的是在clone过程中,引用类型被clone()只是创建一个新的对象引用,但是还是指向同一对象,基本数据类型被clone()是位克隆,至于String虽然是应用类型但是他是不可变类型,每一次clone都是一次new的操作,所以不用担心String类型深浅复制的问题.还有一个需要注意的点是深复制是相对了,没有绝对的深复制,在使用原型模式的时候复制深度是需要预先考虑的事情.
原型模式的实战
原型模式中的复制用的都是深复制,一般作用于需要保护性克隆的场景,也就是说,克隆出来的新对象的改变不应影响原对象.在clone方法的实现中我们应该根据对象的构造难度来预估应该是使用new还是super.clone()
在账号模块中我们希望开发者只能在账号模块中才能修改账号信息,对于外部属性修改是封闭的,只能通过统一的接口来更改已登录账号信息.
怎样实现呢?
package top.huyuxin.prototypemodel;

public class User implements Cloneable {
public String name;
public String age;
public String phone;
public String token;
public Address address;
public User() {
super();
}
public User(String name, String age, String phone, String token, Address address) {
super();
this.name = name;
this.age = age;
this.phone = phone;
this.token = token;
this.address = address;
}

@Override
protected Object clone() throws CloneNotSupportedException {
User user=(User) super.clone();
user.address=(Address) this.address.clone();
return user;
}
}
package top.huyuxin.prototypemodel;
public class Address implements Cloneable{
public String country;
public String province;
public String city;
public Address() {
super();
}
public Address(String country, String province, String city) {
super();
this.country = country;
this.province = province;
this.city = city;
}
@Override
protected Object clone() throws CloneNotSupportedException {
return super.clone();
}
}package top.huyuxin.prototypemodel;
public class LoginSession {
//private 禁止外部直接修改已登录用户信息
private User loginuser;
//用于获取,保存,修改已登录账户
static LoginSession loginSession;
public static LoginSession getInstance(){
if(loginSession==null){
synchronized (LoginSession.class) {
if(loginSession==null){
loginSession=new LoginSession();
}
}
}
return loginSession;
}
//对于外部模块只有通过setLoginuser修改已登录账号信息
public void setLoginuser(User loginuser) {
this.loginuser = loginuser;
}
//使用保护性克隆,获取的是已登录账号的
public User getLoginUser() throws CloneNotSupportedException{
return (User) loginuser.clone();
}
}

相关文章推荐
- 设计模式(十二)------23种设计模式(5):原型模式
- java设计模式——原型模式
- 设计模式(六)原型模式
- 设计模式学习之原型模式
- java设计模式之原型模式
- 原型设计模式
- Android设计模式(七)--原型模式
- 设计模式C++实现(5)——原型模式、模板方法模式
- 跟着实例学习设计模式(7)-原型模式prototype(创建型)
- 二十四种设计模式:原型模式(Prototype Pattern)
- Java23种设计模式——原型模式
- 设计模式(六)原型模式
- 原型模式(设计模式_09)
- 【设计模式与Android】原型模式——复制中心走出来的克隆人
- 设计模式C++实现(5)——原型模式、模板方法模式
- 设计模式(四)-原型模式(Prototype模式)
- 设计模式-快餐简解-【原型模式】
- 设计模式之中介者备忘录原型访问者
- 设计模式练习(5)——原型模式
- 设计模式(Design Pattern)之原型模式(Prototype Pattern)