Android ListView功能扩展,实现高性能的瀑布流布局
2017-08-13 00:00
555 查看
转载请注明出处:http://blog.csdn.net/guolin_blog/article/details/46361889
经过前面两篇文章的学习,我们已经对ListView进行了非常深层次的剖析,不仅了解了ListView的源码和它的工作原理,同时也将ListView中常见的一些问题进行了归纳和总结。
那么本篇文章是我们ListView系列三部曲的最后一篇,在这篇文章当中我们将对ListView进行功能扩展,让它能够以瀑布流的样式来显示数据。另外,本篇文章的内容比较复杂,且知识点严重依赖于前两篇文章,如果你还没有阅读过的话,强烈建议先去阅读 Android ListView工作原理完全解析,带你从源码的角度彻底理解 和 Android ListView异步加载图片乱序问题,原因分析及解决方案 这两篇文章。
一直关注我博客的朋友们应该知道,其实在很早之前我就发布过一篇关于实现瀑布流布局的文章,Android瀑布流照片墙实现,体验不规则排列的美感。但是这篇文章中使用的实现算法比较简单,其实就是在外层嵌套一个ScrollView,然后按照瀑布流的规则不断向里面添加子View,原理如下图所示:
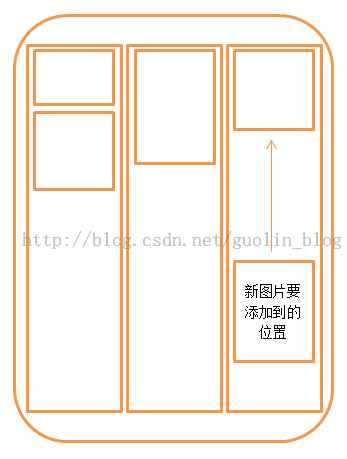
虽说功能是可以正常实现,但是这种实现原理背后的问题太多了,因为它只会不停向ScrollView中添加子View,而没有一种合理的回收机制,当子View无限多的时候,整个瀑布流布局的效率就会严重受影响,甚至有可能会出现OOM的情况。
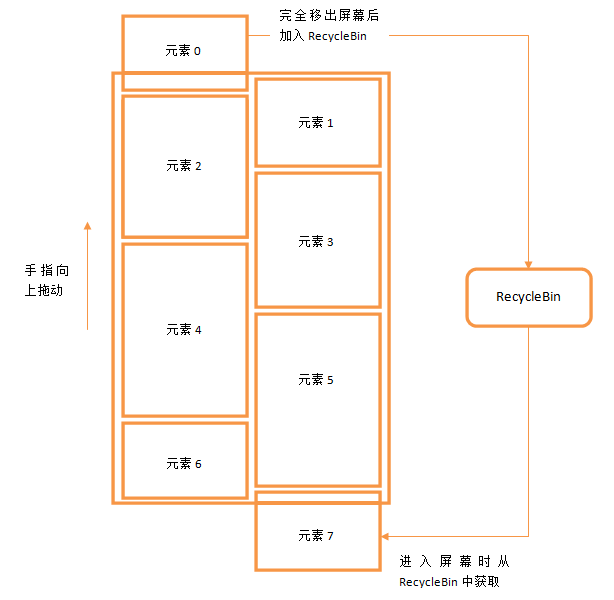
而我们在前两篇文章中对ListView进行了深层次的分析,ListView的工作原理就非常巧妙,它使用RecycleBin实现了非常出色的生产者和消费者的机制,移出屏幕的子View将会被回收,并进入到RecycleBin中进行缓存,而新进入屏幕的子View则会优先从RecycleBin当中获取缓存,这样的话不管我们有多少条数据需要显示,实际上屏幕上的子View其实也就来来回回那么几个。
那么,如果我们使用ListView工作原理来实现瀑布流布局,效率问题、OOM问题就都不复存在了,可以说是真正意义上实现了一个高性能的瀑布流布局。原理示意图如下所示:
OK,工作原理确认了之后,接下来的工作就是动手实现了。由于瀑布流这个扩展对ListView整体的改动非常大,我们没办法简单地使用继承来实现,所以只能先将ListView的源码抽取出来,然后对其内部的逻辑进行修改来实现功能,那么我们第一步的工作就是要将ListView的源码抽取出来。但是这个工作并不是那么简单的,因为仅仅ListView这一个单独的类是不能够独立工作的,我们如果要抽取代码的话还需要将AbsListView、AdapterView等也一起抽取出来,然后还会报各种错误都需要一一解决,我当时也是折腾了很久才搞定的。所以这里我就不带着大家一步步对ListView源码进行抽取了,而是直接将我抽取好的工程UIListViewTest上传到了CSDN,大家只需要点击 这里进行下载就可以了,今天我们所有的代码改动都是在这个工程的基础上进行的。
另外需要注意的是,为了简单起见,我没有抽取最新版本的ListView代码,而是选择了Android 2.3版本ListView的源码,因为老版本的源码更为简洁,方便于我们理解核心的工作流程。
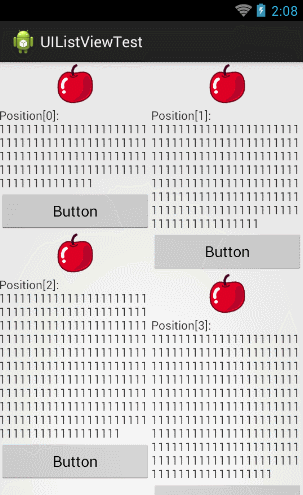
好的,那么现在将UIListViewTest项目导入到开发工具当中,然后运行程序,效果如下图所示:
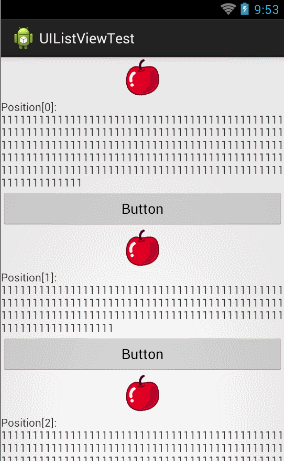
可以看到,这是一个非常普通的ListView,每个ListView的子View里面有一张图片,一段文字,还有一个按钮。文字的长度是随机生成的,因此每个子View的高度也各不相同。那么我们现在就来对ListView进行扩展,让它拥有瀑布流展示的能力。
首先,我们打开AbsListView这个类,在里面添加如下所示的几个全局变量:
[java] view plain copy print?protected int mColumnCount = 2;
protected ArrayList<View>[] mColumnViews = new ArrayList[mColumnCount];
protected Map<Integer, Integer> mPosIndexMap = new HashMap<Integer, Integer>();
接下来让我们回忆一下,ListView最基本的填充方式分为向下填充和向上填充两种,分别对应的方法是fillDown()和fillUp()方法,而这两个方法的触发点都是在fillGap()方法当中的,fillGap()方法又是由trackMotionScroll()方法根据子元素的位置来进行调用的,这个方法只要手指在屏幕上滑动时就会不停进行计算,当有屏幕外的元素需要进入屏幕时,就会调用fillGap()方法来进行填充。那么,trackMotionScroll()方法也许就应该是我们开始着手修改的地方了。
这里我们最主要的就是修改对于子View进入屏幕判断的时机,因为原生的ListView只有一列内容,而瀑布流布局将会有多列内容,所以这个时机的判断算法也就需要进行改动。那么我们先来看一下原先的判断逻辑,如下所示:
[java] view plain copy print?final int firstTop = getChildAt(0).getTop(); final int lastBottom = getChildAt(childCount - 1).getBottom(); final Rect listPadding = mListPadding; final int spaceAbove = listPadding.top - firstTop; final int end = getHeight() - listPadding.bottom; final int spaceBelow = lastBottom - end;
final int childCount = getChildCount();
if (childCount == 0) {
return true;
}
int firstTop = Integer.MIN_VALUE;
int lastBottom = Integer.MAX_VALUE;
int endBottom = Integer.MIN_VALUE;
for (int i = 0; i < mColumnViews.length; i++) {
ArrayList<View> viewList = mColumnViews[i];
int size = viewList.size();
if (size == 0) {
lastBottom = 0;
firstTop = 0;
endBottom = 0;
} else {
int top = viewList.get(0).getTop();
int bottom = viewList.get(size - 1).getBottom();
if (lastBottom > bottom) {
lastBottom = bottom;
}
if (endBottom < bottom) {
endBottom = bottom;
}
if (firstTop < top) {
firstTop = top;
}
}
}
final Rect listPadding = mListPadding;
final int spaceAbove = listPadding.top - firstTop;
final int end = getHeight() - listPadding.bottom;
final int spaceBelow = lastBottom - end;
final int height = getHeight() - getPaddingBottom() - getPaddingTop();
if (deltaY < 0) {
deltaY = Math.max(-(height - 1), deltaY);
} else {
deltaY = Math.min(height - 1, deltaY);
}
if (incrementalDeltaY < 0) {
incrementalDeltaY = Math.max(-(height - 1), incrementalDeltaY);
} else {
incrementalDeltaY = Math.min(height - 1, incrementalDeltaY);
}
final int firstPosition = mFirstPosition;
if (firstPosition == 0 && firstTop >= listPadding.top && deltaY >= 0) {
// Don’t need to move views down if the top of the first position
// is already visible
return true;
}
if (firstPosition + childCount == mItemCount && endBottom <= end && deltaY <= 0) {
// Don’t need to move views up if the bottom of the last position
// is already visible
return true;
}
final boolean down = incrementalDeltaY < 0;
final boolean inTouchMode = isInTouchMode();
if (inTouchMode) {
hideSelector();
}
final int headerViewsCount = getHeaderViewsCount();
final int footerViewsStart = mItemCount - getFooterViewsCount();
int start = 0;
int count = 0;
if (down) {
final int top = listPadding.top - incrementalDeltaY;
for (int i = 0; i < childCount; i++) {
final View child = getChildAt(i);
if (child.getBottom() >= top) {
break;
} else {
count++;
int position = firstPosition + i;
if (position >= headerViewsCount && position < footerViewsStart) {
mRecycler.addScrapView(child);
int columnIndex = (Integer) child.getTag();
if (columnIndex >= 0 && columnIndex < mColumnCount) {
mColumnViews[columnIndex].remove(child);
}
}
}
}
} else {
final int bottom = getHeight() - listPadding.bottom - incrementalDeltaY;
for (int i = childCount - 1; i >= 0; i–) {
final View child = getChildAt(i);
if (child.getTop() <= bottom) {
break;
} else {
start = i;
count++;
int position = firstPosition + i;
if (position >= headerViewsCount && position < footerViewsStart) {
mRecycler.addScrapView(child);
int columnIndex = (Integer) child.getTag();
if (columnIndex >= 0 && columnIndex < mColumnCount) {
mColumnViews[columnIndex].remove(child);
}
}
}
}
}
mMotionViewNewTop = mMotionViewOriginalTop + deltaY;
mBlockLayoutRequests = true;
if (count > 0) {
detachViewsFromParent(start, count);
}
tryOffsetChildrenTopAndBottom(incrementalDeltaY);
if (down) {
mFirstPosition += count;
}
invalidate();
final int absIncrementalDeltaY = Math.abs(incrementalDeltaY);
if (spaceAbove < absIncrementalDeltaY || spaceBelow < absIncrementalDeltaY) {
fillGap(down, down ? lastBottom : firstTop);
}
if (!inTouchMode && mSelectedPosition != INVALID_POSITION) {
final int childIndex = mSelectedPosition - mFirstPosition;
if (childIndex >= 0 && childIndex < getChildCount()) {
positionSelector(getChildAt(childIndex));
}
}
mBlockLayoutRequests = false;
invokeOnItemScrollListener();
awakenScrollBars();
return false;
}
最重要的修改就是这些了,不过在其它一些地方还做了一些小的改动。观察第75行,这里是把被移出屏幕的子View添加到RecycleBin当中,其实也就是说明这个View已经被回收了。那么还记得我们刚刚添加的全局变量mColumnViews吗?它用于缓存每一列的子View,那么当有子View被回收的时候,mColumnViews中也需要进行删除才可以。在第76行,先调用getTag()方法来获取该子View的所处于哪一列,然后调用remove()方法将它移出。第96行处的逻辑是完全相同的,只不过一个是向上移动,一个是向下移动,这里就不再赘述。
另外还有一点改动,就是我们在第115行调用fillGap()方法的时候添加了一个参数,原来的fillGap()方法只接收一个布尔型参数,用于判断向上还是向下滑动,然后在方法的内部自己获取第一个或最后一个元素的位置来获取偏移值。不过在瀑布流ListView中,这个偏移值是需要通过循环进行计算的,而我们刚才在trackMotionScroll()方法中其实已经计算过了,因此直接将这个值通过参数进行传递会更加高效。
现在AbsListView中需要改动的内容已经结束了,那么我们回到ListView当中,首先修改fillGap()方法的参数:
[java] view plain copy print?@Override void fillGap(boolean down, int startOffset) { final int count = getChildCount(); if (down) { startOffset = count > 0 ? startOffset + mDividerHeight : getListPaddingTop(); fillDown(mFirstPosition + count, startOffset); correctTooHigh(getChildCount()); } else { startOffset = count > 0 ? startOffset - mDividerHeight : getHeight() - getListPaddingBottom(); fillUp(mFirstPosition - 1, startOffset); correctTooLow(getChildCount()); } }
接下来makeAndAddView()方法并没有任何需要改动的地方,但是makeAndAddView()方法中调用的setupChild()方法,我们就需要大刀阔斧地修改了。
大家应该还记得,setupChild()方法是用来具体设置子View在ListView中显示的位置的,在这个过程中可能需要用到几个辅助方法,这里我们先提供好,如下所示:
[java] view plain copy print?private int[] getColumnToAppend(int pos) {
int indexToAppend = -1;
int bottom = Integer.MAX_VALUE;
for (int i = 0; i < mColumnViews.length; i++) {
int size = mColumnViews[i].size();
if (size == 0) {
return new int[] { i, 0 };
}
View view = mColumnViews[i].get(size - 1);
if (view.getBottom() < bottom) {
indexToAppend = i;
bottom = view.getBottom();
}
}
return new int[] { indexToAppend, bottom };
}
private int[] getColumnToPrepend(int pos) {
int indexToPrepend = mPosIndexMap.get(pos);
int top = mColumnViews[indexToPrepend].get(0).getTop();
return new int[] { indexToPrepend, top };
}
private void clearColumnViews() {
for (int i = 0; i < mColumnViews.length; i++) {
mColumnViews[i].clear();
}
}
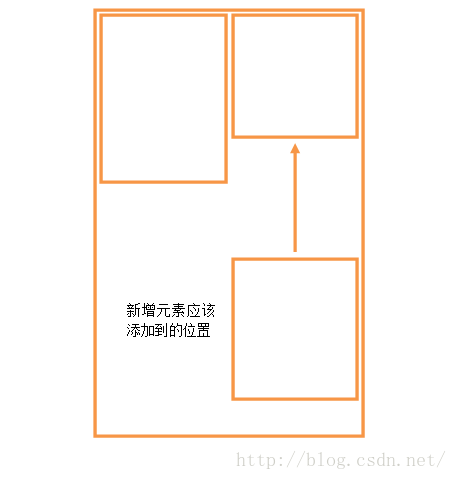
这三个方法全部都非常重要,我们来逐个看一下。getColumnToAppend()方法是用于判断当ListView向下滑动时,新进入屏幕的子View应该添加到哪一列的。而判断的逻辑也很简单,其实就是遍历瀑布流ListView的每一列,取每一列的最下面一个元素,然后再从中找出最靠上的那个元素所在的列,这就是新增子View应该添加到的位置。返回值是待添加位置列的下标和该列最底部子View的bottom值。原理示意图如下所示:
然后来看一下getColumnToPrepend()方法。getColumnToPrepend()方法是用于判断当ListView向上滑动时,新进入屏幕的子View应该添加到哪一列的。不过如果你认为这和getColumnToAppend()方法其实就是类似或者相反的过程,那你就大错特错了。因为向上滑动时,新进入屏幕的子View其实都是之前被移出屏幕后回收的,它们不需要关心每一列最高子View或最低子View的位置,而是只需要遵循一个原则,就是当它们第一次被添加到屏幕时所属于哪一列,那么向上滑动时它们仍然还属于哪一列,绝不能出现向上滑动导致元素换列的情况。而使用的算法也非常简单,就是根据当前子View的position值来从mPosIndexMap中获取该position值对应列的下标,mPosIndexMap的值在setupChild()方法当中填充,这个我们待会就会看到。返回值是待添加位置列的下标和该列最顶部子View的top值。
最后一个clearColumnViews()方法就非常简单了,它就是负责把mColumnViews缓存的所有子View全部清除掉。
所有辅助方法都提供好了,不过在进行setupChild之前我们还缺少一个非常重要的值,那就是列的宽度。普通的ListView是不用考虑这一点的,因为列的宽度其实就是ListView的宽度。但瀑布流ListView则不一样了,列数不同,每列的宽度也会不一样,因此这个值我们需要提前进行计算。修改onMeasure()方法中的代码,如下所示:
[java] view plain copy print?protected void onMeasure(int widthMeasureSpec, int heightMeasureSpec) {
……
setMeasuredDimension(widthSize, heightSize);
mWidthMeasureSpec = widthMeasureSpec;
mColumnWidth = widthSize / mColumnCount;
}
现在准备工作都已经完成了,那么我们开始来修改setupChild()方法中的代码,如下所示:
[java] view plain copy print?private void setupChild(View child, int position, int y, boolean flowDown, int childrenLeft, boolean selected, boolean recycled) { final boolean isSelected = selected && shouldShowSelector(); final boolean updateChildSelected = isSelected != child.isSelected(); final int mode = mTouchMode; final boolean isPressed = mode > TOUCH_MODE_DOWN && mode < TOUCH_MODE_SCROLL && mMotionPosition == position; final boolean updateChildPressed = isPressed != child.isPressed(); final boolean needToMeasure = !recycled || updateChildSelected || child.isLayoutRequested(); AbsListView.LayoutParams p = (AbsListView.LayoutParams) child.getLayoutParams(); if (p == null) { p = new AbsListView.LayoutParams(ViewGroup.LayoutParams.MATCH_PARENT, ViewGroup.LayoutParams.WRAP_CONTENT, 0); } p.viewType = mAdapter.getItemViewType(position); if ((recycled && !p.forceAdd) || (p.recycledHeaderFooter && p.viewType == AdapterView.ITEM_VIEW_TYPE_HEADER_OR_FOOTER)) { attachViewToParent(child, flowDown ? -1 : 0, p); } else { p.forceAdd = false; if (p.viewType == AdapterView.ITEM_VIEW_TYPE_HEADER_OR_FOOTER) { p.recycledHeaderFooter = true; } addViewInLayout(child, flowDown ? -1 : 0, p, true); } if (updateChildSelected) { child.setSelected(isSelected); } if (updateChildPressed) { child.setPressed(isPressed); } if (needToMeasure) { int childWidthSpec = ViewGroup.getChildMeasureSpec( MeasureSpec.makeMeasureSpec(mColumnWidth, MeasureSpec.EXACTLY), 0, p.width); int lpHeight = p.height; int childHeightSpec; if (lpHeight > 0) { childHeightSpec = MeasureSpec.makeMeasureSpec(lpHeight, MeasureSpec.EXACTLY); } else { childHeightSpec = MeasureSpec.makeMeasureSpec(0, MeasureSpec.UNSPECIFIED); } child.measure(childWidthSpec, childHeightSpec); } else { cleanupLayoutState(child); } int w = child.getMeasuredWidth(); int h = child.getMeasuredHeight(); if (needToMeasure) { if (flowDown) { int[] columnInfo = getColumnToAppend(position); int indexToAppend = columnInfo[0]; int childTop = columnInfo[1]; int childBottom = childTop + h; int childLeft = indexToAppend * w; int childRight = indexToAppend * w + w; child.layout(childLeft, childTop, childRight, childBottom); child.setTag(indexToAppend); mColumnViews[indexToAppend].add(child); mPosIndexMap.put(position, indexToAppend); } else { int[] columnInfo = getColumnToPrepend(position); int indexToAppend = columnInfo[0]; int childBottom = columnInfo[1]; int childTop = childBottom - h; int childLeft = indexToAppend * w; int childRight = indexToAppend * w + w; child.layout(childLeft, childTop, childRight, childBottom); child.setTag(indexToAppend); mColumnViews[indexToAppend].add(0, child); } } else { int columnIndex = mPosIndexMap.get(position); if (flowDown) { mColumnViews[columnIndex].add(child); } else { mColumnViews[columnIndex].add(0, child); } } if (mCachingStarted && !child.isDrawingCacheEnabled()) { child.setDrawingCacheEnabled(true); } }
接下来在第48行判断needToMeasure,如果是普通情况下的填充或者ListView滚动,needToMeasure都是为true的,但如果是点击ListView触发onItemClick事件这种场景,needToMeasure就会是false。针对这两种不同的场景处理的逻辑也是不一样的,我们先来看一下needToMeasure为true的情况。
在第49行判断,如果是向下滑动,则调用getColumnToAppend()方法来获取新增子View要添加到哪一列,并计算出子View左上右下的位置,最后调用child.layout()方法完成布局。如果是向上滑动,则调用getColumnToPrepend()方法来获取新增子View要添加到哪一列,同样计算出子View左上右下的位置,并调用child.layout()方法完成布局。另外,在设置完子View布局之后,我们还进行了几个额外的操作。child.setTag()是给当前的子View打一个标签,记录这个子View是属于哪一列的,这样我们在trackMotionScroll()的时候就可以调用getTag()来获取到该值,mColumnViews和mPosIndexMap中的值也都是在这里填充的。
接着看一下needToMeasure为false的情况,首先在第72行调用mPosIndexMap的get()方法获取该View所属于哪一列,接着判断是向下滑动还是向上滑动,如果是向下滑动,则将该View添加到mColumnViews中所属列的末尾,如果是向上滑动,则向该View添加到mColumnViews中所属列的顶部。这么做的原因是因为当needToMeasure为false的时候,所有ListView中子元素的位置都不会变化,因而不需要调用child.layout()方法,但是ListView仍然还会走一遍layoutChildren的过程,而layoutChildren算是一个完整布局的过程,所有的缓存值在这里都应该被清空,所以我们需要对mColumnViews重新进行赋值。
那么说到layoutChildren过程中所有的缓存值应该清空,很明显我们还没有进行这一步,那么现在修改layoutChildren()方法中的代码,如下所示:
[java] view plain copy print?protected void layoutChildren() {
……
try {
super.layoutChildren();
clearColumnViews();
……
} finally {
if (!blockLayoutRequests) {
mBlockLayoutRequests = false;
}
}
}
最后还有一个细节需要注意,之前在定义mColumnViews的时候,其实只是定义了一个长度为mColumnCount的ArrayList数组而已,但数组中的每个元素目前还都是空的,因此我们还需要在ListView开始工作之前对数组中的每个元素进行初始化才行。那么修改ListView构造函数中的代码,如下所示:
[java] view plain copy print?public ListView(Context context, AttributeSet attrs, int defStyle) {
super(context, attrs, defStyle);
for (int i = 0; i < mColumnViews.length; i++) {
mColumnViews[i] = new ArrayList<View>();
}
……
}
恩,效果还是相当不错的,说明我们对ListView的功能扩展已经成功实现了。值得一题的是,这个功能扩展对于调用方而言是完全不透明的,也就是说在使用瀑布流ListView的时候其实仍然在使用标准的ListView用法,但是自动就变成了这种瀑布流的显示模式,而不用做任何特殊的代码适配,这种设计体验对于调用方来说是非常友好的。
另外我们这个瀑布流ListView并不仅仅支持两列内容显示而已,而是可以轻松指定任意列数显示,比如将mColumnCount的值改成3,就可以变成三列显示了。不过三列显示有点挤,这里我把屏幕设置成横屏再来看一下效果:
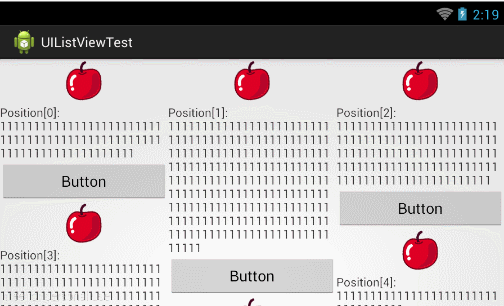
测试结果还是比较让人满意的。
最后还需要提醒大家一点,本篇文章中的例子仅供参考学习,是用于帮助大家理解源码和提升水平的,切误将本篇文章中的代码直接使用在正式项目当中,不管在功能性还是稳定性方面,例子中的代码都还达不到商用产品的标准。如果确实需要在项目实现瀑布流布局的效果,可以使用开源项目 PinterestLikeAdapterView 的代码,或者使用android新推出的RecyclerView控件,RecyclerView中的StaggeredGridLayoutManager也是可以轻松实现瀑布流布局效果的。
好的,那么今天就到这里了,ListView系列的内容也到此结束,相信大家通过这三篇文章的学习,对ListView一定都有了更深一层的理解,使用ListView时碰到了什么问题也可以更多从源码和工作原理的层次去考虑如何解决。感谢大家可以看到最后。
源码下载,请点击这里
blockquote{
border-left: 10px solid rgba(128,128,128,0.075);
background-color: rgba(128,128,128,0.05);
border-radius: 0 5px 5px 0;
padding: 15px 20px;
关注我的技术公众号,每天都有优质技术文章推送。关注我的娱乐公众号,工作、学习累了的时候放松一下自己。
微信扫一扫下方二维码即可关注:


经过前面两篇文章的学习,我们已经对ListView进行了非常深层次的剖析,不仅了解了ListView的源码和它的工作原理,同时也将ListView中常见的一些问题进行了归纳和总结。
那么本篇文章是我们ListView系列三部曲的最后一篇,在这篇文章当中我们将对ListView进行功能扩展,让它能够以瀑布流的样式来显示数据。另外,本篇文章的内容比较复杂,且知识点严重依赖于前两篇文章,如果你还没有阅读过的话,强烈建议先去阅读 Android ListView工作原理完全解析,带你从源码的角度彻底理解 和 Android ListView异步加载图片乱序问题,原因分析及解决方案 这两篇文章。
一直关注我博客的朋友们应该知道,其实在很早之前我就发布过一篇关于实现瀑布流布局的文章,Android瀑布流照片墙实现,体验不规则排列的美感。但是这篇文章中使用的实现算法比较简单,其实就是在外层嵌套一个ScrollView,然后按照瀑布流的规则不断向里面添加子View,原理如下图所示:
虽说功能是可以正常实现,但是这种实现原理背后的问题太多了,因为它只会不停向ScrollView中添加子View,而没有一种合理的回收机制,当子View无限多的时候,整个瀑布流布局的效率就会严重受影响,甚至有可能会出现OOM的情况。
而我们在前两篇文章中对ListView进行了深层次的分析,ListView的工作原理就非常巧妙,它使用RecycleBin实现了非常出色的生产者和消费者的机制,移出屏幕的子View将会被回收,并进入到RecycleBin中进行缓存,而新进入屏幕的子View则会优先从RecycleBin当中获取缓存,这样的话不管我们有多少条数据需要显示,实际上屏幕上的子View其实也就来来回回那么几个。
那么,如果我们使用ListView工作原理来实现瀑布流布局,效率问题、OOM问题就都不复存在了,可以说是真正意义上实现了一个高性能的瀑布流布局。原理示意图如下所示:
OK,工作原理确认了之后,接下来的工作就是动手实现了。由于瀑布流这个扩展对ListView整体的改动非常大,我们没办法简单地使用继承来实现,所以只能先将ListView的源码抽取出来,然后对其内部的逻辑进行修改来实现功能,那么我们第一步的工作就是要将ListView的源码抽取出来。但是这个工作并不是那么简单的,因为仅仅ListView这一个单独的类是不能够独立工作的,我们如果要抽取代码的话还需要将AbsListView、AdapterView等也一起抽取出来,然后还会报各种错误都需要一一解决,我当时也是折腾了很久才搞定的。所以这里我就不带着大家一步步对ListView源码进行抽取了,而是直接将我抽取好的工程UIListViewTest上传到了CSDN,大家只需要点击 这里进行下载就可以了,今天我们所有的代码改动都是在这个工程的基础上进行的。
另外需要注意的是,为了简单起见,我没有抽取最新版本的ListView代码,而是选择了Android 2.3版本ListView的源码,因为老版本的源码更为简洁,方便于我们理解核心的工作流程。
好的,那么现在将UIListViewTest项目导入到开发工具当中,然后运行程序,效果如下图所示:
可以看到,这是一个非常普通的ListView,每个ListView的子View里面有一张图片,一段文字,还有一个按钮。文字的长度是随机生成的,因此每个子View的高度也各不相同。那么我们现在就来对ListView进行扩展,让它拥有瀑布流展示的能力。
首先,我们打开AbsListView这个类,在里面添加如下所示的几个全局变量:
[java] view plain copy print?protected int mColumnCount = 2;
protected ArrayList<View>[] mColumnViews = new ArrayList[mColumnCount];
protected Map<Integer, Integer> mPosIndexMap = new HashMap<Integer, Integer>();
protected int mColumnCount = 2;

protected ArrayList<View>[] mColumnViews = new ArrayList[mColumnCount];

protected Map<Integer, Integer> mPosIndexMap = new HashMap<Integer, Integer>();
其中mColumnCount表示瀑布流布局一共有几列,这里我们先让它分为两列显示,后面随时可以对它进行修改。当然,如果想扩展性做的好的话,也可以使用自定义属性的方式在XML里面指定显示的列数,不过这个功能就不在我们本篇文章的讨论范围之内了。mColumnViews创建了一个长度为mColumnCount的数组,数组中的每个元素都是一个泛型为View的ArrayList,用于缓存对应列的子View。mPosIndexMap则是用于记录每一个位置的子View应当放置在哪一列当中。
接下来让我们回忆一下,ListView最基本的填充方式分为向下填充和向上填充两种,分别对应的方法是fillDown()和fillUp()方法,而这两个方法的触发点都是在fillGap()方法当中的,fillGap()方法又是由trackMotionScroll()方法根据子元素的位置来进行调用的,这个方法只要手指在屏幕上滑动时就会不停进行计算,当有屏幕外的元素需要进入屏幕时,就会调用fillGap()方法来进行填充。那么,trackMotionScroll()方法也许就应该是我们开始着手修改的地方了。
这里我们最主要的就是修改对于子View进入屏幕判断的时机,因为原生的ListView只有一列内容,而瀑布流布局将会有多列内容,所以这个时机的判断算法也就需要进行改动。那么我们先来看一下原先的判断逻辑,如下所示:
[java] view plain copy print?final int firstTop = getChildAt(0).getTop(); final int lastBottom = getChildAt(childCount - 1).getBottom(); final Rect listPadding = mListPadding; final int spaceAbove = listPadding.top - firstTop; final int end = getHeight() - listPadding.bottom; final int spaceBelow = lastBottom - end;
final int firstTop = getChildAt(0).getTop(); final int lastBottom = getChildAt(childCount - 1).getBottom(); final Rect listPadding = mListPadding; final int spaceAbove = listPadding.top - firstTop; final int end = getHeight() - listPadding.bottom; final int spaceBelow = lastBottom - end;这里firstTop表示屏幕中第一个元素顶边的位置,lastBottom表示屏幕中最后一个元素底边的位置,然后spaceAbove记录屏幕第一个元素顶边到ListView上边缘的距离,spaceBelow记录屏幕最后一个元素底边到ListView下边缘的距离。最后使用手指在屏幕上移动的距离和spaceAbove、spaceBelow进行比较,来判断是否需要调用fillGap()方法,如下所示:[java] view plain copy print?final int absIncrementalDeltaY = Math.abs(incrementalDeltaY); if (spaceAbove < absIncrementalDeltaY || spaceBelow < absIncrementalDeltaY) { fillGap(down); }
final int absIncrementalDeltaY = Math.abs(incrementalDeltaY);
if (spaceAbove < absIncrementalDeltaY || spaceBelow < absIncrementalDeltaY) {
fillGap(down);
}了解了原先的工作原理之后,我们就可以来思考一下怎么将这个逻辑改成适配瀑布流布局的方式。比如说目前ListView中有两列内容,那么获取屏幕中的第一个元素和最后一个元素其实意义是不大的,因为在有多列内容的情况下,我们需要找到的是最靠近屏幕上边缘和最靠近屏幕下边缘的元素,因此这里就需要写一个算法来去计算firstTop和lastBottom的值,这里我先把修改后的trackMotionScroll()方法贴出来,然后再慢慢解释:[java] view plain copy print?boolean trackMotionScroll(int deltaY, int incrementalDeltaY) {final int childCount = getChildCount();
if (childCount == 0) {
return true;
}
int firstTop = Integer.MIN_VALUE;
int lastBottom = Integer.MAX_VALUE;
int endBottom = Integer.MIN_VALUE;
for (int i = 0; i < mColumnViews.length; i++) {
ArrayList<View> viewList = mColumnViews[i];
int size = viewList.size();
if (size == 0) {
lastBottom = 0;
firstTop = 0;
endBottom = 0;
} else {
int top = viewList.get(0).getTop();
int bottom = viewList.get(size - 1).getBottom();
if (lastBottom > bottom) {
lastBottom = bottom;
}
if (endBottom < bottom) {
endBottom = bottom;
}
if (firstTop < top) {
firstTop = top;
}
}
}
final Rect listPadding = mListPadding;
final int spaceAbove = listPadding.top - firstTop;
final int end = getHeight() - listPadding.bottom;
final int spaceBelow = lastBottom - end;
final int height = getHeight() - getPaddingBottom() - getPaddingTop();
if (deltaY < 0) {
deltaY = Math.max(-(height - 1), deltaY);
} else {
deltaY = Math.min(height - 1, deltaY);
}
if (incrementalDeltaY < 0) {
incrementalDeltaY = Math.max(-(height - 1), incrementalDeltaY);
} else {
incrementalDeltaY = Math.min(height - 1, incrementalDeltaY);
}
final int firstPosition = mFirstPosition;
if (firstPosition == 0 && firstTop >= listPadding.top && deltaY >= 0) {
// Don’t need to move views down if the top of the first position
// is already visible
return true;
}
if (firstPosition + childCount == mItemCount && endBottom <= end && deltaY <= 0) {
// Don’t need to move views up if the bottom of the last position
// is already visible
return true;
}
final boolean down = incrementalDeltaY < 0;
final boolean inTouchMode = isInTouchMode();
if (inTouchMode) {
hideSelector();
}
final int headerViewsCount = getHeaderViewsCount();
final int footerViewsStart = mItemCount - getFooterViewsCount();
int start = 0;
int count = 0;
if (down) {
final int top = listPadding.top - incrementalDeltaY;
for (int i = 0; i < childCount; i++) {
final View child = getChildAt(i);
if (child.getBottom() >= top) {
break;
} else {
count++;
int position = firstPosition + i;
if (position >= headerViewsCount && position < footerViewsStart) {
mRecycler.addScrapView(child);
int columnIndex = (Integer) child.getTag();
if (columnIndex >= 0 && columnIndex < mColumnCount) {
mColumnViews[columnIndex].remove(child);
}
}
}
}
} else {
final int bottom = getHeight() - listPadding.bottom - incrementalDeltaY;
for (int i = childCount - 1; i >= 0; i–) {
final View child = getChildAt(i);
if (child.getTop() <= bottom) {
break;
} else {
start = i;
count++;
int position = firstPosition + i;
if (position >= headerViewsCount && position < footerViewsStart) {
mRecycler.addScrapView(child);
int columnIndex = (Integer) child.getTag();
if (columnIndex >= 0 && columnIndex < mColumnCount) {
mColumnViews[columnIndex].remove(child);
}
}
}
}
}
mMotionViewNewTop = mMotionViewOriginalTop + deltaY;
mBlockLayoutRequests = true;
if (count > 0) {
detachViewsFromParent(start, count);
}
tryOffsetChildrenTopAndBottom(incrementalDeltaY);
if (down) {
mFirstPosition += count;
}
invalidate();
final int absIncrementalDeltaY = Math.abs(incrementalDeltaY);
if (spaceAbove < absIncrementalDeltaY || spaceBelow < absIncrementalDeltaY) {
fillGap(down, down ? lastBottom : firstTop);
}
if (!inTouchMode && mSelectedPosition != INVALID_POSITION) {
final int childIndex = mSelectedPosition - mFirstPosition;
if (childIndex >= 0 && childIndex < getChildCount()) {
positionSelector(getChildAt(childIndex));
}
}
mBlockLayoutRequests = false;
invokeOnItemScrollListener();
awakenScrollBars();
return false;
}
boolean trackMotionScroll(int deltaY, int incrementalDeltaY) {
final int childCount = getChildCount();
if (childCount == 0) {
return true;
}
int firstTop = Integer.MIN_VALUE;
int lastBottom = Integer.MAX_VALUE;
int endBottom = Integer.MIN_VALUE;
for (int i = 0; i < mColumnViews.length; i++) {
ArrayList<View> viewList = mColumnViews[i];
int size = viewList.size();
if (size == 0) {
lastBottom = 0;
firstTop = 0;
endBottom = 0;
} else {
int top = viewList.get(0).getTop();
int bottom = viewList.get(size - 1).getBottom();
if (lastBottom > bottom) {
lastBottom = bottom;
}
if (endBottom < bottom) {
endBottom = bottom;
}
if (firstTop < top) {
firstTop = top;
}
}
}
final Rect listPadding = mListPadding;
final int spaceAbove = listPadding.top - firstTop;
final int end = getHeight() - listPadding.bottom;
final int spaceBelow = lastBottom - end;
final int height = getHeight() - getPaddingBottom() - getPaddingTop();
if (deltaY < 0) {
deltaY = Math.max(-(height - 1), deltaY);
} else {
deltaY = Math.min(height - 1, deltaY);
}
if (incrementalDeltaY < 0) {
incrementalDeltaY = Math.max(-(height - 1), incrementalDeltaY);
} else {
incrementalDeltaY = Math.min(height - 1, incrementalDeltaY);
}
final int firstPosition = mFirstPosition;
if (firstPosition == 0 && firstTop >= listPadding.top && deltaY >= 0) {
// Don't need to move views down if the top of the first position
// is already visible
return true;
}
if (firstPosition + childCount == mItemCount && endBottom <= end && deltaY <= 0) {
// Don't need to move views up if the bottom of the last position
// is already visible
return true;
}
final boolean down = incrementalDeltaY < 0;
final boolean inTouchMode = isInTouchMode();
if (inTouchMode) {
hideSelector();
}
final int headerViewsCount = getHeaderViewsCount();
final int footerViewsStart = mItemCount - getFooterViewsCount();
int start = 0;
int count = 0;
if (down) {
final int top = listPadding.top - incrementalDeltaY;
for (int i = 0; i < childCount; i++) {
final View child = getChildAt(i);
if (child.getBottom() >= top) {
break;
} else {
count++;
int position = firstPosition + i;
if (position >= headerViewsCount && position < footerViewsStart) {
mRecycler.addScrapView(child);
int columnIndex = (Integer) child.getTag();
if (columnIndex >= 0 && columnIndex < mColumnCount) {
mColumnViews[columnIndex].remove(child);
}
}
}
}
} else {
final int bottom = getHeight() - listPadding.bottom - incrementalDeltaY;
for (int i = childCount - 1; i >= 0; i--) {
final View child = getChildAt(i);
if (child.getTop() <= bottom) {
break;
} else {
start = i;
count++;
int position = firstPosition + i;
if (position >= headerViewsCount && position < footerViewsStart) {
mRecycler.addScrapView(child);
int columnIndex = (Integer) child.getTag();
if (columnIndex >= 0 && columnIndex < mColumnCount) {
mColumnViews[columnIndex].remove(child);
}
}
}
}
}
mMotionViewNewTop = mMotionViewOriginalTop + deltaY;
mBlockLayoutRequests = true;
if (count > 0) {
detachViewsFromParent(start, count);
}
tryOffsetChildrenTopAndBottom(incrementalDeltaY);
if (down) {
mFirstPosition += count;
}
invalidate();
final int absIncrementalDeltaY = Math.abs(incrementalDeltaY);
if (spaceAbove < absIncrementalDeltaY || spaceBelow < absIncrementalDeltaY) {
fillGap(down, down ? lastBottom : firstTop);
}
if (!inTouchMode && mSelectedPosition != INVALID_POSITION) {
final int childIndex = mSelectedPosition - mFirstPosition;
if (childIndex >= 0 && childIndex < getChildCount()) {
positionSelector(getChildAt(childIndex));
}
}
mBlockLayoutRequests = false;
invokeOnItemScrollListener();
awakenScrollBars();
return false;
}从第9行开始看,这里我们使用了一个循环,遍历瀑布流ListView中的所有列,每次循环都去获取该列的第一个元素和最后一个元素,然后和firstTop及lastBottom做比较,以此找出所有列中最靠近屏幕上边缘的元素位置和最靠近屏幕下边缘的元素位置。注意这里除了firstTop和lastBottom之外,我们还计算了一个endBottom的值,这个值记录最底部的元素位置,用于在滑动时做边界检查的。最重要的修改就是这些了,不过在其它一些地方还做了一些小的改动。观察第75行,这里是把被移出屏幕的子View添加到RecycleBin当中,其实也就是说明这个View已经被回收了。那么还记得我们刚刚添加的全局变量mColumnViews吗?它用于缓存每一列的子View,那么当有子View被回收的时候,mColumnViews中也需要进行删除才可以。在第76行,先调用getTag()方法来获取该子View的所处于哪一列,然后调用remove()方法将它移出。第96行处的逻辑是完全相同的,只不过一个是向上移动,一个是向下移动,这里就不再赘述。
另外还有一点改动,就是我们在第115行调用fillGap()方法的时候添加了一个参数,原来的fillGap()方法只接收一个布尔型参数,用于判断向上还是向下滑动,然后在方法的内部自己获取第一个或最后一个元素的位置来获取偏移值。不过在瀑布流ListView中,这个偏移值是需要通过循环进行计算的,而我们刚才在trackMotionScroll()方法中其实已经计算过了,因此直接将这个值通过参数进行传递会更加高效。
现在AbsListView中需要改动的内容已经结束了,那么我们回到ListView当中,首先修改fillGap()方法的参数:
[java] view plain copy print?@Override void fillGap(boolean down, int startOffset) { final int count = getChildCount(); if (down) { startOffset = count > 0 ? startOffset + mDividerHeight : getListPaddingTop(); fillDown(mFirstPosition + count, startOffset); correctTooHigh(getChildCount()); } else { startOffset = count > 0 ? startOffset - mDividerHeight : getHeight() - getListPaddingBottom(); fillUp(mFirstPosition - 1, startOffset); correctTooLow(getChildCount()); } }
@Override
void fillGap(boolean down, int startOffset) {
final int count = getChildCount();
if (down) {
startOffset = count > 0 ? startOffset + mDividerHeight : getListPaddingTop();
fillDown(mFirstPosition + count, startOffset);
correctTooHigh(getChildCount());
} else {
startOffset = count > 0 ? startOffset - mDividerHeight : getHeight() - getListPaddingBottom();
fillUp(mFirstPosition - 1, startOffset);
correctTooLow(getChildCount());
}
}只是将原来的获取数值改成了直接使用参数传递过来的值,并没有什么太大的改动。接下来看一下fillDown方法,原先的逻辑是在while循环中不断地填充子View,当新添加的子View的下边缘超出ListView底部的时候就跳出循环,现在我们进行如下修改:[java] view plain copy print?private View fillDown(int pos, int nextTop) {
View selectedView = null;
int end = (getBottom() - getTop()) - mListPadding.bottom;
while (nextTop < end && pos < mItemCount) {
boolean selected = pos == mSelectedPosition;
View child = makeAndAddView(pos, nextTop, true, mListPadding.left, selected);
int lowerBottom = Integer.MAX_VALUE;
for (int i = 0; i < mColumnViews.length; i++) {
ArrayList<View> viewList = mColumnViews[i];
int size = viewList.size();
if (size > 0) {
int bottom = viewList.get(size - 1).getBottom();
if (bottom < lowerBottom) {
lowerBottom = bottom;
}
} else {
lowerBottom = 0;
break;
}
}
nextTop = lowerBottom + mDividerHeight;
if (selected) {
selectedView = child;
}
pos++;
}
return selectedView;
}private View fillDown(int pos, int nextTop) {
View selectedView = null;
int end = (getBottom() - getTop()) - mListPadding.bottom;
while (nextTop < end && pos < mItemCount) {
boolean selected = pos == mSelectedPosition;
View child = makeAndAddView(pos, nextTop, true, mListPadding.left, selected);
int lowerBottom = Integer.MAX_VALUE;
for (int i = 0; i < mColumnViews.length; i++) {
ArrayList<View> viewList = mColumnViews[i];
int size = viewList.size();
if (size > 0) {
int bottom = viewList.get(size - 1).getBottom();
if (bottom < lowerBottom) {
lowerBottom = bottom;
}
} else {
lowerBottom = 0;
break;
}
}
nextTop = lowerBottom + mDividerHeight;
if (selected) {
selectedView = child;
}
pos++;
}
return selectedView;
}可以看到,这里在makeAndAddView之后并没有直接使用新增的View来获取它的bottom值,而是再次使用了一个循环来遍历瀑布流ListView中的所有列,找出所有列中最靠下的那个子View的bottom值,如果这个值超出了ListView的底部,那就跳出循环。这样的写法就可以保证只要在有子View的情况下,瀑布流ListView中每一列的内容都是填满的,界面上不会有空白的地方出现。接下来makeAndAddView()方法并没有任何需要改动的地方,但是makeAndAddView()方法中调用的setupChild()方法,我们就需要大刀阔斧地修改了。
大家应该还记得,setupChild()方法是用来具体设置子View在ListView中显示的位置的,在这个过程中可能需要用到几个辅助方法,这里我们先提供好,如下所示:
[java] view plain copy print?private int[] getColumnToAppend(int pos) {
int indexToAppend = -1;
int bottom = Integer.MAX_VALUE;
for (int i = 0; i < mColumnViews.length; i++) {
int size = mColumnViews[i].size();
if (size == 0) {
return new int[] { i, 0 };
}
View view = mColumnViews[i].get(size - 1);
if (view.getBottom() < bottom) {
indexToAppend = i;
bottom = view.getBottom();
}
}
return new int[] { indexToAppend, bottom };
}
private int[] getColumnToPrepend(int pos) {
int indexToPrepend = mPosIndexMap.get(pos);
int top = mColumnViews[indexToPrepend].get(0).getTop();
return new int[] { indexToPrepend, top };
}
private void clearColumnViews() {
for (int i = 0; i < mColumnViews.length; i++) {
mColumnViews[i].clear();
}
}
private int[] getColumnToAppend(int pos) {
int indexToAppend = -1;
int bottom = Integer.MAX_VALUE;
for (int i = 0; i < mColumnViews.length; i++) {
int size = mColumnViews[i].size();
if (size == 0) {
return new int[] { i, 0 };
}
View view = mColumnViews[i].get(size - 1);
if (view.getBottom() < bottom) {
indexToAppend = i;
bottom = view.getBottom();
}
}
return new int[] { indexToAppend, bottom };
}

private int[] getColumnToPrepend(int pos) {
int indexToPrepend = mPosIndexMap.get(pos);
int top = mColumnViews[indexToPrepend].get(0).getTop();
return new int[] { indexToPrepend, top };
}

private void clearColumnViews() {
for (int i = 0; i < mColumnViews.length; i++) {
mColumnViews[i].clear();
}
}
这三个方法全部都非常重要,我们来逐个看一下。getColumnToAppend()方法是用于判断当ListView向下滑动时,新进入屏幕的子View应该添加到哪一列的。而判断的逻辑也很简单,其实就是遍历瀑布流ListView的每一列,取每一列的最下面一个元素,然后再从中找出最靠上的那个元素所在的列,这就是新增子View应该添加到的位置。返回值是待添加位置列的下标和该列最底部子View的bottom值。原理示意图如下所示:
然后来看一下getColumnToPrepend()方法。getColumnToPrepend()方法是用于判断当ListView向上滑动时,新进入屏幕的子View应该添加到哪一列的。不过如果你认为这和getColumnToAppend()方法其实就是类似或者相反的过程,那你就大错特错了。因为向上滑动时,新进入屏幕的子View其实都是之前被移出屏幕后回收的,它们不需要关心每一列最高子View或最低子View的位置,而是只需要遵循一个原则,就是当它们第一次被添加到屏幕时所属于哪一列,那么向上滑动时它们仍然还属于哪一列,绝不能出现向上滑动导致元素换列的情况。而使用的算法也非常简单,就是根据当前子View的position值来从mPosIndexMap中获取该position值对应列的下标,mPosIndexMap的值在setupChild()方法当中填充,这个我们待会就会看到。返回值是待添加位置列的下标和该列最顶部子View的top值。
最后一个clearColumnViews()方法就非常简单了,它就是负责把mColumnViews缓存的所有子View全部清除掉。
所有辅助方法都提供好了,不过在进行setupChild之前我们还缺少一个非常重要的值,那就是列的宽度。普通的ListView是不用考虑这一点的,因为列的宽度其实就是ListView的宽度。但瀑布流ListView则不一样了,列数不同,每列的宽度也会不一样,因此这个值我们需要提前进行计算。修改onMeasure()方法中的代码,如下所示:
[java] view plain copy print?protected void onMeasure(int widthMeasureSpec, int heightMeasureSpec) {
……
setMeasuredDimension(widthSize, heightSize);
mWidthMeasureSpec = widthMeasureSpec;
mColumnWidth = widthSize / mColumnCount;
}
protected void onMeasure(int widthMeasureSpec, int heightMeasureSpec) {
......
setMeasuredDimension(widthSize, heightSize);
mWidthMeasureSpec = widthMeasureSpec;
mColumnWidth = widthSize / mColumnCount;
}其实很简单,我们只不过在onMeasure()方法的最后一行添加了一句代码,就是使用当前ListView的宽度除以列数,得到的就是每列的宽度了,这里将列的宽度赋值到mColumnWidth这个全局变量上面。现在准备工作都已经完成了,那么我们开始来修改setupChild()方法中的代码,如下所示:
[java] view plain copy print?private void setupChild(View child, int position, int y, boolean flowDown, int childrenLeft, boolean selected, boolean recycled) { final boolean isSelected = selected && shouldShowSelector(); final boolean updateChildSelected = isSelected != child.isSelected(); final int mode = mTouchMode; final boolean isPressed = mode > TOUCH_MODE_DOWN && mode < TOUCH_MODE_SCROLL && mMotionPosition == position; final boolean updateChildPressed = isPressed != child.isPressed(); final boolean needToMeasure = !recycled || updateChildSelected || child.isLayoutRequested(); AbsListView.LayoutParams p = (AbsListView.LayoutParams) child.getLayoutParams(); if (p == null) { p = new AbsListView.LayoutParams(ViewGroup.LayoutParams.MATCH_PARENT, ViewGroup.LayoutParams.WRAP_CONTENT, 0); } p.viewType = mAdapter.getItemViewType(position); if ((recycled && !p.forceAdd) || (p.recycledHeaderFooter && p.viewType == AdapterView.ITEM_VIEW_TYPE_HEADER_OR_FOOTER)) { attachViewToParent(child, flowDown ? -1 : 0, p); } else { p.forceAdd = false; if (p.viewType == AdapterView.ITEM_VIEW_TYPE_HEADER_OR_FOOTER) { p.recycledHeaderFooter = true; } addViewInLayout(child, flowDown ? -1 : 0, p, true); } if (updateChildSelected) { child.setSelected(isSelected); } if (updateChildPressed) { child.setPressed(isPressed); } if (needToMeasure) { int childWidthSpec = ViewGroup.getChildMeasureSpec( MeasureSpec.makeMeasureSpec(mColumnWidth, MeasureSpec.EXACTLY), 0, p.width); int lpHeight = p.height; int childHeightSpec; if (lpHeight > 0) { childHeightSpec = MeasureSpec.makeMeasureSpec(lpHeight, MeasureSpec.EXACTLY); } else { childHeightSpec = MeasureSpec.makeMeasureSpec(0, MeasureSpec.UNSPECIFIED); } child.measure(childWidthSpec, childHeightSpec); } else { cleanupLayoutState(child); } int w = child.getMeasuredWidth(); int h = child.getMeasuredHeight(); if (needToMeasure) { if (flowDown) { int[] columnInfo = getColumnToAppend(position); int indexToAppend = columnInfo[0]; int childTop = columnInfo[1]; int childBottom = childTop + h; int childLeft = indexToAppend * w; int childRight = indexToAppend * w + w; child.layout(childLeft, childTop, childRight, childBottom); child.setTag(indexToAppend); mColumnViews[indexToAppend].add(child); mPosIndexMap.put(position, indexToAppend); } else { int[] columnInfo = getColumnToPrepend(position); int indexToAppend = columnInfo[0]; int childBottom = columnInfo[1]; int childTop = childBottom - h; int childLeft = indexToAppend * w; int childRight = indexToAppend * w + w; child.layout(childLeft, childTop, childRight, childBottom); child.setTag(indexToAppend); mColumnViews[indexToAppend].add(0, child); } } else { int columnIndex = mPosIndexMap.get(position); if (flowDown) { mColumnViews[columnIndex].add(child); } else { mColumnViews[columnIndex].add(0, child); } } if (mCachingStarted && !child.isDrawingCacheEnabled()) { child.setDrawingCacheEnabled(true); } }
private void setupChild(View child, int position, int y, boolean flowDown, int childrenLeft,
boolean selected, boolean recycled) {
final boolean isSelected = selected && shouldShowSelector();
final boolean updateChildSelected = isSelected != child.isSelected();
final int mode = mTouchMode;
final boolean isPressed = mode > TOUCH_MODE_DOWN && mode < TOUCH_MODE_SCROLL &&
mMotionPosition == position;
final boolean updateChildPressed = isPressed != child.isPressed();
final boolean needToMeasure = !recycled || updateChildSelected || child.isLayoutRequested();
AbsListView.LayoutParams p = (AbsListView.LayoutParams) child.getLayoutParams();
if (p == null) {
p = new AbsListView.LayoutParams(ViewGroup.LayoutParams.MATCH_PARENT,
ViewGroup.LayoutParams.WRAP_CONTENT, 0);
}
p.viewType = mAdapter.getItemViewType(position);
if ((recycled && !p.forceAdd) || (p.recycledHeaderFooter &&
p.viewType == AdapterView.ITEM_VIEW_TYPE_HEADER_OR_FOOTER)) {
attachViewToParent(child, flowDown ? -1 : 0, p);
} else {
p.forceAdd = false;
if (p.viewType == AdapterView.ITEM_VIEW_TYPE_HEADER_OR_FOOTER) {
p.recycledHeaderFooter = true;
}
addViewInLayout(child, flowDown ? -1 : 0, p, true);
}
if (updateChildSelected) {
child.setSelected(isSelected);
}
if (updateChildPressed) {
child.setPressed(isPressed);
}
if (needToMeasure) {
int childWidthSpec = ViewGroup.getChildMeasureSpec(
MeasureSpec.makeMeasureSpec(mColumnWidth, MeasureSpec.EXACTLY), 0, p.width);
int lpHeight = p.height;
int childHeightSpec;
if (lpHeight > 0) {
childHeightSpec = MeasureSpec.makeMeasureSpec(lpHeight, MeasureSpec.EXACTLY);
} else {
childHeightSpec = MeasureSpec.makeMeasureSpec(0, MeasureSpec.UNSPECIFIED);
}
child.measure(childWidthSpec, childHeightSpec);
} else {
cleanupLayoutState(child);
}
int w = child.getMeasuredWidth();
int h = child.getMeasuredHeight();
if (needToMeasure) {
if (flowDown) {
int[] columnInfo = getColumnToAppend(position);
int indexToAppend = columnInfo[0];
int childTop = columnInfo[1];
int childBottom = childTop + h;
int childLeft = indexToAppend * w;
int childRight = indexToAppend * w + w;
child.layout(childLeft, childTop, childRight, childBottom);
child.setTag(indexToAppend);
mColumnViews[indexToAppend].add(child);
mPosIndexMap.put(position, indexToAppend);
} else {
int[] columnInfo = getColumnToPrepend(position);
int indexToAppend = columnInfo[0];
int childBottom = columnInfo[1];
int childTop = childBottom - h;
int childLeft = indexToAppend * w;
int childRight = indexToAppend * w + w;
child.layout(childLeft, childTop, childRight, childBottom);
child.setTag(indexToAppend);
mColumnViews[indexToAppend].add(0, child);
}
} else {
int columnIndex = mPosIndexMap.get(position);
if (flowDown) {
mColumnViews[columnIndex].add(child);
} else {
mColumnViews[columnIndex].add(0, child);
}
}
if (mCachingStarted && !child.isDrawingCacheEnabled()) {
child.setDrawingCacheEnabled(true);
}
}第一个改动的地方是在第33行,计算childWidthSpec的时候。普通ListView由于子View的宽度和ListView的宽度是一致的,因此可以在ViewGroup.getChildMeasureSpec()方法中直接传入mWidthMeasureSpec,但是在瀑布流ListView当中则需要再经过一个MeasureSpec.makeMeasureSpec过程来计算每一列的widthMeasureSpec,传入的参数就是我们刚才保存的全局变量mColumnWidth。经过这一步修改之后,调用child.getMeasuredWidth()方法获取到的子View宽度就是列的宽度,而不是ListView的宽度了。接下来在第48行判断needToMeasure,如果是普通情况下的填充或者ListView滚动,needToMeasure都是为true的,但如果是点击ListView触发onItemClick事件这种场景,needToMeasure就会是false。针对这两种不同的场景处理的逻辑也是不一样的,我们先来看一下needToMeasure为true的情况。
在第49行判断,如果是向下滑动,则调用getColumnToAppend()方法来获取新增子View要添加到哪一列,并计算出子View左上右下的位置,最后调用child.layout()方法完成布局。如果是向上滑动,则调用getColumnToPrepend()方法来获取新增子View要添加到哪一列,同样计算出子View左上右下的位置,并调用child.layout()方法完成布局。另外,在设置完子View布局之后,我们还进行了几个额外的操作。child.setTag()是给当前的子View打一个标签,记录这个子View是属于哪一列的,这样我们在trackMotionScroll()的时候就可以调用getTag()来获取到该值,mColumnViews和mPosIndexMap中的值也都是在这里填充的。
接着看一下needToMeasure为false的情况,首先在第72行调用mPosIndexMap的get()方法获取该View所属于哪一列,接着判断是向下滑动还是向上滑动,如果是向下滑动,则将该View添加到mColumnViews中所属列的末尾,如果是向上滑动,则向该View添加到mColumnViews中所属列的顶部。这么做的原因是因为当needToMeasure为false的时候,所有ListView中子元素的位置都不会变化,因而不需要调用child.layout()方法,但是ListView仍然还会走一遍layoutChildren的过程,而layoutChildren算是一个完整布局的过程,所有的缓存值在这里都应该被清空,所以我们需要对mColumnViews重新进行赋值。
那么说到layoutChildren过程中所有的缓存值应该清空,很明显我们还没有进行这一步,那么现在修改layoutChildren()方法中的代码,如下所示:
[java] view plain copy print?protected void layoutChildren() {
……
try {
super.layoutChildren();
clearColumnViews();
……
} finally {
if (!blockLayoutRequests) {
mBlockLayoutRequests = false;
}
}
}
protected void layoutChildren() {
......
try {
super.layoutChildren();
clearColumnViews();
......
} finally {
if (!blockLayoutRequests) {
mBlockLayoutRequests = false;
}
}
}很简单,由于刚才我们已经提供好辅助方法了,这里只需要在开始layoutChildren过程之前调用一下clearColumnViews()方法就可以了。最后还有一个细节需要注意,之前在定义mColumnViews的时候,其实只是定义了一个长度为mColumnCount的ArrayList数组而已,但数组中的每个元素目前还都是空的,因此我们还需要在ListView开始工作之前对数组中的每个元素进行初始化才行。那么修改ListView构造函数中的代码,如下所示:
[java] view plain copy print?public ListView(Context context, AttributeSet attrs, int defStyle) {
super(context, attrs, defStyle);
for (int i = 0; i < mColumnViews.length; i++) {
mColumnViews[i] = new ArrayList<View>();
}
……
}
public ListView(Context context, AttributeSet attrs, int defStyle) {
super(context, attrs, defStyle);
for (int i = 0; i < mColumnViews.length; i++) {
mColumnViews[i] = new ArrayList<View>();
}
......
}这样基本上就算是把所有的工作都完成了。现在重新运行一下UIListViewTest项目,效果如下图所示:恩,效果还是相当不错的,说明我们对ListView的功能扩展已经成功实现了。值得一题的是,这个功能扩展对于调用方而言是完全不透明的,也就是说在使用瀑布流ListView的时候其实仍然在使用标准的ListView用法,但是自动就变成了这种瀑布流的显示模式,而不用做任何特殊的代码适配,这种设计体验对于调用方来说是非常友好的。
另外我们这个瀑布流ListView并不仅仅支持两列内容显示而已,而是可以轻松指定任意列数显示,比如将mColumnCount的值改成3,就可以变成三列显示了。不过三列显示有点挤,这里我把屏幕设置成横屏再来看一下效果:
测试结果还是比较让人满意的。
最后还需要提醒大家一点,本篇文章中的例子仅供参考学习,是用于帮助大家理解源码和提升水平的,切误将本篇文章中的代码直接使用在正式项目当中,不管在功能性还是稳定性方面,例子中的代码都还达不到商用产品的标准。如果确实需要在项目实现瀑布流布局的效果,可以使用开源项目 PinterestLikeAdapterView 的代码,或者使用android新推出的RecyclerView控件,RecyclerView中的StaggeredGridLayoutManager也是可以轻松实现瀑布流布局效果的。
好的,那么今天就到这里了,ListView系列的内容也到此结束,相信大家通过这三篇文章的学习,对ListView一定都有了更深一层的理解,使用ListView时碰到了什么问题也可以更多从源码和工作原理的层次去考虑如何解决。感谢大家可以看到最后。
源码下载,请点击这里
blockquote{
border-left: 10px solid rgba(128,128,128,0.075);
background-color: rgba(128,128,128,0.05);
border-radius: 0 5px 5px 0;
padding: 15px 20px;
关注我的技术公众号,每天都有优质技术文章推送。关注我的娱乐公众号,工作、学习累了的时候放松一下自己。
微信扫一扫下方二维码即可关注:

相关文章推荐
- Android ListView 功能扩展,实现高性能的瀑布流布局
- Android ListView功能扩展,实现高性能的瀑布流布局
- Android ListView功能扩展,实现高性能的瀑布流布局
- Android ListView功能扩展,实现高性能的瀑布流布局
- Android ListView功能扩展,实现高性能的瀑布流布局
- Android ListView功能扩展,实现高性能的瀑布流布局
- Android ListView功能扩展,实现高性能的瀑布流布局
- Android ListView功能扩展,实现高性能的瀑布流布局
- Android ListView功能扩展,实现高性能的瀑布流布局
- Android ListView功能扩展,实现高性能的瀑布流布局
- Android ListView中点击单行实现RadioButton的单选功能,自定义Item布局文件
- Android自定义listview布局实现上拉加载下拉刷新功能
- 网页瀑布流布局实现方法及功能扩展(附完整代码)
- Android 实现ListView的A-Z字母排序和过滤搜索功能,实现汉字转成拼音
- Android UI ExpandableListView实现扩展列表
- 【处女作】android中的ListView结合BaseAdapter实例 ,加入ViewHolder实现高性能ListView
- android——ListView功能的实现(使用simpleAdapter)
- Android高手进阶篇3-自定义ListView实现底部View自动隐藏和消失的功能
- Android中ListView同过自定义布局并使用SimpleAdapter的方式实现数据的绑定
- android listView 自定义布局结合CheckedTextView实现多选