使用树莓派制作简易监控模块
2017-08-11 09:32
309 查看
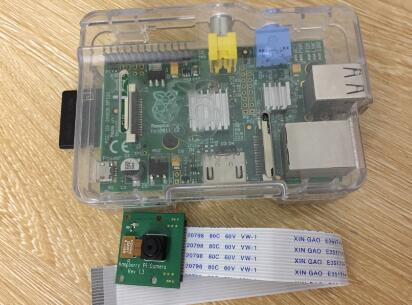
几年前买的Raspberry P 1 (CPU: 700MHz ARM, Memory: 512MB) 已积灰很久, 偶然发现尝试做使用它的拍照功能做监控,如下图:
1、系统安装与配置
首先安装 raspbian-jessie-lite (官方下载),在windows下使用win32diskimager写入SD卡比较容易。
其次插入SD卡,接通电源启动系统。对于没有显示器(也没有外接的键盘)的情况下,只能选择网络方式访问。遇到了一些问题:
(1) 虽然可以通过家庭路由器得到DHCP分配的IP(或者根据ARP,甚至使用nmap扫描)得到这个树莓派的IP,但是前提要求网络环境比较高。
(2) 从2016.11月以后,Raspbian系统默认关闭SSH(估计是考虑安全性),也就是系统启动后SSH服务根本没启动。
这种情况下只能通过修改系统里面的IP等相关参数使得启动后能得到固定的IP。对于在windows下读写Linux分区始终是个不方便的事。
查找了多方面资料,只有Ext2Fsd能满足要求,但是按照后插入SD卡却变成了下图这样:

结果Linux分区无法成为一个被Ext2Fsd识别的卷,所以这个办法就到这里终止了。也尝试过将整个系统刻入SD卡(使用EXT3),但是系统无法启动。
最后,只能通过Linux系统来读写这个Linux分区。在这里使用back track 5来制作一个U盘系统然后重启笔记本,尝试通过笔记本修改SD卡里面的系统参数。
SD卡在BT5下挂载成功:

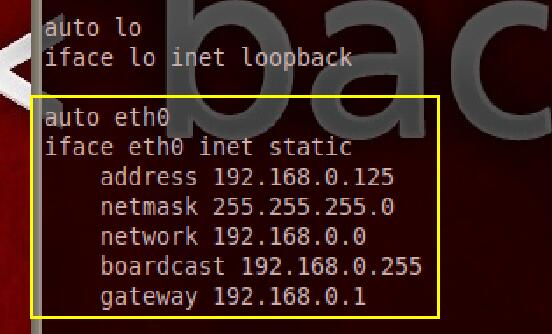
然后修改 /etc/network/interfaces文件,配置一个固定IP,如下:
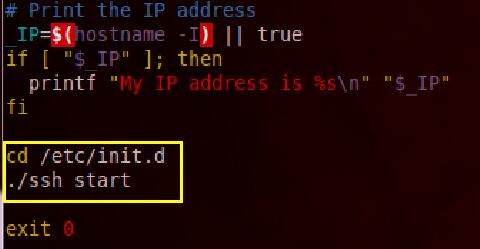
现在IP确定了,但是还有SSH默认情况下是关闭的,所以需要开机启动,修改/etc/rc.local文件,加入SSH的启动命令,如下图:
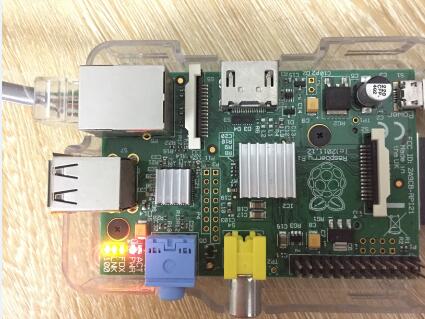
然后umount SD卡后插入树莓派启动,状态灯显示工作正常,如下图:
然后使用笔记本尝试ping&ssh:
至此,系统配置成功,下面可以通过raspi-config命令启用SSH功能了,然后把rc.local中的启动命令删除,另外更改密码。
2. 监控拍摄对比
通过raspi-config工具启用Camera功能并把摄像模块插入,然后就可以使用raspistill工具进行拍照了。
再这里使用Java开发定时拍照任务并做图像对比,由于Camera不能通过Java直接调用,在这里就使用了jrpicam (https://github.com/Hopding/JRPiCam) 开源组件,
通过调用raspistill进行拍照然后得到图像,整个工程的建立如下图,我将从github得到的源码一起合并到工程里面,工程就叫做smallcat吧(像一只猫一样盯着):
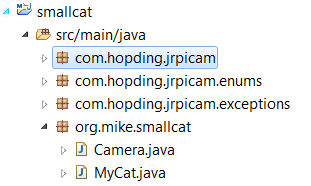
2个类,一个Camera类是拍照获得图像的:
还有一个MyCat是主任务类,获取图像后对比,符合条件后保存图像:
图像的相似性匹配是一个复杂的论题,这里使用最简单的RGB值比对(复杂的算法这个小树莓很难承受),每次比对后睡眠3秒钟后面再执行任务。
打包jar放到树莓派上面执行吧,但首先需要安装下JDK:
3. 结果如何 ?
(1) 得到记录的两张图片如下(相似比例调试到一个比较合适的值)。
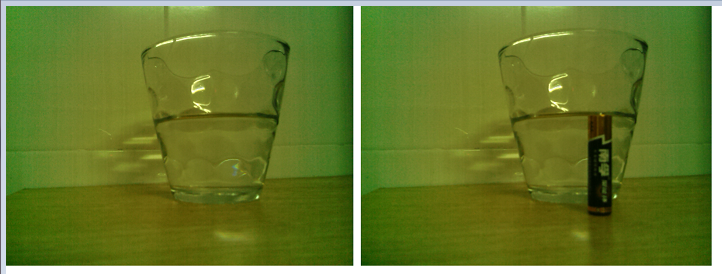
(2) 这个摄像头确实比较差,尝试调整参数效果也不理想,没有自动对焦等功能对于监控来说实际上用起来困难。
(3) 简单的RGB循环对比,CPU一下子撑到80-90%,这个单核的700MHz CPU做这类工作确定有点困难,高负载的时候SSH经常卡顿。
(4) 总之,实用性不强。
1、系统安装与配置
首先安装 raspbian-jessie-lite (官方下载),在windows下使用win32diskimager写入SD卡比较容易。
其次插入SD卡,接通电源启动系统。对于没有显示器(也没有外接的键盘)的情况下,只能选择网络方式访问。遇到了一些问题:
(1) 虽然可以通过家庭路由器得到DHCP分配的IP(或者根据ARP,甚至使用nmap扫描)得到这个树莓派的IP,但是前提要求网络环境比较高。
(2) 从2016.11月以后,Raspbian系统默认关闭SSH(估计是考虑安全性),也就是系统启动后SSH服务根本没启动。
这种情况下只能通过修改系统里面的IP等相关参数使得启动后能得到固定的IP。对于在windows下读写Linux分区始终是个不方便的事。
查找了多方面资料,只有Ext2Fsd能满足要求,但是按照后插入SD卡却变成了下图这样:
结果Linux分区无法成为一个被Ext2Fsd识别的卷,所以这个办法就到这里终止了。也尝试过将整个系统刻入SD卡(使用EXT3),但是系统无法启动。
最后,只能通过Linux系统来读写这个Linux分区。在这里使用back track 5来制作一个U盘系统然后重启笔记本,尝试通过笔记本修改SD卡里面的系统参数。
SD卡在BT5下挂载成功:
然后修改 /etc/network/interfaces文件,配置一个固定IP,如下:
现在IP确定了,但是还有SSH默认情况下是关闭的,所以需要开机启动,修改/etc/rc.local文件,加入SSH的启动命令,如下图:
然后umount SD卡后插入树莓派启动,状态灯显示工作正常,如下图:
然后使用笔记本尝试ping&ssh:
C:\>ping 192.168.0.125

Pinging 192.168.0.125 with 32 bytes of data:
Reply from 192.168.0.125: bytes=32 time=3ms TTL=64
Reply from 192.168.0.125: bytes=32 time=4ms TTL=64
Reply from 192.168.0.125: bytes=32 time=2ms TTL=64
Reply from 192.168.0.125: bytes=32 time=3ms TTL=64

Ping statistics for 192.168.0.125:
Packets: Sent = 4, Received = 4, Lost = 0 (0% loss),
Approximate round trip times in milli-seconds:
Minimum = 2ms, Maximum = 4ms, Average = 3ms
The programs included with the Debian GNU/Linux system are free software;
the exact distribution terms for each program are described in the
individual files in /usr/share/doc/*/copyright.

Debian GNU/Linux comes with ABSOLUTELY NO WARRANTY, to the extent
permitted by applicable law.
Last login: Thu Aug 10 20:37:32 2017 from 192.168.0.210

pi@x:~$
pi@x:~$
至此,系统配置成功,下面可以通过raspi-config命令启用SSH功能了,然后把rc.local中的启动命令删除,另外更改密码。
2. 监控拍摄对比
通过raspi-config工具启用Camera功能并把摄像模块插入,然后就可以使用raspistill工具进行拍照了。
再这里使用Java开发定时拍照任务并做图像对比,由于Camera不能通过Java直接调用,在这里就使用了jrpicam (https://github.com/Hopding/JRPiCam) 开源组件,
通过调用raspistill进行拍照然后得到图像,整个工程的建立如下图,我将从github得到的源码一起合并到工程里面,工程就叫做smallcat吧(像一只猫一样盯着):
2个类,一个Camera类是拍照获得图像的:
public class Camera {

private RPiCamera piCamera = null;
private String defaultSaveDir = "/home/pi/diff-photo";

public Camera() {
try {
piCamera = new RPiCamera(defaultSaveDir);
} catch (FailedToRunRaspistillException e) {
e.printStackTrace();
}
}

public BufferedImage takeOnePhoto() throws Exception {
piCamera.setAWB(AWB.AUTO)       // Change Automatic White Balance setting to automatic
.setDRC(DRC.OFF)            // Turn off Dynamic Range Compression
.setContrast(100)
.setSharpness(100)
.setQuality(100)
.setTimeout(1)
.setBrightness(75)
.turnOnPreview()            // Turn on image preview
.setEncoding(Encoding.PNG); // Change encoding of images to PNG

BufferedImage buffImg = piCamera.takeBufferedStill(800, 600); // Take image and store in BufferedImage
return buffImg;
}

}
还有一个MyCat是主任务类,获取图像后对比,符合条件后保存图像:
public class MyCat {

private Camera camera = null;
private double diffPercentThreshold = 4.0;

private String diffPhotoSaveDir = "/home/pi/diff-photo/";

public static void main(String[] args) {
System.out.println("My-Cat starting...");
MyCat cat = new MyCat();
cat.wakeUpMyCat();
System.out.println("My-Cat started!");
}

public void wakeUpMyCat() {
camera = new Camera();
Thread inspector = new Thread(new CatInspector());
inspector.setName("Cat-Inspector");
inspector.start();
}

class CatInspector implements Runnable {
private BufferedImage previousPhoto = null;

@Override
public void run() {
while (true) {
try {
TimeUnit.SECONDS.sleep(3);
} catch (InterruptedException e1) {
System.out.println("Cat Inspector Interrupted");
return;
}

try {
BufferedImage currentPhoto = camera.takeOnePhoto();
if (previousPhoto != null) {
if (isDifferent(currentPhoto)) {
foundDiffPhoto(currentPhoto);
}
} else {
// Save the first photo
foundDiffPhoto(currentPhoto);
}

previousPhoto = currentPhoto; // Set current photo as previous
} catch (Exception e) {
e.printStackTrace();
}
}
}

/**
* Process different photo
*/
private void foundDiffPhoto(BufferedImage photo) {
String fileName = new SimpleDateFormat("yyyyMMddHHmmss").format(new Date());
File saveFile = new File(diffPhotoSaveDir + fileName + ".png");
try {
ImageIO.write(photo, "png", saveFile);
System.out.println("New image saved to: " + saveFile.getAbsolutePath());
} catch (IOException e) {
System.out.println("Save image error: ");
e.printStackTrace();
}
}

/**
* Compare current photo with previous photo
*/
private boolean isDifferent(BufferedImage currentPhoto) {
int currentWidth = currentPhoto.getWidth();
int currentHeight = currentPhoto.getHeight();

int previousWidth = previousPhoto.getWidth();
int previousHeight = previousPhoto.getHeight();

if ((currentWidth != previousWidth) || (currentHeight != previousHeight)) {
System.err.println("Error: Images dimensions mismatch");
System.exit(1);
}
long diff = 0;
// Find RGB difference
for (int y = 0; y < currentHeight; y++) {
for (int x = 0; x < currentWidth; x++) {
int rgb1 = currentPhoto.getRGB(x, y);
int rgb2 = previousPhoto.getRGB(x, y);

int r1 = (rgb1 >> 16) & 0xff;
int g1 = (rgb1 >> 8) & 0xff;
int b1 = (rgb1) & 0xff;

int r2 = (rgb2 >> 16) & 0xff;
int g2 = (rgb2 >> 8) & 0xff;
int b2 = (rgb2) & 0xff;

diff += Math.abs(r1 - r2);
diff += Math.abs(g1 - g2);
diff += Math.abs(b1 - b2);
}
}
double n = currentWidth * currentHeight * 3;
double p = diff / n / 255.0;

double diffPercent = (p * 100.0);
System.out.println("Diff percent: " + diffPercent);
return diffPercent > diffPercentThreshold;
}
}

}
图像的相似性匹配是一个复杂的论题,这里使用最简单的RGB值比对(复杂的算法这个小树莓很难承受),每次比对后睡眠3秒钟后面再执行任务。
打包jar放到树莓派上面执行吧,但首先需要安装下JDK:
# sudo apt-get update
# sudo apt-get install oracle-java7-jdk
3. 结果如何 ?
(1) 得到记录的两张图片如下(相似比例调试到一个比较合适的值)。
(2) 这个摄像头确实比较差,尝试调整参数效果也不理想,没有自动对焦等功能对于监控来说实际上用起来困难。
(3) 简单的RGB循环对比,CPU一下子撑到80-90%,这个单核的700MHz CPU做这类工作确定有点困难,高负载的时候SSH经常卡顿。
(4) 总之,实用性不强。

相关文章推荐
- 树莓派使用USB摄像头和motion实现监控
- 使用树莓派制作一套“NAS+私有云盘+下载机”
- 使用cocos制作一个简易的小闹钟
- 使用C#制作简易的注册表编辑器
- 使用Consul快速搭建简易分布式服务监控系统
- 制作树莓派监控
- Android 联网监控抓包工具的制作(tcpdump的使用)
- 使用incrontab监控文件夹变化,执行指定命令_树莓派求助&教程_ICKey电子工程师论坛-ickey电子工程师社区
- 使用PHP制作 简易员工管理系统之五(分页显示用户信息)
- 使用ruby的fpm模块实现对二进制MySQL的RPM包制作,实现一键安装
- 第七篇、使用UIView的animateWithDuration方法制作简易动画
- Android 联网监控抓包工具的制作(tcpdump的使用)
- 如何使用和制作 Python 安装模块(setup.py)
- Python中对字节流/二进制流的操作:struct模块简易使用教程
- 进程监控模块配置与使用 ------ACE(开源项目)
- IOS 使用XML制作简易选择题
- (3)Python笔记:使用WMI模块+TCP/IP来远程监控系统信息
- Android 联网监控抓包工具的制作(tcpdump的使用)
- 使用PHP制作 简易员工管理系统之七(MVC实现用户信息增、删、改、查)
- 如何使用和制作 Python 安装模块(setup.py)