【快速搞定】2分钟搞定极光推送(极光推送Android端集成)
2017-07-30 20:25
519 查看
原文请查看http://blog.csdn.net/qq137722697
一、前言
2分钟只是一个虚数哈,不过只要你速度快,两分钟还真是能搞定的哦。在2.1.8版本以前,极光的配置还是非常麻烦的,需要在清单文件(AndroidManifest.xml)里面各种配置,篇幅非常大。可能极光的开发者也意识到了这点,所以在2.1.8之后就加入了gradle的配置,简化了非常多的配置步骤。本文旨在通过简洁的步骤来快速完成极光的配置。(登录、注册和创建应用小白都会,这里就不贴教程了,直接上配置)
二、SDK配置
第一步、Gradle配置(Module的build.gradle)
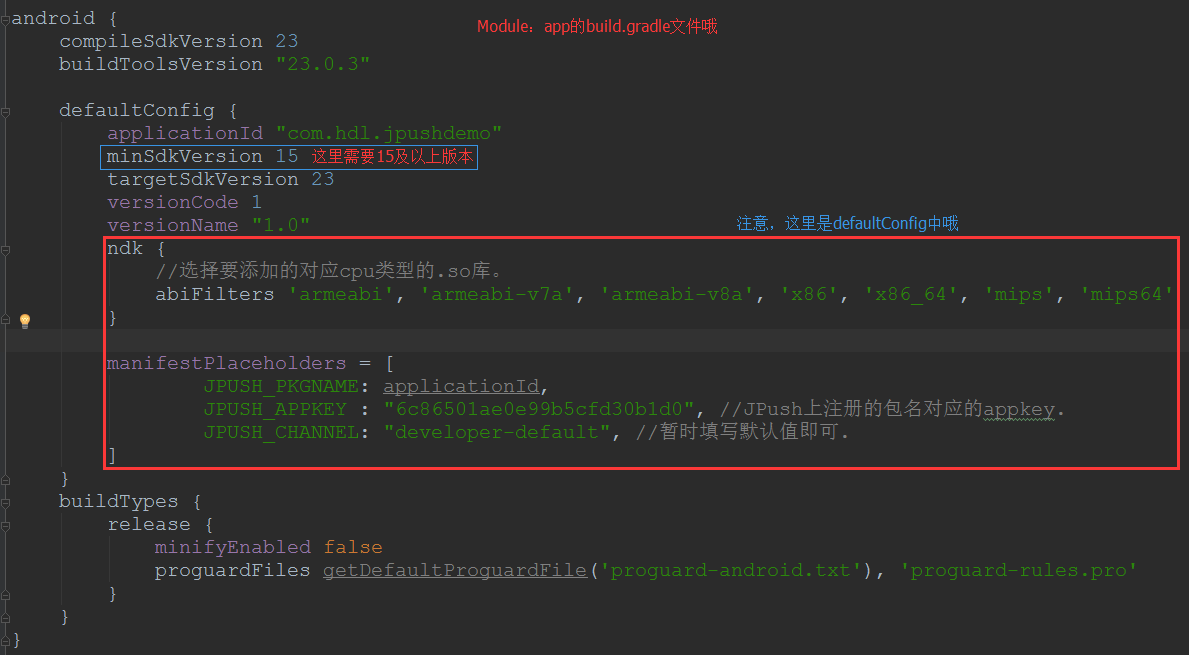
首先,确保你的 minSdkVersion在15及以上版本,然后defaultConfig中加入下面的代码(AppKey需要换成你的应用哦):ndk {
//选择要添加的对应cpu类型的.so库(不需要的删除即可)。
abiFilters 'armeabi', 'armeabi-v7a', 'armeabi-v8a', 'x86', 'x86_64', 'mips', 'mips64'
}
manifestPlaceholders = [
JPUSH_PKGNAME: applicationId,
JPUSH_APPKEY : "6c86501ae0e99b5cfd30b1d0", //JPush上注册的包名对应的appkey(*换成你的*)
JPUSH_CHANNEL: "developer-default", //暂时填写默认值即可.
]12
3
4
5
6
7
8
9
10
1
2
3
4
5
6
7
8
9
10
来张图更直观一点:
第二步、添加依赖
还是Module的build.gradle文件中哦compile 'cn.jiguang:jpush:2.1.8' // 此处以SDK 2.1.8版本为例1
1
至此,只需同步一下即可自动配置sdk
如果报错的话,需要在Project的gradle.properties文件中添加下面的代码:
android.useDeprecatedNdk=true1
1
第三步、混淆
在ProGuard文件(即proguard-rules.pro)中加入混淆代码:-dontoptimize
-dontpreverify
-dontwarn cn.jpush.**
-keep class cn.jpush.** { *; }12
3
4
5
1
2
3
4
5
第四步、初始化
新建一个MyApplication类(继承至Application),并在清单文件(AndroidManifest.xml)的application节点添加name属性关联MyApplication。在MyApplication的onCreate方法中加入初始化的代码:public class MyApplication extends Application {
@Override
public void onCreate() {
super.onCreate();
//初始化sdk
JPushInterface.setDebugMode(true);//正式版的时候设置false,关闭调试
JPushInterface.init(this);
//建议添加tag标签,发送消息的之后就可以指定tag标签来发送了
Set<String> set = new HashSet<>();
set.add("andfixdemo");//名字任意,可多添加几个
JPushInterface.setTags(this, set, null);//设置标签
}
}12
3
4
5
6
7
8
9
10
11
12
13
1
2
3
4
5
6
7
8
9
10
11
12
13
第五步、创建自定义广播接收器
极光推送是需要自定义一个广播器来接收推送消息的。下面是官方demo的MyReceiver。(限于篇幅,省略了部分代码,需要的可以到最后给出的github中或官方demo下载)/**
* 自定义接收器
*
* 如果不定义这个 Receiver,则:
* 1) 默认用户会打开主界面
* 2) 接收不到自定义消息
*/
public class MyReceiver extends BroadcastReceiver {
private static final String TAG = "JPush";
@Override
public void onReceive(Context context, Intent intent) {
Bundle bundle = intent.getExtras();
Log.d(TAG, "[MyReceiver] onReceive - " + intent.getAction() + ", extras: " + printBundle(bundle));
if (JPushInterface.ACTION_REGISTRATION_ID.equals(intent.getAction())) {
String regId = bundle.getString(JPushInterface.EXTRA_REGISTRATION_ID);
Log.d(TAG, "[MyReceiver] 接收Registration Id : " + regId);
//send the Registration Id to your server...
} else if (JPushInterface.ACTION_MESSAGE_RECEIVED.equals(intent.getAction())) {
Log.d(TAG, "[MyReceiver] 接收到推送下来的自定义消息: " + bundle.getString(JPushInterface.EXTRA_MESSAGE));
processCustomMessage(context, bundle);
} else if (JPushInterface.ACTION_NOTIFICATION_RECEIVED.equals(intent.getAction())) {
Log.d(TAG, "[MyReceiver] 接收到推送下来的通知");
int notifactionId = bundle.getInt(JPushInterface.EXTRA_NOTIFICATION_ID);
Log.d(TAG, "[MyReceiver] 接收到推送下来的通知的ID: " + notifactionId);
} else if (JPushInterface.ACTION_NOTIFICATION_OPENED.equals(intent.getAction())) {
Log.d(TAG, "[MyReceiver] 用户点击打开了通知");
//
// //打开自定义的Activity
// Intent i = new Intent(context, TestActivity.class);
// i.putExtras(bundle);
// //i.setFlags(Intent.FLAG_ACTIVITY_NEW_TASK);
// i.setFlags(Intent.FLAG_ACTIVITY_NEW_TASK | Intent.FLAG_ACTIVITY_CLEAR_TOP );
// context.startActivity(i);
} else if (JPushInterface.ACTION_RICHPUSH_CALLBACK.equals(intent.getAction())) {
Log.d(TAG, "[MyReceiver] 用户收到到RICH PUSH CALLBACK: " + bundle.getString(JPushInterface.EXTRA_EXTRA));
//在这里根据 JPushInterface.EXTRA_EXTRA 的内容处理代码,比如打开新的Activity, 打开一个网页等..
} else if(JPushInterface.ACTION_CONNECTION_CHANGE.equals(intent.getAction())) {
boolean connected = intent.getBooleanExtra(JPushInterface.EXTRA_CONNECTION_CHANGE, false);
Log.w(TAG, "[MyReceiver]" + intent.getAction() +" connected state change to "+connected);
} else {
Log.d(TAG, "[MyReceiver] Unhandled intent - " + intent.getAction());
}
}
// 打印所有的 intent extra 数据
private static String printBundle(Bundle bundle) {
...//省略了
}
//send msg to MainActivity
private void processCustomMessage(Context context, Bundle bundle) {
...//省略了
}
}12
3
4
5
6
7
8
9
10
11
12
13
14
15
16
17
18
19
20
21
22
23
24
25
26
27
28
29
30
31
32
33
34
35
36
37
38
39
40
41
42
43
44
45
46
47
48
49
50
51
52
53
54
55
56
57
58
59
60
61
62
1
2
34
5
6
7
8
9
10
11
12
13
14
15
16
17
18
19
20
21
22
23
24
25
26
27
28
29
30
31
32
33
34
35
36
37
38
39
40
41
42
43
44
45
46
47
48
49
50
51
52
53
54
55
56
57
58
59
60
61
62
还没完,因为广播接收器是Android四大组件之一,所以需要在清单文件中加入下面的配置哦。
<receiver
android:name=".MyReceiver"
android:enabled="true"
android:exported="false">
<intent-filter>
<action android:name="cn.jpush.android.intent.REGISTRATION" /> <!--Required  用户注册SDK的intent-->
<action android:name="cn.jpush.android.intent.MESSAGE_RECEIVED" /> <!--Required  用户接收SDK消息的intent-->
<action android:name="cn.jpush.android.intent.NOTIFICATION_RECEIVED" /> <!--Required  用户接收SDK通知栏信息的intent-->
<action android:name="cn.jpush.android.intent.NOTIFICATION_OPENED" /> <!--Required  用户打开自定义通知栏的intent-->
<action android:name="cn.jpush.android.intent.ACTION_RICHPUSH_CALLBACK" /> <!--Optional 用户接受Rich Push Javascript 回调函数的intent-->
<action android:name="cn.jpush.android.intent.CONNECTION" /><!-- 接收网络变化 连接/断开 since 1.6.3 -->
<category android:name="com.hdl.jpushdemo" />
</intent-filter>
</receiver>
1
2
3
4
5
6
7
8
9
10
11
12
13
14
1
2
3
4
5
6
7
8
9
10
11
12
13
14
第六步、测试
1、进入极光推送管理后台,选择当前应用,推送,发送通知,填下推送的内容,选择目标人群,点击发送即可。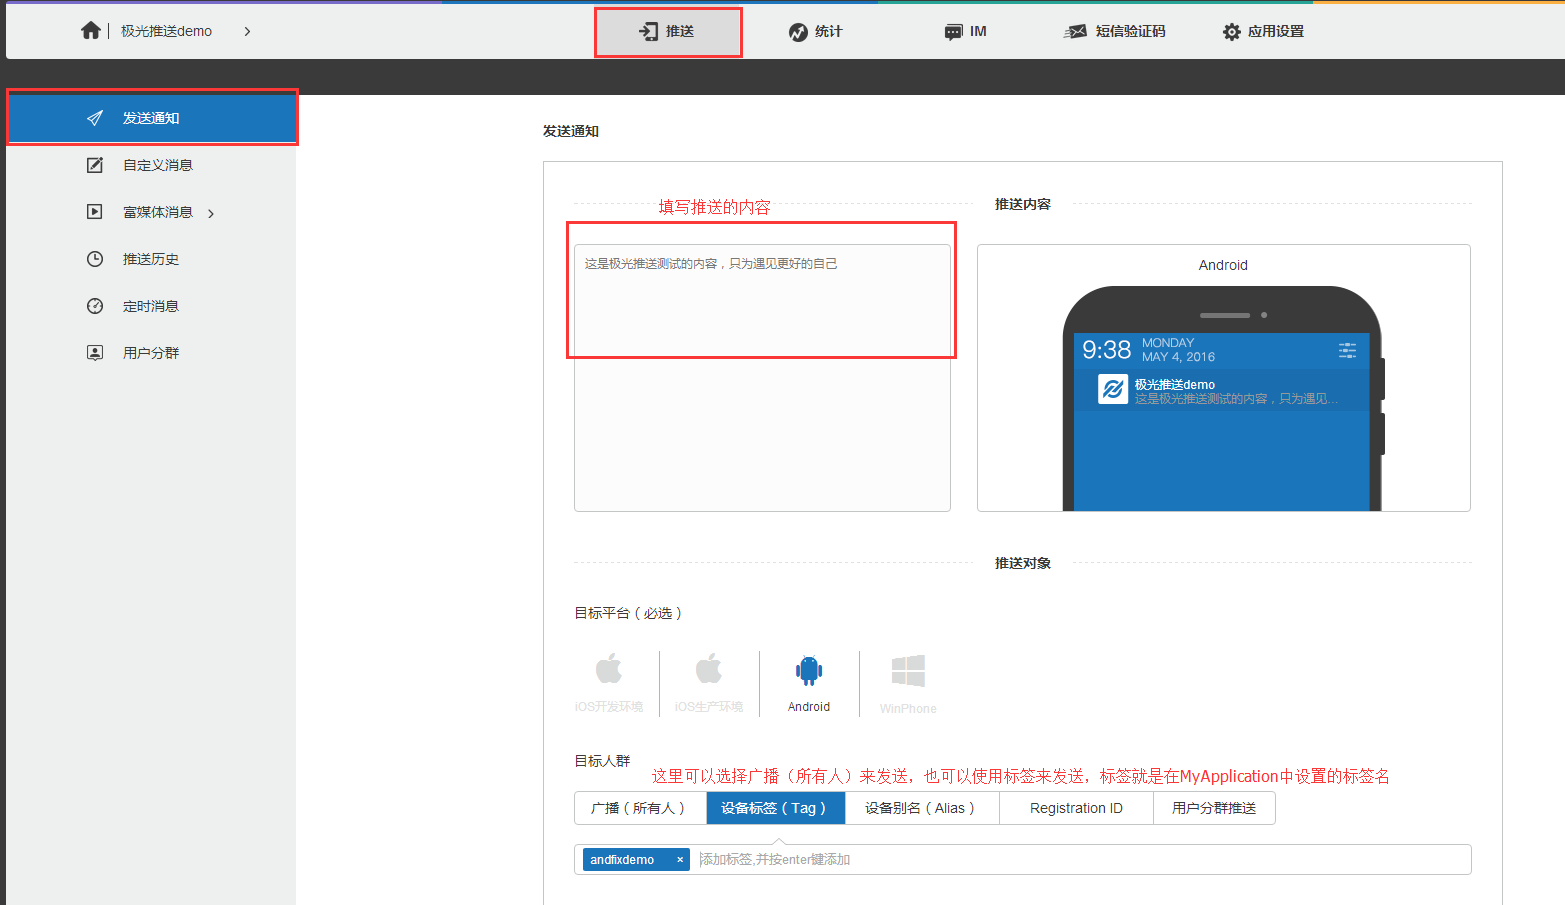
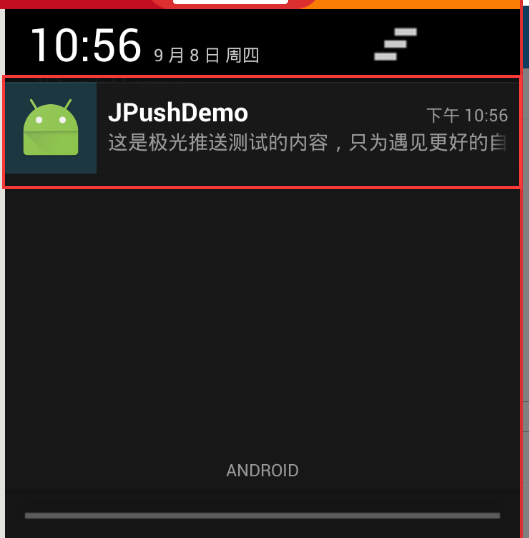
2、手机端
三、Demo下载地址
https://github.com/huangdali/jpushdemo/ 欢迎访问我的博客主页http://blog.csdn.net/qq137722697

相关文章推荐
- 【快速搞定】2分钟搞定极光推送(极光推送Android端集成)
- 【快速搞定】2分钟搞定极光推送(极光推送Android端集成)
- 2分钟搞定极光推送(极光推送Android端集成)
- 【2分钟搞定极光推送】极光推送Android端集成
- Android 十分钟快速自动集成极光推送
- android jpush(极光推送)快速集成
- 极光推送快速集成
- Android Studio集成极光推送(Jpush) 报错 java.lang.UnsatisfiedLinkError: cn.jpush.android.service.PushProtocol
- Android集成极光推送服务
- 用 jpush-react-native 插件快速集成推送功能(Android 篇)
- Android 极光推送集成与使用详解
- Android Studio集成极光推送(Jpush) 报错 java.lang.UnsatisfiedLinkError: cn.jpush.android.service.PushProtocol
- Java.lang.UnsatisfiedLinkError android studio集成Jpush极光推送
- android studio集成极光推送,获取附加字段详细,并提供自己写的一个demo,绝对不是官方demo
- Android JPush的集成 极光推送
- 快速集成极光推送
- android 端极光推送集成,适用于webview
- 用 jpush-react-native 插件快速集成推送功能(Android 篇)
- iOS 极光推送快速最新集成(2.1.0)
- 安卓极光推送-(最新版,10分钟快速集成!)