微信小程序开发-新闻列表之新闻列表绑定
2017-07-27 10:57
741 查看
看了http://blog.csdn.net/SundayAaron/article/details/54893573,觉得他写的比较好。就直接拿过来用了
在拿到效果图后不要先急着去写代码,而是要去分析一下页面的整体结构,用什么方式定位和布局。小程序里建议使用flex布局,因为小程序对flex的支持是很好的。
上一篇博客中完成了轮播图部分,接下来继续完成下面的新闻列表部分
新闻列表部分整体使用flex纵向布局比较合适,
先把页面内的元素标签和类名写好。
2
3
4
5
6
7
8
9
10
11
12
13
14
15
1
2
3
4
5
6
7
8
9
10
11
12
13
14
15
2
3
4
5
6
7
8
9
10
11
12
13
14
15
16
17
18
19
20
21
22
23
24
25
26
27
28
29
30
31
32
33
34
35
36
37
38
39
40
41
42
43
44
45
46
47
48
49
50
51
52
53
54
55
56
57
58
59
60
61
62
1
2
3
4
5
6
7
8
9
10
11
12
13
14
15
16
17
18
19
20
21
22
23
24
25
26
27
28
29
30
31
32
33
34
35
36
37
38
39
40
41
42
43
44
45
46
47
48
49
50
51
52
53
54
55
56
57
58
59
60
61
62
数据绑定很重要,那么多的新闻列表,不可能每个新闻都复制粘贴一下代码。况且小程序还限制在1MB大小。
我们把数据内容单独放在一个文件夹里,模拟从网络加载的情况
如图,在根目录新建一个data文件夹,里面新建一个posts-data.js文件
在posts-data.js里定义一个local_database数组
2
3
4
5
6
7
8
9
10
11
12
13
14
15
16
17
18
19
20
21
22
23
24
25
26
27
28
29
30
31
32
33
34
35
36
1
2
3
4
5
6
7
8
9
10
11
12
13
14
15
16
17
18
19
20
21
22
23
24
25
26
27
28
29
30
31
32
33
34
35
36
别忘了在posts-data.js文件最后加上输出
2
3
1
2
3
例如用户头像图片的路径,用双大括号括起来 里面和数组里定义的要相同,然后前面要加上item. 意思是绑定数组里定义的avatar,代码如下:
1
先把posts-data.js文件引入:
1
然后在onLoad: 函数内设置Data的值
2
3
4
5
6
1
2
3
4
5
6
在wxml要循环的部分外面加上
2
3
4
5
6
7
8
9
10
11
12
13
14
15
16
17
1
2
3
4
5
6
7
8
9
10
11
12
13
14
15
16
17
语法是:
wx:for=”{{数组名}}”
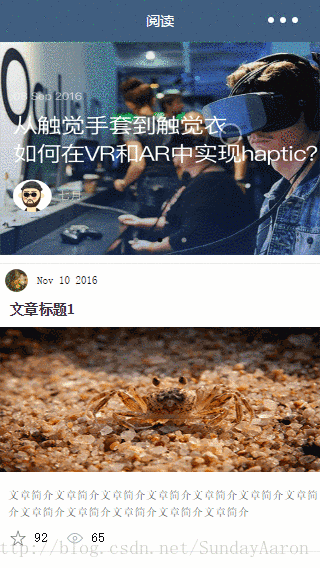
1、效果图预览
2、准备工作
在拿到效果图后不要先急着去写代码,而是要去分析一下页面的整体结构,用什么方式定位和布局。小程序里建议使用flex布局,因为小程序对flex的支持是很好的。上一篇博客中完成了轮播图部分,接下来继续完成下面的新闻列表部分
3、wxml部分
新闻列表部分整体使用flex纵向布局比较合适, 先把页面内的元素标签和类名写好。
<view class="post-container">
<view class="post-author-date">
<image class="post-author" src="{{item.avatar}}"></image>
<text class="post-date">{{item.date}}</text>
</view>
<text class="post-title">{{item.title}}</text>
<image class="post-image" src="{{item.imgSrc}}"></image>
<text class="post-content">{{item.content}}</text>
<view class="post-like">
<image class="post-like-image" src="{{item.view_img}}"></image>
<text class="post-like-font">{{item.reading}}</text>
<image class="post-like-image" src="{{item.collect_img}}"></image>
<text class="post-like-font">{{item.collection}}</text>
</view>
</view>12
3
4
5
6
7
8
9
10
11
12
13
14
15
1
2
3
4
5
6
7
8
9
10
11
12
13
14
15
4、wxss部分
.post-container{
display: flex;
flex-direction: column;
margin-top: 20rpx;
margin-bottom: 40rpx;
background-color: #fff;
border-bottom: 1px solid #ededed;
border-top: 1px solid #ededed;
padding-bottom: 5px;
}
.post-author-date{
margin: 10rpx 0 20rpx 10rpx;
}
.post-author{
width: 60rpx;
height: 60rpx;
vertical-align: middle;
}
.post-date{
margin-left: 20rpx;
vertical-align: middle;
margin-bottom: 5px;
font-size: 26rpx;
}
.post-title{
font-size: 34rpx;
font-weight: 600;
color: #333;
margin-bottom: 10px;
margin-left: 10px;
}
.post-image{

width: 100%;
height: 340rpx;
margin: auto 0;
margin-bottom: 15px;
}
.post-content{
color: #666;
font-size: 28rpx;
margin-bottom: 20rpx;
margin-left: 20rpx;
letter-spacing: 2rpx;
line-height: 40rpx;
}
.post-like{
font-size: 13px;
flex-direction: row;
line-height: 16px;
margin-left: 10px;
}
.post-like-image{
width: 16px;
height: 16px;
margin-right: 8px;
vertical-align: middle;
}
.post-like-font{
vertical-align: middle;
margin-right: 20px;
}12
3
4
5
6
7
8
9
10
11
12
13
14
15
16
17
18
19
20
21
22
23
24
25
26
27
28
29
30
31
32
33
34
35
36
37
38
39
40
41
42
43
44
45
46
47
48
49
50
51
52
53
54
55
56
57
58
59
60
61
62
1
2
3
4
5
6
7
8
9
10
11
12
13
14
15
16
17
18
19
20
21
22
23
24
25
26
27
28
29
30
31
32
33
34
35
36
37
38
39
40
41
42
43
44
45
46
47
48
49
50
51
52
53
54
55
56
57
58
59
60
61
62
5、数据绑定
数据绑定很重要,那么多的新闻列表,不可能每个新闻都复制粘贴一下代码。况且小程序还限制在1MB大小。我们把数据内容单独放在一个文件夹里,模拟从网络加载的情况
如图,在根目录新建一个data文件夹,里面新建一个posts-data.js文件
5.1、posts-data.js
在posts-data.js里定义一个local_database数组var local_database=[
{
date:"Nov 10 2016",
title:"文章标题1",
imgSrc:"/images/post/crab.png",
avatar:"/images/avatar/1.png",
content:"文章简介文章简介文章简介文章简介文章简介文章简介文章简介文章简介文章简介文章简介文章简介文章简介",
reading:"92",
collection:"65",
view_img:"/images/icon/chat.png",
collect_img:"/images/icon/view.png",
},
{
date:"Nov 20 2016",
title:"文章标题2",
imgSrc:"/images/post/bl.png",
avatar:"/images/avatar/2.png",
content:"文章简介文章简介文章简介文章简介文章简介文章简介文章简介文章简介文章简介文章简介文章简介文章简介",
reading:"88",
collection:"66",
view_img:"/images/icon/chat.png",
collect_img:"/images/icon/view.png",
},
{
date:"Nov 25 2016",
title:"文章标题3",
imgSrc:"/images/post/cat.png",
avatar:"/images/avatar/3.png",
content:"文章简介文章简介文章简介文章简介文章简介文章简介文章简介文章简介文章简介文章简介文章简介文章简介",
reading:"123",
collection:"55",
view_img:"/images/icon/chat.png",
collect_img:"/images/icon/view.png",
}
]12
3
4
5
6
7
8
9
10
11
12
13
14
15
16
17
18
19
20
21
22
23
24
25
26
27
28
29
30
31
32
33
34
35
36
1
2
3
4
5
6
7
8
9
10
11
12
13
14
15
16
17
18
19
20
21
22
23
24
25
26
27
28
29
30
31
32
33
34
35
36
别忘了在posts-data.js文件最后加上输出
module.exports={
postList:local_database
}12
3
1
2
3
5.2、post.wxml使用数据绑定:
例如用户头像图片的路径,用双大括号括起来 里面和数组里定义的要相同,然后前面要加上item. 意思是绑定数组里定义的avatar,代码如下:<image class="post-author" src="{{item.avatar}}"></image>11
5.3、post.js
先把posts-data.js文件引入:var postsData=require('../../data/posts-data.js')11
然后在onLoad: 函数内设置Data的值
onLoad:function(options){
// 生命周期函数--监听页面加载
this.setData({
posts_key:postsData.postList
})
},12
3
4
5
6
1
2
3
4
5
6
6、for循环
在wxml要循环的部分外面加上<block> </block>标签
<block wx:for="{{posts_key}}" wx:for-item="item">
<view class="post-container">
<view class="post-author-date">
<image class="post-author" src="{{item.avatar}}"></image>
<text class="post-date">{{item.date}}</text>
</view>
<text class="post-title">{{item.title}}</text>
<image class="post-image" src="{{item.imgSrc}}"></image>
<text class="post-content">{{item.content}}</text>
<view class="post-like">
<image class="post-like-image" src="{{item.view_img}}"></image>
<text class="post-like-font">{{item.reading}}</text>
<image class="post-like-image" src="{{item.collect_img}}"></image>
<text class="post-like-font">{{item.collection}}</text>
</view>
</view>
</block>12
3
4
5
6
7
8
9
10
11
12
13
14
15
16
17
1
2
3
4
5
6
7
8
9
10
11
12
13
14
15
16
17
语法是:
wx:for=”{{数组名}}”

相关文章推荐
- 微信小程序开发实战&电影小程序——阅读页面轮播图-新闻列表页面构建-数据绑定
- 微信小程序开发-新闻列表之新闻列表绑定
- 微信小程序开发-新闻列表之新闻列表绑定
- 微信小程序开发-新闻列表之新闻列表绑定
- 微信小程序开发实战&电影小程序——阅读页面轮播图-新闻列表页面构建-数据绑定
- 微信小程序开发-新闻列表之新闻列表绑定
- 微信小程序开发07-列表页面怎么做
- 微信小程序(应用号)开发新闻客户端的实战课程
- 微信小程序开发详解 5 博客园客户端---新闻资讯类小程序
- 微信小程序项目总结:for循环,绑定点击事件,二维数组列表渲染 ...
- 微信小程序开发之好友列表字母列表跳转对应位置
- 微信小程序开发教程(基础篇)8-数据绑定下
- 微信小程序列表渲染开发
- 微信小程序js开发 swiper,带圆点和列表
- 微信小程序开发中数据绑定一个对象到数组中,然后取值的一个注意点
- 从零开始开发微信小程序(四):微信小程序绑定系统账号并授权登录之后台端
- 绑定小程序数据助手,查看小程序的统计数据-微信小程序开发-视频教程22
- 从零开始开发微信小程序(三):微信小程序绑定系统账号并授权登录之微信端
- 微信小程序开发 ---- 2 列表 详情
- 微信小程序 绑定列表数据 分页