Install OpenCV 3.0 and Python 2.7+ on OSX
2017-07-06 10:57
513 查看
http://www.pyimagesearch.com/2015/06/15/install-OpenCV-3-0-and-Python-2-7-on-osx/
As I mentioned last week, OpenCV 3.0 is finally here!
And if you’ve been paying attention to my Twitter stream, you may have noticed a bunch of tweets regarding installing OpenCV on OSX and Ubuntu (yep, I’ve been tweeting a lot lately, but that’s just because I’m so excited about the 3.0 release!)
To celebrate opencv 3.0, I have decided to perform a series of blog posts that detail how to install OpenCV 3.0 on both python 2.7+ and Python 3+.
We’ll also be performing these Python 2.7 and Python 3+ installations on a variety of platforms including OSX, Ubuntu, and yes, the Raspberry Pi.
As I’m sure you already know, OpenCV has never been an effortless library to install. It’s not like you can let pip or easy_install to the heavy-lifting for you. In most cases you’ll be pulling down the repo, installing prerequisites, compiling by hand, and hoping that your installation goes smoothly.
With OpenCV 3.0 it doesn’t get any easier — and there are definitely some caveats and gotchas that you need to look out for (such as the opencv_contrib repository — without it, you’ll be missing out on some important features, such as SIFT, SURF, etc.)
But don’t worry, I’ve got you covered! Just keep following along with the PyImageSearch blog and I promise these tutorials will get you up and running with OpenCV 3.0 in no time.
We’ll Go ahead and kick-off our OpenCV 3.0 install fest by installing v3.0 with Python 2.7+bindings on the OSX platform.
If you’re an Ubuntu or Raspberry Pi user, be sure to keep an eye on PyImageSearch as I’ll be posting OpenCV 3.0 install instructions for Ubuntu and the Raspberry Pi as well.
A quick note before we get started: While OpenCV 3.0 is indeed compatible with Python 3+, most computer vision developers are still using Python 2.7 (since OpenCV 2.4.X is only compatible with Python 2.7). If you’re a Python 3 user and excited to give the bindings a try — don’t worry! I’ll be covering OpenCV 3.0 and Python 3+ installation in a future tutorial. But for now, let’s stick with what we know and use Python 2.7.
UPDATE: The tutorial you are reading now covers how to install OpenCV 3.0 with Python 2.7 bindings on OSX Yosemite and below. This tutorial still works perfectly if you are using OSX Yosemite or prior, but if you want to install OpenCV on the newer El Capitan and macOS Sierra please use this freshly updated tutorial.
Let’s go ahead and dive into the OpenCV 3.0 and Python 2.7+ install instructions.
But if you don’t, you’ll want to open up the App Store application and search for Xcode. From there, just click Get and Install App (and when prompted, you’ll need to enter your Apple ID username and password):

Figure 1: Installing Xcode on your OSX system.
To install Homebrew, simply head to the Homebrew website and simply copy and paste the command underneath the “Install Homebrew” section into your terminal:
Install OpenCV 3.0 and Python 2.7+ on OSX
Shell
Now that Homebrew is installed, you’ll need to update it and grab the latest package (i.e. “formula”) definitions. These formula are simply instructions on how to install a given package or library.
To update Homebrew, simply execute:
Install OpenCV 3.0 and Python 2.7+ on OSX
Shell
Let’s go ahead and use Homebrew to install our user-specific version of Python 2.7:
Install OpenCV 3.0 and Python 2.7+ on OSX
Shell
Note: This tutorial will be covering how to install and setup OpenCV 3.0 with Python 2.7. I will be covering how to install OpenCV 3.0 with Python 3+ later this month.
However, before we proceed, we need to update our PATH in our ~/.bash_profile file to indicate that we want to use Homebrew packages before any system libraries or packages. This is an absolutely critical step, so be sure not to skip it!
Open up your ~/.bash_profile file in your favorite editor (if it does not exist, create it), and append the following lines to the file:
Install OpenCV 3.0 and Python 2.7+ on OSX
Shell
From there, reload your ~./bash_profile file to ensure the changes have been made:
Install OpenCV 3.0 and Python 2.7+ on OSX
Shell
As a sanity check, let’s confirm that we are using the Homebrew version of Python rather than the system one:
Install OpenCV 3.0 and Python 2.7+ on OSX
Shell
If your output of which python is /usr/local/bin/python , then you are indeed using the Homebrew version of Python. And if your output is /usr/bin/python , then you are still using the system version of Python — and you need to go back and ensure that your~/.bash_profile file is updated and reloaded correctly.
Again, this is a very important step, so be sure not to skip it!
It’s important to note that virtualenv and virtualenvwrapper are by no means requiredto install OpenCV 3.0 and Python 2.7+ on OSX. However, you really should be using these packages when doing Python development. It’s cleaner. Easier to maintain. And well worth the upfront effort.
Anyway, to install virtualenv and virtualenvwrapper , just execute the following command:
Install OpenCV 3.0 and Python 2.7+ on OSX
Shell
Again, we need to update our ~/.bash_profile file by appending the following two lines:
Install OpenCV 3.0 and Python 2.7+ on OSX
Shell
After updating the ~/.bash_profile file, we need to reload it:
Install OpenCV 3.0 and Python 2.7+ on OSX
Shell
At this point, both virtualenv and virtualenvwrapper are installed correctly, so we can create our cv virtual environment:
Install OpenCV 3.0 and Python 2.7+ on OSX
Shell
This command will create a new Python environment that is entirely sequestered from our system and Homebrew Python installations. The cv virtual environment is where we’ll be doing all of our computer vision development (and not to mention, compiling OpenCV 3.0 with Python 2.7+ support).
Install OpenCV 3.0 and Python 2.7+ on OSX
Shell
First, we’ll use brew to install the required developers tools, such as the wonderful CMake utility:
Install OpenCV 3.0 and Python 2.7+ on OSX
Shell
And here we are going to install the necessary image I/O packages. These packages allow you to load various image file formats such as JPEG, PNG, TIFF, etc.
Install OpenCV 3.0 and Python 2.7+ on OSX
Shell
And finally, let’s install libraries that are used to optimize various operations within OpenCV (if we so choose):
Install OpenCV 3.0 and Python 2.7+ on OSX
Shell
The first thing we’ll do is change directory to our home directory, followed by pulling down OpenCV from GitHub, and checking out the 3.0.0 version:
Install OpenCV 3.0 and Python 2.7+ on OSX
Shell
Update (3 January 2016): You can replace the 3.0.0 version with whatever the current release is (as of right now, it’s 3.1.0 ). Be sure to check OpenCV.org for information on the latest release.
Unlike previous versions of OpenCV that were (essentially) self-contained, we need to pull down the extra opencv_contrib repo from GitHub as well. The opencv_contrib repo which contains extra modules for OpenCV, such as feature detection, local invariant descriptors (SIFT, SURF, etc.), text detection in natural images, line descriptors, and more.
Install OpenCV 3.0 and Python 2.7+ on OSX
Shell
Again, make sure that you checkout the same version for opencv_contrib that you did foropencv above, otherwise you could run into compilation errors.
Note: We don’t have to pull down the opencv_contrib repo if we don’t want to. OpenCV will compile and install just fine without it. But if you compile OpenCV without opencv_contrib , be warned that you’ll be missing out on some pretty important features, which will become very obvious, very fast, especially if you’re used to working with the 2.4.X version of OpenCV.
Install OpenCV 3.0 and Python 2.7+ on OSX
Shell
Where we’ll use CMake to configure our build:
Install OpenCV 3.0 and Python 2.7+ on OSX
Shell
There are some very important options we are supplying to CMake here, so let’s break them down:
CMAKE_BUILD_TYPE : This option indicates that we are building a release binary of OpenCV.
CMAKE_INSTALL_PREFIX : The base directory where OpenCV will be installed.
PYTHON2_PACKAGES_PATH : The explicit path to where our site-packages directory lives in our cv virtual environment.
PYTHON2_LIBRARY : Path to our Hombrew installation of Python.
PYTHON2_INCLUDE_DIR : The path to our Python header files for compilation.
INSTALL_C_EXAMPLES : Indicate that we want to install the C/C++ examples after compilation.
INSTALL_PYTHON_EXAMPLES : Indicate that we want to install the Python examples after complication.
BUILD_EXAMPLES : A flag that determines whether or not the included OpenCV examples will be compiled or not.
OPENCV_EXTRA_MODULES_PATH : This option is extremely important — here we supply the path to the opencv_contrib repo that we pulled down earlier, indicating that OpenCV should compile the extra modules as well.
Update (3 January 2016): In order to build OpenCV 3.1.0 , you need to set -DINSTALL_C_EXAMPLES=OFF (rather than ON ) in the cmake command. There is a bug in the OpenCV v3.1.0 CMake build script that can cause errors if you leave this switch on. Once you set this switch to off, CMake should run without a problem.
Whew, that was a lot of options.
Trust me, it’s a lot easier installing OpenCV 3.0 on Ubuntu where these options are automatically determined via CMake for us.
But when using OSX you’ll need to explicitly define the PYTHON2_PACKAGES_PATH ,PYTHON2_LIBRARY , and PYTHON2_INCLUDE_DIR yourself. It’s a real pain, but if you don’t, your compile will fail.
Here’s an example of what my CMake output looks like:
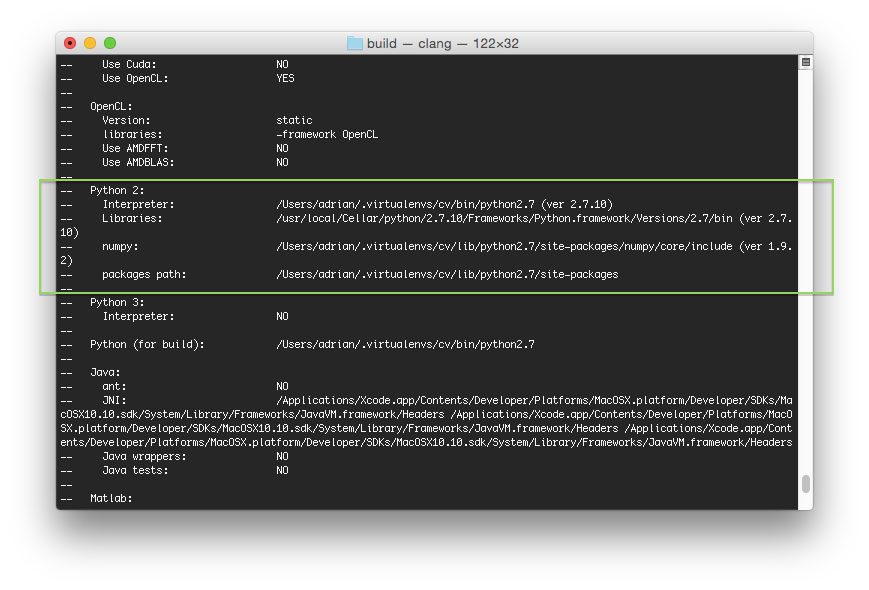
Figure 2: Before compiling OpenCV 3.0 on your OSX system, make sure that cmake has picked up the correct Python interpreter, library, numpy version, and packages path.
Notice how the Python 2 Interpreter, Libraries, numpy version, and packages path have been correctly picked up.
You’ll also want to make sure that python2 is in the list of modules To be built, like this:
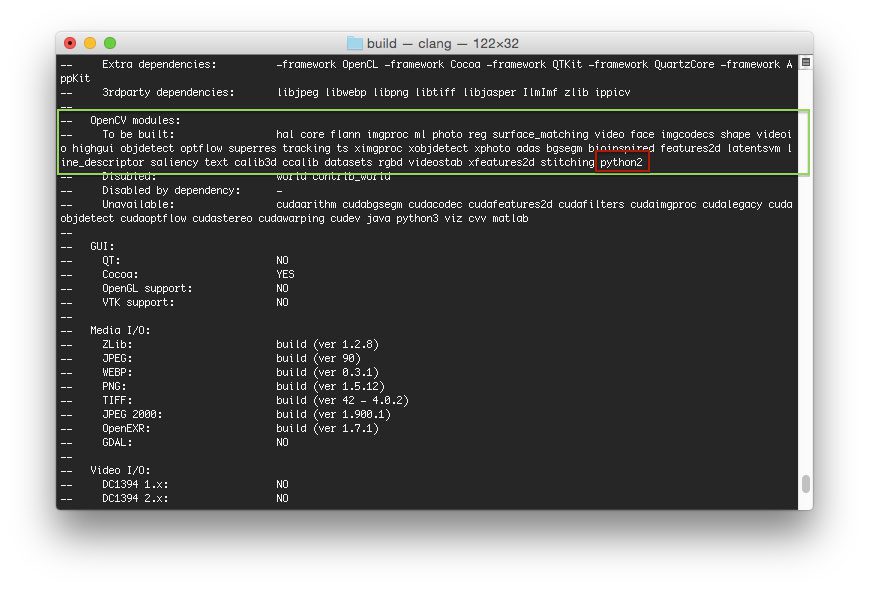
Figure 2: Ensuring the “python2” module is in our list of modules “To be built”.
If it python2 is not in this list, and is in the Unavailable list, then you need to go back to the CMake step and ensure that you have correctly supplied your PYTHON2_PACKAGES_PATH ,PYTHON2_LIBRARY , and PYTHON2_INCLUDE_DIR .
Now that CMake has properly configured the build, we can compile OpenCV:
Install OpenCV 3.0 and Python 2.7+ on OSX
Shell
Where the 4 can be replaced with however many cores you have available on your processor. Here’s an example of OpenCV compiling on my system:
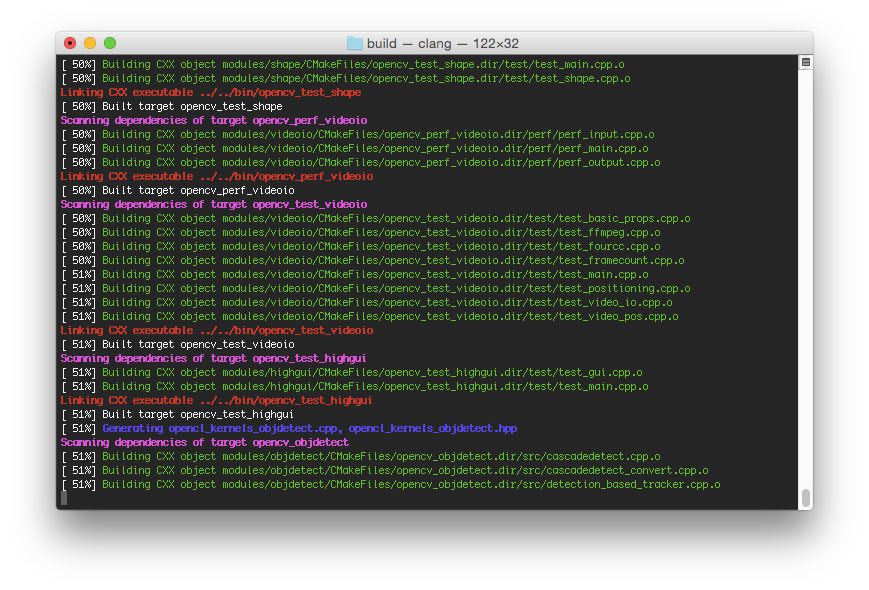
Figure 3: OpenCV 3.0 with Python 2.7+ support compiling on my system.
And assuming that OpenCV compiled without error, you can now install it on your OSX system:
Install OpenCV 3.0 and Python 2.7+ on OSX
Shell
If you get an error message related to permissions (although that really shouldn’t happen), you’ll need to run the install command as sudo :
Install OpenCV 3.0 and Python 2.7+ on OSX
Shell
Install OpenCV 3.0 and Python 2.7+ on OSX
Shell
Sure enough, we can see that OpenCV has been installed in our cv virtual environment’ssite-packages directory!
As a quick note, you’ll be able to find the cv2.so file (which is your OpenCV bindings) in yourbuild/lib directory as well.
Let’s verify our install by firing up a shell and importing OpenCV:
Install OpenCV 3.0 and Python 2.7+ on OSX
Shell
Doesn’t that 3.0.0 look nice?
Congrats, you have now installed OpenCV 3.0 and Python 2.7+ on your OSX system!
Most of my work in computer vision involves image search engines, or more formally, Content-based Image Retrieval. A critical step of CBIR is extracting features to quantify and abstractly represent the contents of an image.
OpenCV 3.0 has numerous updates and changes, but perhaps my personal favorite is an implementation of AKAZE features — Fast Explicit Diffusion for Accelerated Features in Nonlinear Scale Spaces by Alcantarilla et al.
Since Jurassic World was just released (and Jurassic Park is my favorite movie of all time), let’s explore how we can compute and extract AKAZE features from the following image:

Figure 4: Our Jurassic World test image that we are going to detect keypoints and extract features in using AKAZE.
Open up a new file, name it test_akaze.py , and insert the following code:
Install OpenCV 3.0 and Python 2.7+ on OSX
Python
And then execute it via:
Install OpenCV 3.0 and Python 2.7+ on OSX
Shell
Assuming you have download the jurassic_world.jpg image and placed it in the same directory as your test_akaze.py script, you should see the following output:
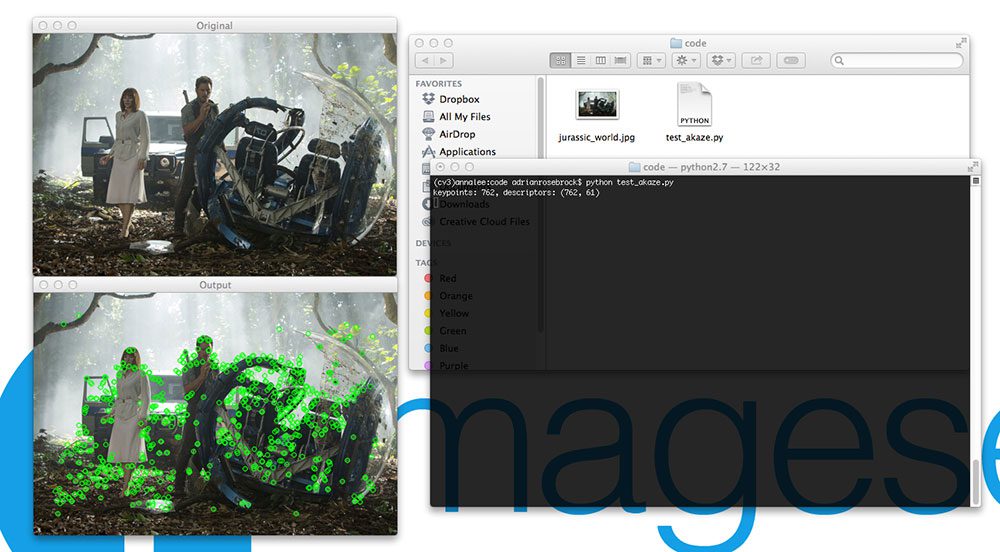
Figure 5: We have successfully been able to detect keypoints, extract AKAZE features, and then draw the keypoints on our image using OpenCV 3.0 and Python 2.7+!
Notice how we have been able to detect keypoints and extract AKAZE features in our image!
Obviously we need to do a lot more work than this to build a useful project using AKAZE features — but this example demonstrates that (1) our OpenCV 3.0 install is working, and (2) we are able to use a unique OpenCV 3.0 feature using Python 2.7.
This article kicked-off the install fest by detailing how to setup and install OpenCV 3.0 and Python 2.7+ on the OSX operating system.
Next week, we’ll be moving over to Ubuntu and detailing the instructions to get OpenCV 3.0 and Python 2.7 installed on Ubuntu 14.04+ (hint: it’s much easier than OSX).
Anyway, I hope you enjoyed this post and found it useful!
Please consider subscribing to the PyImageSearch Newsletter by entering your email address in the form below — I’ll be sending out updates as new OpenCV 3.0 + Python install instructions are released!
As I mentioned last week, OpenCV 3.0 is finally here!
And if you’ve been paying attention to my Twitter stream, you may have noticed a bunch of tweets regarding installing OpenCV on OSX and Ubuntu (yep, I’ve been tweeting a lot lately, but that’s just because I’m so excited about the 3.0 release!)
To celebrate opencv 3.0, I have decided to perform a series of blog posts that detail how to install OpenCV 3.0 on both python 2.7+ and Python 3+.
We’ll also be performing these Python 2.7 and Python 3+ installations on a variety of platforms including OSX, Ubuntu, and yes, the Raspberry Pi.
As I’m sure you already know, OpenCV has never been an effortless library to install. It’s not like you can let pip or easy_install to the heavy-lifting for you. In most cases you’ll be pulling down the repo, installing prerequisites, compiling by hand, and hoping that your installation goes smoothly.
With OpenCV 3.0 it doesn’t get any easier — and there are definitely some caveats and gotchas that you need to look out for (such as the opencv_contrib repository — without it, you’ll be missing out on some important features, such as SIFT, SURF, etc.)
But don’t worry, I’ve got you covered! Just keep following along with the PyImageSearch blog and I promise these tutorials will get you up and running with OpenCV 3.0 in no time.
We’ll Go ahead and kick-off our OpenCV 3.0 install fest by installing v3.0 with Python 2.7+bindings on the OSX platform.
If you’re an Ubuntu or Raspberry Pi user, be sure to keep an eye on PyImageSearch as I’ll be posting OpenCV 3.0 install instructions for Ubuntu and the Raspberry Pi as well.
A quick note before we get started: While OpenCV 3.0 is indeed compatible with Python 3+, most computer vision developers are still using Python 2.7 (since OpenCV 2.4.X is only compatible with Python 2.7). If you’re a Python 3 user and excited to give the bindings a try — don’t worry! I’ll be covering OpenCV 3.0 and Python 3+ installation in a future tutorial. But for now, let’s stick with what we know and use Python 2.7.
UPDATE: The tutorial you are reading now covers how to install OpenCV 3.0 with Python 2.7 bindings on OSX Yosemite and below. This tutorial still works perfectly if you are using OSX Yosemite or prior, but if you want to install OpenCV on the newer El Capitan and macOS Sierra please use this freshly updated tutorial.
How to Install OpenCV 3.0 and Python 2.7+ on OSX
This is our first tutorial in our OpenCV 3.0 install-fest series. In this tutorial I’ll be detailing how to install OpenCV 3.0 and Python 2.7+ on the OSX operating system — I’ll be covering Python 3+ in a future post.Let’s go ahead and dive into the OpenCV 3.0 and Python 2.7+ install instructions.
Step 1:
The first step we need to do is install Xcode, which is a combination of IDE and software development tools for developing applications on the OSX and iOS platforms — most of us already have Xcode installed.But if you don’t, you’ll want to open up the App Store application and search for Xcode. From there, just click Get and Install App (and when prompted, you’ll need to enter your Apple ID username and password):
Figure 1: Installing Xcode on your OSX system.
Step 2:
Now that Xcode is installed, we need to install Homebrew, which is labeled as “The missing package manager for OSX” (and they really are not joking about that one). Think of Homebrew as an (almost) equivalent of apt-get for Ubuntu.To install Homebrew, simply head to the Homebrew website and simply copy and paste the command underneath the “Install Homebrew” section into your terminal:
Install OpenCV 3.0 and Python 2.7+ on OSX
Shell
| 1 2 | $ cd ~ $ $ ruby -e "$(curl -fsSL https://raw.githubusercontent.com/Homebrew/install/master/install)" |
To update Homebrew, simply execute:
Install OpenCV 3.0 and Python 2.7+ on OSX
Shell
| 1 | $ brew update |
Step 3:
It’s bad form to use the system Python as your main interpreter. And this is especially true if you intend on using virtualenv and virtualenvwrapper (which we will be).Let’s go ahead and use Homebrew to install our user-specific version of Python 2.7:
Install OpenCV 3.0 and Python 2.7+ on OSX
Shell
| 1 | $ brew install python |
However, before we proceed, we need to update our PATH in our ~/.bash_profile file to indicate that we want to use Homebrew packages before any system libraries or packages. This is an absolutely critical step, so be sure not to skip it!
Open up your ~/.bash_profile file in your favorite editor (if it does not exist, create it), and append the following lines to the file:
Install OpenCV 3.0 and Python 2.7+ on OSX
Shell
| 1 2 | # Homebrew export PATH=/usr/local/bin:$PATH |
Install OpenCV 3.0 and Python 2.7+ on OSX
Shell
| 1 | $ source ~/.bash_profile |
Install OpenCV 3.0 and Python 2.7+ on OSX
Shell
| 1 2 | $ which python /usr/local/bin/python |
Again, this is a very important step, so be sure not to skip it!
Step 4:
Alright, time to get virtualenv and virtualenvwrapper installed and configured correctly. These packages allow us to create separate Python environments for each project we are working on. This is especially useful if you have projects that require different (or conflicting) versions of a given library.It’s important to note that virtualenv and virtualenvwrapper are by no means requiredto install OpenCV 3.0 and Python 2.7+ on OSX. However, you really should be using these packages when doing Python development. It’s cleaner. Easier to maintain. And well worth the upfront effort.
Anyway, to install virtualenv and virtualenvwrapper , just execute the following command:
Install OpenCV 3.0 and Python 2.7+ on OSX
Shell
| 1 | $ pip install virtualenv virtualenvwrapper |
Install OpenCV 3.0 and Python 2.7+ on OSX
Shell
| 1 2 | # Virtualenv/VirtualenvWrapper source /usr/local/bin/virtualenvwrapper.sh |
Install OpenCV 3.0 and Python 2.7+ on OSX
Shell
| 1 | $ source ~/.bash_profile |
Install OpenCV 3.0 and Python 2.7+ on OSX
Shell
| 1 | $ mkvirtualenv cv |
Step 5:
Now we can start installing some Python packages. We need to install NumPy since the OpenCV Python bindings represent images as multi-dimensional NumPy arrays:Install OpenCV 3.0 and Python 2.7+ on OSX
Shell
| 1 | $ pip install numpy |
Step 6:
Up until this point we have been mainly focusing on actually setting up and configuring our development environment to compile and install OpenCV — here is where the real work starts.First, we’ll use brew to install the required developers tools, such as the wonderful CMake utility:
Install OpenCV 3.0 and Python 2.7+ on OSX
Shell
| 1 | $ brew install cmake pkg-config |
Install OpenCV 3.0 and Python 2.7+ on OSX
Shell
| 1 | $ brew install jpeg libpng libtiff openexr |
Install OpenCV 3.0 and Python 2.7+ on OSX
Shell
| 1 | $ brew install eigen tbb |
Step 7:
Alright, our system is all setup — time to compile and install OpenCV 3.0 with Python 2.7+ support.The first thing we’ll do is change directory to our home directory, followed by pulling down OpenCV from GitHub, and checking out the 3.0.0 version:
Install OpenCV 3.0 and Python 2.7+ on OSX
Shell
| 1 2 3 4 | $ cd ~ $ git clone https://github.com/Itseez/opencv.git $ cd opencv $ git checkout 3.0.0 |
Unlike previous versions of OpenCV that were (essentially) self-contained, we need to pull down the extra opencv_contrib repo from GitHub as well. The opencv_contrib repo which contains extra modules for OpenCV, such as feature detection, local invariant descriptors (SIFT, SURF, etc.), text detection in natural images, line descriptors, and more.
Install OpenCV 3.0 and Python 2.7+ on OSX
Shell
| 1 2 3 4 | $ cd ~ $ git clone https://github.com/Itseez/opencv_contrib $ cd opencv_contrib $ git checkout 3.0.0 |
Note: We don’t have to pull down the opencv_contrib repo if we don’t want to. OpenCV will compile and install just fine without it. But if you compile OpenCV without opencv_contrib , be warned that you’ll be missing out on some pretty important features, which will become very obvious, very fast, especially if you’re used to working with the 2.4.X version of OpenCV.
Step 8:
Let’s setup our OpenCV build by creating the build directory:Install OpenCV 3.0 and Python 2.7+ on OSX
Shell
| 1 2 3 | $ cd ~/opencv $ mkdir build $ cd build |
Install OpenCV 3.0 and Python 2.7+ on OSX
Shell
| 1 2 3 4 5 6 7 | $ cmake -D CMAKE_BUILD_TYPE=RELEASE -D CMAKE_INSTALL_PREFIX=/usr/local \ -D PYTHON2_PACKAGES_PATH=~/.virtualenvs/cv/lib/python2.7/site-packages \ -D PYTHON2_LIBRARY=/usr/local/Cellar/python/2.7.10/Frameworks/Python.framework/Versions/2.7/bin \ -D PYTHON2_INCLUDE_DIR=/usr/local/Frameworks/Python.framework/Headers \ -D INSTALL_C_EXAMPLES=ON -D INSTALL_PYTHON_EXAMPLES=ON \ -D BUILD_EXAMPLES=ON \ -D OPENCV_EXTRA_MODULES_PATH=~/opencv_contrib/modules .. |
CMAKE_BUILD_TYPE : This option indicates that we are building a release binary of OpenCV.
CMAKE_INSTALL_PREFIX : The base directory where OpenCV will be installed.
PYTHON2_PACKAGES_PATH : The explicit path to where our site-packages directory lives in our cv virtual environment.
PYTHON2_LIBRARY : Path to our Hombrew installation of Python.
PYTHON2_INCLUDE_DIR : The path to our Python header files for compilation.
INSTALL_C_EXAMPLES : Indicate that we want to install the C/C++ examples after compilation.
INSTALL_PYTHON_EXAMPLES : Indicate that we want to install the Python examples after complication.
BUILD_EXAMPLES : A flag that determines whether or not the included OpenCV examples will be compiled or not.
OPENCV_EXTRA_MODULES_PATH : This option is extremely important — here we supply the path to the opencv_contrib repo that we pulled down earlier, indicating that OpenCV should compile the extra modules as well.
Update (3 January 2016): In order to build OpenCV 3.1.0 , you need to set -DINSTALL_C_EXAMPLES=OFF (rather than ON ) in the cmake command. There is a bug in the OpenCV v3.1.0 CMake build script that can cause errors if you leave this switch on. Once you set this switch to off, CMake should run without a problem.
Whew, that was a lot of options.
Trust me, it’s a lot easier installing OpenCV 3.0 on Ubuntu where these options are automatically determined via CMake for us.
But when using OSX you’ll need to explicitly define the PYTHON2_PACKAGES_PATH ,PYTHON2_LIBRARY , and PYTHON2_INCLUDE_DIR yourself. It’s a real pain, but if you don’t, your compile will fail.
Here’s an example of what my CMake output looks like:
Figure 2: Before compiling OpenCV 3.0 on your OSX system, make sure that cmake has picked up the correct Python interpreter, library, numpy version, and packages path.
Notice how the Python 2 Interpreter, Libraries, numpy version, and packages path have been correctly picked up.
You’ll also want to make sure that python2 is in the list of modules To be built, like this:
Figure 2: Ensuring the “python2” module is in our list of modules “To be built”.
If it python2 is not in this list, and is in the Unavailable list, then you need to go back to the CMake step and ensure that you have correctly supplied your PYTHON2_PACKAGES_PATH ,PYTHON2_LIBRARY , and PYTHON2_INCLUDE_DIR .
Now that CMake has properly configured the build, we can compile OpenCV:
Install OpenCV 3.0 and Python 2.7+ on OSX
Shell
| 1 | $ make -j4 |
Figure 3: OpenCV 3.0 with Python 2.7+ support compiling on my system.
And assuming that OpenCV compiled without error, you can now install it on your OSX system:
Install OpenCV 3.0 and Python 2.7+ on OSX
Shell
| 1 | $ make install |
Install OpenCV 3.0 and Python 2.7+ on OSX
Shell
| 1 | $ sudo make install |
Step 9:
Assuming you’ve made it this far, let’s perform a sanity check and ensure OpenCV is installed:Install OpenCV 3.0 and Python 2.7+ on OSX
Shell
| 1 2 3 | $ cd ~/.virtualenvs/cv/lib/python2.7/site-packages/ $ ls -l cv2.so -rwxr-xr-x 1 adrian staff 2013052 Jun 5 15:20 cv2.so |
As a quick note, you’ll be able to find the cv2.so file (which is your OpenCV bindings) in yourbuild/lib directory as well.
Let’s verify our install by firing up a shell and importing OpenCV:
Install OpenCV 3.0 and Python 2.7+ on OSX
Shell
| 1 2 3 4 5 6 7 | (cv)annalee:~ adrianrosebrock$ python Python 2.7.8 (default, Jul 31 2014, 15:41:09) [GCC 4.2.1 Compatible Apple LLVM 5.1 (clang-503.0.40)] on darwin Type "help", "copyright", "credits" or "license" for more information. >>> import cv2 >>> cv2.__version__ '3.0.0' |
Congrats, you have now installed OpenCV 3.0 and Python 2.7+ on your OSX system!
Step 10:
After all this work, let’s give our OpenCV 3.0 install a test drive!Most of my work in computer vision involves image search engines, or more formally, Content-based Image Retrieval. A critical step of CBIR is extracting features to quantify and abstractly represent the contents of an image.
OpenCV 3.0 has numerous updates and changes, but perhaps my personal favorite is an implementation of AKAZE features — Fast Explicit Diffusion for Accelerated Features in Nonlinear Scale Spaces by Alcantarilla et al.
Since Jurassic World was just released (and Jurassic Park is my favorite movie of all time), let’s explore how we can compute and extract AKAZE features from the following image:
Figure 4: Our Jurassic World test image that we are going to detect keypoints and extract features in using AKAZE.
Open up a new file, name it test_akaze.py , and insert the following code:
Install OpenCV 3.0 and Python 2.7+ on OSX
Python
| 1 2 3 4 5 6 7 8 9 10 11 12 13 14 15 16 17 18 19 | # import the necessary packages from __future__ import print_function import cv2 # load the image and convert it to grayscale image = cv2.imread("jurassic_world.jpg") gray = cv2.cvtColor(image, cv2.COLOR_BGR2GRAY) cv2.imshow("Original", image) # initialize the AKAZE descriptor, then detect keypoints and extract # local invariant descriptors from the image detector = cv2.AKAZE_create() (kps, descs) = detector.detectAndCompute(gray, None) print("keypoints: {}, descriptors: {}".format(len(kps), descs.shape)) # draw the keypoints and show the output image cv2.drawKeypoints(image, kps, image, (0, 255, 0)) cv2.imshow("Output", image) cv2.waitKey(0) |
Install OpenCV 3.0 and Python 2.7+ on OSX
Shell
| 1 2 | $ python test_akaze.py keypoints: 762, descriptors: (762, 61) |
Figure 5: We have successfully been able to detect keypoints, extract AKAZE features, and then draw the keypoints on our image using OpenCV 3.0 and Python 2.7+!
Notice how we have been able to detect keypoints and extract AKAZE features in our image!
Obviously we need to do a lot more work than this to build a useful project using AKAZE features — but this example demonstrates that (1) our OpenCV 3.0 install is working, and (2) we are able to use a unique OpenCV 3.0 feature using Python 2.7.
Summary
OpenCV 3.0 is finally here! And to celebrate the OpenCV 3.0 release, we are going to performing an OpenCV 3.0 install-fest for both Python 2.7+ and Python 3+ on a variety of operating systems including OSX, Ubuntu, and the Raspberry Pi!This article kicked-off the install fest by detailing how to setup and install OpenCV 3.0 and Python 2.7+ on the OSX operating system.
Next week, we’ll be moving over to Ubuntu and detailing the instructions to get OpenCV 3.0 and Python 2.7 installed on Ubuntu 14.04+ (hint: it’s much easier than OSX).
Anyway, I hope you enjoyed this post and found it useful!
Please consider subscribing to the PyImageSearch Newsletter by entering your email address in the form below — I’ll be sending out updates as new OpenCV 3.0 + Python install instructions are released!

相关文章推荐
- Install OpenCV 3.0 and Python 2.7+ on OSX
- Install OpenCV 3.0 and Python 2.7+ on Ubuntu
- Install OpenCV 3.0 and Python 2.7+ on OSX
- install opencv3 with python2.7 bindings on Mac using Hombrew and git
- How to Install OpenCV 3.0 and Python 3.4+ on Ubuntu
- Install OpenCV 3.0 and Python 2.7+ on Ubuntu
- windowsXP+python2.7+openCV3.0环境搭建
- install opencv 3.0.0 with python 3.4 on Mac using Homebrew and Git
- caffe--ubuntu14.04.04+cuda7.5+opencv3.0+python2.7(Anaconda)+matlab(笔记本双显卡,独显为NVIDIA1060)
- ubuntu 16.04 and python 3.5.2 INSTALL OpenCV3.3 with 1 line code
- Python 2.7 (64 bit )下安装 OpenCV 3.0
- Ubuntu14.04 安装配置Opencv3.0和Python2.7
- Ubuntu 14.04下OpenCV 3.0+Python 2.7安装测试
- Ubuntu14.04 安装配置Opencv3.0和Python2.7
- ubuntu14.04+opencv 3.0+python2.7安装及测试
- Ubuntu 14.04下OpenCV 3.0+Python 2.7安装测试
- How to install Python 2.7 and Python 3.3 on CentOS 6
- ubuntu14.04下安装OpenCV 3.0 +Python 2.7
- Ubuntu 16.04编译Opencv 3.4 (For python2.7 and python3.5)
- Install Rouge and Pyrouge for python 2.7 (conda virtual env) on Linux 64