Ubunt Server 14.04 安装 Zimbra 邮件服务器
2017-06-21 10:41
232 查看
我的Ubuntu Server是安装在虚拟机上的,安装系统服务时,只选择SSH服务,等待系统安装完成。
点我试试
2. 修改hosts,vi /etc/hosts
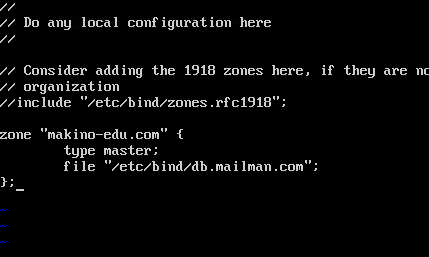
2. 添加zone:
vi /etc/bind/named.conf.local
3. 根据
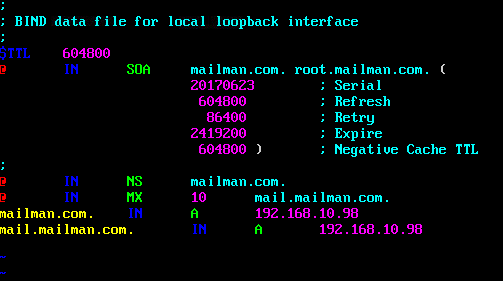
vi /etc/bind/db.mailman.com
4. 设置DNS
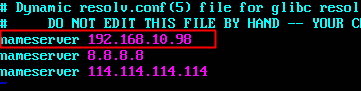
vi /etc/resolv.conf,增加
【注意】
需要在/etc/network/interfaces同时添加一行
如果没有,系统重启后,resolv.conf会被重写,导致设置无效。
5. 启动bind9服务
注意:配置文件中行首是用Tab键分隔,不是用空格!
我配置好后,启动bind服务报错[fail],
后来用
重新修改
6. 测试
1. 在windows平台,点我下载 选择对应的版本(开源版本),然后FileZilla传给Ubuntu
2. 在Ubuntu 的命令行:
如果提示
2. 将 .tgz 压缩包复制到你希望的文件目录下,tar解压,cd进入安装目录
3. 安装
开始
如果你的网速不够快,你会以为系统挂了……
根据提示实际情况确认,我这里输入
根据提示实际情况确认,我这里输入
意思是端口冲突。解决方法:
再开一个远程登录关闭postfix
我这里直接回车跳过
输入
设置
重新进入
等待……
在浏览器输入
Zimbra邮件服务器,相当的吃内存
一、首先配置网络环境,保证Ubuntu Server能够正常上网。
1. 设置静态IP地址 vi /etc/network/interfaces点我试试
2. 修改hosts,vi /etc/hosts
192.168.10.98   mail.mailman.com    mail
// 我的Ubuntu主机名是mail
二、 安装配置bind
1. 安装bind9apt-get install bind9 如果提示没有包,就要更新Ubuntu的安装源 apt-get update apt-get upgrade
2. 添加zone:
vi /etc/bind/named.conf.local
3. 根据
named.conf.local中的路径创建
db.mymails.com
vi /etc/bind/db.mailman.com
4. 设置DNS
vi /etc/resolv.conf,增加
【注意】
需要在/etc/network/interfaces同时添加一行
nameserver 192.168.10.98。
如果没有,系统重启后,resolv.conf会被重写,导致设置无效。
5. 启动bind9服务
service bind9 restart
注意:配置文件中行首是用Tab键分隔,不是用空格!
我配置好后,启动bind服务报错[fail],
后来用
named -g检查,提示
unkonwn option forwardrs,
重新修改
named.conf.options文件,将
8.8.8.8前面的空格改为Tab后重新启动bind9服务正常。
6. 测试
host mail.mailman.com
四、下载Zimbra的安装包
两种方式:1. 在windows平台,点我下载 选择对应的版本(开源版本),然后FileZilla传给Ubuntu
2. 在Ubuntu 的命令行:
wget https://files.zimbra.com/downloads/8.7.11_GA/zcs-8.7.11_GA_1854.UBUNTU14_64.20170531151956.tgz
五、安装Zimbra
1. 安装一些必备的Zimbra依赖库(如果不安装依赖库,在后面install时也会被提示中止安装)apt-get install sudo libgmp3c2 libpcre3 libgmp3-dev sysstat libexpat1 wget netcat-openbsd pax sqlite3 apt-get remove sendmail sendmail-bin
如果提示
Unable to locate package libgmp3c2,单独下载安装:
wget http://th.archive.ubuntu.com/ubuntu/pool/universe/g/gmp4/libgmp3c2_4.3.2+dfsg-2ubuntu1_amd64.deb
dpkg -i libgmp3c2_4.3.2+dfsg-2ubuntu1_amd64.deb
2. 将 .tgz 压缩包复制到你希望的文件目录下,tar解压,cd进入安装目录
tar xzvf zcs*
cd zcs*
3. 安装
./install.sh
Do you agree with the terms of the software license agreement?–输入
Y
Use Zimbra's package repository [Y]– 一开始输入
Y不能下载安装包,后来输入
N成功了
Select the packages to install– 全部输入
Y
The system will be modified. Continue?– 输入
Y
开始
Downloading packages,进入漫长的等待……
如果你的网速不够快,你会以为系统挂了……
It is suggested that the hostname be resolvable via DNS
Change hostname [Yes]
根据提示实际情况确认,我这里输入
no
It is suggested that the domain name an MX record configured in DNS
Change domain name? [Yes]
根据提示实际情况确认,我这里输入
yes改成
mailman.com
Checking for port conflicts
Port conflict detected: 53 (zimbra-dnscache)
Port conflict detected: 53 (zimbra-dnscache)
Port conflict detected: 53 (zimbra-dnscache)
port conflict detected! Press Enter/Return key to continue
意思是端口冲突。解决方法:
再开一个远程登录关闭postfix
/etc/init.d/postfix stop
我这里直接回车跳过
输入
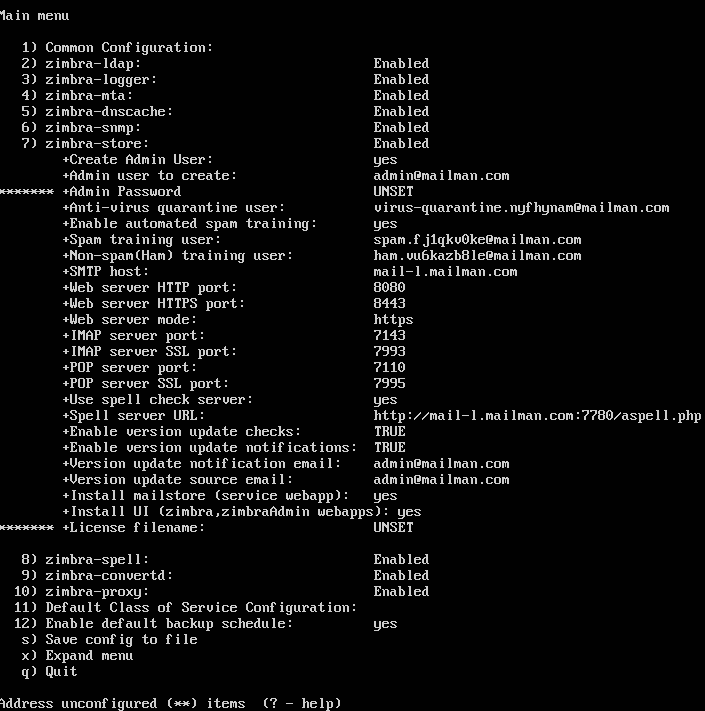
7选择
zimbra-store
设置
Admin Password后输入
r
重新进入
Main menu,提示
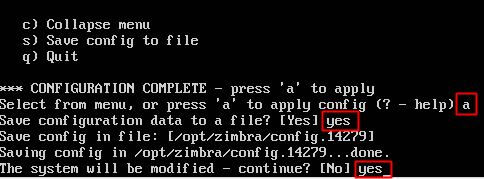
apply config,输入
a
等待……
Notify Zimbra of your installation? [Yes]–输入
NO
Configuration complete - press return to exit回车
reboot重启系统
在浏览器输入
https://192.168.10.98
Zimbra邮件服务器,相当的吃内存

相关文章推荐
- Zimbra邮件服务器的安装与配置
- ubuntu server 14.04编译安装bluez5.18
- 在虚拟机安装 Linux Server (ubuntu-14.04-server)
- Ubunt 14.04 lts 安装 workbench及相关错误解决
- Ubuntu14.04 安装MySQL 及Can‘t connect to local MYSQL server through socket ’/var/run/mysqld/mysqld.sock‘ (2)
- 安装搭建zimbra邮件服务器(dns域名解析)
- 在Ubuntu Server 14.04 LTS版上以git方式源码安装Odoo8.0
- ubuntu 14.04 server (x64) LTS 安装 virtualbox + phpvirtualbox
- 服务器windows server 2008 R2下安装Centos6.4 x86_64位 Ubuntu server14.04尝试
- 虚拟机安装Ubuntu14.04打开FireFox提示Server not found
- ubuntu server 14.04手动安装svn
- 在Ubuntu 14.04 64bit上编译安装Crtmpserver trunk svn 811版本!
- Ubuntu 14.04 64bit上编译安装simple-rtmp-server(srs)服务器
- ubuntu14.04安装openldapserver
- Ubuntu 14.04 安装TFTP server
- Zimbra8.x邮件服务器安装及配置
- ubuntu-14.04-server配置Jexus --安装步骤记录
- 在 Ubuntu 14.04 Server 上安装部署 Ruby on Rails 应用
- Ubuntu14.04server 下安装samba
- 虚拟机安装Ubuntu14.04打开FireFox提示Server not found