android布局优化之<merge>标签的使用
2017-06-21 07:46
295 查看
学习android知识,却经常忘记,是应该把知识总结为文字. -2017年6月21日07:51:19
1,<merge>标签的作用
<merge />标签用于减少View树的层次来优化Android的布局.通过一个例子来理解这句话:
建立mergelayout.xml,作为Activity的布局:
<?xml version="1.0" encoding="utf-8"?>
<FrameLayout xmlns:android="http://schemas.android.com/apk/res/android"
android:layout_width="match_parent"
android:layout_height="match_parent">
<ImageView
android:layout_width="match_parent"
android:layout_height="match_parent"
android:src="@mipmap/ic_launcher"
android:scaleType="fitXY"/>
<TextView
android:layout_width="wrap_content"
android:layout_height="wrap_content"
android:text="GreenRobot"
android:layout_marginBottom="20dp"
android:textColor="#000"
android:background="#22000000"
android:padding="12dp"
android:layout_gravity="center_horizontal|bottom"/>
</FrameLayout>
运行一下效果图:

使用sdk/tools/里的工具monitor.bat,点击Dump View Hierarchy for UI Automator按钮,查看这部分的视图结构:

可以看到xml中的FrameLayout节点上面还有一个FrameLayout节点,这个xml中的FrameLayout节点其实是个无用的父节点(Useless parent),白白增加了布局的层级.
那么怎么办呢?这就是<merge>标签派上用场的时候了.当LayoutInflater遇见<merge>标签时,就会跳过<merge>标签并且把<merge>标签的子view添加到<merge>标签的父view中.修改mergelayout.xml布局,替换根节点<FrameLayout>为<merge>,如下:
<?xml version="1.0" encoding="utf-8"?>
<merge xmlns:android="http://schemas.android.com/apk/res/android">
<ImageView
android:layout_width="match_parent"
android:layout_height="match_parent"
android:src="@mipmap/ic_launcher"
android:scaleType="fitXY"/>
<TextView
android:layout_width="wrap_content"
android:layout_height="wrap_content"
android:text="GreenRobot"
android:layout_marginBottom="20dp"
android:textColor="#000"
android:background="#22000000"
android:padding="12dp"
android:layout_gravity="center_horizontal|bottom"/>
</merge>
查看视图结构:

可以发现那个useless parent不见了,这就是达到了<merge />标签用于减少View树的层次来优化Android的布局的效果.
2,<merge>标签什么时候用
2.1,当你发现了useless parent时,使用<merge>标签
例子见1中的例子.2.2,<merge>标签和<include>标签配合使用,弥补<include>标签的不足
2.3,当创建一个自定义组合控件时,使用<merge>标签
例子如下:最终的效果图是:

底部的两个按钮是一个自定义组合控件OkCancelBar,代码如下
public class OkCancelBar extends LinearLayout {
public OkCancelBar(Context context) {
this(context, null);
}

public OkCancelBar(Context context, @Nullable AttributeSet attrs) {
super(context, attrs);

setOrientation(HORIZONTAL);
setGravity(Gravity.CENTER);
setWeightSum(1.0f);

LayoutInflater.from(context).inflate(R.layout.okcancel_bar, this, true);

TypedArray typedArray = context.obtainStyledAttributes(attrs, R.styleable.OkCancelBar, 0, 0);
// 获取xml中设置的属性值
String okLabel = typedArray.getString(R.styleable.OkCancelBar_okLabel);
String cancelLabel = typedArray.getString(R.styleable.OkCancelBar_cancelLabel);
// 获取控件
Button btnOk = (Button) findViewById(R.id.okcancelbar_ok);
Button btnCancel = (Button) findViewById(R.id.okcancelbar_cancel);
// 给控件设置值
btnOk.setText(okLabel == null ? "Ok" : okLabel);
btnCancel.setText(cancelLabel == null ? "Cancel" : cancelLabel);
typedArray.recycle();
}
}对应的layout/okcancel_bar.xml为<?xml version="1.0" encoding="utf-8"?> <merge xmlns:android="http://schemas.android.com/apk/res/android"> <include android:id="@+id/okcancelbar_ok" layout="@layout/okcancelbar_button"/> <include android:id="@+id/okcancelbar_cancel" layout="@layout/okcancelbar_button"/> </merge>
对应的layout/okcancelbar_button.xml为
<?xml version="1.0" encoding="utf-8"?>
<Button xmlns:android="http://schemas.android.com/apk/res/android"
android:layout_width="wrap_content"
android:layout_height="wrap_content"
xmlns:tools="http://schemas.android.com/tools"
android:textSize="18sp"
tools:text="AAAAA">

</Button>
自定义控件的attrs.xml文件为
<?xml version="1.0" encoding="utf-8"?>
<resources>
<declare-styleable name="OkCancelBar">
<attr name="okLabel" format="string"/>
<attr name="cancelLabel" format="string"/>
</declare-styleable>
</resources>
作为Activity布局的mergelayout.xml为
<?xml version="1.0" encoding="utf-8"?>
<merge xmlns:android="http://schemas.android.com/apk/res/android"
xmlns:okCancelBar="http://schemas.android.com/apk/res-auto">
<ImageView
android:layout_width="match_parent"
android:layout_height="match_parent"
android:scaleType="fitXY"
android:src="@mipmap/ic_launcher" />
<com.android.demo.OkCancelBar
android:layout_width="match_parent"
android:layout_height="wrap_content"
android:layout_gravity="bottom"
android:paddingTop="8dp"
android:gravity="center_horizontal"
android:background="#AA000000"
okCancelBar:okLabel="Save"
okCancelBar:cancelLabel="Don't save" >

</com.android.demo.OkCancelBar>
</merge>
代码贴完了,分析一下:
利用monitor.bat工具,切换到Hierachy View下,查看Tree View,截图如下(只截取了与分析相关的内容):
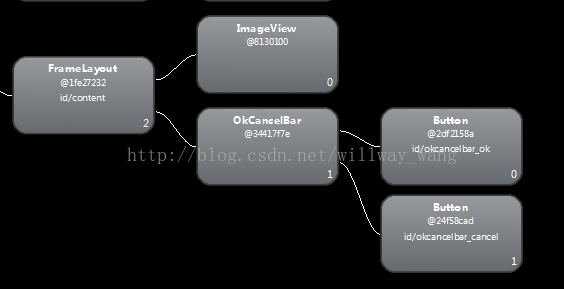
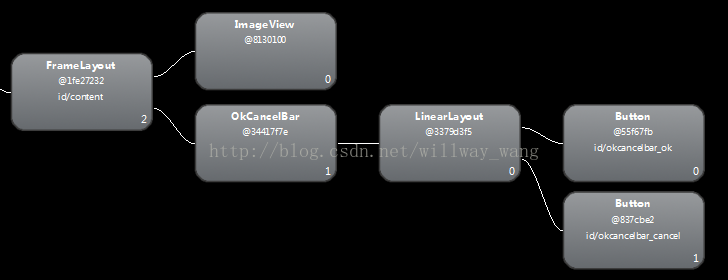
如果把okcancelbar.xml根节点改为LinearLayout:
<?xml version="1.0" encoding="utf-8"?>
<LinearLayout xmlns:android="http://schemas.android.com/apk/res/android"
android:layout_width="wrap_content"
android:layout_height="wrap_content">

<include
android:id="@+id/okcancelbar_ok"
layout="@layout/okcancelbar_button"/>

<include
android:id="@+id/okcancelbar_cancel"
layout="@layout/okcancelbar_button"/>
</LinearLayout>
再看一下Tree View视图,可以看到多出了LinearLayout节点,增加了视图层级:
3,使用&l
4000
t;merge>标签需要注意的地方
3.1,merge标签只能作为复用布局的root元素来使用.3.2,当Inflate以<merge />开头的布局文件时,必须指定一个父ViewGroup,并且必须设定attachToRoot为true。
参考资料:
1,http://www.tuicool.com/articles/jyyUV33
2,http://blog.csdn.net/xyz_lmn/article/details/14524567

相关文章推荐
- Android布局优化 之 <merge>标签使用详解
- Android布局优化 之 <merge>标签简单使用
- Android中View绘制优化二一---- 使用<include />标签复用布局文件
- Android中View绘制优化二一---- 使用<include />标签复用布局文件
- Android中View绘制优化二一---- 使用<include />标签复用布局文件
- Android中View绘制优化二一---- 使用<include />标签复用布局文件
- android布局优化之<include>标签的使用
- Android布局优化之<merge>与<ViewStub>标签使用
- 性能优化之布局优化篇二 使用<merge>标签
- (转)Android中View绘制优化二一---- 使用<include />标签复用布局文件
- android 布局优化——<include>的是使用
- Android UI 优化 使用<include/>和 <merge />标签
- android 布局优化标签<include/>、<merge />、<ViewStub />
- Android最佳性能实践——布局优化技巧之<include>、<merge>标签及仅在需要时才加载布局的:ViewStub
- Android UI 优化 使用<include/>和 <merge />标签
- Android UI 优化 使用<include/>和 <merge />标签
- Android UI 优化 使用<include/>和 <merge />标签
- android布局标签<include />使用
- Android UI 优化 使用<include/>和 <merge />标签
- android_应用开发之(使用<include>标签重用布局)