分布式文件系统--------GlusterFS最佳实战 推荐
2017-06-15 17:49
477 查看
1. 背景
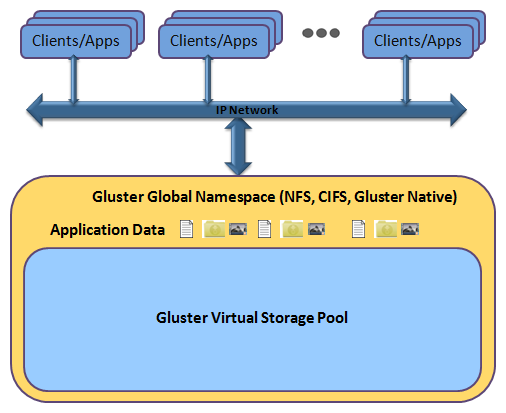
GlusterFS 是一个开源的分布式文件系统,具有强大的横向扩展能力,通过扩展能够支持数PB存储容量和处理数千客户端。GlusterFS借助TCP/IP或InfiniBand RDMA(一种支持多并发链接的“转换线缆”技术)网络将物理分布的存储资源聚集在一起,使用单一全局命名空间来管理数据。GlusterFS基于可堆叠的用户空间设计,可为各种不同的数据负载提供优异的性能。
GlusterFS支持运行在任何标准IP网络上标准应用程序的标准客户端
2. 优势
* 线性横向扩展和高性能
* 高可用性
* 全局统一命名空间
* 弹性哈希算法和弹性卷管理
* 基于标准协议
* 完全软件实现(Software Only)
* 用户空间实现(User Space)
* 模块化堆栈式架构(Modular Stackable Architecture)
* 原始数据格式存储(Data Stored in Native Formats)
* 无元数据服务设计(No Metadata with the Elastic Hash Algorithm)

3. 环境
server_1 CentOS 7.2.1511 (Core) 192.168.60.201
server_2 CentOS 7.2.1511 (Core) 192.168.60.202
4. 安装
* server_1 安装centos-release-gluster
* server_1 安装 glusterfs-server
* server_2 安装centos-release-gluster
* server_2 安装 glusterfs-server
* server_2 启动 glusterfs-server 服务
5. 建立信任池 [ 信任单向建立即可 ]
* server_1 对 server_2 建立信任
* 查看信任池建立情况
6. 创建分布式卷
* server_1 和 server_2 创建数据存放目录
* 使用命令创建分布式卷,命名为test-volume
* 查看卷信息
* 启动卷
7. 创建复制卷 [ 对比Raid 1 ]
* server_1 和 server_2 创建数据存放目录
* 使用命令创建复制卷,命名为repl-volume
* 查看卷信息
* 启动卷
8. 创建条带卷 [ 对比Raid 0 ]
* server_1 和 server_2 创建数据存放目录
* 使用命令创建复制卷,命名为raid0-volume
* 查看卷信息
* 启动卷
9. 客户端应用
* 安装glusterfs-cli
* 创建挂载目录
* 挂载卷
10. 扩展卷
* 创建存放目录
* 扩展卷
* 重新均衡
11. 总结
以需求驱动技术,技术本身没有优略之分,只有业务之分。
GlusterFS 是一个开源的分布式文件系统,具有强大的横向扩展能力,通过扩展能够支持数PB存储容量和处理数千客户端。GlusterFS借助TCP/IP或InfiniBand RDMA(一种支持多并发链接的“转换线缆”技术)网络将物理分布的存储资源聚集在一起,使用单一全局命名空间来管理数据。GlusterFS基于可堆叠的用户空间设计,可为各种不同的数据负载提供优异的性能。
GlusterFS支持运行在任何标准IP网络上标准应用程序的标准客户端
2. 优势
* 线性横向扩展和高性能
* 高可用性
* 全局统一命名空间
* 弹性哈希算法和弹性卷管理
* 基于标准协议
* 完全软件实现(Software Only)
* 用户空间实现(User Space)
* 模块化堆栈式架构(Modular Stackable Architecture)
* 原始数据格式存储(Data Stored in Native Formats)
* 无元数据服务设计(No Metadata with the Elastic Hash Algorithm)
3. 环境
server_1 CentOS 7.2.1511 (Core) 192.168.60.201
server_2 CentOS 7.2.1511 (Core) 192.168.60.202
4. 安装
* server_1 安装centos-release-gluster
[root@server_1 ~]# yum install centos-release-gluster -y
* server_1 安装 glusterfs-server
[root@server_1 ~]# yum install glusterfs-server -y* server_1 启动 glusterfs-server 服务
[root@server_1 ~]# systemctl start glusterd
* server_2 安装centos-release-gluster
[root@server_2 ~]# yum install centos-release-gluster -y
* server_2 安装 glusterfs-server
[root@server_2 ~]# yum install glusterfs-server -y
* server_2 启动 glusterfs-server 服务
[root@server_2 ~]# systemctl start glusterd
5. 建立信任池 [ 信任单向建立即可 ]
* server_1 对 server_2 建立信任
[root@server_1 ~]# gluster peer probe 192.168.60.202
peer probe: success.
* 查看信任池建立情况
[root@server_1 ~]# gluster peer status
Number of Peers: 1

Hostname: 192.168.60.202
Uuid: 84d98fd8-4500-46d3-9d67-8bafacb5898b
State: Peer in Cluster (Connected)

[root@server_2 ~]# gluster peer status
Number of Peers: 1

Hostname: 192.168.60.201
Uuid: 20722daf-35c4-422c-99ff-6b0a41d07eb4
State: Peer in Cluster (Connected)
6. 创建分布式卷
* server_1 和 server_2 创建数据存放目录
[root@server_1 ~]# mkdir -p /data/exp1
[root@server_2 ~]# mkdir -p /data/exp2
* 使用命令创建分布式卷,命名为test-volume
[root@server_1 ~]# gluster volume create test-volume 192.168.60.201:/data/exp1 192.168.60.202:/data/exp2 force
volume create: test-volume: success: please start the volume to access data
* 查看卷信息
[root@server_1 ~]# gluster volume info test-volume

Volume Name: test-volume
Type: Distribute
Volume ID: 457ca1ff-ac55-4d59-b827-fb80fc0f4184
Status: Created
Snapshot Count: 0
Number of Bricks: 2
Transport-type: tcp
Bricks:
Brick1: 192.168.60.201:/data/exp1
Brick2: 192.168.60.202:/data/exp2
Options Reconfigured:
transport.address-family: inet
nfs.disable: on

[root@server_2 ~]# gluster volume info test-volume

Volume Name: test-volume
Type: Distribute
Volume ID: 457ca1ff-ac55-4d59-b827-fb80fc0f4184
Status: Created
Snapshot Count: 0
Number of Bricks: 2
Transport-type: tcp
Bricks:
Brick1: 192.168.60.201:/data/exp1
Brick2: 192.168.60.202:/data/exp2
Options Reconfigured:
transport.address-family: inet
nfs.disable: on
* 启动卷
[root@server_1 ~]# gluster volume start test-volume
volume start: test-volume: success
7. 创建复制卷 [ 对比Raid 1 ]
* server_1 和 server_2 创建数据存放目录
[root@server_1 ~]# mkdir -p /data/exp3
[root@server_2 ~]# mkdir -p /data/exp4
* 使用命令创建复制卷,命名为repl-volume
[root@server_1 ~]# gluster volume create repl-volume replica 2 transport tcp 192.168.60.201:/data/exp3 192.168.60.202:/data/exp4 force
volume create: repl-volume: success: please start the volume to access data
* 查看卷信息
[root@server_1 ~]# gluster volume info repl-volume

Volume Name: repl-volume
Type: Replicate
Volume ID: 1924ed7b-73d4-45a9-af6d-fd19abb384cd
Status: Created
Snapshot Count: 0
Number of Bricks: 1 x 2 = 2
Transport-type: tcp
Bricks:
Brick1: 192.168.60.201:/data/exp3
Brick2: 192.168.60.202:/data/exp4
Options Reconfigured:
transport.address-family: inet
nfs.disable: on

[root@server_2 ~]# gluster volume info repl-volume

Volume Name: repl-volume
Type: Replicate
Volume ID: 1924ed7b-73d4-45a9-af6d-fd19abb384cd
Status: Created
Snapshot Count: 0
Number of Bricks: 1 x 2 = 2
Transport-type: tcp
Bricks:
Brick1: 192.168.60.201:/data/exp3
Brick2: 192.168.60.202:/data/exp4
Options Reconfigured:
transport.address-family: inet
nfs.disable: on
* 启动卷
[root@server_1 ~]# gluster volume start repl-volume
volume start: repl-volume: success
8. 创建条带卷 [ 对比Raid 0 ]
* server_1 和 server_2 创建数据存放目录
[root@server_1 ~]# mkdir -p /data/exp5
[root@server_2 ~]# mkdir -p /data/exp6
* 使用命令创建复制卷,命名为raid0-volume
[root@server_1 ~]# gluster volume create raid0-volume stripe 2 transport tcp 192.168.60.201:/data/exp5 192.168.60.202:/data/exp6 force
volume create: raid0-volume: success: please start the volume to access data
* 查看卷信息
[root@server_1 ~]# gluster volume info raid0-volume

Volume Name: raid0-volume
Type: Stripe
Volume ID: 13b36adb-7e8b-46e2-8949-f54eab5356f6
Status: Created
Snapshot Count: 0
Number of Bricks: 1 x 2 = 2
Transport-type: tcp
Bricks:
Brick1: 192.168.60.201:/data/exp5
Brick2: 192.168.60.202:/data/exp6
Options Reconfigured:
transport.address-family: inet
nfs.disable: on

[root@server_2 ~]# gluster volume info raid0-volume

Volume Name: raid0-volume
Type: Stripe
Volume ID: 13b36adb-7e8b-46e2-8949-f54eab5356f6
Status: Created
Snapshot Count: 0
Number of Bricks: 1 x 2 = 2
Transport-type: tcp
Bricks:
Brick1: 192.168.60.201:/data/exp5
Brick2: 192.168.60.202:/data/exp6
Options Reconfigured:
transport.address-family: inet
nfs.disable: on
* 启动卷
[root@server_1 ~]# gluster volume start raid0-volume
volume start: raid0-volume: success
9. 客户端应用
* 安装glusterfs-cli
[root@client ~]# yum install glusterfs-cli -y
* 创建挂载目录
[root@client ~]# mkdir /mnt/g1 /mnt/g2 /mnt/g3
* 挂载卷
[root@server_1 ~]# mount.glusterfs 192.168.60.201:/test-volume /mnt/g1
[root@server_1 ~]# mount.glusterfs 192.168.60.202:/repl-volume /mnt/g2
[root@server_1 ~]# mount.glusterfs 192.168.60.201:/raid0-volume /mnt/g3
10. 扩展卷
* 创建存放目录
[root@server_1 ~]# mkdir -p /data/exp9
* 扩展卷
[root@server_1 ~]# gluster volume add-brick test-volume 192.168.60.201:/data/exp9 force
volume add-brick: success
* 重新均衡
[root@server_1 ~]# gluster volume rebalance test-volume start
volume rebalance: test-volume: success: Rebalance on test-volume has been started successfully. Use rebalance status command to check status of the rebalance process.
ID: 008c3f28-d8a1-4f05-b63c-4543c51050ec
11. 总结
以需求驱动技术,技术本身没有优略之分,只有业务之分。

相关文章推荐
- maven3实战之坐标和依赖(最佳实践之归类依赖)
- 最佳食品推荐
- GlusterFS分布式文件系统
- 【ActionBar】Android ActionBar完全解析,使用官方推荐的最佳导航栏(上)
- 共享存储之分布式文件系统应用及MogileFS基础应用 推荐
- 实战CentOS 6.0+Nagios中文版+PNP+Nagios Web管理工具nagiosQL中文版 推荐
- 推荐系统实战 初学之路笔记(1)--推荐系统基本概念
- Android切近实战(三) 推荐
- [零基础学JAVA]Java SE实战开发-37.MIS信息管理系统实战开发[JDBC](1) 推荐
- 18 个最佳代码编辑器/IDE推荐
- 实战mysql的安装与复制 推荐
- 基于协同过滤的推荐引擎(实战部分)
- Android ActionBar完全解析使用官方推荐的最佳导航栏(上)
- 推荐几款最佳免费的图标集
- 苹果推荐并非最佳 iOS 11下的HEVC编码设置优化
- MySQL DDL操作--------自定义函数最佳实战
- 精心推荐 web开发人员必须知道的21个最佳web教程开发网站
- day62-Spark SQL下的Parquet使用最佳实践和代码实战
- 精通软件性能测试与LoadRunner最佳实战 连载七
- Android ActionBar完全解析,使用官方推荐的最佳导航栏(下)