Linux SPI 子系统驱动程序开发笔记
2017-06-11 22:32
176 查看
1.SPI协议:
SPI, Serial Perripheral Interface, 串行外围设备接口,
是Motorola公司推出的一种同步串行接口技术.主要实现CPU与EEPROM、FLASH、实时时钟、AD转换器等外设芯片的通讯。
采用主-从模式(Master-Slave) 的控制方式。Master 设备可以通过提供 Clock 以及对 Slave设备进行片选 (Slave Select) 来控制多个 Slave 设备, Slave则 设备本身不能产生或控制 Clock, 没有 Clock 则 Slave设备不能正常工作。
基于SPI总线的设备由MISO(串行数据输入)、MOSI(串行数据输出)、SCK(串行移位时钟)、CS(使能信号)4个信号线组成。
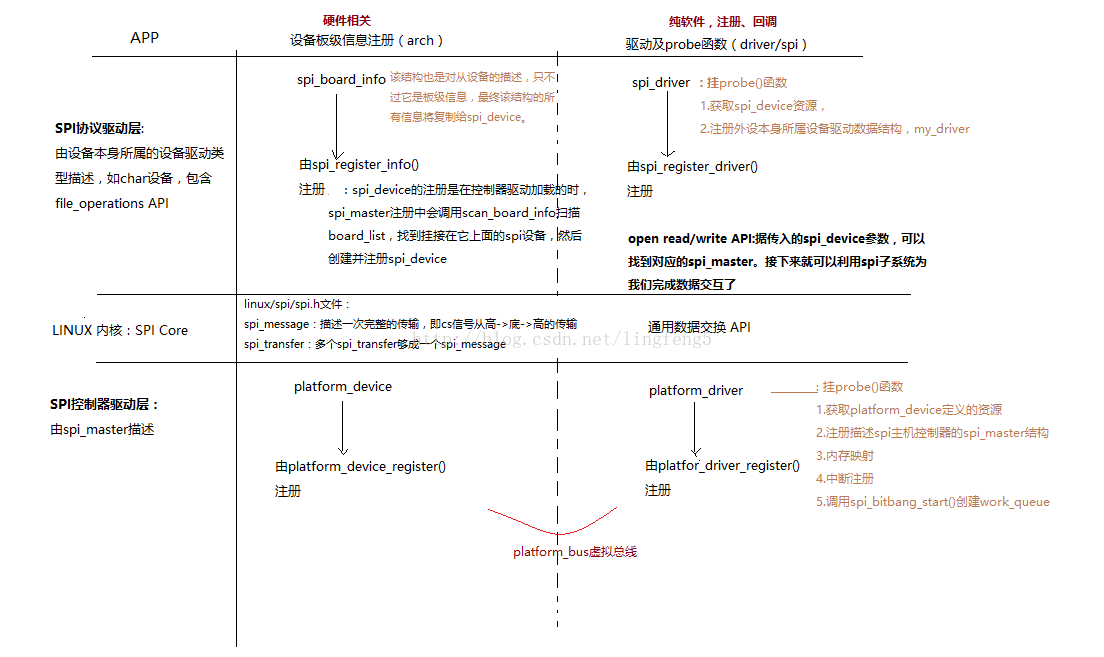
2.Linux SPI 子系统框架学习小结
SPI子系统采用分层分离的思想。

实现流程:
1.注册平台设备
2.注册平台驱动
.probe()函数中注册描述spi控制器的spi_master
3.注册spi设备:spi_board_info
4.注册spi_driver
.probe()函数中注册描述外设的设备结构体,如char设备
5.用户操作API实现。read()/write()
画了个流程图:
代码实例:转自博文——http://blog.chinaunix.NET/uid-25445243-id-4026974.html
需要将/WP和/HOLD管脚接电源。
发送地址或数据到设备时,MOSI管脚数据采样在CLK的上升沿,从芯片读数据或者状态时,MISO管脚数据采样在CLK
的下降沿,所以在设置SPI的工作模式时,必须设置为MODE0或者MODE3,本文设置为MODE3。
4KB、32KB、64KB,或者擦除整个芯片。整个芯片的存储空间如下图:

W25Q32BV存储空间分为sector和block。一个sector共有4KB,一个block共有32KB。一个sector存储空间如下图:

本文共支持四种擦除方式,分别如下:
1) cmd = 0x20,sector擦除,一次可以擦除4KB。芯片共有1024个sector。
2) cmd = 0x52,半个block擦除,一次可以擦除32KB。芯片共有128个半block。
3) cmd = 0xd8,block擦除,一次可以擦除64KB。芯片共有64个block。
4) cmd = 0xC7,芯片擦除,擦除整个芯片。
BIT0:busy flag,1:busy,0:free。
BIT1:write enable latch,1:write enable,0:write disable。
在从芯片接收数据时,首先往芯片写一个字节的0xff,然后就是需要读取的数据。
二、设备驱动
驱动程序时,首先需要对设备信息进行注册,具体内容如下:
点击(此处)折叠或打开
#if defined(CONFIG_SPI_FLASH_W25Q)
static struct gsc3280_spi_info w25q_spi1_dev_platdata = {
.cs_type = 1,
.pin_cs = 87,
.num_cs = 1,
.cs_value = 0,
.lsb_flg = 0,
.bits_per_word = 8,
};
#endif
static struct spi_board_info gsc3280_spi_devices[] = {
#if defined(CONFIG_SPI_FLASH_W25Q)
{
.modalias = "spi-w25q",
.bus_num = 1,
.chip_select = 2,
.mode = SPI_MODE_3,
.max_speed_hz = 5 * 1000 * 1000,
.controller_data = &w25q_spi1_dev_platdata,
},
#endif
};
static int __init gsc3280_spi_devices_init(void)
{
spi_register_board_info(gsc3280_spi_devices, ARRAY_SIZE(gsc3280_spi_devices));
return 0;
}
device_initcall(gsc3280_spi_devices_init);
点击(此处)折叠或打开
static struct spi_driver w25q_driver = {
.driver = {
.name = "spi-w25q",
.owner = THIS_MODULE,
},
//.id_table = w25q_ids,
.probe = w25q_probe,
.remove = __devexit_p(w25q_remove),
};
static int __init w25q_init(void)
{
return spi_register_driver(&w25q_driver);
}
static void __exit w25q_exit(void)
{
spi_unregister_driver(&w25q_driver);
}
module_init(w25q_init);
module_exit(w25q_exit);
由于W25Q32BV使用SPI接口,所以将其注册为SPI驱动,接下来看下探测函数w25q_probe,程序如下:
点击(此处)折叠或打开
static int __devinit w25q_probe(struct spi_device *spi)
{
int ret = 0;
struct w25q_dev *w25q;
DBG("############\n");
DBG("w25q spi flash probe start.\n");
w25q = kzalloc(sizeof(struct w25q_dev), GFP_KERNEL);
if (!w25q) {
DBG("!!!!kzalloc error!\n");
return -ENOMEM;
}
ret = spi_setup(spi);
if (ret != 0) {
DBG("!!!!setup error!\n");
return ret;
}
w25q->spi = spi;
mutex_init(&w25q->mlock);
strlcpy(w25q->name, W25Q_SPI_FLASH_NAME, sizeof(w25q->name));
ret = alloc_chrdev_region(&w25q->devt, 0, W25Q_MAX_MINOR, "w25q");
if (ret < 0) {
DBG("!!!!%s: failed to allocate char dev region!\n", __FILE__);
goto err_kzall;
}
w25q->dev.devt = MKDEV(MAJOR(w25q->devt), 1);
cdev_init(&w25q->cdev, &w25q_fops);
w25q->cdev.owner = THIS_MODULE;
ret = cdev_add(&w25q->cdev, w25q->devt, 1);
if (ret) {
DBG("!!!!cdev add error!\n");
goto err_alloc;
}
w25q->class = class_create(THIS_MODULE, "w25q-spi");
if (IS_ERR(w25q->class)) {
DBG("!!!!failed in create w25q spi flash class!\n");
goto err_alloc;;
}
device_create(w25q->class, NULL, w25q->devt, NULL, "w25q");
dev_set_drvdata(&spi->dev, w25q);
DBG("w25q spi flash probe success.\n");
DBG("############\n");
return 0;
err_alloc:
unregister_chrdev_region(w25q->devt, W25Q_MAX_MINOR);
err_kzall:
kfree(w25q);
printk(KERN_ERR "!!!!!!w25q spi flash probe error.!!!!!!\n");
return ret;
}
说明:
1) 首先申请设备驱动结构体。
2) 调用spi_setup(spi)函数对设备信息初始化。
3) 初始化设备驱动结构体成员变量。
4) 创建/dev目录下操作文件,操作函数集为w25q_fops。
5) 将设备驱动结构体中的链表插入本文件全局链表w25q_device_list中,以便在函数操作集的open函数中找到设备驱动结构体。
remove函数是探测函数的相反过程,具体程序如下:
点击(此处)折叠或打开
static int __devexit w25q_remove(struct spi_device *spi)
{
struct w25q_dev *w25q = dev_get_drvdata(&spi->dev);
cdev_del(&w25q->cdev);
unregister_chrdev_region(w25q->devt, W25Q_MAX_MINOR);
device_destroy(w25q->class, w25q->devt);
class_destroy(w25q->class);
kfree(w25q);
return 0;
}
点击(此处)折叠或打开
static const struct file_operations w25q_fops = {
.owner = THIS_MODULE,
.open = w25q_open,
.write = w25q_write,
.unlocked_ioctl = w25q_ioctl,
.read = w25q_read,
.llseek = w25q_llseek,
.release = w25q_release,
};
接下来我们一一讲述。
首先看下open函数w25q_open,具体程序如下:
点击(此处)折叠或打开
static int w25q_open(struct inode *inode, struct file *file)
{
struct w25q_dev *w25q = container_of(inode->i_cdev, struct w25q_dev, char_cdev);
if (test_and_set_bit(W25Q_BIT_LOCK_OPEN, &w25q->bit_lock)) {
DBG("!!!!w25q open err, busy!\n");
return -EBUSY;
}
file->private_data = w25q;
return 0;
}
说明:
1) 通过container_of找到在探测函数w25q_probe中定义的设备驱动结构体。
2) 测试并且设置忙标志,如果测试忙,直接忙退出。
3) 将找到的设备驱动结构体指针指向file->private_data,在函数操作集的其他函数中就可以使用设备驱动结构体了。
接下来看下写函数w25q_write(),程序如下:
点击(此处)折叠或打开
#define W25Q_BUF_LEN 4096
#define W25Q_PAGE_NUM 256
static ssize_t w25q_write(struct file *file, const char __user *user_buf, size_t count, loff_t *ppos)
{
int ret = 0;
u8 *buf_start, *buf_tmp, *w25q_buf;
struct w25q_dev *w25q= file->private_data;
u32 buf_size = 0, page_num = W25Q_PAGE_NUM, len = 0;
DBG("@@@@w25q write start\n");
buf_start = buf_tmp = kzalloc(W25Q_BUF_LEN, GFP_KERNEL);
w25q_buf = w25q->buf = kzalloc(page_num + 4, GFP_KERNEL);
if (!buf_start || !w25q_buf) {
DBG("!!!!kzalloc error!\n");
return -ENOMEM;
}
ret = mutex_lock_interruptible(&w25q->mlock);
if (ret) {
DBG("!!!!mutex lock error!");
goto exit_kfree;
}
len = W25Q_BUF_LEN;
buf_size = min(count, len);
if (copy_from_user(buf_tmp, user_buf, buf_size)) {
DBG("!!!!copy_from_user() error!\n");
ret = -EFAULT;
goto exit_lock;
}
DBG("w25q->const_addr = 0x%x\n", w25q->const_addr);
buf_tmp = buf_start;
w25q->cmd = W25X_PAGE_PROG;
w25q->addr = w25q->const_addr;
while(buf_size) {
w25q->buf = w25q_buf;
w25q->len = min(buf_size, page_num);
memcpy(w25q->buf + 4, buf_tmp, w25q->len);
ret = w25q_write_date(w25q);
if (ret != 0) {
break;
}
buf_tmp += w25q->len;
w25q->addr += w25q->len;
buf_size -= w25q->len;
}
exit_lock:
mutex_unlock(&w25q->mlock);
exit_kfree:
kfree(buf_start);
kfree(w25q_buf);
if (ret != 0)
DBG("!!!!w25q write error!\n");
else
DBG("w25q write success\n");
return ret;
}
说明:
1) 写函数首先申请两段内存,第一段内存用于存储从应用层复制来的待写数据,最大为4KB。第二段内存用于存储每次
往W25Q32BV写的数据。由于W25Q32BV每次最大能写256bytes,所以page_num= 256,加上4是由于每次
传输时,需要在最前面加上一个字节的命令和三个字节的地址。
2) 获取本次可以传输的最大数据长度。
3) 设置好传输的cmd和起始地址,然后进入while循环。
4) 在while循环中,获取本次可以传输的最大长度,最长为256bytes,然后将其拷贝到buf中,加上4的目的是因为buf
的前四个字节需要放置命令和地址。
5) 调用w25q_write_date(w25q)函数实现数据传输。
6) 更新变量,为下一次传输做好准备。
w25q_write_date(w25q)函数具体内容如下:
点击(此处)折叠或打开
static void w25q_write_enable(struct w25q_dev *w25q)
{
u8 cmd = W25X_WRITE_ENABLE;
spi_w8r8(w25q->spi, cmd);
}
static int w25q_wait_null(struct w25q_dev *w25q)
{
uint8_t limit = 5;
/* wait BUSY bit clear */
while(((w25q_read_stat_reg(w25q) & 0x01) == 0x01) && (limit != 0)) {
limit--;
mdelay(50);
}
if (limit == 0) {
DBG("!!!!w25q_wait_null:time out!\n");
return -EBUSY;
}
else
return 0;
}
/*
* when you call this function,
* the w25q->cmd, w25q->len(tx date len),
* w25q->addr and w25q->buf(date) are OK
*
*/
static int w25q_write_date(struct w25q_dev *w25q)
{
int ret = 0;
u8 i = 0, rx = 0;
struct spi_message message;
struct spi_transfer x[(w25q->len + 4) * 2];
w25q_write_enable(w25q); //SET WEL
ret = w25q_wait_null(w25q);
if (ret != 0) {
DBG("!!!!w25q_write_date: wait null err!\n");
return ret;
}
if((w25q_read_stat_reg(w25q) & 0x02) != 0x02) {
DBG("!!!!state register write able is 0\n");
return -EBUSY; //disable write
}
DBG("cmd = 0x%x, addr = 0x%x\n", w25q->cmd, w25q->addr);
w25q->buf[0] = w25q->cmd;
w25q->buf[1] = ((u8)(w25q->addr >> 16));
w25q->buf[2] = ((u8)(w25q->addr >> 8));
w25q->buf[3] = ((u8)w25q->addr);
spi_message_init(&message);
memset(x, 0, sizeof x);
for (i = 0; i < (w25q->len + 4) * 2; i++) {
x[i].len = 1;
spi_message_add_tail(&x[i], &message);
if ((i % 2) == 0) {
x[i].tx_buf = w25q->buf++;
} else {
x[i].rx_buf = ℞
}
}
/* do the i/o */
ret = spi_sync(w25q->spi, &message);
if (ret != 0) {
DBG("!!!!w25q_write_date: spi_sync() error!");
return ret;
}
ret = w25q_wait_null(w25q);
if (ret != 0)
DBG("!!!!w25q_write_date: w25q_wait_null() error!");
return ret;
}
说明:
1) 在调用w25q_write_date(w25q)函数之前,需要首先设置好w25q->cmd,
w25q->len(txdatelen),
w25q->addr和w25q->buf(date)变量。
2) 设置芯片状态寄存器,使其可写。
3) 等待芯片不忙。
4) 读取芯片状态寄存器,查看其是否可写。
5) 配置发送buf,调用spi_sync(w25q->spi,&message);函数实现写数据。
6) 等待芯片不忙,退出。
接下来看下函数操作集中的ioctl函数,程序如下:
点击(此处)折叠或打开
static long w25q_ioctl(struct file *file, unsigned int cmd, unsigned long arg)
{
int ret = 0;
u32 get_value = 0;
struct w25q_dev *w25q= file->private_data;
void __user *argp = (void __user *)arg;
int __user *p = argp;
DBG("@@@@w25q ioctl start.\n");
ret = mutex_lock_interruptible(&w25q->mlock);
if (ret) {
DBG("!!!!mutex lock error!\n");
return ret;
}
if ((_IOC_TYPE(cmd) != W25Q_IOC_MAGIC) || (_IOC_NR(cmd) > W25Q_IOC_MAXNR)) {
DBG("!!!!ioc type or ioc nr error!\n");
ret = -ENOTTY;
goto exit;
}
switch(cmd) {
case W25Q_SECTOR_ERASE:
case W25Q_HALF_BLOCK_ERASE:
case W25Q_BLOCK_ERASE:
if (get_user(get_value, p)) {
DBG("!!!!get value error!\n");
ret = -EFAULT;
goto exit;
}
ret = w25q_erase(w25q, get_value, cmd);
break;
case W25Q_CHIP_ERASE:
ret = w25q_chip_erase(w25q);
break;
case W25Q_READ_DEVICE_ID:
ret = w25q_read_id(w25q);
if (ret == 0)
put_user(w25q->result, p);
break;
default:
DBG("!!!!cmd error!\n");
ret = -ENOTTY;
break;
}
exit:
mutex_unlock(&w25q->mlock);
if (ret != 0)
DBG("!!!!w25q ioctl error!\n");
else
DBG("w25q ioctl success.\n");
return ret;
}
说明:
1) 目前共支持5个命令,包括sector擦除,half block擦除,block擦除,芯片擦除和读取芯片ID。
2) 前三种擦除方式共用一个函数w25q_erase(w25q, get_value,
cmd);,程序如下:
点击(此处)折叠或打开
static int w25q_erase(struct w25q_dev *w25q, u32 num, unsigned int cmd)
{
int ret = 0;
u8 *buf_start;
switch(cmd) {
case W25Q_SECTOR_ERASE:
DBG("sector erase cmd\n");
if (num > W25Q_SECTOR_MAX) {
DBG("!!!!sector max is over\n");
return -EFAULT;
}
w25q->const_addr = num * W25Q_ONE_SECTOR_ADDR;
w25q->cmd = W25X_SECTOR_ERASE_CMD;
break;
case W25Q_HALF_BLOCK_ERASE:
DBG("half block erase cmd\n");
if (num > W25Q_HALF_BLOCK_MAX) {
DBG("!!!!half block max is over\n");
return -EFAULT;
}
w25q->const_addr = num * W25Q_HALF_BLOCK_ADDR;
w25q->cmd = W25X_HALF_BLOCK_ERASE_CMD;
break;
case W25Q_BLOCK_ERASE:
DBG("block erase cmd\n");
if (num > W25Q_BLOCK_MAX) {
DBG("!!!!block max is over\n");
return -EFAULT;
}
w25q->const_addr = num * W25Q_ONE_BLOCK_ADDR;
w25q->cmd = W25X_BLOCK_ERASE_CMD;
break;
}
DBG("w25q->const_addr = 0x%x\n", w25q->const_addr);
w25q->len = 0;
buf_start = w25q->buf = kzalloc(w25q->len + 4, GFP_KERNEL);
if (!buf_start) {
DBG("!!!!kzalloc is error\n");
return -ENOMEM;
}
w25q->addr = w25q->const_addr;
ret = w25q_write_date(w25q);
kfree(buf_start);
if (ret != 0) {
DBG("!!!!w25q_erase: spi write err!\n");
return ret;
}
DBG("w25q_erase: erase OK\n");
return ret;
}
说明:
1) 首先根据不同的擦除方式,设置命令和地址两个变量。
2) 调用w25q_write_date(w25q);函数实现数据传输。
芯片擦除函数w25q_chip_erase()如下:
点击(此处)折叠或打开
static int w25q_chip_erase(struct w25q_dev *w25q)
{
int ret = 0;
u8 cmd = W25X_CHIP_ERASE;
DBG("w25q_chip_erase\n");
w25q_write_enable(w25q); //SET WEL
ret = w25q_wait_null(w25q);
if (ret != 0) {
DBG("!!!!chip_erase: wait null err!\n");
return ret;
}
if((w25q_read_stat_reg(w25q) & 0x02) != 0x02) {
DBG("!!!!state register write able is 0\n");
return -EBUSY; //disable write
}
spi_w8r8(w25q->spi, cmd);
return w25q_wait_null(w25q);
}
读取设备ID函数w25q_read_id()如下:
点击(此处)折叠或打开
static int w25q_read_id(struct w25q_dev *w25q)
{
int ret = 0;
u8 *buf_start;
DBG("w25q_read_id\n");
w25q->len = 2;
w25q->addr = 0;
w25q->cmd = W25X_READ_ID_CMD;
buf_start = w25q->buf = kzalloc(w25q->len, GFP_KERNEL);
if (!buf_start) {
DBG("!!!!kzalloc is error\n");
return -ENOMEM;
}
ret = w25q_read_data(w25q);
w25q->buf = buf_start;
w25q->result = *w25q->buf << 8;
w25q->buf++;
w25q->result |= *w25q->buf;
kfree(buf_start);
if (ret != 0) {
DBG("!!!!w25q_read_id: w25q_read_data error!\n");
return ret;
}
DBG("w25q_read_id: read id OK\n");
return ret;
}
说明:
1) 首先设置好变量,申请内存
2) 调用w25q_read_data()函数实现读取数据。
w25q_read_data函数如下:
点击(此处)折叠或打开
/*
* when you call this function,
* the w25q->cmd, w25q->len(receive len)
* w25q->buf(kzalloc receive) and w25q->addr are OK
*
*/
static int w25q_read_data(struct w25q_dev *w25q)
{
int ret = 0;
struct spi_message message;
struct spi_transfer x[(w25q->len + 4) * 2];
u8 i = 0, rx = 0, dumy_value = 0xff, tx_buff[4] = {0};
w25q_write_enable(w25q); //SET WEL
ret = w25q_wait_null(w25q);
if (ret != 0) {
DBG("!!!!chip_erase: wait null err!\n");
return ret;
}
if((w25q_read_stat_reg(w25q) & 0x02) != 0x02) {
DBG("!!!!state register write able is 0\n");
return -EBUSY; //disable write
}
DBG("cmd = 0x%x, addr = 0x%x\n", w25q->cmd, w25q->addr);
tx_buff[0] = w25q->cmd;
tx_buff[1] = ((uint8_t)(w25q->addr >> 16));
tx_buff[2] = ((uint8_t)(w25q->addr >> 8));
tx_buff[3] = ((uint8_t)(w25q->addr));
spi_message_init(&message);
memset(x, 0, sizeof x);
for (i = 0; i < 8; i++) { //cmd
x[i].len = 1;
spi_message_add_tail(&x[i], &message);
if ((i % 2) == 0) {
x[i].tx_buf = &tx_buff[i / 2];
} else {
x[i].rx_buf = ℞
}
}
for (i = 8; i < (w25q->len + 4) * 2; i++) {
x[i].len = 1;
spi_message_add_tail(&x[i], &message);
if ((i % 2) == 0) {
x[i].tx_buf = &dumy_value;
} else {
x[i].rx_buf = w25q->buf++;
}
}
/* do the i/o */
return spi_sync(w25q->spi, &message);
}
说明:
1) 在从芯片读取数据时的格式为:首先发送一个字节命令+三个字节读取地址,然后就可以接收数据了。
2) 第一个for循环发送的是命令和地址,第二个for循环是接收数据。
3) 调用此函数之前,需要设置好w25q->cmd, w25q->len(receivelen),w25q->buf(kzalloc
receive)和w25q->addr。
接下来看下函数操作集中的读数据函数w25q_read(),程序如下:
点击(此处)折叠或打开
static ssize_t w25q_read(struct file *file, char __user *user_buf, size_t count, loff_t *ppos)
{
int ret = 0;
u8 *buf_start, *buf_tmp, *w25q_buf;
struct w25q_dev *w25q = file->private_data;
u32 buf_size = 0, read_len = 0, page_num = W25Q_PAGE_NUM;
DBG("@@@@w25q read start\n");
buf_start = buf_tmp = kzalloc(W25Q_BUF_LEN, GFP_KERNEL);
w25q_buf = w25q->buf = kzalloc(page_num, GFP_KERNEL);
if (!buf_start || !w25q_buf ) {
DBG("!!!!kzalloc error!\n");
return -ENOMEM;
}
ret = mutex_lock_interruptible(&w25q->mlock);
if (ret) {
DBG("!!!!mutex lock error!\n");
goto exit_kfree;
}
read_len = W25Q_BUF_LEN;
buf_size = min(count, read_len);
read_len = buf_size;
w25q->cmd = W25X_READ_DATA;
w25q->addr = w25q->const_addr;
DBG("w25q->addr = 0x%x\n", w25q->addr);
while (buf_size) {
w25q->buf = w25q_buf;
w25q->len = min(buf_size, page_num);
ret = w25q_read_data(w25q);
if (ret != 0) {
goto exit_lock;
}
memcpy(buf_tmp, w25q_buf, w25q->len);
buf_tmp += w25q->len;
buf_size -= w25q->len;
w25q->addr += w25q->len;
}
ret = copy_to_user(user_buf, buf_start, read_len);
ret = read_len -ret;
exit_lock:
mutex_unlock(&w25q->mlock);
exit_kfree:
kfree(buf_start);
kfree(w25q_buf);
DBG("w25q read stop, ret = %d\n", ret);
return ret;
}
说明:
1) 此函数需要申请两段内存空间,第一段用于存放从W25Q32BV接收到的数据,第二段用于存放每次接收的数据。
2) 设置好变量后,调用w25q_read_data(w25q)读取数据。
3) 读取完成后,将读取到的数据拷贝到应用层。
三、应用层测试
应用层测试程序如下:
点击(此处)折叠或打开
/*
* first you must erase,
* then write, then read
* or you can read only
*
*/
#include "w25q.h"
int main(int argc, char **argv)
{
char str[10] = {0};
int fd = 0, ret = 0;
unsigned char buffer[BUFSIZE] = {0};
unsigned int i = 0, idCmd = 0, num = 0;
fd = open("/dev/w25q", O_RDWR);
if (fd < 0) {
printf("Open ADC Device Faild!\n");
exit(1);
}
while(1) {
idCmd = 0;
printf("please enter the cmd and num :\n");
scanf("%s%x", str, &num);
//printf("cmd = %s, idFreq = %d\n", str, idFreq);
if (num >= 0) {
if (strcmp(str, "SECTOR") == 0) {
idCmd = W25Q_SECTOR_ERASE;
ret = ioctl(fd, idCmd, &num);
if (ret != 0) {
printf("sector erase Faild!\n");
}
} else if(strcmp(str, "HALF") == 0) {
idCmd = W25Q_HALF_BLOCK_ERASE;
ret = ioctl(fd, idCmd, &num);
if (ret != 0) {
printf("half block erase Faild!\n");
}
} else if(strcmp(str, "BLOCK") == 0) {
idCmd = W25Q_BLOCK_ERASE;
ret = ioctl(fd, idCmd, &num);
if (ret != 0) {
printf("block erase Faild!\n");
}
} else if(strcmp(str, "CHIP") == 0) {
idCmd = W25Q_CHIP_ERASE;
ret = ioctl(fd, idCmd, &num);
if (ret != 0) {
printf("chip erase Faild!\n");
}
} else if(strcmp(str, "ID") == 0) {
idCmd = W25Q_READ_DEVICE_ID;
ret = ioctl(fd, idCmd, &num);
if (ret != 0) {
printf("read ID Faild!\n");
} else {
printf("ID = 0x%x\n", num);
}
} else if(strcmp(str, "READ") == 0) {
memset(buffer, 0, BUFSIZE);
printf("------------\n");
for (i = 0; i < WRITE_NUM; i++) {
if((i != 0) && ((i % 8) == 0)) {
printf("\n");
}
printf("0x%x ", buffer[i]);
}
printf("\n------------\n");
ret = read(fd, buffer, WRITE_NUM);
printf("\n------------\n");
for (i = 0; i < WRITE_NUM; i++) {
if((i != 0) && ((i % 8) == 0)) {
printf("\n");
}
printf("0x%x ", buffer[i]);
}
printf("\n------------\n");
} else if(strcmp(str, "WRITE") == 0) {
for (i = 0; i < WRITE_NUM; i++) {
buffer[i] = i;
}
ret = write(fd, buffer, WRITE_NUM);
if (ret != 0) {
printf("w25q write oper Faild!\n");
}
} else if(strcmp(str, "QUIT") == 0) {
break;
} else {
printf("wrong string\n");
}
} else {
printf("wrong input num(< 0)\n");
}
}/* end while(1) */
close(fd);
return 0;
}
说明:
1) 首先从终端接收命令内容。
2) 比较命令,然后进入不同的处理流程。
参考博文:
1.http://blog.chinaunix.net/uid-20620288-id-3164730.html //写的很清晰
2.http://blog.chinaunix.net/uid-27041925-id-3576276.html
3.http://blog.chinaunix.NET/uid-25445243-id-4026974.html
SPI, Serial Perripheral Interface, 串行外围设备接口,
是Motorola公司推出的一种同步串行接口技术.主要实现CPU与EEPROM、FLASH、实时时钟、AD转换器等外设芯片的通讯。
采用主-从模式(Master-Slave) 的控制方式。Master 设备可以通过提供 Clock 以及对 Slave设备进行片选 (Slave Select) 来控制多个 Slave 设备, Slave则 设备本身不能产生或控制 Clock, 没有 Clock 则 Slave设备不能正常工作。
基于SPI总线的设备由MISO(串行数据输入)、MOSI(串行数据输出)、SCK(串行移位时钟)、CS(使能信号)4个信号线组成。
2.Linux SPI 子系统框架学习小结
SPI子系统采用分层分离的思想。
实现流程:
1.注册平台设备
2.注册平台驱动
.probe()函数中注册描述spi控制器的spi_master
3.注册spi设备:spi_board_info
4.注册spi_driver
.probe()函数中注册描述外设的设备结构体,如char设备
5.用户操作API实现。read()/write()
画了个流程图:
代码实例:转自博文——http://blog.chinaunix.NET/uid-25445243-id-4026974.html
一、W25Q32BV芯片简介
W25X是一系列SPI接口Flash芯片的简称,它采用SPI接口和CPU通信,本文使用的W25Q32BV容量为32M,具体特性如下:1.1、基本特性
该芯片最大支持104MHz的时钟,供电电压范围在2.7~3.6V,SPI的片选信号CS低有效,在操作芯片的时候,需要将/WP和/HOLD管脚接电源。
发送地址或数据到设备时,MOSI管脚数据采样在CLK的上升沿,从芯片读数据或者状态时,MISO管脚数据采样在CLK
的下降沿,所以在设置SPI的工作模式时,必须设置为MODE0或者MODE3,本文设置为MODE3。
1.2、存储空间简介
W25Q32BV总共有16384页(page),每页有256bytes,每次最大可以编程一页。在擦除上,可以一次擦除4KB、32KB、64KB,或者擦除整个芯片。整个芯片的存储空间如下图:
W25Q32BV存储空间分为sector和block。一个sector共有4KB,一个block共有32KB。一个sector存储空间如下图:
本文共支持四种擦除方式,分别如下:
1) cmd = 0x20,sector擦除,一次可以擦除4KB。芯片共有1024个sector。
2) cmd = 0x52,半个block擦除,一次可以擦除32KB。芯片共有128个半block。
3) cmd = 0xd8,block擦除,一次可以擦除64KB。芯片共有64个block。
4) cmd = 0xC7,芯片擦除,擦除整个芯片。
1.3、状态寄存器
W25Q32BV共有两个字节的状态寄存器,我们需要关心的就是BIT0和BIT1。BIT0:busy flag,1:busy,0:free。
BIT1:write enable latch,1:write enable,0:write disable。
1.4、操作要求
在操作W25Q32BV时,如果是写数据到芯片,则每写一个字节,都需要读取一个数据。在从芯片接收数据时,首先往芯片写一个字节的0xff,然后就是需要读取的数据。
二、设备驱动
2.1、设备注册
在系统启动的时候,首先会对设备信息进行注册,见《Linux spi驱动分析(一)----总线驱动》中的3.1,所以编写w25q的设备驱动程序时,首先需要对设备信息进行注册,具体内容如下:
点击(此处)折叠或打开
#if defined(CONFIG_SPI_FLASH_W25Q)
static struct gsc3280_spi_info w25q_spi1_dev_platdata = {
.cs_type = 1,
.pin_cs = 87,
.num_cs = 1,
.cs_value = 0,
.lsb_flg = 0,
.bits_per_word = 8,
};
#endif
static struct spi_board_info gsc3280_spi_devices[] = {
#if defined(CONFIG_SPI_FLASH_W25Q)
{
.modalias = "spi-w25q",
.bus_num = 1,
.chip_select = 2,
.mode = SPI_MODE_3,
.max_speed_hz = 5 * 1000 * 1000,
.controller_data = &w25q_spi1_dev_platdata,
},
#endif
};
static int __init gsc3280_spi_devices_init(void)
{
spi_register_board_info(gsc3280_spi_devices, ARRAY_SIZE(gsc3280_spi_devices));
return 0;
}
device_initcall(gsc3280_spi_devices_init);
2.2、初始化函数
首先我们从设备注册开始,程序如下:点击(此处)折叠或打开
static struct spi_driver w25q_driver = {
.driver = {
.name = "spi-w25q",
.owner = THIS_MODULE,
},
//.id_table = w25q_ids,
.probe = w25q_probe,
.remove = __devexit_p(w25q_remove),
};
static int __init w25q_init(void)
{
return spi_register_driver(&w25q_driver);
}
static void __exit w25q_exit(void)
{
spi_unregister_driver(&w25q_driver);
}
module_init(w25q_init);
module_exit(w25q_exit);
由于W25Q32BV使用SPI接口,所以将其注册为SPI驱动,接下来看下探测函数w25q_probe,程序如下:
点击(此处)折叠或打开
static int __devinit w25q_probe(struct spi_device *spi)
{
int ret = 0;
struct w25q_dev *w25q;
DBG("############\n");
DBG("w25q spi flash probe start.\n");
w25q = kzalloc(sizeof(struct w25q_dev), GFP_KERNEL);
if (!w25q) {
DBG("!!!!kzalloc error!\n");
return -ENOMEM;
}
ret = spi_setup(spi);
if (ret != 0) {
DBG("!!!!setup error!\n");
return ret;
}
w25q->spi = spi;
mutex_init(&w25q->mlock);
strlcpy(w25q->name, W25Q_SPI_FLASH_NAME, sizeof(w25q->name));
ret = alloc_chrdev_region(&w25q->devt, 0, W25Q_MAX_MINOR, "w25q");
if (ret < 0) {
DBG("!!!!%s: failed to allocate char dev region!\n", __FILE__);
goto err_kzall;
}
w25q->dev.devt = MKDEV(MAJOR(w25q->devt), 1);
cdev_init(&w25q->cdev, &w25q_fops);
w25q->cdev.owner = THIS_MODULE;
ret = cdev_add(&w25q->cdev, w25q->devt, 1);
if (ret) {
DBG("!!!!cdev add error!\n");
goto err_alloc;
}
w25q->class = class_create(THIS_MODULE, "w25q-spi");
if (IS_ERR(w25q->class)) {
DBG("!!!!failed in create w25q spi flash class!\n");
goto err_alloc;;
}
device_create(w25q->class, NULL, w25q->devt, NULL, "w25q");
dev_set_drvdata(&spi->dev, w25q);
DBG("w25q spi flash probe success.\n");
DBG("############\n");
return 0;
err_alloc:
unregister_chrdev_region(w25q->devt, W25Q_MAX_MINOR);
err_kzall:
kfree(w25q);
printk(KERN_ERR "!!!!!!w25q spi flash probe error.!!!!!!\n");
return ret;
}
说明:
1) 首先申请设备驱动结构体。
2) 调用spi_setup(spi)函数对设备信息初始化。
3) 初始化设备驱动结构体成员变量。
4) 创建/dev目录下操作文件,操作函数集为w25q_fops。
5) 将设备驱动结构体中的链表插入本文件全局链表w25q_device_list中,以便在函数操作集的open函数中找到设备驱动结构体。
remove函数是探测函数的相反过程,具体程序如下:
点击(此处)折叠或打开
static int __devexit w25q_remove(struct spi_device *spi)
{
struct w25q_dev *w25q = dev_get_drvdata(&spi->dev);
cdev_del(&w25q->cdev);
unregister_chrdev_region(w25q->devt, W25Q_MAX_MINOR);
device_destroy(w25q->class, w25q->devt);
class_destroy(w25q->class);
kfree(w25q);
return 0;
}
2.3、操作函数集w25q_fops
操作函数集结构体具体内容如下:点击(此处)折叠或打开
static const struct file_operations w25q_fops = {
.owner = THIS_MODULE,
.open = w25q_open,
.write = w25q_write,
.unlocked_ioctl = w25q_ioctl,
.read = w25q_read,
.llseek = w25q_llseek,
.release = w25q_release,
};
接下来我们一一讲述。
首先看下open函数w25q_open,具体程序如下:
点击(此处)折叠或打开
static int w25q_open(struct inode *inode, struct file *file)
{
struct w25q_dev *w25q = container_of(inode->i_cdev, struct w25q_dev, char_cdev);
if (test_and_set_bit(W25Q_BIT_LOCK_OPEN, &w25q->bit_lock)) {
DBG("!!!!w25q open err, busy!\n");
return -EBUSY;
}
file->private_data = w25q;
return 0;
}
说明:
1) 通过container_of找到在探测函数w25q_probe中定义的设备驱动结构体。
2) 测试并且设置忙标志,如果测试忙,直接忙退出。
3) 将找到的设备驱动结构体指针指向file->private_data,在函数操作集的其他函数中就可以使用设备驱动结构体了。
接下来看下写函数w25q_write(),程序如下:
点击(此处)折叠或打开
#define W25Q_BUF_LEN 4096
#define W25Q_PAGE_NUM 256
static ssize_t w25q_write(struct file *file, const char __user *user_buf, size_t count, loff_t *ppos)
{
int ret = 0;
u8 *buf_start, *buf_tmp, *w25q_buf;
struct w25q_dev *w25q= file->private_data;
u32 buf_size = 0, page_num = W25Q_PAGE_NUM, len = 0;
DBG("@@@@w25q write start\n");
buf_start = buf_tmp = kzalloc(W25Q_BUF_LEN, GFP_KERNEL);
w25q_buf = w25q->buf = kzalloc(page_num + 4, GFP_KERNEL);
if (!buf_start || !w25q_buf) {
DBG("!!!!kzalloc error!\n");
return -ENOMEM;
}
ret = mutex_lock_interruptible(&w25q->mlock);
if (ret) {
DBG("!!!!mutex lock error!");
goto exit_kfree;
}
len = W25Q_BUF_LEN;
buf_size = min(count, len);
if (copy_from_user(buf_tmp, user_buf, buf_size)) {
DBG("!!!!copy_from_user() error!\n");
ret = -EFAULT;
goto exit_lock;
}
DBG("w25q->const_addr = 0x%x\n", w25q->const_addr);
buf_tmp = buf_start;
w25q->cmd = W25X_PAGE_PROG;
w25q->addr = w25q->const_addr;
while(buf_size) {
w25q->buf = w25q_buf;
w25q->len = min(buf_size, page_num);
memcpy(w25q->buf + 4, buf_tmp, w25q->len);
ret = w25q_write_date(w25q);
if (ret != 0) {
break;
}
buf_tmp += w25q->len;
w25q->addr += w25q->len;
buf_size -= w25q->len;
}
exit_lock:
mutex_unlock(&w25q->mlock);
exit_kfree:
kfree(buf_start);
kfree(w25q_buf);
if (ret != 0)
DBG("!!!!w25q write error!\n");
else
DBG("w25q write success\n");
return ret;
}
说明:
1) 写函数首先申请两段内存,第一段内存用于存储从应用层复制来的待写数据,最大为4KB。第二段内存用于存储每次
往W25Q32BV写的数据。由于W25Q32BV每次最大能写256bytes,所以page_num= 256,加上4是由于每次
传输时,需要在最前面加上一个字节的命令和三个字节的地址。
2) 获取本次可以传输的最大数据长度。
3) 设置好传输的cmd和起始地址,然后进入while循环。
4) 在while循环中,获取本次可以传输的最大长度,最长为256bytes,然后将其拷贝到buf中,加上4的目的是因为buf
的前四个字节需要放置命令和地址。
5) 调用w25q_write_date(w25q)函数实现数据传输。
6) 更新变量,为下一次传输做好准备。
w25q_write_date(w25q)函数具体内容如下:
点击(此处)折叠或打开
static void w25q_write_enable(struct w25q_dev *w25q)
{
u8 cmd = W25X_WRITE_ENABLE;
spi_w8r8(w25q->spi, cmd);
}
static int w25q_wait_null(struct w25q_dev *w25q)
{
uint8_t limit = 5;
/* wait BUSY bit clear */
while(((w25q_read_stat_reg(w25q) & 0x01) == 0x01) && (limit != 0)) {
limit--;
mdelay(50);
}
if (limit == 0) {
DBG("!!!!w25q_wait_null:time out!\n");
return -EBUSY;
}
else
return 0;
}
/*
* when you call this function,
* the w25q->cmd, w25q->len(tx date len),
* w25q->addr and w25q->buf(date) are OK
*
*/
static int w25q_write_date(struct w25q_dev *w25q)
{
int ret = 0;
u8 i = 0, rx = 0;
struct spi_message message;
struct spi_transfer x[(w25q->len + 4) * 2];
w25q_write_enable(w25q); //SET WEL
ret = w25q_wait_null(w25q);
if (ret != 0) {
DBG("!!!!w25q_write_date: wait null err!\n");
return ret;
}
if((w25q_read_stat_reg(w25q) & 0x02) != 0x02) {
DBG("!!!!state register write able is 0\n");
return -EBUSY; //disable write
}
DBG("cmd = 0x%x, addr = 0x%x\n", w25q->cmd, w25q->addr);
w25q->buf[0] = w25q->cmd;
w25q->buf[1] = ((u8)(w25q->addr >> 16));
w25q->buf[2] = ((u8)(w25q->addr >> 8));
w25q->buf[3] = ((u8)w25q->addr);
spi_message_init(&message);
memset(x, 0, sizeof x);
for (i = 0; i < (w25q->len + 4) * 2; i++) {
x[i].len = 1;
spi_message_add_tail(&x[i], &message);
if ((i % 2) == 0) {
x[i].tx_buf = w25q->buf++;
} else {
x[i].rx_buf = ℞
}
}
/* do the i/o */
ret = spi_sync(w25q->spi, &message);
if (ret != 0) {
DBG("!!!!w25q_write_date: spi_sync() error!");
return ret;
}
ret = w25q_wait_null(w25q);
if (ret != 0)
DBG("!!!!w25q_write_date: w25q_wait_null() error!");
return ret;
}
说明:
1) 在调用w25q_write_date(w25q)函数之前,需要首先设置好w25q->cmd,
w25q->len(txdatelen),
w25q->addr和w25q->buf(date)变量。
2) 设置芯片状态寄存器,使其可写。
3) 等待芯片不忙。
4) 读取芯片状态寄存器,查看其是否可写。
5) 配置发送buf,调用spi_sync(w25q->spi,&message);函数实现写数据。
6) 等待芯片不忙,退出。
接下来看下函数操作集中的ioctl函数,程序如下:
点击(此处)折叠或打开
static long w25q_ioctl(struct file *file, unsigned int cmd, unsigned long arg)
{
int ret = 0;
u32 get_value = 0;
struct w25q_dev *w25q= file->private_data;
void __user *argp = (void __user *)arg;
int __user *p = argp;
DBG("@@@@w25q ioctl start.\n");
ret = mutex_lock_interruptible(&w25q->mlock);
if (ret) {
DBG("!!!!mutex lock error!\n");
return ret;
}
if ((_IOC_TYPE(cmd) != W25Q_IOC_MAGIC) || (_IOC_NR(cmd) > W25Q_IOC_MAXNR)) {
DBG("!!!!ioc type or ioc nr error!\n");
ret = -ENOTTY;
goto exit;
}
switch(cmd) {
case W25Q_SECTOR_ERASE:
case W25Q_HALF_BLOCK_ERASE:
case W25Q_BLOCK_ERASE:
if (get_user(get_value, p)) {
DBG("!!!!get value error!\n");
ret = -EFAULT;
goto exit;
}
ret = w25q_erase(w25q, get_value, cmd);
break;
case W25Q_CHIP_ERASE:
ret = w25q_chip_erase(w25q);
break;
case W25Q_READ_DEVICE_ID:
ret = w25q_read_id(w25q);
if (ret == 0)
put_user(w25q->result, p);
break;
default:
DBG("!!!!cmd error!\n");
ret = -ENOTTY;
break;
}
exit:
mutex_unlock(&w25q->mlock);
if (ret != 0)
DBG("!!!!w25q ioctl error!\n");
else
DBG("w25q ioctl success.\n");
return ret;
}
说明:
1) 目前共支持5个命令,包括sector擦除,half block擦除,block擦除,芯片擦除和读取芯片ID。
2) 前三种擦除方式共用一个函数w25q_erase(w25q, get_value,
cmd);,程序如下:
点击(此处)折叠或打开
static int w25q_erase(struct w25q_dev *w25q, u32 num, unsigned int cmd)
{
int ret = 0;
u8 *buf_start;
switch(cmd) {
case W25Q_SECTOR_ERASE:
DBG("sector erase cmd\n");
if (num > W25Q_SECTOR_MAX) {
DBG("!!!!sector max is over\n");
return -EFAULT;
}
w25q->const_addr = num * W25Q_ONE_SECTOR_ADDR;
w25q->cmd = W25X_SECTOR_ERASE_CMD;
break;
case W25Q_HALF_BLOCK_ERASE:
DBG("half block erase cmd\n");
if (num > W25Q_HALF_BLOCK_MAX) {
DBG("!!!!half block max is over\n");
return -EFAULT;
}
w25q->const_addr = num * W25Q_HALF_BLOCK_ADDR;
w25q->cmd = W25X_HALF_BLOCK_ERASE_CMD;
break;
case W25Q_BLOCK_ERASE:
DBG("block erase cmd\n");
if (num > W25Q_BLOCK_MAX) {
DBG("!!!!block max is over\n");
return -EFAULT;
}
w25q->const_addr = num * W25Q_ONE_BLOCK_ADDR;
w25q->cmd = W25X_BLOCK_ERASE_CMD;
break;
}
DBG("w25q->const_addr = 0x%x\n", w25q->const_addr);
w25q->len = 0;
buf_start = w25q->buf = kzalloc(w25q->len + 4, GFP_KERNEL);
if (!buf_start) {
DBG("!!!!kzalloc is error\n");
return -ENOMEM;
}
w25q->addr = w25q->const_addr;
ret = w25q_write_date(w25q);
kfree(buf_start);
if (ret != 0) {
DBG("!!!!w25q_erase: spi write err!\n");
return ret;
}
DBG("w25q_erase: erase OK\n");
return ret;
}
说明:
1) 首先根据不同的擦除方式,设置命令和地址两个变量。
2) 调用w25q_write_date(w25q);函数实现数据传输。
芯片擦除函数w25q_chip_erase()如下:
点击(此处)折叠或打开
static int w25q_chip_erase(struct w25q_dev *w25q)
{
int ret = 0;
u8 cmd = W25X_CHIP_ERASE;
DBG("w25q_chip_erase\n");
w25q_write_enable(w25q); //SET WEL
ret = w25q_wait_null(w25q);
if (ret != 0) {
DBG("!!!!chip_erase: wait null err!\n");
return ret;
}
if((w25q_read_stat_reg(w25q) & 0x02) != 0x02) {
DBG("!!!!state register write able is 0\n");
return -EBUSY; //disable write
}
spi_w8r8(w25q->spi, cmd);
return w25q_wait_null(w25q);
}
读取设备ID函数w25q_read_id()如下:
点击(此处)折叠或打开
static int w25q_read_id(struct w25q_dev *w25q)
{
int ret = 0;
u8 *buf_start;
DBG("w25q_read_id\n");
w25q->len = 2;
w25q->addr = 0;
w25q->cmd = W25X_READ_ID_CMD;
buf_start = w25q->buf = kzalloc(w25q->len, GFP_KERNEL);
if (!buf_start) {
DBG("!!!!kzalloc is error\n");
return -ENOMEM;
}
ret = w25q_read_data(w25q);
w25q->buf = buf_start;
w25q->result = *w25q->buf << 8;
w25q->buf++;
w25q->result |= *w25q->buf;
kfree(buf_start);
if (ret != 0) {
DBG("!!!!w25q_read_id: w25q_read_data error!\n");
return ret;
}
DBG("w25q_read_id: read id OK\n");
return ret;
}
说明:
1) 首先设置好变量,申请内存
2) 调用w25q_read_data()函数实现读取数据。
w25q_read_data函数如下:
点击(此处)折叠或打开
/*
* when you call this function,
* the w25q->cmd, w25q->len(receive len)
* w25q->buf(kzalloc receive) and w25q->addr are OK
*
*/
static int w25q_read_data(struct w25q_dev *w25q)
{
int ret = 0;
struct spi_message message;
struct spi_transfer x[(w25q->len + 4) * 2];
u8 i = 0, rx = 0, dumy_value = 0xff, tx_buff[4] = {0};
w25q_write_enable(w25q); //SET WEL
ret = w25q_wait_null(w25q);
if (ret != 0) {
DBG("!!!!chip_erase: wait null err!\n");
return ret;
}
if((w25q_read_stat_reg(w25q) & 0x02) != 0x02) {
DBG("!!!!state register write able is 0\n");
return -EBUSY; //disable write
}
DBG("cmd = 0x%x, addr = 0x%x\n", w25q->cmd, w25q->addr);
tx_buff[0] = w25q->cmd;
tx_buff[1] = ((uint8_t)(w25q->addr >> 16));
tx_buff[2] = ((uint8_t)(w25q->addr >> 8));
tx_buff[3] = ((uint8_t)(w25q->addr));
spi_message_init(&message);
memset(x, 0, sizeof x);
for (i = 0; i < 8; i++) { //cmd
x[i].len = 1;
spi_message_add_tail(&x[i], &message);
if ((i % 2) == 0) {
x[i].tx_buf = &tx_buff[i / 2];
} else {
x[i].rx_buf = ℞
}
}
for (i = 8; i < (w25q->len + 4) * 2; i++) {
x[i].len = 1;
spi_message_add_tail(&x[i], &message);
if ((i % 2) == 0) {
x[i].tx_buf = &dumy_value;
} else {
x[i].rx_buf = w25q->buf++;
}
}
/* do the i/o */
return spi_sync(w25q->spi, &message);
}
说明:
1) 在从芯片读取数据时的格式为:首先发送一个字节命令+三个字节读取地址,然后就可以接收数据了。
2) 第一个for循环发送的是命令和地址,第二个for循环是接收数据。
3) 调用此函数之前,需要设置好w25q->cmd, w25q->len(receivelen),w25q->buf(kzalloc
receive)和w25q->addr。
接下来看下函数操作集中的读数据函数w25q_read(),程序如下:
点击(此处)折叠或打开
static ssize_t w25q_read(struct file *file, char __user *user_buf, size_t count, loff_t *ppos)
{
int ret = 0;
u8 *buf_start, *buf_tmp, *w25q_buf;
struct w25q_dev *w25q = file->private_data;
u32 buf_size = 0, read_len = 0, page_num = W25Q_PAGE_NUM;
DBG("@@@@w25q read start\n");
buf_start = buf_tmp = kzalloc(W25Q_BUF_LEN, GFP_KERNEL);
w25q_buf = w25q->buf = kzalloc(page_num, GFP_KERNEL);
if (!buf_start || !w25q_buf ) {
DBG("!!!!kzalloc error!\n");
return -ENOMEM;
}
ret = mutex_lock_interruptible(&w25q->mlock);
if (ret) {
DBG("!!!!mutex lock error!\n");
goto exit_kfree;
}
read_len = W25Q_BUF_LEN;
buf_size = min(count, read_len);
read_len = buf_size;
w25q->cmd = W25X_READ_DATA;
w25q->addr = w25q->const_addr;
DBG("w25q->addr = 0x%x\n", w25q->addr);
while (buf_size) {
w25q->buf = w25q_buf;
w25q->len = min(buf_size, page_num);
ret = w25q_read_data(w25q);
if (ret != 0) {
goto exit_lock;
}
memcpy(buf_tmp, w25q_buf, w25q->len);
buf_tmp += w25q->len;
buf_size -= w25q->len;
w25q->addr += w25q->len;
}
ret = copy_to_user(user_buf, buf_start, read_len);
ret = read_len -ret;
exit_lock:
mutex_unlock(&w25q->mlock);
exit_kfree:
kfree(buf_start);
kfree(w25q_buf);
DBG("w25q read stop, ret = %d\n", ret);
return ret;
}
说明:
1) 此函数需要申请两段内存空间,第一段用于存放从W25Q32BV接收到的数据,第二段用于存放每次接收的数据。
2) 设置好变量后,调用w25q_read_data(w25q)读取数据。
3) 读取完成后,将读取到的数据拷贝到应用层。
三、应用层测试
应用层测试程序如下:点击(此处)折叠或打开
/*
* first you must erase,
* then write, then read
* or you can read only
*
*/
#include "w25q.h"
int main(int argc, char **argv)
{
char str[10] = {0};
int fd = 0, ret = 0;
unsigned char buffer[BUFSIZE] = {0};
unsigned int i = 0, idCmd = 0, num = 0;
fd = open("/dev/w25q", O_RDWR);
if (fd < 0) {
printf("Open ADC Device Faild!\n");
exit(1);
}
while(1) {
idCmd = 0;
printf("please enter the cmd and num :\n");
scanf("%s%x", str, &num);
//printf("cmd = %s, idFreq = %d\n", str, idFreq);
if (num >= 0) {
if (strcmp(str, "SECTOR") == 0) {
idCmd = W25Q_SECTOR_ERASE;
ret = ioctl(fd, idCmd, &num);
if (ret != 0) {
printf("sector erase Faild!\n");
}
} else if(strcmp(str, "HALF") == 0) {
idCmd = W25Q_HALF_BLOCK_ERASE;
ret = ioctl(fd, idCmd, &num);
if (ret != 0) {
printf("half block erase Faild!\n");
}
} else if(strcmp(str, "BLOCK") == 0) {
idCmd = W25Q_BLOCK_ERASE;
ret = ioctl(fd, idCmd, &num);
if (ret != 0) {
printf("block erase Faild!\n");
}
} else if(strcmp(str, "CHIP") == 0) {
idCmd = W25Q_CHIP_ERASE;
ret = ioctl(fd, idCmd, &num);
if (ret != 0) {
printf("chip erase Faild!\n");
}
} else if(strcmp(str, "ID") == 0) {
idCmd = W25Q_READ_DEVICE_ID;
ret = ioctl(fd, idCmd, &num);
if (ret != 0) {
printf("read ID Faild!\n");
} else {
printf("ID = 0x%x\n", num);
}
} else if(strcmp(str, "READ") == 0) {
memset(buffer, 0, BUFSIZE);
printf("------------\n");
for (i = 0; i < WRITE_NUM; i++) {
if((i != 0) && ((i % 8) == 0)) {
printf("\n");
}
printf("0x%x ", buffer[i]);
}
printf("\n------------\n");
ret = read(fd, buffer, WRITE_NUM);
printf("\n------------\n");
for (i = 0; i < WRITE_NUM; i++) {
if((i != 0) && ((i % 8) == 0)) {
printf("\n");
}
printf("0x%x ", buffer[i]);
}
printf("\n------------\n");
} else if(strcmp(str, "WRITE") == 0) {
for (i = 0; i < WRITE_NUM; i++) {
buffer[i] = i;
}
ret = write(fd, buffer, WRITE_NUM);
if (ret != 0) {
printf("w25q write oper Faild!\n");
}
} else if(strcmp(str, "QUIT") == 0) {
break;
} else {
printf("wrong string\n");
}
} else {
printf("wrong input num(< 0)\n");
}
}/* end while(1) */
close(fd);
return 0;
}
说明:
1) 首先从终端接收命令内容。
2) 比较命令,然后进入不同的处理流程。
参考博文:
1.http://blog.chinaunix.net/uid-20620288-id-3164730.html //写的很清晰
2.http://blog.chinaunix.net/uid-27041925-id-3576276.html
3.http://blog.chinaunix.NET/uid-25445243-id-4026974.html

相关文章推荐
- linu spi子系统驱动开发笔记之实例(1)
- 驱动程序开发--AT91SAM9260的GPIO驱动笔记
- CE下的驱动程序和服务开发笔记,体验及总结
- Windows驱动开发工具 WDK 学习笔记(1) 分类: windows驱动程序WDM 2013-08-01 11:08 566人阅读 评论(0) 收藏
- inux 驱动程序开发中, 输入子系统事件类型
- STM32F0开发笔记2: ST-LINK/V2-1驱动程序的安装
- Linux字符设备驱动程序开发之笔记及摘要
- 韦东山驱动视频笔记——6.输入子系统之编写驱动程序
- linu spi子系统驱动开发笔记之实例(2)
- inux 驱动程序开发中输入子系统总共能产生哪些事件类型(EV_KEY,EV_ABS,EV_REL)
- inux 驱动程序开发中输入子系统总共能产生哪些事件类型(EV_KEY,EV_ABS,EV_REL)
- Windows驱动程序开发学习笔记(一) - 下载并安装WDK
- BeagleBone Black Linux3.8内核驱动程序开发笔记——LED
- Windows驱动程序开发学习笔记(一) - 下载并安装WDK
- 没头没尾--项目开发笔记:如何编写最外层用例?!
- 没头没尾--项目开发笔记:分层开发 ≠ 分层
- 没头没尾--项目开发笔记:分模块开发!!?? 分层开发!!??
- 没头没尾--项目开发笔记:如何开发代码更新工具?!(下)
- SCO UNIX 下设备驱动程序开发
- 没头没尾--项目开发笔记:C#分布式工程的修改版本