安卓手机无法root的情况下使用busybox
2017-06-02 18:17
543 查看
安卓手机无法root的情况下,如何使用busybox
一、什么是BusyBox?
BusyBox 是标准 Linux 工具的一个单个可执行实现。BusyBox 包含了一些简单的工具,例如 cat 和echo,还包含了一些更大、更复杂的工具,例如 grep、find、mount 以及 telnet。有些人将 BusyBox 称为 Linux 工具里的瑞士军刀。简单的说BusyBox就好像是个大工具箱,它集成压缩了 Linux 的许多工具和命令。二、为什么要使用Busybox?
手残党想要掌上玩转Linux命令行。迫于需要。有时候通过Linux命令来操纵数据会比编译型语言简单很多。
Android本身自带ToolBox,和BusyBox类似,不过命令少得可怜,且很多命令也精简只有基础功能了。网络上已经有各种安卓一键安装busybox的集成工具了,但都有前提,需要root权限才能安装。
我的手机也是无法root的,正巧拿来当实验了。
三、怎么做?
Busybox编译完后其实就只是一个二进制文件。这个文件可以选择下载:https://busybox.net/downloads/binaries/,也可以选择下载源码编译:https://busybox.net/downloads/。
这里我选择下载源码编译吧。
2.编译busybox(我这里就选择1.20版本):
# 获取交叉编译工具链
# 这里引用别人的博客:http://download.csdn.net/download/mybelief321/5563837 可以下载
# 如何配置?引用别人的博客:http://blog.csdn.net/u010661782/article/details/49020613
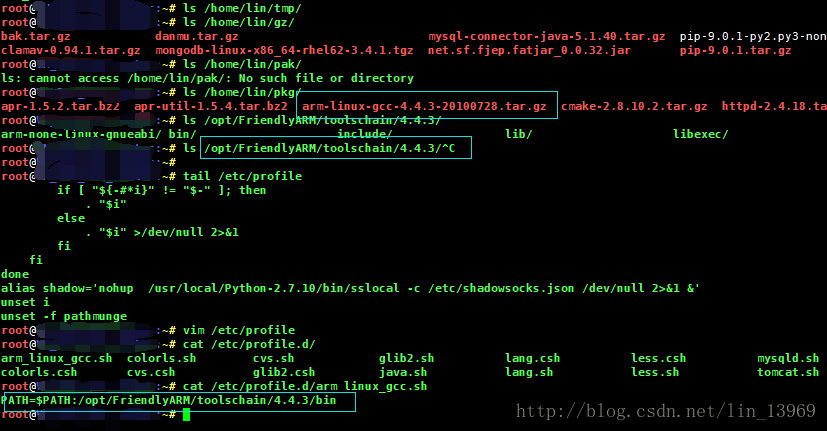
# 获取busybox源码
wget https://busybox.net/downloads/busybox-1.20.0.tar.bz2 # 解压
tar xf busybox-1.20.0.tar.bz2 -C /usr/local
# 创建软链接(可以不创,直接进。我习惯这么做。)
ln -s /usr/local/busybox-1.20.0 /usr/local/busybox
# 进入文件夹
cd /usr/local/busybox
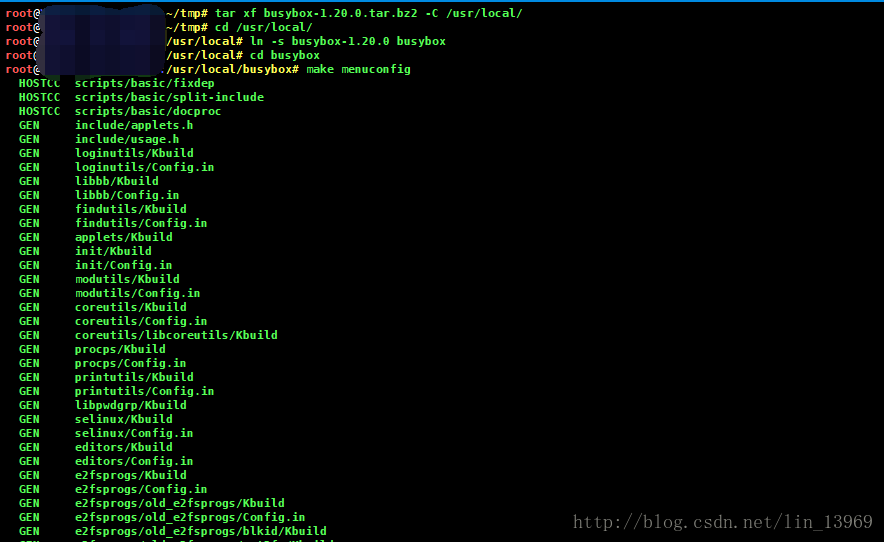
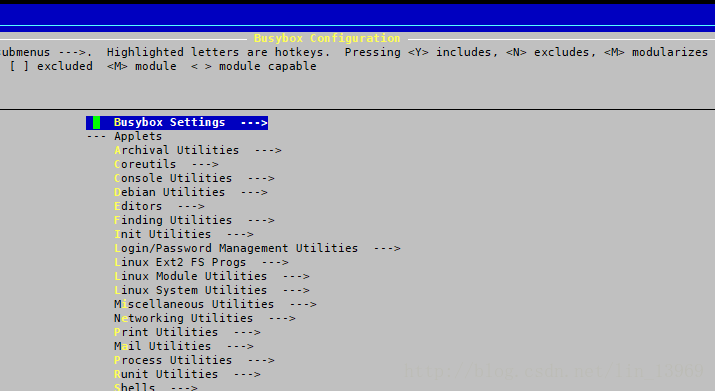
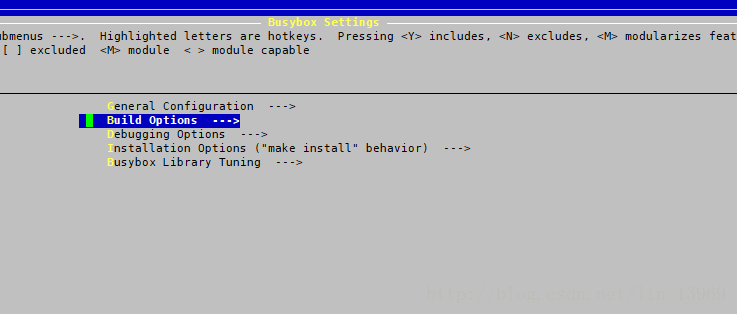
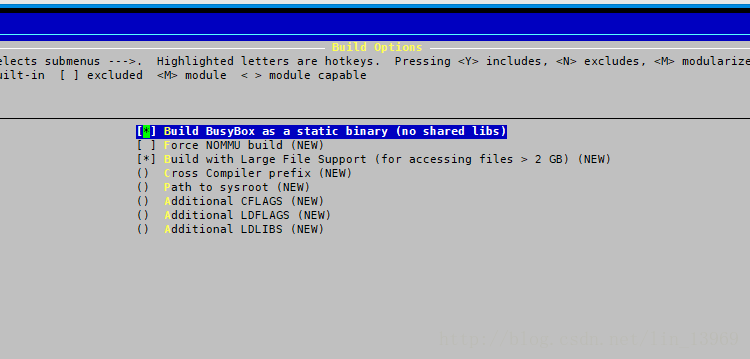
# 配置.config文件
makemenuconfig
# 以下为Menu中的选项修改
## 不使用动态链接库,才能保证每个命令都能使用
#Busybox Settings --> Build Options --> Build Busybox as a static binary (no shared libs)  -  Enable this option by pressing \"Y\"
## 配置交叉编译工具,这里使用的是刚才配置的友善之臂交叉编译工具链。
#Busybox Settings --> Build Options --> Cross compiler prefix  -  Set this option equal to \"arm-none-linux-gnueabi-\"
## 这个菜单可能会没有。没有就不配置吧。
#Busybox Settings --> Installation Options --> Don\'t use /usr  -  Enable this option by pressing \"Y\"
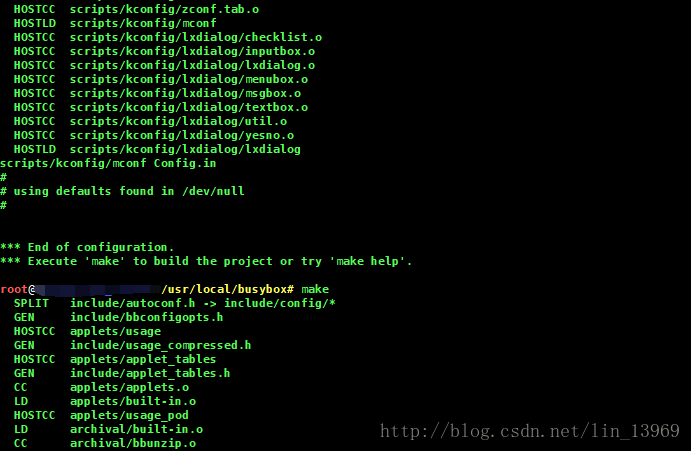
make
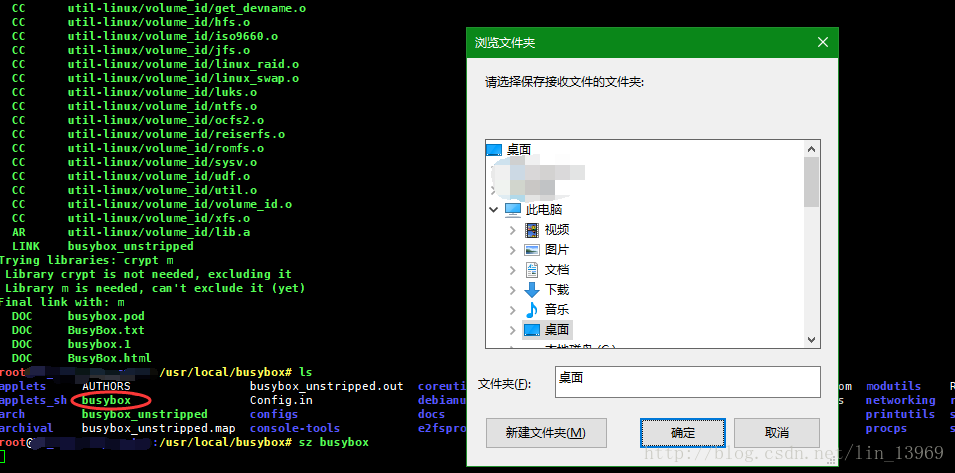
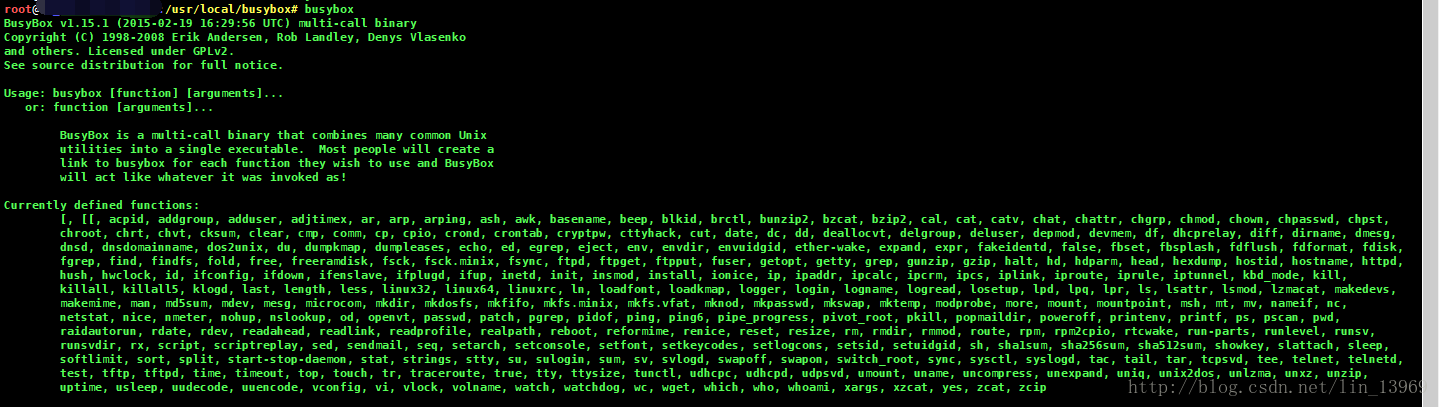
#将编译好的busybox(当前目录下)可执行文件拷贝出来
sz busybox
3.手机权限问题需要考虑。
直接拷贝到sdcard里不会有执行权限,而且访问不到;
命令行被调用时处于根目录,非root没有写权限,只有少部分读权限。权限太低,不可能创建在root里;
Android 操作系统会为每个应用程序设置一个用户, 这个用户对其安装目录(/data/data/包名/)下的文件有完整的权限;
assets 文件夹是存放不进行编译加工的原生文件,即该文件夹里面的文件不会像 xml, java 文件被预编译;目录下的文件在打包后会原封不动的保存在apk包中,不会被编译成二进制。
创建测试项目(注释很清楚,我就不废话了)
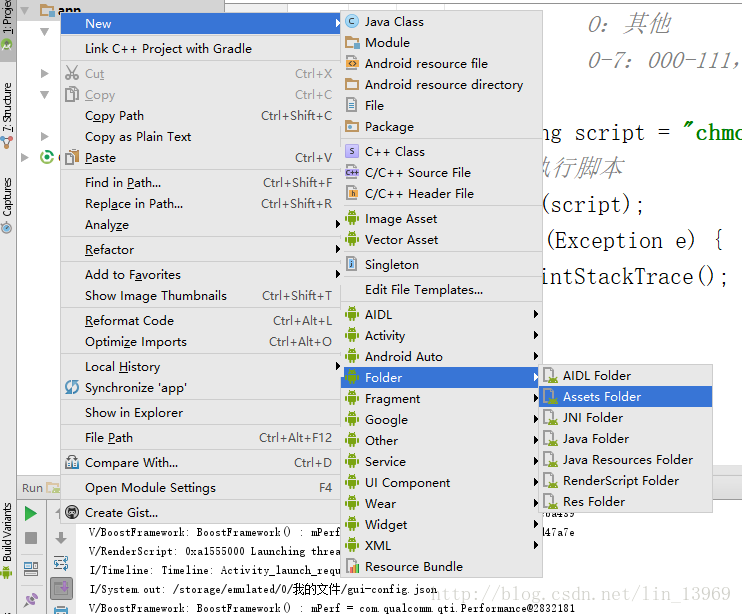
新建项目
添加assets文件夹,并将busybox可执行文件复制进去
修改xml,定义命令输入框,命令执行按钮,命令清空按钮,文本地址选择按钮。
<!-- 命令输入框-->
<EditText
android:layout_width="wrap_content"
android:layout_height="wrap_content"
android:inputType="textPersonName"
android:hint="Command"
android:ems="10"
android:layout_alignParentTop="true"
android:layout_alignParentLeft="true"
android:layout_alignParentStart="true"
android:id="@+id/editCmd"
android:layout_alignParentRight="true"
android:layout_alignParentEnd="true" />

<!-- 返回结果展示的列表-->
<ListView
android:layout_width="match_parent"
android:layout_height="match_parent"
android:id="@+id/listRes"
android:layout_below="@+id/btn_run"
android:layout_alignParentLeft="true"
android:layout_alignParentStart="true" />
<!-- 执行命令的按钮-->
<Button
android:text="Run"
android:layout_width="wrap_content"
android:layout_height="wrap_content"
android:id="@+id/btn_run"
android:layout_below="@+id/editCmd"
android:layout_alignParentRight="true"
android:layout_alignParentEnd="true" />
<!-- 添加文件的按钮-->
<Button
android:text="file"
android:layout_width="wrap_content"
android:layout_height="wrap_content"
android:layout_below="@+id/editCmd"
android:layout_alignParentLeft="true"
android:layout_alignParentStart="true"
android:id="@+id/btn_files" />
<!-- 清空命令的按钮-->
<Button
android:text="clear"
android:layout_width="wrap_content"
android:layout_height="wrap_content"
android:id="@+id/btn_clear"
android:layout_below="@+id/editCmd"
android:layout_centerHorizontal="true" />
定义使用AssetsManager对象获取Assets文件夹下的文件并复制到 /data/data/包名/files/下(APP安装目录下/files/)的函数:
/**
* 将文件从assets目录中拷贝到app安装目录的files目录下
* @param context  应用程序的context
* @param source 源文件名(Assets下的文件名)
* @param destination 目标保存文件名(files下的文件名)
* */
private void copyFromAssets(Context context, String source,
String destination) throws IOException {
/**
* 获取assets目录下文件的输入流
*
* 1、获取AssetsManager : 调用 Context 上下文对象的 context.getAssets() 即可获取 AssetsManager对象;
* 2、获取输入流 : 调用 AssetsManager 的 open(String fileName) 即可获取对应文件名的输入流;
*/
InputStream is = context.getAssets().open(source);
// 获取文件大小
int size = is.available();
// 创建文件的缓冲区
byte[] buffer = new byte[size];
// 将文件读取到缓冲区中
is.read(buffer);
// 关闭输入流
is.close();
/*
*  打开app安装目录文件的输出流
*  Context.MODE_PRIVATE  设置该文件只能被本应用使用,为私有数据
*/
FileOutputStream output = context.openFileOutput(destination,
Context.MODE_PRIVATE);
// 将文件从缓冲区中写出到内存中
output.write(buffer);
//关闭输出流
output.close();
}
使用JAVA代码通过Process对象执行shell命令:
/**
*  执行 shell 脚本命令
*  @param cmd  被执行的命令行
*  @return 返回结果列表
*  */
private List<String> exec(String cmd) {
// 获取执行工具
Process process = null;
// 存放脚本执行结果
List<String> list = new ArrayList<String>();
try {
// 获取运行时环境
Runtime runtime = Runtime.getRuntime();
//执行脚本
process = runtime.exec(cmd);
//获取脚本结果的输入流
InputStream is = process.getInputStream();
BufferedReader br = new BufferedReader(new InputStreamReader(is));
String line = null;
// 逐行读取脚本执行结果
while ((line = br.readLine()) != null) {
list.add(line);
}
br.close();
} catch (IOException e) {
e.printStackTrace();
}
return list;
}
OnCreate注册点击事件
//文件URI返回代码
private int FILE_PATH_RETURN_CODE = 1;
//保存app安装路径
private String app_path;
//数组适配器(绑定执行结果输出的数据)
private ArrayAdapter<String> arrayAdapter;
@Override
protected void onCreate(Bundle savedInstanceState) {
super.onCreate(savedInstanceState);
setContentView(R.layout.activity_main);
//获取app安装路径
app_path = getApplicationContext().getFilesDir().getAbsolutePath();
//获取组件
//命令输入框
final EditText textCmd = (EditText)findViewById(R.id.editCmd);
//命令执行按钮
Button btn_run = (Button)findViewById(R.id.btn_run);
//命令执行按钮
Button btn_clear = (Button)findViewById(R.id.btn_clear);
//命令执行按钮
Button btn_file = (Button)findViewById(R.id.btn_files);
//命令结果展示框
final ListView listRes = (ListView) findViewById(R.id.listRes);
//命令执行按钮点击事件
btn_run.setOnClickListener(new View.OnClickListener() {
@Override
public void onClick(View v) {
//查看busybox是否存在
try {
// 查看文件是否存在, 如果不存在就进入catch
getApplicationContext().openFileInput("busybox");
} catch (FileNotFoundException notfoundE) {
try {
/**
* 拷贝文件到app安装目录的files目录下
* 从assets文件夹中 拷贝到 /data/user/0/PACKAGE_NAME/files/
* */
copyFromAssets(getApplicationContext(), "busybox", "busybox");
/*
*修改文件权限脚本
* chmod UGO(000-777) FILENAME
* U:所有者
* G:所属组
* O:其他
* 0-7:000-111,rwx读写执行
*/
String script = "chmod 700 " + app_path + "/busybox" ;
// 执行脚本
exec(script);
} catch (Exception e) {
e.printStackTrace();
}
}
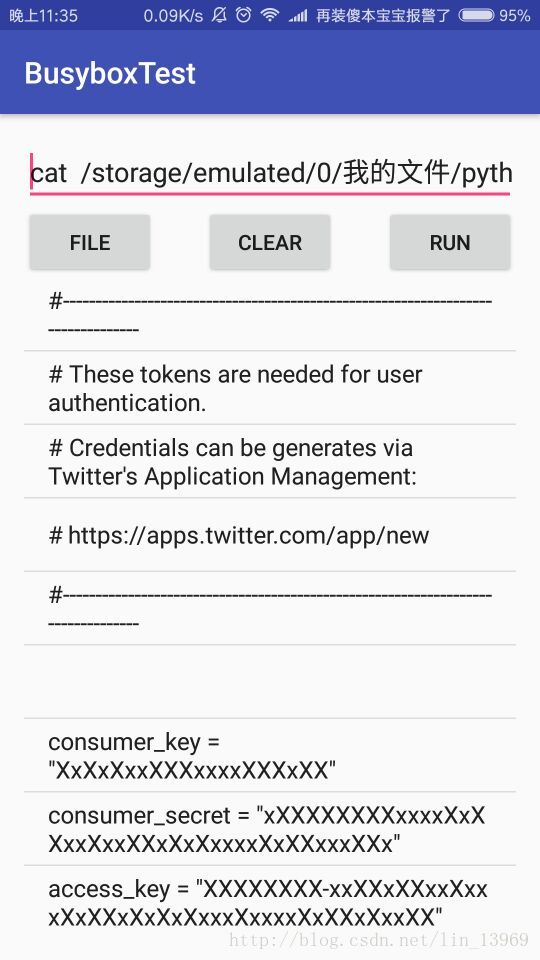
//构造执行命令
String cmdPath = "." + app_path + "/busybox ";
// System.out.println(cmdPath);
String cmd = cmdPath +textCmd.getText().toString();
//执行并获取结果
List<String> results = exec(cmd);
String[] res = new String[results.size()];
results.toArray(res);
//结果绑定在数组适配器上显示
arrayAdapter = new ArrayAdapter<String>(MainActivity.this,
android.R.layout.simple_list_item_1,res);
listRes.setAdapter(arrayAdapter);
}
});
// 清空命令按钮点击事件
btn_clear.setOnClickListener(new View.OnClickListener() {
@Override
public void onClick(View v) {
textCmd.setText("");
}
});
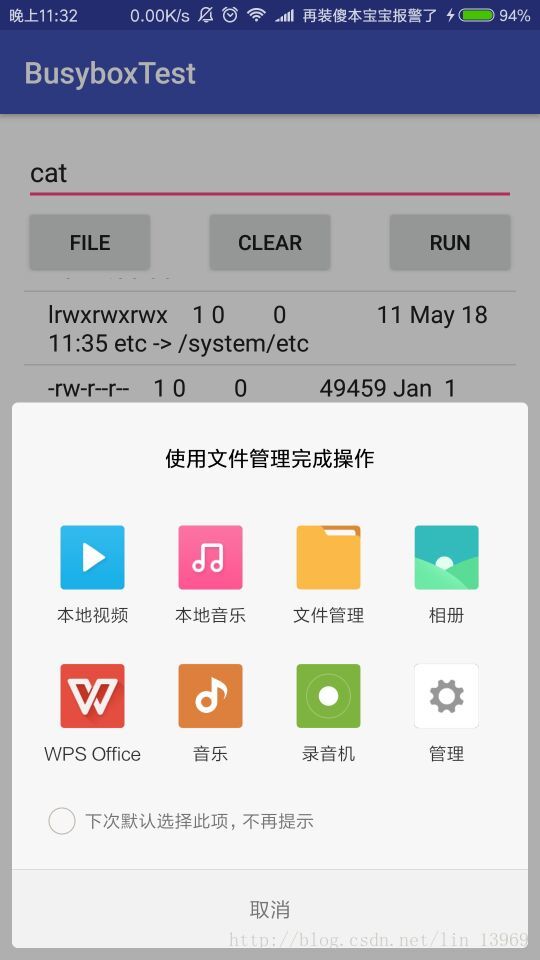
//文件地址选择按钮点击事件
btn_file.setOnClickListener(new View.OnClickListener() {
@Override
public void onClick(View v) {
//通过intent调用系统文件浏览器选择并返回文件数据
Intent intent = new Intent(Intent.ACTION_GET_CONTENT);
intent.setType("*/*");//设置文件类型
//为添加Action执行环境添加一个可打开的分类
intent.addCategory(Intent.CATEGORY_OPENABLE);
//调用Activity,并获取返回的数据
startActivityForResult(intent,FILE_PATH_RETURN_CODE);
}
});
}此时需要接收文件浏览器返回的数据,要重载onActivityResult函数:
/**
*获取被调用Activity所返回的结果
* @param requestCode requestCode用于与startActivityForResult中的requestCode中值进行比较判断,是以便确认返回的数据是从哪个Activity返回的。
* @param resultCode resultCode是由子Activity通过其setResult()方法返回。适用于多个activity都返回数据时,来标识到底是哪一个activity返回的值。
* @param data 一个Intent对象,带有返回的数据。可以通过data.getXxxExtra( );方法来获取指定数据类型的数据
*/
@Override
protected void onActivityResult(int requestCode, int resultCode, Intent data) {
super.onActivityResult(requestCode, resultCode, data);
if(resultCode== Activity.RESULT_OK){
//如果是这个Activity定义的intent返回代码
if(requestCode==FILE_PATH_RETURN_CODE){
String uri = data.getDataString();
//必须用decode,解析中文路径
//去掉file://  7个字符
uri = Uri.decode(uri);
uri = uri.substring(7);
//  System.out.println(uri);
final EditText textCmd = (EditText)findViewById(R.id.editCmd);

textCmd.setText(textCmd.getText().toString() + " "+uri);

}
}
}
最后,命令会涉及文件读写权限,AndroidManifest.xml中添加sd卡读写权限:
<uses-permission android:name="android.permission.WRITE_EXTERNAL_STORAGE"/>
5.测试结果:


author
Name:LuisEmail:@Luis
QQ:1396954967
CSDN:fjnuLuis
github:fjnuLuis
作者:林雍
原文链接:安卓手机无法root的情况下使用busybox

相关文章推荐
- 安卓手机无法root的情况下使用busybox
- 安卓手机安装busybox使用linux命令
- Android Studio 在使用华为手机真机调试时Log无法打印的情况
- 国内阉割版安卓手机无法使用google maps
- 今天就教大家查看手机的内存使用情况,可以帮你查看自己的程序占用了多大的内存(图文说明)
- 安卓手机的root问题
- 部分地区移动手机无法使用QQ邮箱IMAP收件原因的分析[附解决方法]
- MAC OS tcpdump无法使用解决方案 & 如何启用 root 用户
- Fedora 11 安装完成后无法使用root登录的解决方案
- 谷歌-安卓系统使用必读,什么是root, Recovery, Radio, APP TO SD, Rom
- Android手机无法使用debug解决方法
- 解决dropbear在busybox中使用无法使用本地用户登录问题
- 解决fedora 10无法使用root 账户登录
- android获取手机SD卡的使用情况
- 利用反射解决有些手机无法使用手电筒的问题
- 无法访问android.git.kernel.org的情况下如何使用repo
- vsftp无法使用root登录
- Fedora10下无法使用root登陆的详细解决步骤
- 手机无法使用debug的解决方法
- 无法找到“XXX.exe”的调试信息,或者调试信息不匹配。未使用调试信息生成二进制文件。”遇到这种情况肿么办???