详解 Vue & Vuex 实践
2017-06-02 16:09
357 查看
详解 Vue & Vuex 实践翻译自Vue
+ Vuex — Getting started,承接自2017
Vue.js 2快速入门指南,从属于Web
前端入门与工程实践。
随着应用复杂度的增加,我们需要考虑如何进行应用的状态管理,将业务逻辑与界面交互相剥离,详细讨论参考笔者的2016-我的前端之路:工具化与工程化。Vue
为我们提供了方便的组件内状态管理的机制,下面这个例子就是常见的获取列表数据然后渲染到界面中:
在 template 中我们可以方便的访问项目列表并且进行过滤、排序等操作,不过如果我们在另一个列表中也需要来展示相同的数据信息,继续按照这种方式实现的话我们不得不重新加载一遍数据。更麻烦的是如果用户在本地修改了某个列表数据,那么如何同步两个组件中的列表信息会是个头疼的问题。Vue 官方推荐使用Vuex,类似于
Redux 的集中式状态管理工具来辅助解决这个问题。
根据 Vuex 文档中的描述,Vuex
是适用于 Vue.js 应用的状态管理库,为应用中的所有组件提供集中式的状态存储与操作,保证了所有状态以可预测的方式进行修改。
Vuex 中 Store 的模板化定义如下:
上述代码中包含了定义 Vuex Store 时关键的 5 个属性:
state: state 定义了应用状态的数据结构,同样可以在这里设置默认的初始状态。
actions:Actions 即是定义提交触发更改信息的描述,常见的例子有从服务端获取数据,在数据获取完成后会调用store.commit()来调用更改 Store 中的状态。可以在组件中使用dispatch来发出 Actions。
mutations: 调用 mutations 是唯一允许更新应用状态的地方。
getters: Getters 允许组件从 Store 中获取数据,譬如我们可以从 Store 中的 projectList 中筛选出已完成的项目列表:
modules: modules 对象允许将单一的 Store 拆分为多个 Store 的同时保存在单一的状态树中。随着应用复杂度的增加,这种拆分能够更好地组织代码,更多细节参考这里。
在理解了 Vuex 的基础概念之后,我们会创建一个真正的应用来熟悉整个使用流程。该应用承接自这个博客,在准备好基础项目之后,我们需要将
vuex 引入项目中:
该步骤完成之后,我们需要在 src 目录下创建名为 store 的目录来存放状态管理相关代码,首先创建 index.js:
然后在 main.js 文件中我们需要将该 Store 实例添加到构造的 Vue 实例中:
然后,我们需要去完善 Store 定义:
在本项目中,我们将原本存放在组件内的项目数组移动到 Store 中,并且将所有关于状态的改变都通过 Action 进行而不是直接修改:
这个模板还是十分直观,我们通过computed对象来访问 Store 中的状态信息。值得一提的是这里的mapState函数,这里用的是简写,完整的话可以直接访问 Store 对象:
mapState 是 Vuex 提供的简化数据访问的辅助函数。我们视线回到 project.vue 容器组件,在该组件中调用this.$store.dispatch(‘LOAD_PROJECT_LIST)来触发从服务端中加载项目列表:
当我们启动应用时,Vuex 状态管理容器会自动在数据获取之后渲染整个项目列表。现在我们需要添加新的 Action 与 Mutation 来创建新的项目:
然后我们创建一个简单的用于添加新的项目的组件 addProject.vue:
该组件会派发某个 Action 来添加组件,我们需要将该组件引入到 projects.vue 中:
重新运行下该应用会看到服务端返回的创建成功的提示,现在我们添加另一个功能,就是允许用户将某个项目设置为已完成。我们现在添加新的组件 completeToggle.vue:
该组件会展示一个用于切换项目是否完成的按钮,我们通过 Props 传入具体的项目信息然后通过触发 TOGGLE_COMPLETED Action 来使服务端进行相对应的更新与相应:
UPDATE_PROJECT 会触发项目列表移除对应的项目并且将服务端返回的数据重新添加到数组中:
最后一步就是将 completeToggle 组件引入到 projectList 组件中,然后将其添加到列表中:
现在我们的应用已经具备了基本的特性,这里我们再度回顾下文首的讨论,为什么我们需要大费周章的引入外部状态管理,将业务逻辑切分到组件外。譬如这里我们需要另一个组件来展示项目的统计信息,譬如项目的总数或者已完成项目的数目。我们肯定要避免重复地从服务端抓取数据,而是所谓的 Single Source Of Truth。这里我们添加新的 projectStatus.vue 组件来展示项目的统计信息:
该组件会展示项目的总数与已完成项目的总数,上面我们使用了maoGetters辅助函数来减少冗余代码:
最后我们将该统计信息添加到项目列表中,效果图示如下:
+ Vuex — Getting started,承接自2017
Vue.js 2快速入门指南,从属于Web
前端入门与工程实践。
随着应用复杂度的增加,我们需要考虑如何进行应用的状态管理,将业务逻辑与界面交互相剥离,详细讨论参考笔者的2016-我的前端之路:工具化与工程化。Vue
为我们提供了方便的组件内状态管理的机制,下面这个例子就是常见的获取列表数据然后渲染到界面中:
import axios from 'axios'
export default {
name: 'projects',
data: function () {
return {
projects: []
}
},
methods: {
loadProjects: function () {
axios.get('/secured/projects').then((response) => {
this.projects = response.data
}, (err) => {
console.log(err)
})
}
},
mounted: function () {
this.loadProjects()
}
}
</script>
在 template 中我们可以方便的访问项目列表并且进行过滤、排序等操作,不过如果我们在另一个列表中也需要来展示相同的数据信息,继续按照这种方式实现的话我们不得不重新加载一遍数据。更麻烦的是如果用户在本地修改了某个列表数据,那么如何同步两个组件中的列表信息会是个头疼的问题。Vue 官方推荐使用Vuex,类似于
Redux 的集中式状态管理工具来辅助解决这个问题。
何谓 Vuex?
根据 Vuex 文档中的描述,Vuex是适用于 Vue.js 应用的状态管理库,为应用中的所有组件提供集中式的状态存储与操作,保证了所有状态以可预测的方式进行修改。
Vuex 中 Store 的模板化定义如下:
import Vue from 'vue'
import Vuex from 'vuex'
Vue.use(Vuex)
const store = new Vuex.Store({
state: {
},
actions: {
},
mutations: {
},
getters: {
},
modules: {

}
})
export default store
上述代码中包含了定义 Vuex Store 时关键的 5 个属性:
state: state 定义了应用状态的数据结构,同样可以在这里设置默认的初始状态。
state: {
projects: [],
userProfile: {}
}
actions:Actions 即是定义提交触发更改信息的描述,常见的例子有从服务端获取数据,在数据获取完成后会调用store.commit()来调用更改 Store 中的状态。可以在组件中使用dispatch来发出 Actions。
actions: {
LOAD_PROJECT_LIST: function ({ commit }) {
axios.get('/secured/projects').then((response) => {
commit('SET_PROJECT_LIST', { list: response.data })
}, (err) => {
console.log(err)
})
}
}
mutations: 调用 mutations 是唯一允许更新应用状态的地方。
mutations: {
SET_PROJECT_LIST: (state, { list }) => {
state.projects = list
}
}
getters: Getters 允许组件从 Store 中获取数据,譬如我们可以从 Store 中的 projectList 中筛选出已完成的项目列表:
getters: {
completedProjects: state => {
return state.projects.filter(project => project.completed).length
}
}
modules: modules 对象允许将单一的 Store 拆分为多个 Store 的同时保存在单一的状态树中。随着应用复杂度的增加,这种拆分能够更好地组织代码,更多细节参考这里。
Example
在理解了 Vuex 的基础概念之后,我们会创建一个真正的应用来熟悉整个使用流程。该应用承接自这个博客,在准备好基础项目之后,我们需要将vuex 引入项目中:
$ yarn add vuex
该步骤完成之后,我们需要在 src 目录下创建名为 store 的目录来存放状态管理相关代码,首先创建 index.js:
import Vue from 'vue'
import Vuex from 'vuex'
import axios from 'axios'
Vue.use(Vuex)
const store = new Vuex.Store({
state: {

},
actions: {

},
mutations: {

},
getters: {

}
})
export default store
然后在 main.js 文件中我们需要将该 Store 实例添加到构造的 Vue 实例中:
import store from './store'
/* eslint-disable no-new */
new Vue({
template: `
<div>
<navbar />
<section class="section">
<div class="container is-fluid">
<router-view></router-view>
</div>
</section>
</div>
`,
router,
store,
components: {
navbar
}
}).$mount('#app')
然后,我们需要去完善 Store 定义:
import Vue from 'vue'
import Vuex from 'vuex'
import axios from 'axios'
Vue.use(Vuex)
const store = new Vuex.Store({
state: {
projects: []
},
actions: {
LOAD_PROJECT_LIST: function ({ commit }) {
axios.get('/secured/projects').then((response) => {
commit('SET_PROJECT_LIST', { list: response.data })
}, (err) => {
console.log(err)
})
}
},
mutations: {
SET_PROJECT_LIST: (state, { list }) => {
state.projects = list
}
},
getters: {
openProjects: state => {
return state.projects.filter(project => !project.completed)
}
}
})
export default store
在本项目中,我们将原本存放在组件内的项目数组移动到 Store 中,并且将所有关于状态的改变都通过 Action 进行而不是直接修改:
// /src/components/projectList.vue
<template lang="html">
<div class="">
<table class="table">
<thead>
<tr>
<th>Project Name</th>
<th>Assigned To</th>
<th>Priority</th>
<th>Completed</th>
</tr>
</thead>
<tbody>
<tr v-for="item in projects">
<td>{{item.name}}</td>
<td>{{item.assignedTo}}</td>
<td>{{item.pri
c513
ority}}</td>
<td><i v-if="item.completed" class="fa fa-check"></i></td>
</tr>
</tbody>
</table>
</div>
</template>
<script>
import { mapState } from 'vuex'
export default {
name: 'projectList',
computed: mapState([
'projects'
])
}
</script>
<style lang="css">
</style>
这个模板还是十分直观,我们通过computed对象来访问 Store 中的状态信息。值得一提的是这里的mapState函数,这里用的是简写,完整的话可以直接访问 Store 对象:
computed: {
projects () {
return this.$store.state.projects
}
}
mapState 是 Vuex 提供的简化数据访问的辅助函数。我们视线回到 project.vue 容器组件,在该组件中调用this.$store.dispatch(‘LOAD_PROJECT_LIST)来触发从服务端中加载项目列表:
<template lang="html">
<div id="projects">
<div class="columns">
<div class="column is-half">
<div class="notification">
Project List
</div>
<project-list />
</div>
</div>
</div>
</template>
<script>
import projectList from '../components/projectList'
export default {
name: 'projects',
components: {
projectList
},
mounted: function () {
this.$store.dispatch('LOAD_PROJECT_LIST')
}
}
</script>
当我们启动应用时,Vuex 状态管理容器会自动在数据获取之后渲染整个项目列表。现在我们需要添加新的 Action 与 Mutation 来创建新的项目:
// under actions:
ADD_NEW_PROJECT: function ({ commit }) {
axios.post('/secured/projects').then((response) => {
commit('ADD_PROJECT', { project: response.data })
}, (err) => {
console.log(err)
})
}
// under mutations:
ADD_PROJECT: (state, { project }) => {
state.projects.push(project)
}
然后我们创建一个简单的用于添加新的项目的组件 addProject.vue:
<template lang="html">
<button type="button" class="button" @click="addProject()">Add New Project</button>
</template>
<script>
export default {
name: 'addProject',
methods: {
addProject () {
this.$store.dispatch('ADD_NEW_PROJECT')
}
}
}
</script>
该组件会派发某个 Action 来添加组件,我们需要将该组件引入到 projects.vue 中:
<template lang="html">
<div id="projects">
<div class="columns">
<div class="column is-half">
<div class="notification">
Project List
</div>
<project-list />
<add-project />
</div>
</div>
</div>
</template>
<script>
import projectList from '../components/projectList'
import addProject from '../components/addProject'
export default {
name: 'projects',
components: {
projectList,
addProject
},
mounted: function () {
this.$store.dispatch('LOAD_PROJECT_LIST')
}
}
</script>
重新运行下该应用会看到服务端返回的创建成功的提示,现在我们添加另一个功能,就是允许用户将某个项目设置为已完成。我们现在添加新的组件 completeToggle.vue:
<template lang="html">
<button type="button" class="button"  @click="toggle(item)">
<i class="fa fa-undo" v-if="item.completed"></i>
<i class="fa fa-check-circle" v-else></i>
</button>
</template>
<script>
export default {
name: 'completeToggle',
props: ['item'],
methods: {
toggle (item) {
this.$store.dispatch('TOGGLE_COMPLETED', { item: item })
}
}
}
</script>
该组件会展示一个用于切换项目是否完成的按钮,我们通过 Props 传入具体的项目信息然后通过触发 TOGGLE_COMPLETED Action 来使服务端进行相对应的更新与相应:
// actions
TOGGLE_COMPLETED: function ({ commit, state }, { item }) {
axios.put('/secured/projects/' + item.id, item).then((response) => {
commit('UPDATE_PROJECT', { item: response.data })
}, (err) => {
console.log(err)
})
}
// mutations
UPDATE_PROJECT: (state, { item }) => {
let idx = state.projects.map(p => p.id).indexOf(item.id)
state.projects.splice(idx, 1, item)
}
UPDATE_PROJECT 会触发项目列表移除对应的项目并且将服务端返回的数据重新添加到数组中:
app.put('/secured/projects/:id', function (req, res) {
let project = data.filter(function (p) { return p.id == req.params.id })
if (project.length > 0) {
project[0].completed = !project[0].completed
res.status(201).json(project[0])
} else {
res.sendStatus(404)
}
})
最后一步就是将 completeToggle 组件引入到 projectList 组件中,然后将其添加到列表中:
// new column in table
<td><complete-toggle :item="item" /></td>
// be sure import and add to the components object
再谈引入状态管理的意义
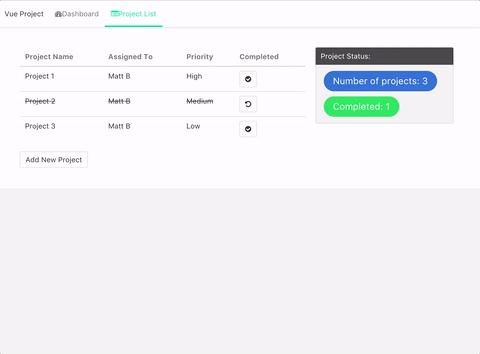
现在我们的应用已经具备了基本的特性,这里我们再度回顾下文首的讨论,为什么我们需要大费周章的引入外部状态管理,将业务逻辑切分到组件外。譬如这里我们需要另一个组件来展示项目的统计信息,譬如项目的总数或者已完成项目的数目。我们肯定要避免重复地从服务端抓取数据,而是所谓的 Single Source Of Truth。这里我们添加新的 projectStatus.vue 组件来展示项目的统计信息:<template lang="html">
<article class="message">
<div class="message-header">
<p>Project Status:</p>
</div>
<div class="message-body">
<div class="control">
<span class="tag is-info">Number of projects: {{projectCount}}</span>
</div>
<div class="control">
<span class="tag is-success">Completed: {{completedProjects}}</span>
</div>
</div>
</article>
</template>
<script>
import { mapGetters } from 'vuex'
export default {
name: 'projectStatus',
computed: {
...mapGetters([
'completedProjects',
'projectCount'
])
}
}
</script>该组件会展示项目的总数与已完成项目的总数,上面我们使用了maoGetters辅助函数来减少冗余代码:
getters: {
completedProjects: state => {
return state.projects.filter(project =>project.completed).length
},
projectCount: state => {
return state.projects.length
}
}
最后我们将该统计信息添加到项目列表中,效果图示如下:

相关文章推荐
- 详解 Vue & Vuex 实践
- 详解vue-cli多页面工程实践第1/2页
- Vue微信项目按需授权登录策略实践思路详解
- Linux进程间通信(IPC)编程实践(四) 详解System V消息队列(2)(msgsnd & msgrcv)
- 详解基于 Nuxt 的 Vue.js 服务端渲染实践
- 详解在Vue中使用TypeScript的一些思考(实践)
- 详解vue组件的is特性:限制元素&动态组件
- Vue的应用之道——实践&&领悟
- 详解vue通过NGINX部署在子目录或者二级目录实践
- vue.js+boostrap项目实践(案例详解)
- JavaScript Event Loop 机制详解与 Vue.js 中实践应用
- 详解Vue.js项目API、Router配置拆分实践
- 详解Vue CLI3 多页应用实践和源码设计
- TCP&UDP伪首部详解
- STL实践(string&IO)
- 详解extern "C"
- JavaScript中的关键字"VAR"使用详解
- GCC常用选项&使用详解
- 我的Lean & Agile(精简和敏捷)经历(这才是最佳实践)
- "Partial Class"详解