3 ElasticSearch 索引查询使用指南
2017-06-02 15:10
501 查看
转账自http://blog.csdn.net/pilihaotian/article/details/52452014
curl ‘localhost:9200/_cat/health?v’
绿色表示一切正常, 黄色表示所有的数据可用但是部分副本还没有分配,红色表示部分数据因为某些原因不可用.
curl -XPUT ‘localhost:9200/customer?pretty’
curl ‘localhost:9200/_cat/indices?v’
结果如下:


上图中红框所表示的是:我们有一个叫customer的索引,它有五个私有的分片以及一个副本,在它里面有0个文档。
主体为JSON格式的语句: { “name”: “John Doe” }
curl -XPUT ‘localhost:9200/customer/external/1?pretty’ -d ’
{
“name”: “John Doe”
}’
返回结果为:create:true 表示插入成功。
获取GET,curl -XGET ‘localhost:9200/customer/external/1?pretty’
其中含义为:获取customer索引下类型为external,id为1的数据,pretty参数表示返回结果格式美观。
curl ‘localhost:9200/_cat/indices?v’
:REST风格的语法谓词
:节点ip
:节点端口号,默认9200
:索引名
:索引类型
:操作对象的ID号
{
“name”: “John Doe”
}’
curl -XPUT ‘localhost:9200/customer/external/1?pretty’ -d ’
{
“name”: “Jane Doe”
}’
上述命令语句是:先新增id为1,name为John Doe的数据,然后将id为1的name修改为Jane Doe。
curl -XPOST ‘localhost:9200/customer/external/1/_update?pretty’ -d ’
{
“doc”: { “name”: “Jane Doe” }
}’
9.2 这个例子展示如何将id为1数据的name字段更新为Jane Doe同时增加字段age为20:
curl -XPOST ‘localhost:9200/customer/external/1/_update?pretty’ -d ’
{
“doc”: { “name”: “Jane Doe”, “age”: 20 }
}’
9.3 也可以通过一些简单的scripts来执行更新。一下语句通过使用script将年龄增加5:
curl -XPOST ‘localhost:9200/customer/external/1/_update?pretty’ -d ’
{
“script” : “ctx._source.age += 5”
}’
curl -XDELETE ‘localhost:9200/customer/external/2?pretty’
curl -XPOST ‘localhost:9200/customer/external/_bulk?pretty’ -d ’
{“index”:{“_id”:”1”}}
{“name”: “John Doe” }
{“index”:{“_id”:”2”}}
{“name”: “Jane Doe” }
’
下面语句批处理执行更新id为1的数据然后执行删除id为2的数据
curl -XPOST ‘localhost:9200/customer/external/_bulk?pretty’ -d ’
{“update”:{“_id”:”1”}}
{“doc”: { “name”: “John Doe becomes Jane Doe” } }
{“delete”:{“_id”:”2”}}
其中每个数据都是如下格式:
{
“index”:{“_id”:”1”}
}
{
“account_number”: 0,
“balance”: 16623,
“firstname”: “Bradshaw”,
“lastname”: “Mckenzie”,
“age”: 29,
“gender”: “F”,
“address”: “244 Columbus Place”,
“employer”: “Euron”,
“email”: “bradshawmckenzie@euron.com”,
“city”: “Hobucken”,
“state”: “CO”
}
导入示例数据集:
curl -XPOST ‘localhost:9200/bank/account/_bulk?pretty’ –data-binary “@accounts.json”
curl ‘localhost:9200/_cat/indices?v’

{
“took” : 63,
“timed_out” : false,
“_shards” : {
“total” : 5,
“successful” : 5,
“failed” : 0
},
“hits” : {
“total” : 1000,
“max_score” : 1.0,
“hits” : [ {
“_index” : “bank”,
“_type” : “account”,
“_id” : “1”,
“_score” : 1.0, “_source” : {“account_number”:1,”balance”:39225,”firstname”:”Amber”,”lastname”:”Duke”,”age”:32,”gender”:”M”,”address”:”880 Holmes Lane”,”employer”:”Pyrami”,”email”:”amberduke@pyrami.com”,”city”:”Brogan”,”state”:”IL”}
}, {
“_index” : “bank”,
“_type” : “account”,
“_id” : “6”,
“_score” : 1.0, “_source” : {“account_number”:6,”balance”:5686,”firstname”:”Hattie”,”lastname”:”Bond”,”age”:36,”gender”:”M”,”address”:”671 Bristol Street”,”employer”:”Netagy”,”email”:”hattiebond@netagy.com”,”city”:”Dante”,”state”:”TN”}
}, {
“_index” : “bank”,
“_type” : “account”,
上面示例返回所有bank中的索引数据。其中 q=* 表示匹配索引中所有的数据。
等价于:
curl -XPOST ‘localhost:9200/bank/_search?pretty’ -d ’
{
“query”: { “match_all”: {} }
}’
curl -XPOST ‘localhost:9200/bank/_search?pretty’ -d ‘
{
“query”: { “match_all”: {} },
“size”: 1
}’
注意:如果siez不指定,则默认返回10条数据。
curl -XPOST ‘localhost:9200/bank/_search?pretty’ -d ‘
{
“query”: { “match_all”: {} },
“from”: 10,
“size”: 10
}’
返回从11到20的数据。(索引下标从0开始)
curl -XPOST ‘localhost:9200/bank/_search?pretty’ -d ‘
{
“query”: { “match_all”: {} },
“sort”: { “balance”: { “order”: “desc” } }
}’
上述示例匹配所有的索引中的数据,按照balance字段降序排序,并且返回前10条(如果不指定size,默认最多返回10条)。
curl -XPOST ‘localhost:9200/bank/_search?pretty’ -d ‘
{
“query”: { “match_all”: {} },
“_source”: [“account_number”, “balance”]
}’
返回account_number 为20 的数据:
curl -XPOST ‘localhost:9200/bank/_search?pretty’ -d ’
{
“query”: { “match”: { “account_number”: 20 } }
}’
返回address中包含mill的所有数据::
curl -XPOST ‘localhost:9200/bank/_search?pretty’ -d ’
{
“query”: { “match”: { “address”: “mill” } }
}’
返回地址中包含mill或者lane的所有数据:
curl -XPOST ‘localhost:9200/bank/_search?pretty’ -d ’
{
“query”: { “match”: { “address”: “mill lane” } }
}’
和上面匹配单个词语不同,下面这个例子是多匹配(match_phrase短语匹配),返回地址中包含短语 “mill lane”的所有数据:
curl -XPOST ‘localhost:9200/bank/_search?pretty’ -d ’
{
“query”: { “match_phrase”: { “address”: “mill lane” } }
}’
以下是布尔查询,布尔查询允许我们将多个简单的查询组合成一个更复杂的布尔逻辑查询。
这个例子将两个查询组合,返回地址中含有mill和lane的所有记录数据:
curl -XPOST ‘localhost:9200/bank/_search?pretty’ -d ’
{
“query”: {
“bool”: {
“must”: [
{ “match”: { “address”: “mill” } },
{ “match”: { “address”: “lane” } }
]
}
}
}’
上述例子中,must表示所有查询必须都为真才被认为匹配。
相反, 这个例子组合两个查询,返回地址中含有mill或者lane的所有记录数据:
curl -XPOST ‘localhost:9200/bank/_search?pretty’ -d ’
{
“query”: {
“bool”: {
“should”: [
{ “match”: { “address”: “mill” } },
{ “match”: { “address”: “lane” } }
]
}
}
}’
上述例子中,bool表示查询列表中只要有任何一个为真则认为匹配。
下面例子组合两个查询,返回地址中既没有mill也没有lane的所有数据:
curl -XPOST ‘localhost:9200/bank/_search?pretty’ -d ’
{
“query”: {
“bool”: {
“must_not”: [
{ “match”: { “address”: “mill” } },
{ “match”: { “address”: “lane” } }
]
}
}
}’
上述例子中,must_not表示查询列表中没有为真的(也就是全为假)时则认为匹配。
我们可以组合must、should、must_not来实现更加复杂的多级逻辑查询。
下面这个例子返回年龄大于40岁、不居住在ID的所有数据:
curl -XPOST ‘localhost:9200/bank/_search?pretty’ -d ’
{
“query”: {
“bool”: {
“must”: [
{ “match”: { “age”: “40” } }
],
“must_not”: [
{ “match”: { “state”: “ID” } }
]
}
}
}’
curl -XPOST ‘localhost:9200/bank/_search?pretty’ -d ‘
{
“query”: {
“bool”: {
}
}
}’
curl -XPOST ‘localhost:9200/bank/_search?pretty’ -d ‘
{
“size”: 0,
“aggs”: {
“group_by_state”: {
}
}
}’
注意:我们设置size=0,不显示查询hits,因为我们只想看返回的聚合结果。


上述语句类似于以下SQL语句:
SELECT state, COUNT() FROM bank GROUP BY state ORDER BY COUNT() DESC
下面这个实例按照state分组,降序排序,返回balance的平均值:
curl -XPOST ‘localhost:9200/bank/_search?pretty’ -d ‘
{
“size”: 0,
“aggs”: {
“group_by_state”: {
}
}’
一 查询集群健康
我们通常用用_cat API检测集群是否健康。 确保9200端口号可用:
curl ‘localhost:9200/_cat/health?v’
绿色表示一切正常, 黄色表示所有的数据可用但是部分副本还没有分配,红色表示部分数据因为某些原因不可用.
二 获取节点列表
curl ‘localhost:9200/_cat/nodes?v’三 列出所有索引
curl ‘localhost:9200/_cat/indices?v’四 创建索引
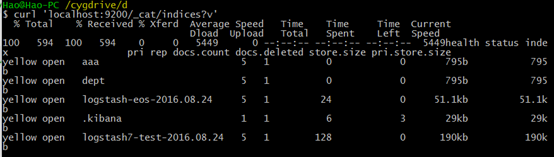
现在我们创建一个名为“customer”的索引,然后再查看所有的索引:curl -XPUT ‘localhost:9200/customer?pretty’
curl ‘localhost:9200/_cat/indices?v’
结果如下:
上图中红框所表示的是:我们有一个叫customer的索引,它有五个私有的分片以及一个副本,在它里面有0个文档。
五 插入和获取
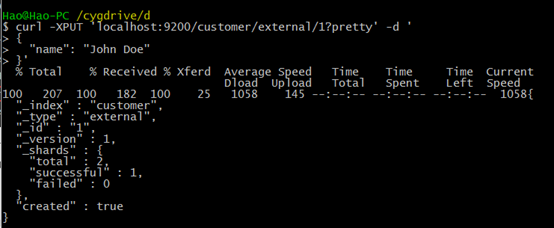
现在插入一些数据到集群索引。我们必须给ES指定所以的类型。如下语句:”external” type, ID:1:主体为JSON格式的语句: { “name”: “John Doe” }
curl -XPUT ‘localhost:9200/customer/external/1?pretty’ -d ’
{
“name”: “John Doe”
}’
返回结果为:create:true 表示插入成功。
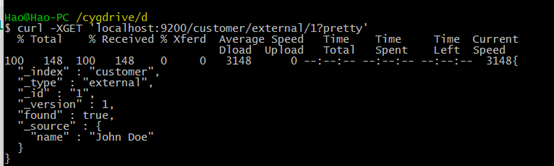
获取GET,curl -XGET ‘localhost:9200/customer/external/1?pretty’
其中含义为:获取customer索引下类型为external,id为1的数据,pretty参数表示返回结果格式美观。
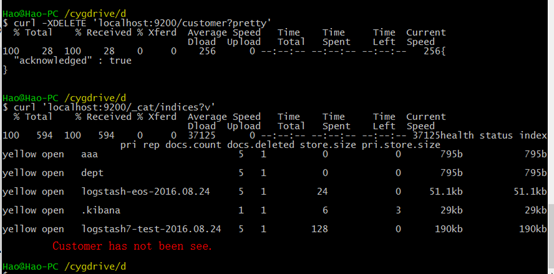
六 删除索引
curl -XDELETE ‘localhost:9200/customer?pretty’curl ‘localhost:9200/_cat/indices?v’
七 格式总结
curl -X :///:REST风格的语法谓词
:节点ip
:节点端口号,默认9200
:索引名
:索引类型
:操作对象的ID号
八 修改数据
curl -XPUT ‘localhost:9200/customer/external/1?pretty’ -d ’{
“name”: “John Doe”
}’
curl -XPUT ‘localhost:9200/customer/external/1?pretty’ -d ’
{
“name”: “Jane Doe”
}’
上述命令语句是:先新增id为1,name为John Doe的数据,然后将id为1的name修改为Jane Doe。
九 更新数据
9.1 这个例子展示如何将id为1文档的name字段更新为Jane Doe:curl -XPOST ‘localhost:9200/customer/external/1/_update?pretty’ -d ’
{
“doc”: { “name”: “Jane Doe” }
}’
9.2 这个例子展示如何将id为1数据的name字段更新为Jane Doe同时增加字段age为20:
curl -XPOST ‘localhost:9200/customer/external/1/_update?pretty’ -d ’
{
“doc”: { “name”: “Jane Doe”, “age”: 20 }
}’
9.3 也可以通过一些简单的scripts来执行更新。一下语句通过使用script将年龄增加5:
curl -XPOST ‘localhost:9200/customer/external/1/_update?pretty’ -d ’
{
“script” : “ctx._source.age += 5”
}’
十 删除数据
删除数据那是相当的直接. 下面的语句将执行删除Customer中ID为2的数据:curl -XDELETE ‘localhost:9200/customer/external/2?pretty’
十一 批处理
下面语句将在一个批量操作中执行创建索引:curl -XPOST ‘localhost:9200/customer/external/_bulk?pretty’ -d ’
{“index”:{“_id”:”1”}}
{“name”: “John Doe” }
{“index”:{“_id”:”2”}}
{“name”: “Jane Doe” }
’
下面语句批处理执行更新id为1的数据然后执行删除id为2的数据
curl -XPOST ‘localhost:9200/customer/external/_bulk?pretty’ -d ’
{“update”:{“_id”:”1”}}
{“doc”: { “name”: “John Doe becomes Jane Doe” } }
{“delete”:{“_id”:”2”}}
十二 导入数据集
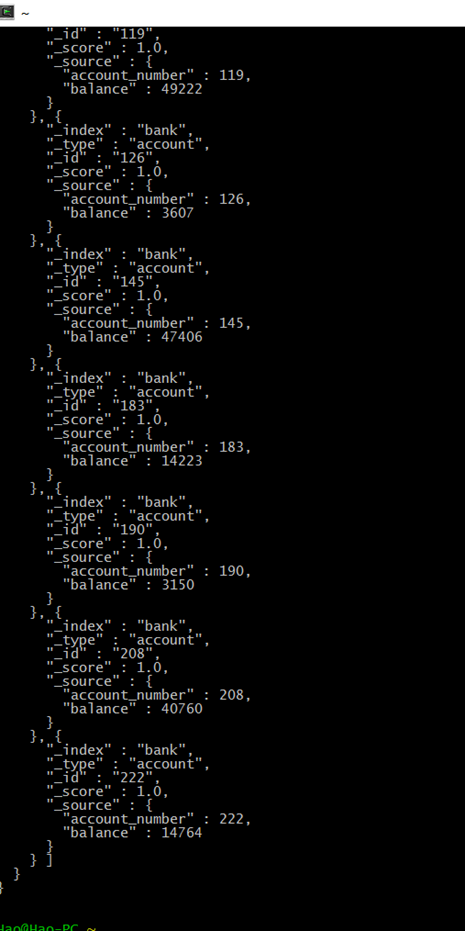
可以导入json数据集,譬如有个accounts.json其中每个数据都是如下格式:
{
“index”:{“_id”:”1”}
}
{
“account_number”: 0,
“balance”: 16623,
“firstname”: “Bradshaw”,
“lastname”: “Mckenzie”,
“age”: 29,
“gender”: “F”,
“address”: “244 Columbus Place”,
“employer”: “Euron”,
“email”: “bradshawmckenzie@euron.com”,
“city”: “Hobucken”,
“state”: “CO”
}
导入示例数据集:
curl -XPOST ‘localhost:9200/bank/account/_bulk?pretty’ –data-binary “@accounts.json”
curl ‘localhost:9200/_cat/indices?v’
十三 查询
curl ‘localhost:9200/bank/_search?q=*&pretty’{
“took” : 63,
“timed_out” : false,
“_shards” : {
“total” : 5,
“successful” : 5,
“failed” : 0
},
“hits” : {
“total” : 1000,
“max_score” : 1.0,
“hits” : [ {
“_index” : “bank”,
“_type” : “account”,
“_id” : “1”,
“_score” : 1.0, “_source” : {“account_number”:1,”balance”:39225,”firstname”:”Amber”,”lastname”:”Duke”,”age”:32,”gender”:”M”,”address”:”880 Holmes Lane”,”employer”:”Pyrami”,”email”:”amberduke@pyrami.com”,”city”:”Brogan”,”state”:”IL”}
}, {
“_index” : “bank”,
“_type” : “account”,
“_id” : “6”,
“_score” : 1.0, “_source” : {“account_number”:6,”balance”:5686,”firstname”:”Hattie”,”lastname”:”Bond”,”age”:36,”gender”:”M”,”address”:”671 Bristol Street”,”employer”:”Netagy”,”email”:”hattiebond@netagy.com”,”city”:”Dante”,”state”:”TN”}
}, {
“_index” : “bank”,
“_type” : “account”,
上面示例返回所有bank中的索引数据。其中 q=* 表示匹配索引中所有的数据。
等价于:
curl -XPOST ‘localhost:9200/bank/_search?pretty’ -d ’
{
“query”: { “match_all”: {} }
}’
十四 查询语言
匹配所有数据,但只返回1个:curl -XPOST ‘localhost:9200/bank/_search?pretty’ -d ‘
{
“query”: { “match_all”: {} },
“size”: 1
}’
注意:如果siez不指定,则默认返回10条数据。
curl -XPOST ‘localhost:9200/bank/_search?pretty’ -d ‘
{
“query”: { “match_all”: {} },
“from”: 10,
“size”: 10
}’
返回从11到20的数据。(索引下标从0开始)
curl -XPOST ‘localhost:9200/bank/_search?pretty’ -d ‘
{
“query”: { “match_all”: {} },
“sort”: { “balance”: { “order”: “desc” } }
}’
上述示例匹配所有的索引中的数据,按照balance字段降序排序,并且返回前10条(如果不指定size,默认最多返回10条)。
十五 执行搜索
下面例子展示如何返回两个字段(account_number balance)curl -XPOST ‘localhost:9200/bank/_search?pretty’ -d ‘
{
“query”: { “match_all”: {} },
“_source”: [“account_number”, “balance”]
}’
返回account_number 为20 的数据:
curl -XPOST ‘localhost:9200/bank/_search?pretty’ -d ’
{
“query”: { “match”: { “account_number”: 20 } }
}’
返回address中包含mill的所有数据::
curl -XPOST ‘localhost:9200/bank/_search?pretty’ -d ’
{
“query”: { “match”: { “address”: “mill” } }
}’
返回地址中包含mill或者lane的所有数据:
curl -XPOST ‘localhost:9200/bank/_search?pretty’ -d ’
{
“query”: { “match”: { “address”: “mill lane” } }
}’
和上面匹配单个词语不同,下面这个例子是多匹配(match_phrase短语匹配),返回地址中包含短语 “mill lane”的所有数据:
curl -XPOST ‘localhost:9200/bank/_search?pretty’ -d ’
{
“query”: { “match_phrase”: { “address”: “mill lane” } }
}’
以下是布尔查询,布尔查询允许我们将多个简单的查询组合成一个更复杂的布尔逻辑查询。
这个例子将两个查询组合,返回地址中含有mill和lane的所有记录数据:
curl -XPOST ‘localhost:9200/bank/_search?pretty’ -d ’
{
“query”: {
“bool”: {
“must”: [
{ “match”: { “address”: “mill” } },
{ “match”: { “address”: “lane” } }
]
}
}
}’
上述例子中,must表示所有查询必须都为真才被认为匹配。
相反, 这个例子组合两个查询,返回地址中含有mill或者lane的所有记录数据:
curl -XPOST ‘localhost:9200/bank/_search?pretty’ -d ’
{
“query”: {
“bool”: {
“should”: [
{ “match”: { “address”: “mill” } },
{ “match”: { “address”: “lane” } }
]
}
}
}’
上述例子中,bool表示查询列表中只要有任何一个为真则认为匹配。
下面例子组合两个查询,返回地址中既没有mill也没有lane的所有数据:
curl -XPOST ‘localhost:9200/bank/_search?pretty’ -d ’
{
“query”: {
“bool”: {
“must_not”: [
{ “match”: { “address”: “mill” } },
{ “match”: { “address”: “lane” } }
]
}
}
}’
上述例子中,must_not表示查询列表中没有为真的(也就是全为假)时则认为匹配。
我们可以组合must、should、must_not来实现更加复杂的多级逻辑查询。
下面这个例子返回年龄大于40岁、不居住在ID的所有数据:
curl -XPOST ‘localhost:9200/bank/_search?pretty’ -d ’
{
“query”: {
“bool”: {
“must”: [
{ “match”: { “age”: “40” } }
],
“must_not”: [
{ “match”: { “state”: “ID” } }
]
}
}
}’
十六 过滤filter(条件查询)
下面这个例子使用了布尔查询返回balance在20000到30000之间的所有数据。curl -XPOST ‘localhost:9200/bank/_search?pretty’ -d ‘
{
“query”: {
“bool”: {
      "must": { "match_all": {} },

     "filter": {

    "range": {

  "balance": {

    "gte": 20000,

   "lte": 30000

   }

   }

   }
}
}
}’
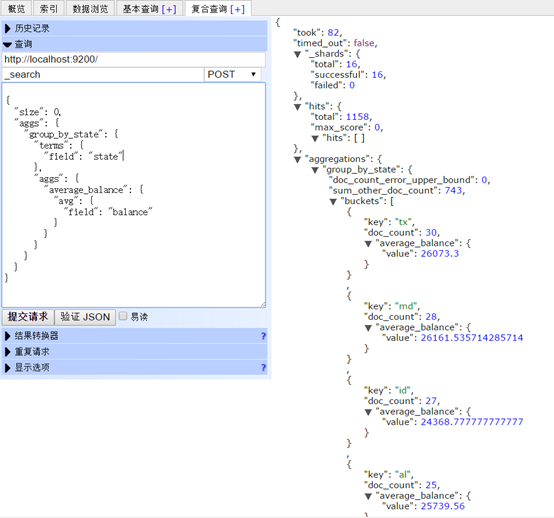
十七 聚合查询
下面这个例子: 将所有的数据按照state分组(group),然后按照分组记录数从大到小排序,返回前十条(默认):curl -XPOST ‘localhost:9200/bank/_search?pretty’ -d ‘
{
“size”: 0,
“aggs”: {
“group_by_state”: {
    "terms": {

      "field": "state"

    }
}
}
}’
注意:我们设置size=0,不显示查询hits,因为我们只想看返回的聚合结果。
上述语句类似于以下SQL语句:
SELECT state, COUNT() FROM bank GROUP BY state ORDER BY COUNT() DESC
下面这个实例按照state分组,降序排序,返回balance的平均值:
curl -XPOST ‘localhost:9200/bank/_search?pretty’ -d ‘
{
“size”: 0,
“aggs”: {
“group_by_state”: {
    "terms": {

   "field": "state"

   },

    "aggs": {

   "average_balance": {

    "avg": {

     "field": "balance"

   }

   }

   }

  }
}
}’

相关文章推荐
- ElasticSearch 索引查询使用指南——详细版
- ElasticSearch 索引查询使用指南(开发笔记170203)
- ElasticSearch 索引查询使用指南——详细版
- Elasticsearch使用指南--查询
- MySQL查询优化技术系列讲座之使用索引
- 关联表查询和索引使用的探讨一则 推荐
- 使用索引的误区之二:使用了 和 != 操作符,导致查询不使用索引
- 使用索引的误区之一:没有使用复合索引的前导列导致查询不使用索引
- 如何指定查询使用某一索引
- ABAP--在查询条件只包含部分索引字段时,如何使用索引
- pgpool-II使用指南-并发查询(二)(簡體)
- oracle使用了索引但是查询性能没有改善(oracle的索引陷阱)
- 数据库查询的优化——索引使用的注意点(转)
- ABAP--在查询条件只包含部分索引字段时,如何使用索引
- ABAP--在查询条件只包含部分索引字段时,如何使用索引
- MySQL查询优化技术系列讲座之使用索引
- 使用索引的误区之一:没有使用复合索引的前导列导致查询不使用索引
- oracle使用了索引但是查询性能没有改善(oracle的索引陷阱)
- oracle使用了索引但是查询性能没有改善(oracle的索引陷阱) 【转】
- 使用索引的误区之二:使用了和!=操作符,导致查询不使用索引