[大数据]-Logstash-5.3.1的安装导入数据到Elasticsearch5.3.1并配置同义词过滤
2017-05-23 18:06
706 查看
阅读此文请先阅读上文:[大数据]-Elasticsearch5.3.1 IK分词,同义词/联想搜索设置,前面介绍了ES,Kibana5.3.1的安装配置,以及IK分词的安装和同义词设置,这里主要记录Logstash导入mysql数据到Elasticsearch5.3.1并设置IK分词和同义词。由于logstash配置好JDBC,ES连接之后运行脚本一站式创建index,mapping,导入数据。但是如果我们要配置IK分词器就需要修改创建index,mapping的配置,下面详细介绍。
解压:tar -zxf logstash-5.3.1.tar.gz
启动:bin/logstash -e 'input { stdin { } } output { stdout {} }' (参数表示终端输入输出)如下则成功。
创建一个SQL文件:如上配置test.sql内容: select * from table1
test.conf,test.sql文件都在logstash的根目录下。
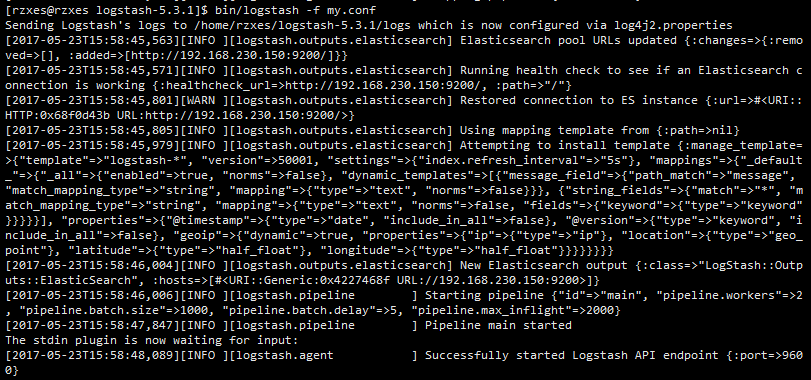
运行logstash脚本导入数据: bin/logstash -f test.conf 启动如下;
等待数据导入完成。开启Es-head,访问9100端口如下:
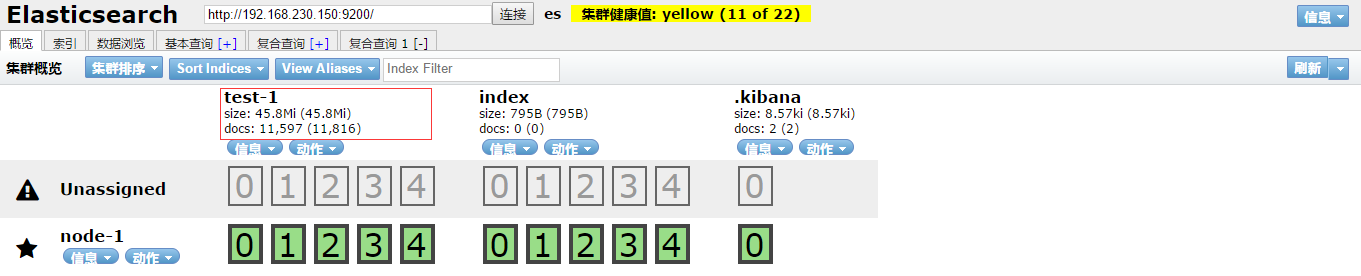
可以看到已经导入了11597条数据。
更多详细的配置参考官方文档:plugins-inputs-jdbc-jdbc_driver_library
添加IK分词,只需要创建一个json文件: vim /home/rzxes/logstash-5.3.1/template/logstash.json 添加如下内容:
如需配置同义词,需自定义分词器,配置同义词过滤<IK分词同义词详见上一篇文章>。修改模板logstash.json如下:
有了自定义模板文件,test.conf中配置模板覆盖使模板生效。test.conf最终配置如下:
删除上次创建的index(由于数据导入时会根据原有数据的index,mapping进行索引创建),重新启动logstash。
最终在Kibana中检索关键词 番茄,就会发现西红柿也会被检索到。如下图:

致此logstash数据导入的template重写就完成了。
另一种方式配置IK分词:全局配置,不需要自定义模板。
可以使用curl查看模板: curl -XGET "http://192.168.230.150:9200/_template"
一、Logstash-5.3.1下载安装:
下载:https://www.elastic.co/cn/downloads/logstash解压:tar -zxf logstash-5.3.1.tar.gz
启动:bin/logstash -e 'input { stdin { } } output { stdout {} }' (参数表示终端输入输出)如下则成功。
Sending Logstash's logs to /home/rzxes/logstash-5.3.1/logs which is now configured via log4j2.properties
[2017-05-16T10:27:36,957][INFO ][logstash.setting.writabledirectory] Creating directory {:setting=>"path.queue", :path=>"/home/rzxes/logstash-5.3.1/data/queue"}
[2017-05-16T10:27:37,041][INFO ][logstash.agent           ] No persistent UUID file found. Generating new UUID {:uuid=>"c987803c-9b18-4395-bbee-a83a90e6ea60", :path=>"/home/rzxes/logstash-5.3.1/data/uuid"}
[2017-05-16T10:27:37,581][INFO ][logstash.pipeline        ] Starting pipeline {"id"=>"main", "pipeline.workers"=>1, "pipeline.batch.size"=>125, "pipeline.batch.delay"=>5, "pipeline.max_inflight"=>125}
[2017-05-16T10:27:37,682][INFO ][logstash.pipeline        ] Pipeline main started
The stdin plugin is now waiting for input:
[2017-05-16T10:27:37,886][INFO ][logstash.agent           ] Successfully started Logstash API endpoint {:port=>9600}
二、Logstash-5.3.1连接mysql作为数据源,ES作为数据输出端:
由于此版本的logstash已经集成了jdbc插件,我们只需要添加一个配置文件xxx.conf。内容如下test.conf:input {
stdin {
}
jdbc {
# 数据库地址 端口 数据库名
jdbc_connection_string => "jdbc:mysql://IP:3306/dbname"
# 数据库用户名
jdbc_user => "user"
# 数据库密码
jdbc_password => "pass"
# mysql java驱动地址
jdbc_driver_library => "/home/rzxes/logstash-5.3.1/mysql-connector-java-5.1.17.jar"
jdbc_driver_class => "com.mysql.jdbc.Driver"
jdbc_paging_enabled => "true"
jdbc_page_size => "100000"
# sql 语句文件,也可以直接写SQL,如statement => "select * from table1"
statement_filepath => "/home/rzxes/logstash-5.3.1/test.sql"
schedule => "* * * * *"
type => "jdbc"
}
}
output {
stdout {
codec => json_lines
}
elasticsearch {
hosts => "192.168.230.150:9200"
index => "test-1" #索引名称
document_type => "form" #type名称
document_id => "%{id}" #id必须是待查询的数据表的序列字段} }
创建一个SQL文件:如上配置test.sql内容: select * from table1
test.conf,test.sql文件都在logstash的根目录下。
运行logstash脚本导入数据: bin/logstash -f test.conf 启动如下;
等待数据导入完成。开启Es-head,访问9100端口如下:
可以看到已经导入了11597条数据。
更多详细的配置参考官方文档:plugins-inputs-jdbc-jdbc_driver_library
三、logstash是如何创建index,mapping,并导入数据?
ES导入数据必须先创建index,mapping,但是在logstash中并没有直接创建,我们只传入了index,type等参数,logstash是通过es的mapping template来创建的,这个模板文件不需要指定字段,就可以根据输入自动生成。在logstash启动的时候这个模板已经输出了如下log:[2017-05-23T15:58:45,801][WARN ][logstash.outputs.elasticsearch] Restored connection to ES instance {:url=>#<URI::HTTP:0x68f0d43b URL:http://192.168.230.150:9200/>}
[2017-05-23T15:58:45,805][INFO ][logstash.outputs.elasticsearch] Using mapping template from {:path=>nil}
[2017-05-23T15:58:45,979][INFO ][logstash.outputs.elasticsearch] Attempting to install template {:manage_template=>{"template"=>"logstash-*", "version"=>50001, "settings"=>{"index.refresh_interval"=>"5s"}, "mappings"=>{"_default_"=>{"_all"=>{"enabled"=>true, "norms"=>false}, "dynamic_templates"=>[{"message_field"=>{"path_match"=>"message", "match_mapping_type"=>"string", "mapping"=>{"type"=>"text", "norms"=>false}}}, {"string_fields"=>{"match"=>"*", "match_mapping_type"=>"string", "mapping"=>{"type"=>"text", "norms"=>false, "fields"=>{"keyword"=>{"type"=>"keyword"}}}}}], "properties"=>{"@timestamp"=>{"type"=>"date", "include_in_all"=>false}, "@version"=>{"type"=>"keyword", "include_in_all"=>false}, "geoip"=>{"dynamic"=>true, "properties"=>{"ip"=>{"type"=>"ip"}, "location"=>{"type"=>"geo_point"}, "latitude"=>{"type"=>"half_float"}, "longitude"=>{"type"=>"half_float"}}}}}}}}添加IK分词,只需要创建一个json文件: vim /home/rzxes/logstash-5.3.1/template/logstash.json 添加如下内容:
{
"template": "*",
"version": 50001,
"settings": {
"index.refresh_interval": "5s"
},
"mappings": {
"_default_": {
"_all": {
"enabled": true,
"norms": false
},
"dynamic_templates": [
{
"message_field": {
"path_match": "message",
"match_mapping_type": "string",
"mapping": {
"type": "text",
"norms": false
}
}
},
{
"string_fields": {
"match": "*",
"match_mapping_type": "string",
"mapping": {
"type": "text",
"norms": false,
"analyzer": "ik_max_word",#只需要添加这一行即可设置分词器为ik_max_word
"fields": {
"keyword": {
"type": "keyword"
}
}
}
}
}
],
"properties": {
"@timestamp": {
"type": "date",
"include_in_all": false
},
"@version": {
"type": "keyword",
"include_in_all": false
}
}
}
}
}如需配置同义词,需自定义分词器,配置同义词过滤<IK分词同义词详见上一篇文章>。修改模板logstash.json如下:
{
"template" : "*",
"version" : 50001,
"settings" : {
"index.refresh_interval" : "5s",
#分词,同义词配置:自定义分词器,过滤器,如不配同义词则没有index这一部分
"index": {
"analysis": {
"analyzer": {
"by_smart": {
"type": "custom",
"tokenizer": "ik_smart",
"filter": ["by_tfr","by_sfr"],
"char_filter": ["by_cfr"]
},
"by_max_word": {
"type": "custom",
"tokenizer": "ik_max_word",
"filter": ["by_tfr","by_sfr"],
"char_filter": ["by_cfr"]
}
},
"filter": {
"by_tfr": {
"type": "stop",
"stopwords": [" "]
},
"by_sfr": {
"type": "synonym",
"synonyms_path": "analysis/synonyms.txt" #同义词路径
}
},
"char_filter": {
"by_cfr": {
"type": "mapping",
"mappings": ["| => |"]
}
}
}
} # index --end--
},
"mappings" : {
"_default_" : {
"_all" : {
"enabled" : true,
"norms" : false
},
"dynamic_templates" : [
{
"message_field" : {
"path_match" : "message",
"match_mapping_type" : "string",
"mapping" : {
"type" : "text",
"norms" : false
}}
},
{
"string_fields" : {
"match" : "*",
"match_mapping_type" : "string",
"mapping" : {
"type" : "text",
"norms" : false,
#选择分词器:自定义分词器,或者ik_mmax_word
"analyzer" : "by_max_word",
"fields" : {
"keyword" : {
"type" : "keyword"
}
}
}
}
}
],
"properties" : {
"@timestamp" : {
"type" : "date",
"include_in_all" : false
},
"@version" : {
"type" : "keyword",
"include_in_all" : false
}
}
}
}
}
有了自定义模板文件,test.conf中配置模板覆盖使模板生效。test.conf最终配置如下:
input {
stdin {
}
jdbc {
# 数据库地址  端口  数据库名
jdbc_connection_string => "jdbc:mysql://IP:3306/dbname"
# 数据库用户名
jdbc_user => "user"
# 数据库密码
jdbc_password => "pass"
# mysql java驱动地址
jdbc_driver_library => "/home/rzxes/logstash-5.3.1/mysql-connector-java-5.1.17.jar"
jdbc_driver_class => "com.mysql.jdbc.Driver"
jdbc_paging_enabled => "true"
jdbc_page_size => "100000"
# sql 语句文件
statement_filepath => "/home/rzxes/logstash-5.3.1/mytest.sql"
schedule => "* * * * *"
type => "jdbc"
}
}
output {
stdout {
codec => json_lines
}
elasticsearch {
hosts  => "192.168.230.150:9200"
index => "test-1"
document_type => "form"
document_id => "%{id}" #id必须是待查询的数据表的序列字段
template_overwrite => true
template => "/home/rzxes/logstash-5.3.1/template/logstash.json"
}
}
删除上次创建的index(由于数据导入时会根据原有数据的index,mapping进行索引创建),重新启动logstash。
最终在Kibana中检索关键词 番茄,就会发现西红柿也会被检索到。如下图:
致此logstash数据导入的template重写就完成了。
另一种方式配置IK分词:全局配置,不需要自定义模板。
curl -XPUT "http://192.168.230.150:9200/_template/rtf" -H 'Content-Type: application/json' -d'
{
"template" : "*",
"version" : 50001,
"settings" : {
"index.refresh_interval" : "5s",
"index": {
"analysis": {
"analyzer": {
"by_smart": {
"type": "custom",
"tokenizer": "ik_smart",
"filter": ["by_tfr","by_sfr"],
"char_filter": ["by_cfr"]
},
"by_max_word": {
"type": "custom",
"tokenizer": "ik_max_word",
"filter": ["by_tfr","by_sfr"],
"char_filter": ["by_cfr"]
}
},
"filter": {
"by_tfr": {
"type": "stop",
"stopwords": [" "]
},
"by_sfr": {
"type": "synonym",
"synonyms_path": "analysis/synonyms.txt"
}
},
"char_filter": {
"by_cfr": {
"type": "mapping",
"mappings": ["| => |"]
}
}
}
}
},
"mappings" : {
"_default_" : {
"_all" : {
"enabled" : true,
"norms" : false
},
"dynamic_templates" : [
{
"message_field" : {
"path_match" : "message",
"match_mapping_type" : "string",
"mapping" : {
"type" : "text",
"norms" : false
}}
},
{
"string_fields" : {
"match" : "*",
"match_mapping_type" : "string",
"mapping" : {
"type" : "text",
"norms" : false,
"analyzer" : "by_max_word",
"fields" : {
"keyword" : {
"type" : "keyword"
}
}
}
}
}
],
"properties" : {
"@timestamp" : {
"type" : "date",
"include_in_all" : false
},
"@version" : {
"type" : "keyword",
"include_in_all" : false
}
}
}
}
}'
可以使用curl查看模板: curl -XGET "http://192.168.230.150:9200/_template"

相关文章推荐
- [大数据]-Fscrawler导入文件(txt,html,pdf,worf...)到Elasticsearch5.3.1并配置同义词过滤
- logstash 安装导入mysql数据至ElasticSearch
- ORACLE小经验积累——OMS SERVER的安装与配置(用于数据备份、导入/导出等操作)
- Sqoop安装配置与从mysql中导入数据到hbase
- 大数据——hadoop1.2.1+hbase0.94.11+nutch2.2.1+elasticsearch0.90.5安装配置(上集)
- Elasticsearch 入门:logstash 5.0.0 安装及输出数据到 elasticsearch
- (待完成)使用sqoop将mysql中的数据导入HDFS中,含sqoop配置与安装
- Centos6.7安装oracle11gR2及配置开机启动、新建表空间和用户、导入数据
- lasticsearch 入门:Filebeat 安装及输出数据到 elasticsearch 或 logstash
- Sqoop安装配置及将mysql数据导入到hdfs中
- Ubuntu16.x服务器 安装 Java,Elasticsearch5.4.X,中文分词,同义词,Logstash5.4.X 日志搜集
- Sqoop安装配置及将mysql数据导入到hdfs中
- Dynamics AX 2012 R3 Demo 安装与配置 - 导入测试数据 (Step 4)
- elasticsearch安装与使用(6)-- Logstash安装与配置
- Oracle安装后服务器端配置及数据导出导入操作
- linux下Mysql 的安装、配置、数据导入导出
- Sqoop安装配置与从mysql中导入数据到hbase
- linux下Mysql 的安装、配置、数据导入导出
- [大数据]-Elasticsearch5.3.1+Kibana5.3.1从单机到分布式的安装与使用<2>