TextInputLayout+EditText在注册界面的使用(密码的的隐藏和可见,imeOptions的使用)
2017-05-18 13:40
387 查看
本文主要利用注册界面的例子介绍TextInputLayout和EditText一些属性的使用
TextInputLayout是Design Support Library中的一个控件,使用的时候需要添加下面这个依赖
布局代码:
TextInputLayout下面两个属性

!注意: 使用者两个属性要在根标签加上
密码中加密和可见,利用TextInputLayout控件和容易实现,只需要设置下面的属性即可
效果就会像上面密码输入框那样
如果感觉只带的小眼睛不好看,可以自定义那个图案,使用
设置图片,应为,密码可见和加密是两种状态,点击图片应该有相应的变化,使用selector 可以实现:
使用TextInputLayout的
但与TextInputLayout显示效果不一样。
是一种悬浮效果,挺好的,但是密码输入框就有点坑了
密码输入框的小眼睛和错误提示位置冲突了,效果就好了。
图片中最后一个实现关键代码现如下
使用imeOptions属性需要设置android:inputType属性,否则没有效果
给回车键绑定事件,使用通
TextInputLayout是Design Support Library中的一个控件,使用的时候需要添加下面这个依赖
compile 'com.android.support:design:25.3.1'
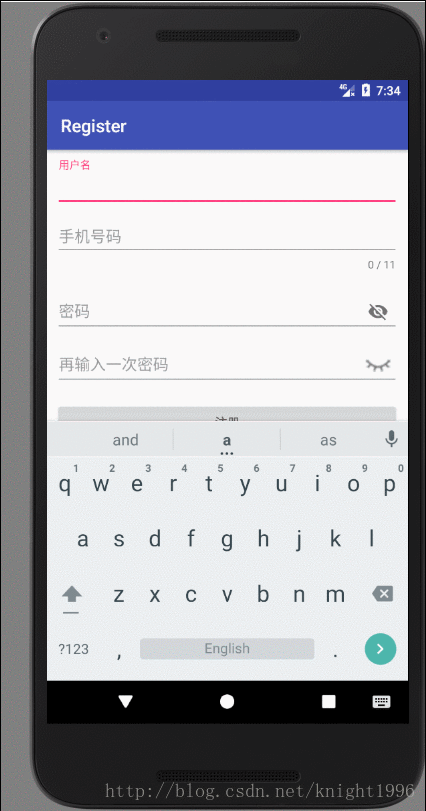
先看看运行效果吧
布局代码:
<LinearLayout
android:id="@+id/email_login_form"
android:layout_width="match_parent"
android:layout_height="wrap_content"
android:layout_margin="10dp"
android:orientation="vertical">

<android.support.design.widget.TextInputLayout
android:id="@+id/username"
android:layout_width="match_parent"
android:layout_height="wrap_content">

<EditText
android:layout_width="match_parent"
android:layout_height="wrap_content"
android:hint="@string/prompt_username"
android:imeOptions="actionNext"
android:inputType="text"
android:maxLines="1" />

</android.support.design.widget.TextInputLayout>

<android.support.design.widget.TextInputLayout
android:id="@+id/tel_number"
android:layout_width="match_parent"
android:layout_height="match_parent"
app:counterEnabled="true"
app:counterMaxLength="11">

<EditText
android:id="@+id/editText"
android:layout_width="match_parent"
android:layout_height="wrap_content"
android:hint="@string/pormpt_tel"
android:imeOptions="actionNext"
android:inputType="phone"
android:maxLines="1" />
</android.support.design.widget.TextInputLayout>

<android.support.design.widget.TextInputLayout
android:id="@+id/password"
android:layout_width="match_parent"
android:layout_height="wrap_content"
app:passwordToggleEnabled="true">

<EditText
android:layout_width="match_parent"
android:layout_height="wrap_content"
android:hint="@string/prompt_password"
android:imeOptions="actionNext"
android:inputType="textPassword"
android:maxLines="1" />

</android.support.design.widget.TextInputLayout>

<android.support.design.widget.TextInputLayout
android:id="@+id/repeat_password"
android:layout_width="match_parent"
android:layout_height="match_parent"              app:passwordToggleDrawable="@drawable/password_visible_invisible"
app:passwordToggleEnabled="true">

<EditText
android:layout_width="match_parent"
android:layout_height="wrap_content"
android:hint="@string/prompt_repeat_password"
android:imeActionId="@+id/register"
android:imeActionLabel="@string/action_register"
android:imeOptions="actionUnspecified"
android:inputType="textPassword" />
</android.support.design.widget.TextInputLayout>

<Button
android:id="@+id/register_btn"
style="?android:textAppearanceSmall"
android:layout_width="match_parent"
android:layout_height="wrap_content"
android:layout_marginTop="16dp"
android:text="@string/action_register"
android:textStyle="bold" />

</LinearLayout>
1.带计数的文本框
像手机号码,身份证号码等都有位数都是有固定值,而且还比较长,这个时候就应该把用户输入的字符长度统计出来,给予友好的提示,实现这个功能就可以利用TextInputLayout下面两个属性
app:counterEnabled="true"//开启输入计数功能
app:counterMaxLength="11"//设置输入字符的最大值
!注意: 使用者两个属性要在根标签加上
xmlns:app="http://schemas.android.com/apk/res-auto"命名空间,否则找不到两个属性
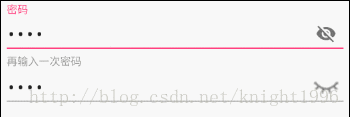
2密码输入框中的火眼晶晶,密码快快显出原形
密码中加密和可见,利用TextInputLayout控件和容易实现,只需要设置下面的属性即可
app:passwordToggleEnabled="true"
效果就会像上面密码输入框那样
如果感觉只带的小眼睛不好看,可以自定义那个图案,使用
app:passwordToggleDrawable="@drawable/password_visible_invisible"
设置图片,应为,密码可见和加密是两种状态,点击图片应该有相应的变化,使用selector 可以实现:
<selector xmlns:android="http://schemas.android.com/apk/res/android">
<item android:drawable="@drawable/eye_open"  android:state_checked="true"/>
<item android:drawable="@drawable/eye_close" android:state_checked="false"/>
</selector>
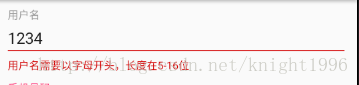
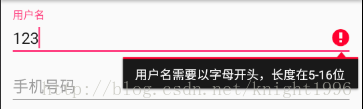
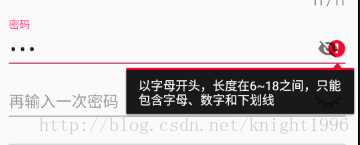
3.错误提示的设置
家有家法,国有国法,简单注册也应该有有所限制,不能让用户随意输入一些信息。当用户输入不合法的时候应该给予提示:使用TextInputLayout的
setError( CharSequence error)方法设置当用户输入不合法时会在输入框下面给予提示信息。EditText也有
setError( CharSequence error)方法,
但与TextInputLayout显示效果不一样。
是一种悬浮效果,挺好的,但是密码输入框就有点坑了
密码输入框的小眼睛和错误提示位置冲突了,效果就好了。
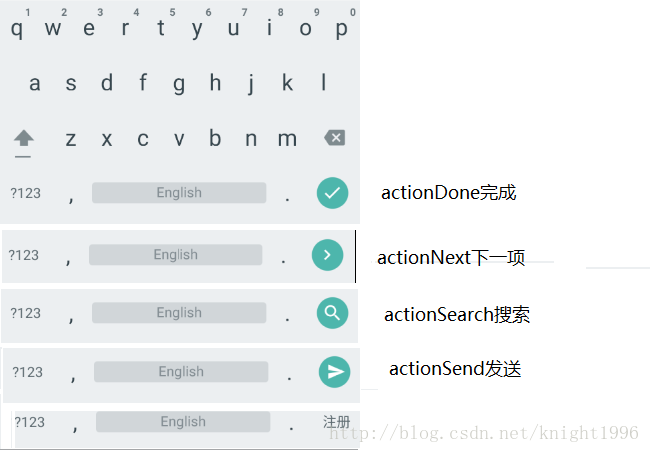
4.EditText中的imeOptions属性的使用,设置软键盘回车键动作
该属性值常用的有actiondone(完成)、actionNext(下一项,)、actionSearch(搜索)、actionSend(发送)图片中最后一个实现关键代码现如下
android:imeActionLabel="注册"  //设置显示的内容
android:imeOptions="actionUnspecified" //不指定类型
android:inputType="textPassword"
使用imeOptions属性需要设置android:inputType属性,否则没有效果
给回车键绑定事件,使用通
setOnEditorActionListener方法设置相关监听事件
TextInputLayout  repeatPassword = (TextInputLayout) findViewById(R.id.repeat_password);

repeatPassword.getEditText().setOnEditorActionListener(new TextView.OnEditorActionListener() {
@Override
public boolean onEditorAction(TextView v, int actionId, KeyEvent event) {
if(actionId == EditorInfo.IME_NULL){
register();//进行注册操作
return  true;
}
return false;
}
});
源码下载

相关文章推荐
- 使用TextInputLayout创建一个登陆界面(j界面很漂亮)
- 使用TextInputLayout创建一个登陆界面
- Anroid 新特性 使用TextInputLayout的使用 :创建一个登陆界面
- 使用TextInputLayout创建一个登陆界面
- (转)使用TextInputLayout创建一个登陆界面
- EditText之imeOptions与inputType属性的使用
- 使用TextInputLayout创建一个登陆界面(转自google官网)
- 使用TextInputLayout创建一个登陆界面
- Android 即时通讯 使用TextInputLayout创建一个登陆界面
- Android 使用TextInputLayout创建一个登陆界面
- 使用TextInputLayout创建一个登陆界面
- android 使用TextInputLayout创建一个登陆界面
- 使用TextInputLayout创建一个登陆界面
- Android基础学习总结(六)——TextInputLayout+EditText 轻松实现登录界面
- 使用TextInputLayout创建一个登陆界面
- TextInputLayout使用:创建一个登陆界面
- 使用TextInputLayout提升EditText的输入用户体验
- 使用TextInputLayout创建一个登陆界面
- Android进阶UI之使用TextInputLayout创建一个登陆界面
- 设置EditText显示或隐藏密码