Android动画案例(五)布局动画与自定义动画
2017-05-14 15:37
323 查看
在前面我通过看一些网络视频学习到了动画的基本用法,这几天通过对Android群英传的学习又学到了布局动画和自定义动画
这篇博客我会把我从Android群英传学习到的有关内容写出来
布局动画
这是一个Button从左向右依次出现的动画效果
所谓的布局动画就是在ViewGroup上,给ViewGroup增加View时添加一个动画的过滤效果
最简单的布局动画是在ViewGroup的XML中,使用一下代码打开布局动画
此外还可以使用LayoutAnimationController类来自定义一个子View的过渡效果
LayoutAnimationController 第一个参数是需要的动画,第二个参数是每个子View显示的delay时间,若时间不为0,还可以setOrder设置子View的显示顺序:
LayoutAnimationController.ORDER_NORMAL:顺序
LayoutAnimationController.ORDER_RANDOM:随机
LayoutAnimationController.ORDER_REVEESE:反序
模拟电视机关闭
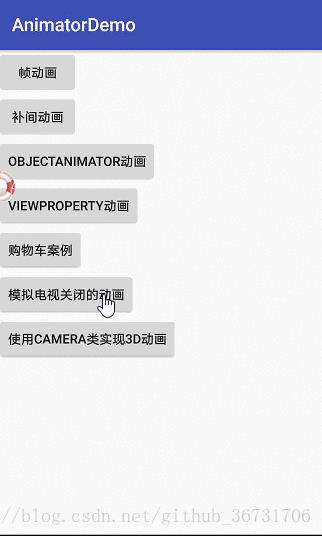
最上面用了一个布局动画,代码
电视机的关闭动画定义步骤
自定义一个类继承自 Animation
重写父类的initalize方法实现一些初始化工作,比如持续时间,插值器,获得宽高之类的
需要实现它的applyTransformation的逻辑,设置动画
代码如下
第一个参数是插值器的时间因子,由动画当前完成的百分比和当前时间所对应的插值所计算得来的,取值范围为0到1.0
第二个参数是矩阵封装类,一般使用该类获取矩阵对象
3D动画效果

Camera可以实现一个自定义的3D动画效果,这里的Camera并不是指手机中的相机,而是android.graphics.Camera中的Camera类,,它封装了openGL的3D动画,当物体固定在某处时,只要移动Camera就能拍摄到具有立体感的图像
实现自定义的动画
最后是我整个完整动画项目的代码
https://github.com/XuDaHaoRen/AnimatorDemo
这篇博客我会把我从Android群英传学习到的有关内容写出来
布局动画
这是一个Button从左向右依次出现的动画效果
所谓的布局动画就是在ViewGroup上,给ViewGroup增加View时添加一个动画的过滤效果
最简单的布局动画是在ViewGroup的XML中,使用一下代码打开布局动画
android:animateLayoutChanges="true"
此外还可以使用LayoutAnimationController类来自定义一个子View的过渡效果
ll= (LinearLayout) findViewById(R.id.main_ll);
TranslateAnimation animation=new TranslateAnimation(-1000f,0f,0,0);
animation.setFillAfter(true);
//布局显示每一个子View所用的时间
animation.setDuration(1000);
LayoutAnimationController controller=new LayoutAnimationController(animation,0.5f);
controller.setOrder(LayoutAnimationController.ORDER_NORMAL);
ll.setLayoutAnimation(controller);
LayoutAnimationController 第一个参数是需要的动画,第二个参数是每个子View显示的delay时间,若时间不为0,还可以setOrder设置子View的显示顺序:
LayoutAnimationController.ORDER_NORMAL:顺序
LayoutAnimationController.ORDER_RANDOM:随机
LayoutAnimationController.ORDER_REVEESE:反序
模拟电视机关闭
最上面用了一个布局动画,代码
ll= (LinearLayout) findViewById(R.id.layout_ll);
ScaleAnimation scaleAnimation=new ScaleAnimation(0,1,0,1);
scaleAnimation.setDuration(2000);
//设置布局动画的显示属性
LayoutAnimationController layoutAnimationController=new
LayoutAnimationController(scaleAnimation,0.5f);
layoutAnimationController.setOrder(LayoutAnimationController.ORDER_NORMAL);
ll.setLayoutAnimation(layoutAnimationController);
电视机的关闭动画定义步骤
自定义一个类继承自 Animation
重写父类的initalize方法实现一些初始化工作,比如持续时间,插值器,获得宽高之类的
需要实现它的applyTransformation的逻辑,设置动画
代码如下
public class MyAnimation extends Animation {
//获得View的中心点
private int centerWidth;
private int centerHeigh;

@Override
public void initialize(int width, int height, int parentWidth, int parentHeight) {
super.initialize(width, height, parentWidth, parentHeight);
//定义差值器和持续时间等属性
setDuration(300);
setInterpolator(new AccelerateDecelerateInterpolator());
setFillAfter(true);
centerHeigh=height/2;
centerWidth=width/2;
}

@Override
protected void applyTransformation(float interpolatedTime, Transformation t) {
super.applyTransformation(interpolatedTime, t);
Matrix matrix=t.getMatrix();
if (interpolatedTime < 0.8) {
matrix.preScale(1+0.625f*interpolatedTime, 1-interpolatedTime/0.8f+0.01f,centerWidth,centerHeigh);
}else{
matrix.preScale(7.5f*(1-interpolatedTime),0.01f,centerWidth,centerHeigh);
}
}
}
第一个参数是插值器的时间因子,由动画当前完成的百分比和当前时间所对应的插值所计算得来的,取值范围为0到1.0
第二个参数是矩阵封装类,一般使用该类获取矩阵对象
3D动画效果
Camera可以实现一个自定义的3D动画效果,这里的Camera并不是指手机中的相机,而是android.graphics.Camera中的Camera类,,它封装了openGL的3D动画,当物体固定在某处时,只要移动Camera就能拍摄到具有立体感的图像
public class CameraAniDemo extends Animation {
private int centerWidth;
private int centerHeigh;
private Camera camera;
@Override
public void initialize(int width, int height, int parentWidth, int parentHeight) {
super.initialize(width, height, parentWidth, parentHeight);
setDuration(2000);
setFillAfter(true);
//设置默认差值器
setInterpolator(new BounceInterpolator());
centerHeigh=height/2;
centerWidth=width/2;

}

@Override
protected void applyTransformation(float interpolatedTime, Transformation t) {
super.applyTransformation(interpolatedTime, t);
camera=new Camera();
Matrix matrix=t.getMatrix();
//保存状态,与restore()成对出现
camera.save();
//设置旋转角度
camera.rotateY(60*interpolatedTime);
//将旋转变换到矩形方阵上
camera.getMatrix(matrix);
//在使用camera设置动画之前,进行了camera.save(),将状态恢复到保存的状态
camera.restore();
//        //通过pre方法设置矩阵作用前的偏移量来改变旋转中心
//        matrix.preTranslate(centerWidth,centerHeigh);
//        matrix.postTranslate(-centerWidth,-centerHeigh);
}
}
实现自定义的动画
v.startAnimation(new CameraAniDemo());
最后是我整个完整动画项目的代码
https://github.com/XuDaHaoRen/AnimatorDemo

相关文章推荐
- Android动画效果之自定义ViewGroup添加布局动画
- Android动画效果之自定义ViewGroup添加布局动画
- Android十个小案例动画,自定义View动画实现,ValueAnimator
- Android动画机制与使用技巧(二)布局动画、插值器、自定义动画
- Android动画效果之自定义ViewGroup添加布局动画
- Android动画效果之自定义ViewGroup添加布局动画
- Android动画效果之自定义ViewGroup添加布局动画
- Android动画效果之自定义ViewGroup添加布局动画(五)
- android控件使用---recycleview自定义上拉加载,和加载多个布局及加入动画
- Android之使用帧动画实现自定义loading加载布局
- Android获取dialog自定义布局中的控件
- 写在前进的路上!Android的自定义动画和Handler的用法
- android popupwindow 动画 特效 案例
- Android开发之自定义动画
- Android学习03自定义动画的播放
- 转载 自定义Android标题栏TitleBar布局
- 写在前进的路上!Android的自定义动画和Handler的用法
- 写在前进的路上!Android的自定义动画和Handler的用法
- 自定义Android标题栏修改TitleBar的布局
- android自定义布局