使用nexus在局域网内搭建maven私服及idea的使用
2017-05-12 08:38
477 查看
摘要: 使用nexus在局域网内搭建maven私服及idea的使用
一:JDK
1.Installation
Download the lasted version of the JDK from: http://java.sun.com ,now is JDK1.7.0_10.
Unpack the arcive to /usr/lib/jvm/java with the below command line:
tar -zxvf jdk-7u10-linux-i586.tar.gz
2. Set java environment variable
# vi /etc/profile
# This is added by selina for set java environment:
JAVA_HOME=/usr/lib/jvm/java/jdk1.7.0_10
JRE_HOME=/usr/lib/jvm/java/jdk1.7.0_10/jre
export JAVA_HOME
export JRE_HOME
export PATH=$JAVA_HOME/bin:$JRE_HOME/bin:$PATH
export CLASSPATH=.:$JAVA_HOME/lib:$JRE_HOME/lib:$CLASSPATH
# end of set java environmnet
save and exit.
# source /etc/profile //with immediate effect
# java -version or echo $JAVA_HOME
check whether take effect :logout then
# java -version or echo $JAVA_HOME
二:Maven
1.Installation
Download the lasted version of the Maven from http://maven.apache.org/download.html ,now is 3.0.4 .
Unapack the archive to /usr/local with beow the command line :
tar -zxvf apache-maven-3.0.4-bin.tar.gz
rename apache-maven-3.0.4 as maven3
mv apache-maven-3.0.4 maven3
2.Set Maven environment variable
# vi /etc/profile
# This is added by selina for set Maven environment:
MAVEN_HOME=/usr/local/maven3
export MAVEN_HOME
export PATH=$MAVEN_HOME/bin:$PATH
# end of set java environmnet
save and exit.
# source /etc/profile //with immediate effect
# mvn -v or echo $MAVEN_HOME
check whether take effect :logout then
# mvn -v or echo $MAVEN_HOME
Note that if you use "mvn -v" to see ,will show maven and jave version info indicate that successfully installed and configured.
三:Nexus
1.Installation
Download the lasted version of the Nexus from http://nexus.sonatype.org/downloads/ ,now is nexus-2.2-01.
Unpack the archive to /usr/local with the below command line
tar -zxvf nexus-2.2-01-bundle.tar.gz
and remane to nexus2 with the below command line
mv nexus-2.2-01-bundle nexus2
2. Run Nexus
$ cd /usr/local/nexus2/bin/
$ ./nexus start (restart/stop...) # use ordinary account not root
if successd ,Go to browser http://ip:8081/nexus ,account and passowd is admin and admin123
(if you want to change port number ,pls go to ./nexus2/conf/nexus.properties to set ,the default is 8081)
issues:
(1)if successfully installed ,will show :
Starting Nexus OSS...
Stared Nexus OSS
But ,after installing nexus ,excute command "./nexus start" failed ,show the below message:
Starting Nexus OSS...
Failed to start Nexus OSS.
Solution : this is casued by priviledge of nexus directory ,it belongs to root user .After change the owner of the nexus directory to the current user ,rerun the command "./nexus start",it works.
sudo chown -R selina:selina ../../nexus
(2)Can't browser
when http://ip:8081/nexus ,failed ,need to see log message from: ./nexus/logs/wrapper.log ,show "Unable to start JVM: No such file or directory" in here ,
Solution : editing "<nexus_root>/bin/jsw/conf/wrapper.conf" and changing "wrapper.java.commad" the full path to my java executable
wrapper.java.commad={JAVA_HOME}/bin/java
Again to http://ip:8081/nexus ,failed ,see log message ,show " error..Temp directory:/usr/lcoal/sonatype-work/nexus/tmp "
Solution : chmod -R 777 /usr/local/sonatype-work/nexus/tmp
Congratulations ,well done.Click the "Login In" on the top right corner.the default username is admin ,password is admin123.

注意:Nexus 不能使用root用户启动,需要使用普通用户启动,假设普通用户为user,则需要:
chown -R user:user nexus2
chown -R user:user sonatype-work
登录后最重要的事情就是打开远程索引下载,操作为选择菜单Administrator->Repositories,然后在右边打开的列表中依次选择type字段为proxy的记录,在下方的编辑区中修改"Download Remote Indexes"值为true,再从这三个仓库上点右键选择"Reapir Index",这一步别忘,Repair Index后,Nexus会从后台去官方地址下载仓库索引文件,大概20M大小,根据网速快慢下载相应时间后选择仓库时会以树形目录的方式显示仓库内容。(注意:如果repaire-index后,在“browser index"里仍然看不到东西,要确定/usr/lcoal/sonatype-work/nexus目录是否有写权限 )Central的"Remote storage location"默认的是http://repo1.maven.org/maven2,因这是国外网站,忒慢,如此找到了以下这个源镜像:http://repo.maven.apache.org/maven2
想要maven使用刚刚配置的nexus服务作为仓库服务器,需要修改settings.xml文件。
在maven中存在两个 settings.xml,一个位于maven2的安装目录conf下面,作为全局性配置。对于团队设置,保持一致的定义是关键,所以 maven/conf下面的settings.xml就作为团队共同的配置文件。保证所有的团队成员都拥有相同的配置。当然对于每个成员,都需要特殊的 自定义设置,如用户信息,所以另外一个settings.xml就作为本地配置。默认的位置为:${HOME} /.m2/settings.xml目录
<settings>
<!--<localRepository>这个是存放eclipse项目需要费用的jar包(在eclipse项目添加maven依赖的时候,eclipse自动从nexus服务器中下载jar包,然后存到这个路径,默认路径是~/.m2/repository,可以不修改-->
<localRepository>/resource/java/repos/maven-repo</localRepository>
<servers>
<server>
<!-- 这是server的id(注意不是用户登陆的id),该id与pom.xml 中distributionManagement中repository元素的id相匹配。-->
<!--远程nexus 服务器的用户名与密码,作用就是当要向nexus deploy 自已写的jar 时,会用到在pom.xml 中distributionManagement ,在那里会引用此处的id -->
<id>releases</id>
<username>admin</username>
<password>admin123</password>
</server>
<server>
<id>snapshots</id>
<username>admin</username>
<password>admin123</password>
</server>
</servers>
<mirrors>
<mirror>
<!--This sends everything else to /public -->
<!--该镜像的唯一标识符。id用来区分不同的mirror元素。 -->
<id>nexus</id>
<!--该镜像的URL。构建系统会优先考虑使用该URL,而非使用默认的服务器URL -->
<url>http://localhost:8081/nexus/content/groups/public</url>
<!--被镜像的服务器的id。例如,如果我们要设置了一个Maven中央仓库(http://repo1.maven.org/maven2)的镜像,就需要将该元素设置成central。这必须和中央仓库的id central完全一致。 -->
<mirrorOf>central</mirrorOf>
</mirror>
</mirrors>
<profiles>
<!--个性配置。类似于pom.xml中的profile元素。单独定义profile后,并不会生效,需要通过满足条件来激活-->
<profile>
<!--该配置的唯一标识符。 -->
<id>development</id>
<repositories>
<!--包含需要连接到远程仓库的信息 -->
<repository>
<!--远程仓库唯一标识-->
<id>central</id>
<name>local private nexus</name>
<url>http://127.0.0.1:8081/nexus/content/groups/public</url>
<!--如何处理远程仓库里发布版本的下载-->
<releases><enabled>true</enabled></releases>
<snapshots><enabled>false</enabled></snapshots>
</repository>
</repositories>
<pluginRepositories>
<pluginRepository>
<id>central</id>
<name>local private nexus</name>
<url>http://127.0.0.1:8081/nexus/content/groups/public</url>
<releases><enabled>true</enabled></releases>
<snapshots><enabled>false</enabled></snapshots>
</pluginRepository>
</pluginRepositories>
</profile>
</profiles>
<activeProfiles>
<activeProfile>development</activeProfile>
</activeProfiles>
</settings>
然后,在从你的工程里的pom.xml中加入以下内容:
<distributionManagement>
<repository>
<!--ID要与maven中的setting.xml中的ID一致-->
<id>releases</id>
<name>Nexus Release Repo</name>
<url>http://localhost:8081/nexus/content/repositories/releases</url>
</repository>
<snapshotRepository>
<!--ID要与maven中的setting.xml中的ID一致-->
<id>snapshots</id>
<name>snapshots</name>
<url>http://localhost:8081/nexus/content/repositories/snapshots</url>
</snapshotRepository>
</distributionManagement>
访问http://localhost:8081/nexus/ 启动后如下页面,在右上角有个Log in 的超链接,点击登录
默认的用户名是 admin 密码是 admin123

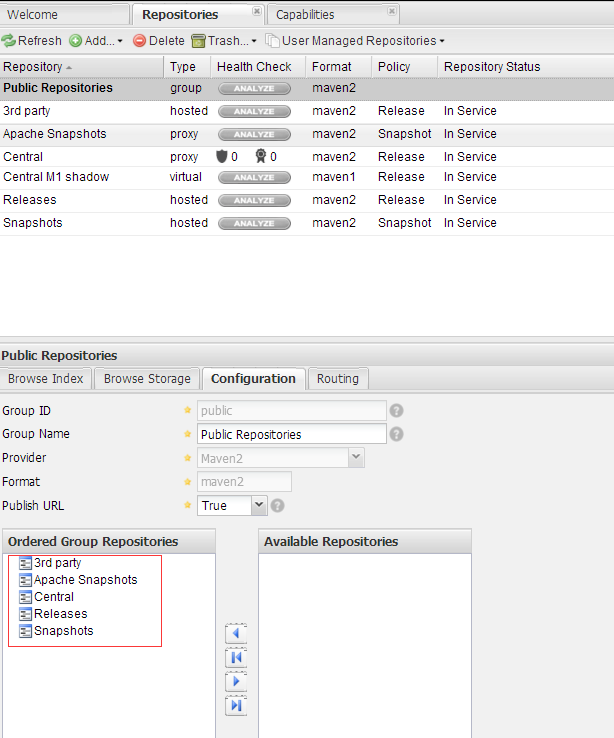
Public Repositories: 仓库组
3rd party: 无法从公共仓库获得的第三方发布版本的构件仓库
Apache Snapshots: 用了代理ApacheMaven仓库快照版本的构件仓库
Central: 用来代理maven中央仓库中发布版本构件的仓库
Central M1 shadow: 用于提供中央仓库中M1格式的发布版本的构件镜像仓库
Releases: 用来部署管理内部的发布版本构件的宿主类型仓库
Snapshots:用来部署管理内部的快照版本构件的宿主类型仓库
配置Public Repositories属性,在Ordered Group Repositories中将仓库都选中。
二 IntelliJ IDE使用私服配置
方法一:
找到maven的安装目录 D:\JetBrains\IntelliJ IDEA 14.1.5\plugins\maven\lib\maven3\conf
修改setting.xml 添加如下:
修改 工程设置,一定要把user setting file 钩给勾上 . OK 工程无需其它配置 就可以使用私服了

方法二:
在项目的pom.xml中添加:
三上传构建到私服
直接用 idea 中的 deploy按钮就可以将 打好的 jar 包或者 war包上传到 私服中 (install 是将jar包 拷贝到本地仓库)
maven setting.xml 添加如下配置:
工程pom.xml 添加如下配置:
一:JDK
1.Installation
Download the lasted version of the JDK from: http://java.sun.com ,now is JDK1.7.0_10.
Unpack the arcive to /usr/lib/jvm/java with the below command line:
tar -zxvf jdk-7u10-linux-i586.tar.gz
2. Set java environment variable
# vi /etc/profile
# This is added by selina for set java environment:
JAVA_HOME=/usr/lib/jvm/java/jdk1.7.0_10
JRE_HOME=/usr/lib/jvm/java/jdk1.7.0_10/jre
export JAVA_HOME
export JRE_HOME
export PATH=$JAVA_HOME/bin:$JRE_HOME/bin:$PATH
export CLASSPATH=.:$JAVA_HOME/lib:$JRE_HOME/lib:$CLASSPATH
# end of set java environmnet
save and exit.
# source /etc/profile //with immediate effect
# java -version or echo $JAVA_HOME
check whether take effect :logout then
# java -version or echo $JAVA_HOME
二:Maven
1.Installation
Download the lasted version of the Maven from http://maven.apache.org/download.html ,now is 3.0.4 .
Unapack the archive to /usr/local with beow the command line :
tar -zxvf apache-maven-3.0.4-bin.tar.gz
rename apache-maven-3.0.4 as maven3
mv apache-maven-3.0.4 maven3
2.Set Maven environment variable
# vi /etc/profile
# This is added by selina for set Maven environment:
MAVEN_HOME=/usr/local/maven3
export MAVEN_HOME
export PATH=$MAVEN_HOME/bin:$PATH
# end of set java environmnet
save and exit.
# source /etc/profile //with immediate effect
# mvn -v or echo $MAVEN_HOME
check whether take effect :logout then
# mvn -v or echo $MAVEN_HOME
Note that if you use "mvn -v" to see ,will show maven and jave version info indicate that successfully installed and configured.
三:Nexus
1.Installation
Download the lasted version of the Nexus from http://nexus.sonatype.org/downloads/ ,now is nexus-2.2-01.
Unpack the archive to /usr/local with the below command line
tar -zxvf nexus-2.2-01-bundle.tar.gz
and remane to nexus2 with the below command line
mv nexus-2.2-01-bundle nexus2
2. Run Nexus
$ cd /usr/local/nexus2/bin/
$ ./nexus start (restart/stop...) # use ordinary account not root
if successd ,Go to browser http://ip:8081/nexus ,account and passowd is admin and admin123
(if you want to change port number ,pls go to ./nexus2/conf/nexus.properties to set ,the default is 8081)
issues:
(1)if successfully installed ,will show :
Starting Nexus OSS...
Stared Nexus OSS
But ,after installing nexus ,excute command "./nexus start" failed ,show the below message:
Starting Nexus OSS...
Failed to start Nexus OSS.
Solution : this is casued by priviledge of nexus directory ,it belongs to root user .After change the owner of the nexus directory to the current user ,rerun the command "./nexus start",it works.
sudo chown -R selina:selina ../../nexus
(2)Can't browser
when http://ip:8081/nexus ,failed ,need to see log message from: ./nexus/logs/wrapper.log ,show "Unable to start JVM: No such file or directory" in here ,
Solution : editing "<nexus_root>/bin/jsw/conf/wrapper.conf" and changing "wrapper.java.commad" the full path to my java executable
wrapper.java.commad={JAVA_HOME}/bin/java
Again to http://ip:8081/nexus ,failed ,see log message ,show " error..Temp directory:/usr/lcoal/sonatype-work/nexus/tmp "
Solution : chmod -R 777 /usr/local/sonatype-work/nexus/tmp
Congratulations ,well done.Click the "Login In" on the top right corner.the default username is admin ,password is admin123.
注意:Nexus 不能使用root用户启动,需要使用普通用户启动,假设普通用户为user,则需要:
chown -R user:user nexus2
chown -R user:user sonatype-work
登录后最重要的事情就是打开远程索引下载,操作为选择菜单Administrator->Repositories,然后在右边打开的列表中依次选择type字段为proxy的记录,在下方的编辑区中修改"Download Remote Indexes"值为true,再从这三个仓库上点右键选择"Reapir Index",这一步别忘,Repair Index后,Nexus会从后台去官方地址下载仓库索引文件,大概20M大小,根据网速快慢下载相应时间后选择仓库时会以树形目录的方式显示仓库内容。(注意:如果repaire-index后,在“browser index"里仍然看不到东西,要确定/usr/lcoal/sonatype-work/nexus目录是否有写权限 )Central的"Remote storage location"默认的是http://repo1.maven.org/maven2,因这是国外网站,忒慢,如此找到了以下这个源镜像:http://repo.maven.apache.org/maven2
想要maven使用刚刚配置的nexus服务作为仓库服务器,需要修改settings.xml文件。
在maven中存在两个 settings.xml,一个位于maven2的安装目录conf下面,作为全局性配置。对于团队设置,保持一致的定义是关键,所以 maven/conf下面的settings.xml就作为团队共同的配置文件。保证所有的团队成员都拥有相同的配置。当然对于每个成员,都需要特殊的 自定义设置,如用户信息,所以另外一个settings.xml就作为本地配置。默认的位置为:${HOME} /.m2/settings.xml目录
<settings>
<!--<localRepository>这个是存放eclipse项目需要费用的jar包(在eclipse项目添加maven依赖的时候,eclipse自动从nexus服务器中下载jar包,然后存到这个路径,默认路径是~/.m2/repository,可以不修改-->
<localRepository>/resource/java/repos/maven-repo</localRepository>
<servers>
<server>
<!-- 这是server的id(注意不是用户登陆的id),该id与pom.xml 中distributionManagement中repository元素的id相匹配。-->
<!--远程nexus 服务器的用户名与密码,作用就是当要向nexus deploy 自已写的jar 时,会用到在pom.xml 中distributionManagement ,在那里会引用此处的id -->
<id>releases</id>
<username>admin</username>
<password>admin123</password>
</server>
<server>
<id>snapshots</id>
<username>admin</username>
<password>admin123</password>
</server>
</servers>
<mirrors>
<mirror>
<!--This sends everything else to /public -->
<!--该镜像的唯一标识符。id用来区分不同的mirror元素。 -->
<id>nexus</id>
<!--该镜像的URL。构建系统会优先考虑使用该URL,而非使用默认的服务器URL -->
<url>http://localhost:8081/nexus/content/groups/public</url>
<!--被镜像的服务器的id。例如,如果我们要设置了一个Maven中央仓库(http://repo1.maven.org/maven2)的镜像,就需要将该元素设置成central。这必须和中央仓库的id central完全一致。 -->
<mirrorOf>central</mirrorOf>
</mirror>
</mirrors>
<profiles>
<!--个性配置。类似于pom.xml中的profile元素。单独定义profile后,并不会生效,需要通过满足条件来激活-->
<profile>
<!--该配置的唯一标识符。 -->
<id>development</id>
<repositories>
<!--包含需要连接到远程仓库的信息 -->
<repository>
<!--远程仓库唯一标识-->
<id>central</id>
<name>local private nexus</name>
<url>http://127.0.0.1:8081/nexus/content/groups/public</url>
<!--如何处理远程仓库里发布版本的下载-->
<releases><enabled>true</enabled></releases>
<snapshots><enabled>false</enabled></snapshots>
</repository>
</repositories>
<pluginRepositories>
<pluginRepository>
<id>central</id>
<name>local private nexus</name>
<url>http://127.0.0.1:8081/nexus/content/groups/public</url>
<releases><enabled>true</enabled></releases>
<snapshots><enabled>false</enabled></snapshots>
</pluginRepository>
</pluginRepositories>
</profile>
</profiles>
<activeProfiles>
<activeProfile>development</activeProfile>
</activeProfiles>
</settings>
然后,在从你的工程里的pom.xml中加入以下内容:
<distributionManagement>
<repository>
<!--ID要与maven中的setting.xml中的ID一致-->
<id>releases</id>
<name>Nexus Release Repo</name>
<url>http://localhost:8081/nexus/content/repositories/releases</url>
</repository>
<snapshotRepository>
<!--ID要与maven中的setting.xml中的ID一致-->
<id>snapshots</id>
<name>snapshots</name>
<url>http://localhost:8081/nexus/content/repositories/snapshots</url>
</snapshotRepository>
</distributionManagement>
访问http://localhost:8081/nexus/ 启动后如下页面,在右上角有个Log in 的超链接,点击登录
默认的用户名是 admin 密码是 admin123
Public Repositories: 仓库组
3rd party: 无法从公共仓库获得的第三方发布版本的构件仓库
Apache Snapshots: 用了代理ApacheMaven仓库快照版本的构件仓库
Central: 用来代理maven中央仓库中发布版本构件的仓库
Central M1 shadow: 用于提供中央仓库中M1格式的发布版本的构件镜像仓库
Releases: 用来部署管理内部的发布版本构件的宿主类型仓库
Snapshots:用来部署管理内部的快照版本构件的宿主类型仓库
配置Public Repositories属性,在Ordered Group Repositories中将仓库都选中。
二 IntelliJ IDE使用私服配置
方法一:
找到maven的安装目录 D:\JetBrains\IntelliJ IDEA 14.1.5\plugins\maven\lib\maven3\conf
修改setting.xml 添加如下:
<mirrors>
<mirror>
<id>central</id>
<mirrorOf>*</mirrorOf>
<name>Central Repository</name>
<url>http://192.168.1.7:8081/nexus/content/groups/public/</url>
</mirror>
</mirrors>
修改 工程设置,一定要把user setting file 钩给勾上 . OK 工程无需其它配置 就可以使用私服了
方法二:
在项目的pom.xml中添加:
<repositories>
<repository>
<id>public</id>
<name>Public Repositories</name>
<url>http://ip:8081/nexus/content/groups/public</url>
</repository>
</repositories>
<pluginRepositories>
<pluginRepository>
<id>public</id>
<name>Public Repositories</name>
<url>http://ip:8081/nexus/content/groups/public</url>
</pluginRepository>
</pluginRepositories>
三上传构建到私服
直接用 idea 中的 deploy按钮就可以将 打好的 jar 包或者 war包上传到 私服中 (install 是将jar包 拷贝到本地仓库)
maven setting.xml 添加如下配置:
<servers>
<server>
<id>nexus-releases</id>
<username>admin</username>
<password>admin123</password>
</server>
<server>
<id>nexus-snapshots</id>
<username>admin</username>
<password>admin123</password>
</server>

</servers>
工程pom.xml 添加如下配置:
<distributionManagement>
<repository>
<id>nexus-releases</id>
<name>Nexus Release Repository</name>
<url>http://192.168.1.7:8081/nexus/content/repositories/releases/</url>
</repository>
<snapshotRepository>
<id>nexus-snapshots</id>
<name>Nexus Snapshot Repository</name>
<url>http://192.168.1.7:8081/nexus/content/repositories/snapshots/</url>
</snapshotRepository>
</distributionManagement>

相关文章推荐
- 如何使用nexus在局域网内搭建maven私服及idea的使用
- 使用nexus在局域网内搭建maven私服及idea的使用
- 使用nexus在局域网内搭建maven私服及idea的使用
- Maven学习 (四) 使用Nexus搭建Maven私服 为什么要搭建nexus私服,原因很简单,有些公司都不提供外网给项目组人员,因此就不能使用maven访问远程的仓库地址,所以很有必要在局域网里找
- Maven学习 (四) 使用Nexus搭建Maven私服
- 在操作系统Centos 6.3 上使用Nexus 2.8搭建MAVEN私服 及 cloudstack 开发环境
- Maven学习 (四) 使用Nexus搭建Maven私服
- maven--私服的搭建(Nexus的使用)
- Maven学习 (四) 使用Nexus搭建Maven私服
- 使用nexus搭建maven私服、手动更新索引
- Maven学习 (四) 使用Nexus搭建Maven私服
- Maven学习 (四) 使用Nexus搭建Maven私服
- 使用Nexus搭建Maven私服
- maven--私服的搭建(Nexus的使用)
- 使用nexus为maven搭建私服
- 使用Nexus搭建Maven私服
- Maven入门指南⑤:使用Nexus搭建Maven私服
- 使用Nexus搭建Maven私服
- 使用Nexus搭建Maven私服
- 使用Sonatype Nexus搭建Maven私服后如何添加第三方JAR包?