Android 中处理POWER/HOME流程
2017-05-11 08:58
399 查看
转载请注明出处: http://blog.csdn.net/peng_cao
目录(?)[+]
Android按键消息处理
1kernel中同按键相关代码
2framework针对键盘事件的处理
Step1 启动服务
Step2 InputManagerService创建
Step3 com_android_server_InputManagerServicecpp
Step4 NativeInputManager
Step5 InputManager构造函数
Step6 将服务运行起来
Step7 InputManagerServicecppbatuveStart
Step8 InputManagercpp start
Step9 InputReaderloopOnce
Step 10 InputDeviceprocess
Step 11 KeyboardInputMapperprocess
Step 12 KeyboardInputMapperprocessKe
Step 13 consumeRawTouche
Android中针对按键处理的流程图
Power短按
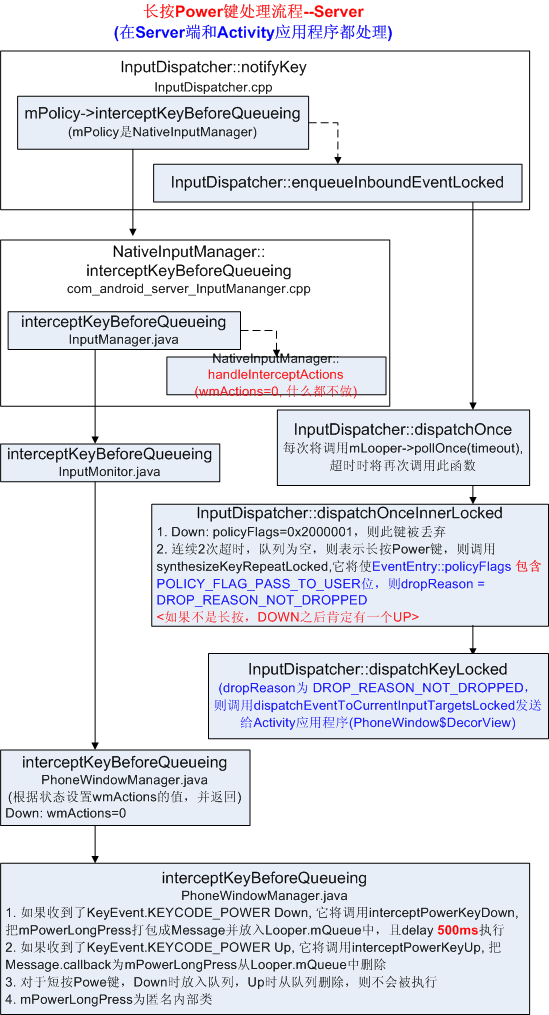
power长按
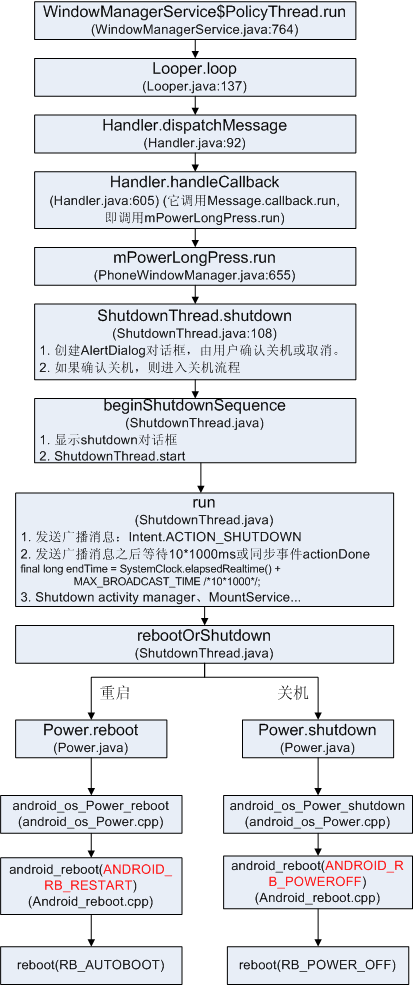
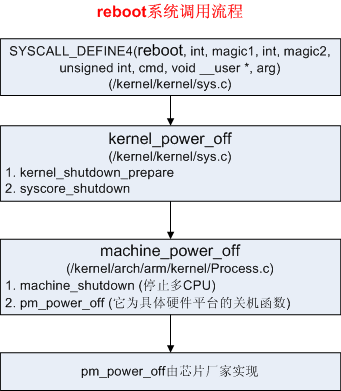
reboot and shutdown
参考资料
kernel的相关驱动来实现。
键盘消息有别于其他类型的消息;需要从Linux kernel drivers产生由上层app来处理。同时按键有着不同的映射值,因此从模块独立性角度各个独立的模块应该拥有不同的键盘映射。这样以来,kernel产生的按键事件必然回经过不同的映射才到app。

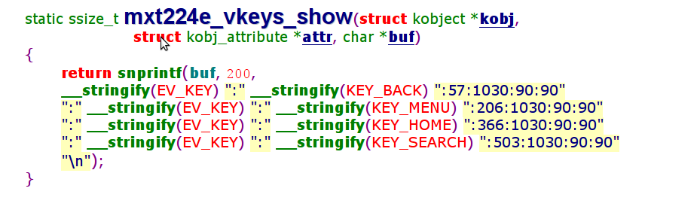
有了按键的定义,就需要产生相应的按键事件了。在kernel/arch/arm/mach-msm/xxx/xxx/xxx.c会对BACK HOME和MENU进行注册。这里使用在屏幕上的坐标来对按键进行区分。这部分代码会在系统启动的时候,将相应的数据存储,以供framework查询。
(这里以xxx代替,是因为针对不同的硬件,需要的Linux kernel不同)
当然从核心板原理图到kernel是属于驱动范畴,不讨论。
2
3
4
5
6
7
8
9
10
11
12
1
2
3
4
5
6
7
8
9
10
11
12
可以看到,在系统启动的时候,会首先创建一个系统级别的Handler线程wmHandlerThread用于处理键盘消息(仅说明键盘消息)。然后在创建输入管理服务 inputManager,InputManagerService 的第二个参数就是用于处理按键消息的Handler。
2
3
4
5
6
7
8
9
1
2
3
4
5
6
7
8
9
这里做了重要的两件事情
第一:将SystemServer级别的Handler赋值给 InputManagerService自己的消息处理Handler;
第二:调用nativeInit继续进行初始化。
2
3
4
5
6
7
8
1
2
3
4
5
6
7
8
这里nativeInit直接调用了 NativeInputManager的构造函数
2
3
4
5
6
7
8
9
10
11
12
13
14
15
16
17
18
1
2
3
4
5
6
7
8
9
10
11
12
13
14
15
16
17
18
这里需要特别注意最后两行代码。第一:创建了 EventHub;第二:创建 InputManager并将 EventHub作为参数传入InputManager。
2
3
4
5
6
7
8
9
10
11
12
13
1
2
3
4
5
6
7
8
9
10
11
12
13
创建了InputDispatcher 和InputReader,并调用了initialize函数创建了InputReaderThread和InputDispatcherThread。InputDispatcher类是负责把键盘消息分发给当前激活的Activity窗口的,而InputReader类则是通过
EventHub类来实现读取键盘事件的,InputReader实列mReader就是通过这里的 InputReaderThread线程实列mReaderThread来读取键盘事件的,而InputDispatcher实例mDispatcher 则是通过这里的InputDispatcherThread线程实例mDisptacherThread来分发键盘消息的。
到这里,相关的组件都已经被创建了;
在systemServer.java中创建inputManager之后。将InputManagerServer进行注册,并运行start()
2
3
4
5
6
7
8
1
2
3
4
5
6
7
8
调用nativeStart继续往下走。顺带说一下,这里的参数mPtr是指向nativeinputmanager service对象的,在InputManagerService构造函数中由nativeInit赋值。
2
3
4
5
6
7
8
1
2
3
4
5
6
7
8
这里的im就是inputManager并且用到了上面传下来的mPtr来重新构建。
2
3
4
5
6
7
8
9
10
11
12
13
14
15
16
1
2
3
4
5
6
7
8
9
10
11
12
13
14
15
16
这个函数主要就是分别启动一个InputDispatcherThread线程和一个InputReaderThread线程来读取和分发键 盘消息的了。这里的InputDispatcherThread线程对象mDispatcherThread和InputReaderThread线程对 象是在前面的Step9中创建的,调用了它们的run函数后,就会进入到它们的threadLoop函数中去,只要threadLoop函数返回true,函数 threadLoop就会一直被循环调用,于是这两个线程就起到了不断地读取和分发键盘消息的作用。
2
3
4
5
6
7
8
9
10
11
12
13
14
15
16
17
1
2
3
4
5
6
7
8
9
10
11
12
13
14
15
16
17
这里面需要注意像神一样的函数 mEventHub->getEvents()。其实现原理,还有点不是很清楚;但是其功能就是负责键盘消息的读取工作,如果当前有键盘事件发生或者有键盘事件等待处理,通过mEventHub的 getEvent函数就可以得到这个事件,然后交给processEventsLocked 函数进行处理。同样需要特别注意最后一行;后面回解释。我们还会回来的~~~
2
3
4
5
6
7
8
9
10
11
12
13
1
2
3
4
5
6
7
8
9
10
11
12
13
函数原型!
在成功获取input Event之后,就会用到 processEventsLocked函数来处理Event
然后在调用到 processEventsForDeviceLocked(deviceId,rawEvent, batchSize);
最后在void InputDevice::process(constRawEvent* rawEvents, size_t count)
我就在想:问什么不直接到process函数呢?其实我觉得这里体现了设计模式中的单一职责原则;这种设计可以有效的控制函数粒度(有个类粒度,这里自创函数粒度)的大小,函数承担的职责越多其复用的可能性就越小,并且当期中某一个职责发生变化,可能会影响其他职责的运作!
2
3
4
5
1
2
3
4
5
走到这里才算是真真正正的知道了有按键发生了,调用 KeyboardInputMapper::process(const RawEvent*)处理input event; KeyboardInputMapper 继承自 InputMapper。那为什么调用的是 KeyboardInputMapper而不是SwitchInputMapper等等。。
请留意
2
1
2
函数中的片段:
1
这里Event Type有必要提一下,以下是一些常用的Event。在kernel/Documentation/input/event-codes.txt中有详细的描述。
EV_SYN:
Used as markers to separate events. Eventsmay be separated in time or in space, such as with the multitouch protocol.
EV_KEY:
Used to describe state changes ofkeyboards, buttons, or other key-like devices.
EV_REL:
Used to describe relative axis value changes,e.g. moving the mouse 5 units to the left.
EV_ABS:
Used to describe absolute axis valuechanges, e.g. describing the coordinates of a touch on a touchscreen.
EV_MSC:
Used to describe miscellaneous input datathat do not fit into other types.
EV_SW:
Used to describe binary stateinput switches.
2
3
4
5
6
7
8
9
10
11
12
13
14
15
16
17
18
19
20
1
2
3
4
5
6
7
8
9
10
11
12
13
14
15
16
17
18
19
20
在这里,先判断isKeyboardOrGamepadKey(scanCode),然后在用getEventHub()->mapKey()检测 提供的key是否正确,在然后就开始处理了processKey
2
3
4
5
6
7
8
9
1
2
3
4
5
6
7
8
9
不用多解释了,直接notifyKey了。。但需要注意,这里的notifyKey 仅仅是 NotifyKeyArgs push到消息队列中去;并没有通知上层!那到底在那儿通知的呢?
还记不记得在void InputReader::loopOnce()这个函数的最后一行代码,其实质是在这个函数中通知上层有按键事件发生。
这个flush()很明显,notify了之后,就delete,不存在了。问什么不是在getListener()->notifyKey(&args);的时候就真正的notify?我觉得可以做如下角度予以考虑:
第一:线程是最小的执行单位;因此每当inputThread.start()的时候,如果不flush,回造成数据混乱。
第二:flush操作是必须的,同时在loopOnce的最后操作也是最恰当的。其实这里的Listener也就是充当了一个事件分发者的角色。
这说明,到这里已经完全识别了按键了,并按照自己的键盘映射映射了一个值保存在args中,notifyKey给上层应用了。。
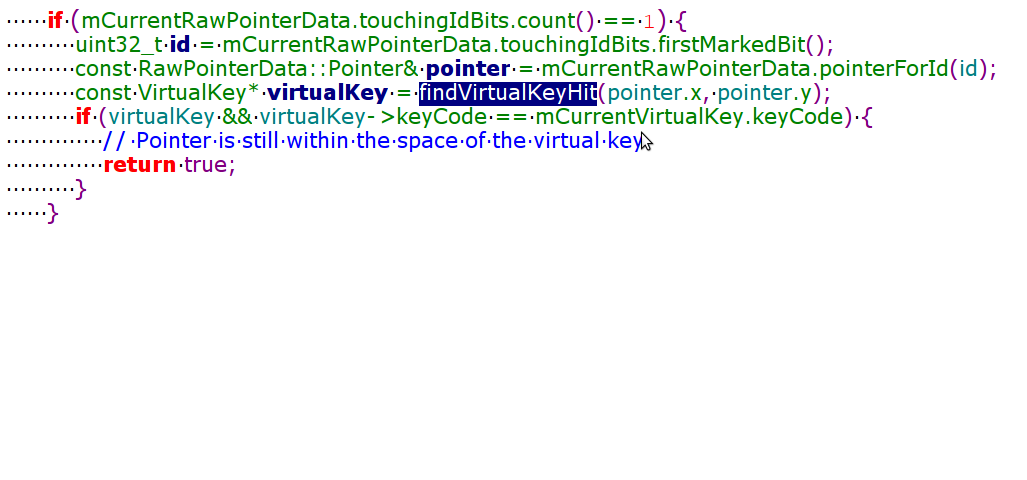
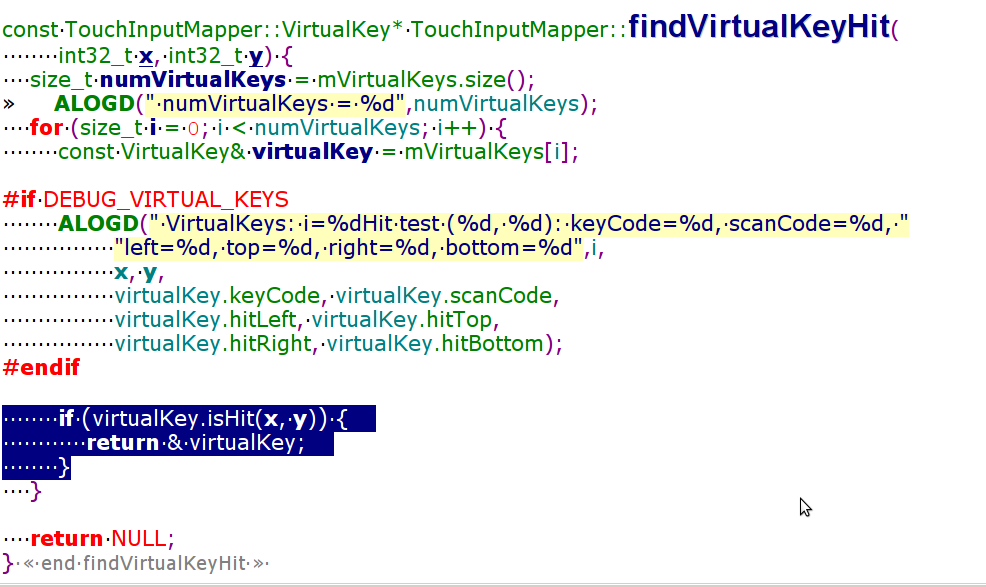
首先检测不是多点Touch。然后使用const TouchInputMapper::VirtualKey*TouchInputMapper::findVirtualKeyHit( int32_t x, int32_t y)依据坐标值查找出Touch的映射值。
到最后了啊。。。
呵呵,看看是怎么实现的。。
目录(?)[+]
Android按键消息处理
1kernel中同按键相关代码
2framework针对键盘事件的处理
Step1 启动服务
Step2 InputManagerService创建
Step3 com_android_server_InputManagerServicecpp
Step4 NativeInputManager
Step5 InputManager构造函数
Step6 将服务运行起来
Step7 InputManagerServicecppbatuveStart
Step8 InputManagercpp start
Step9 InputReaderloopOnce
Step 10 InputDeviceprocess
Step 11 KeyboardInputMapperprocess
Step 12 KeyboardInputMapperprocessKe
Step 13 consumeRawTouche
Android中针对按键处理的流程图
Power短按
power长按
reboot and shutdown
参考资料
Android按键消息处理
在Android系统中,键盘按键事件是由SystemServer服务来管理的;然后在以消息的形式分发给应用程序处理。产生键盘按键事件则是有Linuxkernel的相关驱动来实现。
键盘消息有别于其他类型的消息;需要从Linux kernel drivers产生由上层app来处理。同时按键有着不同的映射值,因此从模块独立性角度各个独立的模块应该拥有不同的键盘映射。这样以来,kernel产生的按键事件必然回经过不同的映射才到app。
1、kernel中同按键相关代码
Android 使用标准的 linux 输入事件设备(/dev/input/)和驱动按键定义在 linux 内核include/linux/input.h中,按键的定义形式如下(仅以BACK HOME MENU POWER为例):
有了按键的定义,就需要产生相应的按键事件了。在kernel/arch/arm/mach-msm/xxx/xxx/xxx.c会对BACK HOME和MENU进行注册。这里使用在屏幕上的坐标来对按键进行区分。这部分代码会在系统启动的时候,将相应的数据存储,以供framework查询。
(这里以xxx代替,是因为针对不同的硬件,需要的Linux kernel不同)
当然从核心板原理图到kernel是属于驱动范畴,不讨论。
2、framework针对键盘事件的处理
上层对输入事件的侦听和分发是在InputManagerService 中实现,首先来看看InputManagerService的创建,Step1 启动服务
SystemServer.Javaclass ServerThread extends Thread {
//省略。。
public void run() {
// Create a handler thread just for the window manager to enjoy.
HandlerThread wmHandlerThread = new HandlerThread("WindowManager");
wmHandlerThread.start();
Handler wmHandler = new Handler(wmHandlerThread.getLooper());
//此处省略5k字。。
Slog.i(TAG, "Input Manager");
inputManager = new InputManagerService(context, wmHandler);
}
}12
3
4
5
6
7
8
9
10
11
12
1
2
3
4
5
6
7
8
9
10
11
12
可以看到,在系统启动的时候,会首先创建一个系统级别的Handler线程wmHandlerThread用于处理键盘消息(仅说明键盘消息)。然后在创建输入管理服务 inputManager,InputManagerService 的第二个参数就是用于处理按键消息的Handler。
Step2 InputManagerService创建
在往下走到 InputManagerService.java的构造函数。public InputManagerService(Context context, Handler handler) {
this.mContext = context;
this.mHandler = new InputManagerHandler(handler.getLooper());
mUseDevInputEventForAudioJack =
context.getResources().getBoolean(R.bool.config_useDevInputEventForAudioJack);
Slog.i(TAG, "Initializing input manager, mUseDevInputEventForAudioJack="
+ mUseDevInputEventForAudioJack);
mPtr = nativeInit(this, mContext, mHandler.getLooper().getQueue());
}12
3
4
5
6
7
8
9
1
2
3
4
5
6
7
8
9
这里做了重要的两件事情
第一:将SystemServer级别的Handler赋值给 InputManagerService自己的消息处理Handler;
第二:调用nativeInit继续进行初始化。
Step3 com_android_server_InputManagerService.cpp
static jint nativeInit(JNIEnv* env, jclass clazz,
jobject serviceObj, jobject contextObj, jobject messageQueueObj) {
sp<MessageQueue> messageQueue = android_os_MessageQueue_getMessageQueue(env, messageQueueObj);
NativeInputManager* im = new NativeInputManager(contextObj, serviceObj,
messageQueue->getLooper());
im->incStrong(serviceObj);
return reinterpret_cast<jint>(im);
}12
3
4
5
6
7
8
1
2
3
4
5
6
7
8
这里nativeInit直接调用了 NativeInputManager的构造函数
Step4 NativeInputManager
NativeInputManager::NativeInputManager(jobject contextObj,
jobject serviceObj, const sp<Looper>& looper) :
mLooper(looper) {
JNIEnv* env = jniEnv();

mContextObj = env->NewGlobalRef(contextObj);
mServiceObj = env->NewGlobalRef(serviceObj);

{
AutoMutex _l(mLock);
mLocked.systemUiVisibility = ASYSTEM_UI_VISIBILITY_STATUS_BAR_VISIBLE;
mLocked.pointerSpeed = 0;
mLocked.pointerGesturesEnabled = true;
mLocked.showTouches = false;
}
sp<EventHub> eventHub = new EventHub();
mInputManager = new InputManager(eventHub, this, this);
}12
3
4
5
6
7
8
9
10
11
12
13
14
15
16
17
18
1
2
3
4
5
6
7
8
9
10
11
12
13
14
15
16
17
18
这里需要特别注意最后两行代码。第一:创建了 EventHub;第二:创建 InputManager并将 EventHub作为参数传入InputManager。
Step5 InputManager构造函数
InputManager::InputManager(
const sp<EventHubInterface>& eventHub,
const sp<InputReaderPolicyInterface>& readerPolicy,
const sp<InputDispatcherPolicyInterface>& dispatcherPolicy) {
mDispatcher = new InputDispatcher(dispatcherPolicy);
mReader = new InputReader(eventHub, readerPolicy, mDispatcher);
initialize();
}

void InputManager::initialize() {
mReaderThread = new InputReaderThread(mReader);
mDispatcherThread = new InputDispatcherThread(mDispatcher);
}12
3
4
5
6
7
8
9
10
11
12
13
1
2
3
4
5
6
7
8
9
10
11
12
13
创建了InputDispatcher 和InputReader,并调用了initialize函数创建了InputReaderThread和InputDispatcherThread。InputDispatcher类是负责把键盘消息分发给当前激活的Activity窗口的,而InputReader类则是通过
EventHub类来实现读取键盘事件的,InputReader实列mReader就是通过这里的 InputReaderThread线程实列mReaderThread来读取键盘事件的,而InputDispatcher实例mDispatcher 则是通过这里的InputDispatcherThread线程实例mDisptacherThread来分发键盘消息的。
到这里,相关的组件都已经被创建了;
Step6 将服务运行起来
接下来看看他们是如何运行起来的。在systemServer.java中创建inputManager之后。将InputManagerServer进行注册,并运行start()
ServiceManager.addService(Context.INPUT_SERVICE, inputManager);
inputManager.start();
//InputManager的start函数:
public void start() {
Slog.i(TAG, "Starting input manager");
nativeStart(mPtr);
//省略。。
}12
3
4
5
6
7
8
1
2
3
4
5
6
7
8
调用nativeStart继续往下走。顺带说一下,这里的参数mPtr是指向nativeinputmanager service对象的,在InputManagerService构造函数中由nativeInit赋值。
Step7 InputManagerService.cpp–>batuveStart
接下来又到了com_android_server_InputManagerService.cpp中。static void nativeStart(JNIEnv* env, jclass clazz, jint ptr) {
NativeInputManager* im = reinterpret_cast<NativeInputManager*>(ptr);
status_t result = im->getInputManager()->start();
if (result) {
jniThrowRuntimeException(env, "Input manager could not be started.");
}
}12
3
4
5
6
7
8
1
2
3
4
5
6
7
8
这里的im就是inputManager并且用到了上面传下来的mPtr来重新构建。
Step8 InputManager.cpp start
继续往下则会调用到InputManager.cpp 的start函数status_t InputManager::start() {
status_t result = mDispatcherThread->run("InputDispatcher", PRIORITY_URGENT_DISPLAY);
if (result) {
ALOGE("Could not start InputDispatcher thread due to error %d.", result);
return result;
}
result = mReaderThread->run("InputReader", PRIORITY_URGENT_DISPLAY);
if (result) {
ALOGE("Could not start InputReader thread due to error %d.", result);
mDispatcherThread->requestExit();
return result;
}
return OK;
}12
3
4
5
6
7
8
9
10
11
12
13
14
15
16
1
2
3
4
5
6
7
8
9
10
11
12
13
14
15
16
这个函数主要就是分别启动一个InputDispatcherThread线程和一个InputReaderThread线程来读取和分发键 盘消息的了。这里的InputDispatcherThread线程对象mDispatcherThread和InputReaderThread线程对 象是在前面的Step9中创建的,调用了它们的run函数后,就会进入到它们的threadLoop函数中去,只要threadLoop函数返回true,函数 threadLoop就会一直被循环调用,于是这两个线程就起到了不断地读取和分发键盘消息的作用。
Step9 InputReader::loopOnce()
在下来继续看loopOnce()这个函数。void InputReader::loopOnce() {
//......
size_t count = mEventHub->getEvents(timeoutMillis, mEventBuffer, EVENT_BUFFER_SIZE);
//......
if (count) {
processEventsLocked(mEventBuffer, count);
}
//......
// Flush queued events out to the listener.
// This must happen outside of the lock because the listener could potentially call
// back into the InputReader's methods, such as getScanCodeState, or become blocked
// on another thread similarly waiting to acquire the InputReader lock thereby
// resulting in a deadlock. This situation is actually quite plausible because the
// listener is actually the input dispatcher, which calls into the window manager,
// which occasionally calls into the input reader.
mQueuedListener->flush();
}12
3
4
5
6
7
8
9
10
11
12
13
14
15
16
17
1
2
3
4
5
6
7
8
9
10
11
12
13
14
15
16
17
这里面需要注意像神一样的函数 mEventHub->getEvents()。其实现原理,还有点不是很清楚;但是其功能就是负责键盘消息的读取工作,如果当前有键盘事件发生或者有键盘事件等待处理,通过mEventHub的 getEvent函数就可以得到这个事件,然后交给processEventsLocked 函数进行处理。同样需要特别注意最后一行;后面回解释。我们还会回来的~~~
/*
* Wait for events to become available and returns them.
* After returning, the EventHub holds onto a wake lock until the next call to getEvent.
* This ensures that the device will not go to sleep while the event is being processed.
* If the device needs to remain awake longer than that, then the caller is responsible
* for taking care of it (say, by poking the power manager user activity timer).
*
* The timeout is advisory only. If the device is asleep, it will not wake just to
* service the timeout.
*
* Returns the number of events obtained, or 0 if the timeout expired.
*/
virtual size_t getEvents(int timeoutMillis, RawEvent* buffer, size_t bufferSize)
1
2
3
4
5
6
7
8
9
10
11
12
13
1
2
3
4
5
6
7
8
9
10
11
12
13
函数原型!
在成功获取input Event之后,就会用到 processEventsLocked函数来处理Event
然后在调用到 processEventsForDeviceLocked(deviceId,rawEvent, batchSize);
最后在void InputDevice::process(constRawEvent* rawEvents, size_t count)
我就在想:问什么不直接到process函数呢?其实我觉得这里体现了设计模式中的单一职责原则;这种设计可以有效的控制函数粒度(有个类粒度,这里自创函数粒度)的大小,函数承担的职责越多其复用的可能性就越小,并且当期中某一个职责发生变化,可能会影响其他职责的运作!
Step 10 InputDevice::process
接下来继续看InputDevice::process函数void InputDevice::process(const RawEvent* rawEvents, size_t count) {
//。。。。
InputMapper* mapper = mMappers[i];
mapper->process(rawEvent);
}12
3
4
5
1
2
3
4
5
走到这里才算是真真正正的知道了有按键发生了,调用 KeyboardInputMapper::process(const RawEvent*)处理input event; KeyboardInputMapper 继承自 InputMapper。那为什么调用的是 KeyboardInputMapper而不是SwitchInputMapper等等。。
请留意
InputDevice* InputReader::createDeviceLocked(int32_t deviceId,
const InputDeviceIdentifier& identifier, uint32_t classes)
1
2
1
2
函数中的片段:
if (keyboardSource != 0) {device->addMapper(new KeyboardInputMapper(device, keyboardSource, keyboardType));}11
这里Event Type有必要提一下,以下是一些常用的Event。在kernel/Documentation/input/event-codes.txt中有详细的描述。
EV_SYN:
Used as markers to separate events. Eventsmay be separated in time or in space, such as with the multitouch protocol.
EV_KEY:
Used to describe state changes ofkeyboards, buttons, or other key-like devices.
EV_REL:
Used to describe relative axis value changes,e.g. moving the mouse 5 units to the left.
EV_ABS:
Used to describe absolute axis valuechanges, e.g. describing the coordinates of a touch on a touchscreen.
EV_MSC:
Used to describe miscellaneous input datathat do not fit into other types.
EV_SW:
Used to describe binary stateinput switches.
Step 11 KeyboardInputMapper::process
void KeyboardInputMapper::process(const RawEvent* rawEvent) {
switch (rawEvent->type) {
case EV_KEY: {
int32_t scanCode = rawEvent->code;
int32_t usageCode = mCurrentHidUsage;
mCurrentHidUsage = 0;

if (isKeyboardOrGamepadKey(scanCode)) {
int32_t keyCode;
uint32_t flags;
if (getEventHub()->mapKey(getDeviceId(), scanCode, usageCode, &keyCode, &flags)) {
keyCode = AKEYCODE_UNKNOWN;
flags = 0;
}
processKey(rawEvent->when, rawEvent->value != 0, keyCode, scanCode, flags);
}
break;
}
}
}12
3
4
5
6
7
8
9
10
11
12
13
14
15
16
17
18
19
20
1
2
3
4
5
6
7
8
9
10
11
12
13
14
15
16
17
18
19
20
在这里,先判断isKeyboardOrGamepadKey(scanCode),然后在用getEventHub()->mapKey()检测 提供的key是否正确,在然后就开始处理了processKey
Step 12 KeyboardInputMapper::processKe
void KeyboardInputMapper::processKey(nsecs_t when, bool down, int32_t keyCode,
int32_t scanCode, uint32_t policyFlags) {
//忽略到所有的。。只看最后两行。。
NotifyKeyArgs args(when, getDeviceId(), mSource, policyFlags,
down ? AKEY_EVENT_ACTION_DOWN : AKEY_EVENT_ACTION_UP,
AKEY_EVENT_FLAG_FROM_SYSTEM, keyCode, scanCode, newMetaState, downTime);

getListener()->notifyKey(&args);
}12
3
4
5
6
7
8
9
1
2
3
4
5
6
7
8
9
不用多解释了,直接notifyKey了。。但需要注意,这里的notifyKey 仅仅是 NotifyKeyArgs push到消息队列中去;并没有通知上层!那到底在那儿通知的呢?
还记不记得在void InputReader::loopOnce()这个函数的最后一行代码,其实质是在这个函数中通知上层有按键事件发生。
这个flush()很明显,notify了之后,就delete,不存在了。问什么不是在getListener()->notifyKey(&args);的时候就真正的notify?我觉得可以做如下角度予以考虑:
第一:线程是最小的执行单位;因此每当inputThread.start()的时候,如果不flush,回造成数据混乱。
第二:flush操作是必须的,同时在loopOnce的最后操作也是最恰当的。其实这里的Listener也就是充当了一个事件分发者的角色。
这说明,到这里已经完全识别了按键了,并按照自己的键盘映射映射了一个值保存在args中,notifyKey给上层应用了。。
Step 13 consumeRawTouche
其实针对BACK HOME MENU这三个按键来说,其实质就是TouchScreen;因此在inputReader.cpp中获取Touch映射是在函数boolTouchInputMapper::consumeRawTouche**s(nsecs_t when, uint32_t policyFlags) 中。这里同上面的**Step 12相同。首先检测不是多点Touch。然后使用const TouchInputMapper::VirtualKey*TouchInputMapper::findVirtualKeyHit( int32_t x, int32_t y)依据坐标值查找出Touch的映射值。
到最后了啊。。。
呵呵,看看是怎么实现的。。
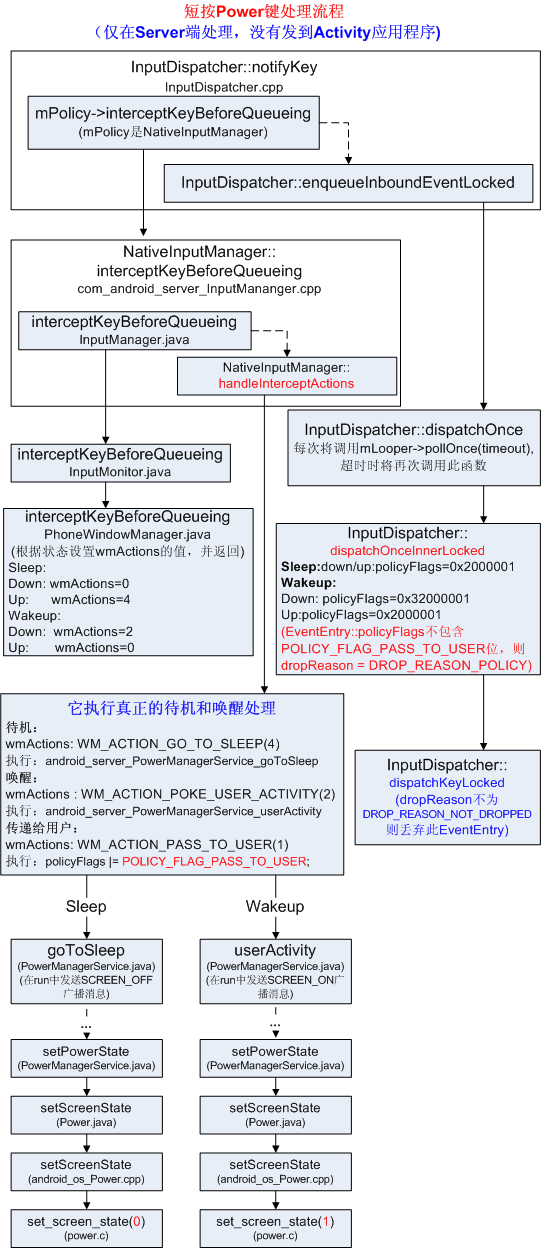
Android中针对按键处理的流程图
这里使用针对power按键为例进行说明Power短按
power长按
reboot and shutdown

相关文章推荐
- Android 中处理POWER/HOME流程
- Android Framework层Power键关机流程(一,Power长按键操作处理)
- 【Android休眠】之Android对PowerKey事件的处理(1)代码流程
- Android Framework层Power键关机流程(一,Power长按键操作处理)
- Android 7.0 Power 按键处理流程
- Android 7.0 Power 按键处理流程
- 【Android游戏开发十九】(必看篇)SurfaceView运行机制详解—剖析Back与Home按键及切入后台等异常处理!
- android游戏开发中按下power后如何来处理游戏
- 【Android游戏开发十九】(必看篇)SurfaceView运行机制详解—剖析Back与Home按键及切入后台等异常处理!
- Android 通话处理流程【转】
- android如何屏蔽home back power按键(现保存以后很可能会需要的)
- Android Poweroff 流程
- 读取SDcard Database并在Android ListView显示的处理流程
- Android事件处理分析+Android事件处理 +Android输入事件流程
- Android 事件捕捉和处理流程分析
- Android项目开发中如何处理Home键
- Android 传感器(Sensor)API教程 (三) 传感器值取得例程及处理流程
- 【Android游戏开发十九】(必看篇)SurfaceView运行机制详解—剖析Back与Home按键及切入后台等异常处理!
- Android中ListView的onKeyDown、onKeyUp、onKeyMultiple事件的处理流程
- Android ISurface PostBuffer 处理流程