Android 自定义控件-Canvas和Paint绘图详解-手把手带你绘制一个时钟.
2017-05-03 21:30
686 查看
,Android - Paint基础
在自定义控件时,经常需要使用canvas、paint等,在canvas类中,绘画基本都是靠drawXXX()方法来完成的,在这些方法中,很多时候都需要用到paint类型的参数,Paint作为一个非常重要的元素,功能也是非常强大的,这里简单列举一些它的属性和对应的功能.
setAntiAlias() //设置画笔的锯齿效果
setColor() //设置画笔的颜色
setARGB() //设置画笔的ARGB值
setAlpha() //设置画笔的Alpha值
setTextSize() //设置字体的的大小
setStyle() //设置画笔的风格(实心或者是空心)
setStrokeWidth() //设置空心边框的宽度.
正是由于画笔的功能不一样,再结合各种不同的绘图api,这样任意的组合就可以实现不同的绘图效果.
例如:
mPaint = new Paint();
mPaint.setColor(getResources().getColor(R.color.colorAccent));
mPaint.setAntiAlias(true);
mPaint.setStyle(Paint.Style.STROKE);
mPaint.setStrokeWidth(10);
mPaint.setTextSize(100);
1
2
3
4
5
6
1
2
3
4
5
6
以上就是关于Paint类的一个简单的介绍,更多的介绍可以参考Google的官方文档
2,Android - Canvas基础
具体的看代码canvas.drawPoint(100,100,mPaint);
//绘制一条直线
canvas.drawLine(150,150,150,300,mPaint);
float [] pts = {
300,300,300,400,
300,400,400,400,
400,400,400,500
};
//绘制多条直线
canvas.drawLines(pts,mPaint);
//绘制一个矩形
RectF rectF = new RectF(500,100,600,300);
canvas.drawRect(rectF,mPaint);
//绘制圆角矩形
RectF rectF2 = new RectF(700,100,900,300);
canvas.drawRoundRect(rectF2,50,50,mPaint);
//绘制一个圆
canvas.drawCircle(600,600,100,mPaint);
//绘制一个扇形
RectF rectFArc = new RectF(300,800,500,1000);
canvas.drawArc(rectFArc,0,270,true,mPaint);
mPaint.setStyle(Paint.Style.STROKE);
//绘制一个弧形
RectF rectFArc2 = new RectF(300,1100,500,1300);
canvas.drawArc(rectFArc2,0,270,false,mPaint);
//绘制椭圆 外接矩形 也就就是该椭圆为矩形的内接椭圆
RectF rectFArOval = new RectF(520,1100,720,1400);
canvas.drawOval(rectFArOval,mPaint);
//绘制文本
canvas.drawText("hello",100,100,mPaint);
Path path = new Path();
path.moveTo(100,400);
path.lineTo(200,500);
path.lineTo(100,600);
path.lineTo(50,700);
canvas.drawPath(path,mPaint);12
3
4
5
6
7
8
9
10
11
12
13
14
15
16
17
18
19
20
21
22
23
24
25
26
27
28
29
30
31
32
33
34
35
36
37
38
39
1
2
3
4
5
6
7
8
9
10
11
12
13
14
15
16
17
18
19
20
21
22
23
24
25
26
27
28
29
30
31
32
33
34
35
36
37
38
39
3,简单实例,绘制一个时钟
先看图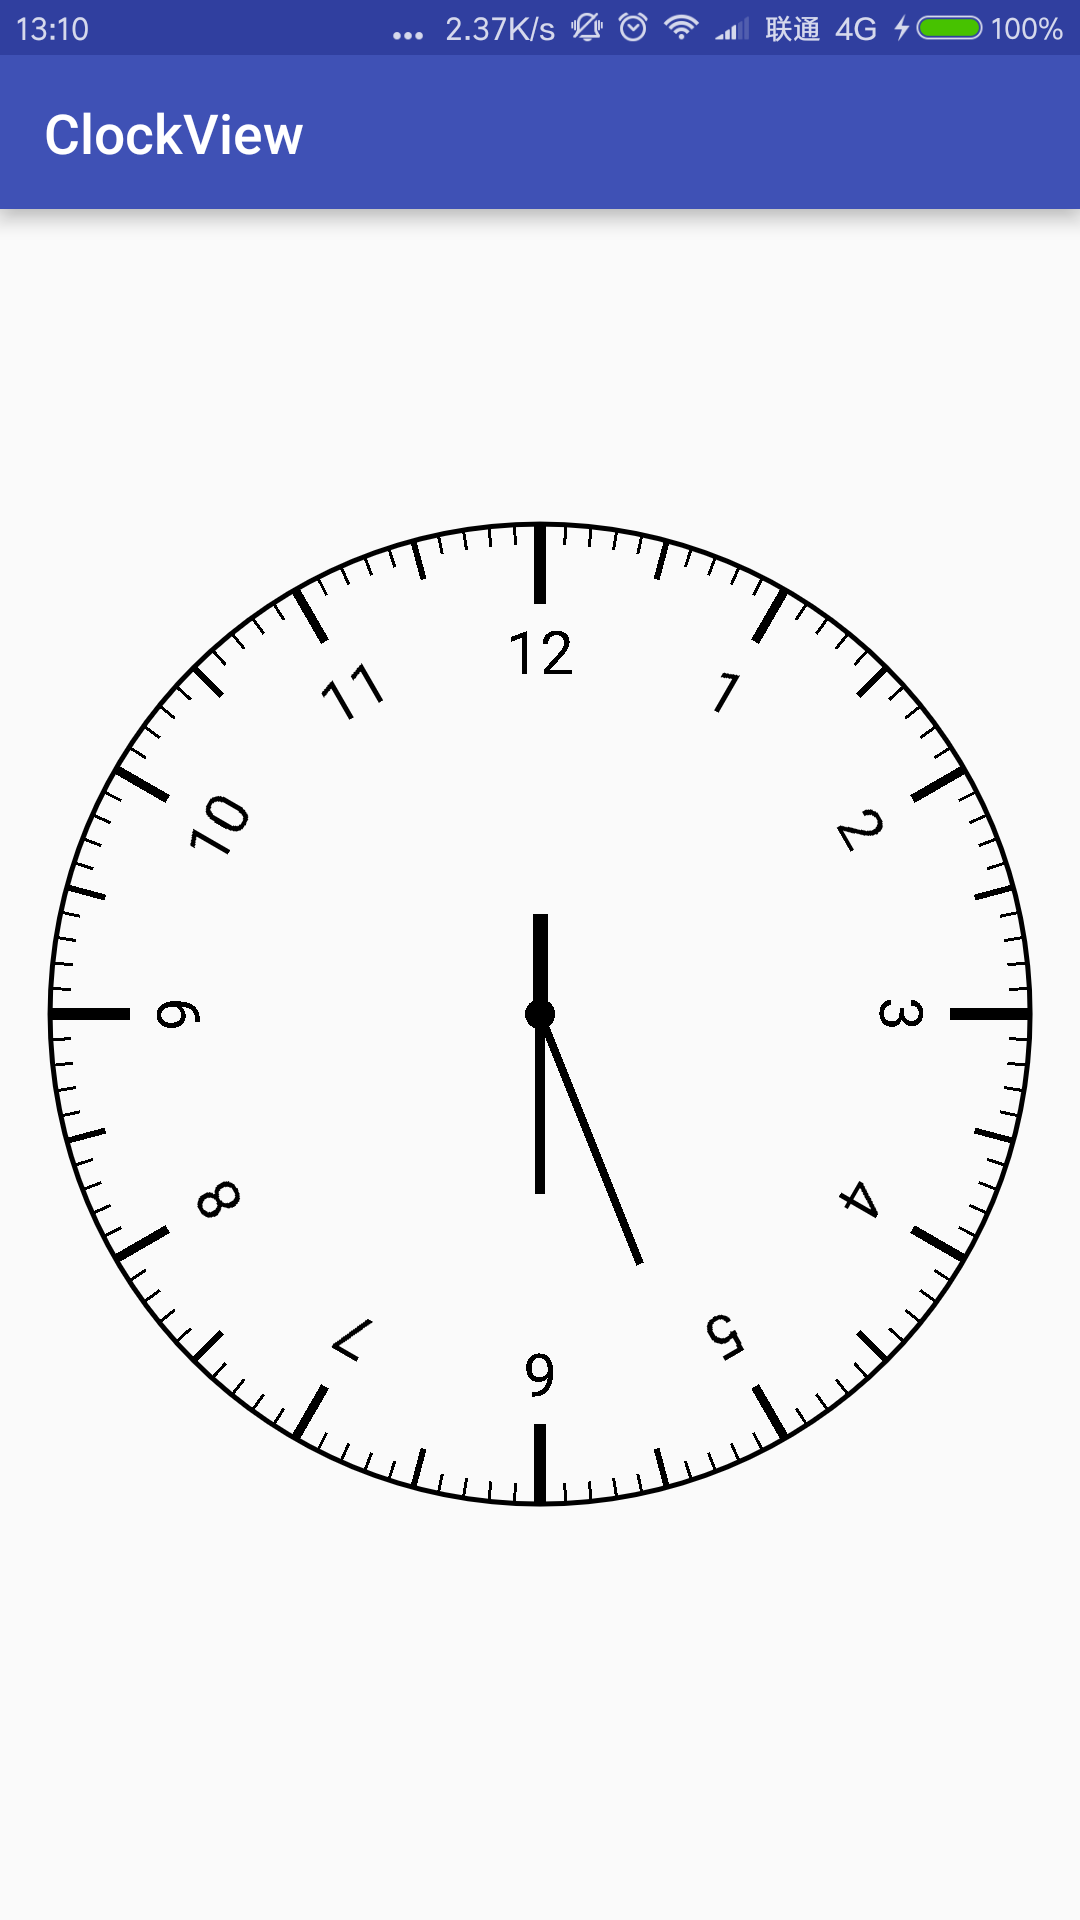
效果就如上图所示,那这样的效果是怎么实现的呢?这就需要用到Canvas和Paint的相关知识了.
Canvas作为绘制图形的直接对象,它提供了以下几个非常有用发方法.
1. canvas.save() : 保存画布,它的作用是将之前的所有已经绘制的图像保存起来,让后续的操作就好像在一个新的图层上,操作一样.
2. canvas.restore() :可以理解和PhotosShop中的合并图层操作.它的作用是我们在save之后绘制的所有图像与save之前的图像进行合并.
3. canvas.translate():画布平移,就是将画布的坐标原点移动到你指定的位置.
4. canvas,rotate():画布翻转,.就是将坐标系翻转了一定的角度.
理解了以上几个方法,那么我们就可以开始绘制我们的时钟了,先来分析下要绘制的这个图形,.我们可以分成4个步骤.
绘制仪表盘–外面的那个大圆形
刻度线-
刻度值
指针
在这个实例中,第一步绘制表盘,这个挺简单的,只要调用canvas,drawCircle()来绘制一个圆盘就可以了,圆心位置和半径按照自己的需要来确定,
代码如下:
mWidth = getMeasuredWidth()-100;
mHeight = getMeasuredHeight()-100;
//首先绘制一个大圆盘
Paint paintCircle = new Paint();
paintCircle.setStyle(Paint.Style.STROKE);
paintCircle.setAntiAlias(true);
paintCircle.setStrokeWidth(5);
canvas.drawCircle(mWidth/2,mHeight/2,mWidth/2,paintCircle);
1
2
3
4
5
6
7
8
1
2
3
4
5
6
7
8
第二部绘制刻度线和刻度值,我们可以将一个圆分成120根刻度线,每两根刻度线之间的角度为3度,我们只要每绘制好一根线后,我们就画布旋转3度,代码如下:
//绘制刻度
Paint paintDegree = new Paint();
paintDegree.setStrokeWidth(3);
for (int i = 0 ;i<120 ;i++){
//大点,12点 3点 6点 9点
if (i == 0 || i == 30 || i==60 || i ==90){
paintDegree.setStrokeWidth(12);
paintDegree.setTextSize(60);
canvas.drawLine(mWidth/2,mHeight/2-mWidth/2,mWidth/2,mHeight/2-mWidth/2+80,paintDegree);
String degree = String.valueOf(i/10);
if (i == 0){
degree = "12";
}
canvas.drawText(degree,mWidth/2-paintDegree.measureText(degree)/2,mHeight/2-mWidth/2+150,paintDegree);
}else if (i % 10 == 0){////整点
paintDegree.setStrokeWidth(9);
paintDegree.setTextSize(60);
String degree = String.valueOf(i/10);
canvas.drawText(degree,mWidth/2-paintDegree.measureText(degree)/2,mHeight/2-mWidth/2+140,paintDegree);
canvas.drawLine(mWidth/2,mHeight/2-mWidth/2,mWidth/2,mHeight/2-mWidth/2+60,paintDegree);
}else if (i % 5 == 0){
paintDegree.setStrokeWidth(6);
paintDegree.setTextSize(20);
canvas.drawLine(mWidth/2,mHeight/2-mWidth/2,mWidth/2,mHeight/2-mWidth/2+40,paintDegree);
}
else{
paintDegree.setStrokeWidth(3);
paintDegree.setTextSize(20);
canvas.drawLine(mWidth/2,mHeight/2-mWidth/2,mWidth/2,mHeight/2-mWidth/2+20,paintDegree);
}
//每次绘制完成后将画布旋转3度
canvas.rotate(3, mWidth / 2, mHeight / 2);
}12
3
4
5
6
7
8
9
10
11
12
13
14
15
16
17
18
19
20
21
22
23
24
25
26
27
28
29
30
31
32
33
1
2
3
4
5
6
7
8
9
10
11
12
13
14
15
16
17
18
19
20
21
22
23
24
25
26
27
28
29
30
31
32
33
最后在绘制指针:
//保存表盘和刻度的画布
canvas.save();
//绘制指针
Paint paintPoint = new Paint();
Paint paintHouse = new Paint();
paintHouse.setStrokeWidth(15);
Paint paintMinute = new Paint();
paintMinute.setStrokeWidth(10);
Paint paintSecond = new Paint();
paintSecond.setStrokeWidth(8);

//将画布的起点坐标移动到圆心位置
canvas.translate(mWidth/2,mHeight/2);
canvas.drawCircle(0,0,15,paintPoint);
canvas.drawLine(0,0,0,-100,paintHouse);
canvas.drawLine(0,0,0,180,paintMinute);
canvas.drawLine(0,0,100,250,paintSecond);
//合并图层
canvas.restore();
1
2
3
4
5
6
7
8
9
10
11
12
13
14
15
16
17
18
19
1
2
3
4
5
6
7
8
9
10
11
12
13
14
15
16
17
18
19
全部的代码如下:
package com.example.administrator.myscrollview.view;1
import android.content.Context;
import android.graphics.Canvas;
import android.graphics.Paint;
import android.util.AttributeSet;
import android.view.View;
/**
* Created by Administrator on 2016/9/29.
*/
public class ClockView extends View {
private int mWidth,mHeight;
public ClockView(Context context) {
this(context,null);
}
public ClockView(Context context, AttributeSet attrs) {
this(context, attrs,-1);
}
public ClockView(Context context, AttributeSet attrs, int defStyleAttr) {
super(context, attrs, defStyleAttr);
}
@Override
protected void onDraw(Canvas canvas) {
super.onDraw(canvas);
canvas.translate(50,0);
mWidth = getMeasuredWidth()-100;
mHeight = getMeasuredHeight()-100;
//首先绘制一个大圆盘
Paint paintCircle = new Paint();
paintCircle.setStyle(Paint.Style.STROKE);
paintCircle.setAntiAlias(true);
paintCircle.setStrokeWidth(5);
canvas.drawCircle(mWidth/2,mHeight/2,mWidth/2,paintCircle);
//绘制刻度 Paint paintDegree = new Paint(); paintDegree.setStrokeWidth(3); for (int i = 0 ;i<120 ;i++){ //大点,12点 3点 6点 9点 if (i == 0 || i == 30 || i==60 || i ==90){ paintDegree.setStrokeWidth(12); paintDegree.setTextSize(60); canvas.drawLine(mWidth/2,mHeight/2-mWidth/2,mWidth/2,mHeight/2-mWidth/2+80,paintDegree); String degree = String.valueOf(i/10); if (i == 0){ degree = "12"; } canvas.drawText(degree,mWidth/2-paintDegree.measureText(degree)/2,mHeight/2-mWidth/2+150,paintDegree); }else if (i % 10 == 0){////整点 paintDegree.setStrokeWidth(9); paintDegree.setTextSize(60); String degree = String.valueOf(i/10); canvas.drawText(degree,mWidth/2-paintDegree.measureText(degree)/2,mHeight/2-mWidth/2+140,paintDegree); canvas.drawLine(mWidth/2,mHeight/2-mWidth/2,mWidth/2,mHeight/2-mWidth/2+60,paintDegree); }else if (i % 5 == 0){ paintDegree.setStrokeWidth(6); paintDegree.setTextSize(20); canvas.drawLine(mWidth/2,mHeight/2-mWidth/2,mWidth/2,mHeight/2-mWidth/2+40,paintDegree); } else{ paintDegree.setStrokeWidth(3); paintDegree.setTextSize(20); canvas.drawLine(mWidth/2,mHeight/2-mWidth/2,mWidth/2,mHeight/2-mWidth/2+20,paintDegree); } //每次绘制完成后将画布旋转3度 canvas.rotate(3, mWidth / 2, mHeight / 2); }
//保存表盘和刻度的画布
canvas.save();
//绘制指针
Paint paintPoint = new Paint();
Paint paintHouse = new Paint();
paintHouse.setStrokeWidth(15);
Paint paintMinute = new Paint();
paintMinute.setStrokeWidth(10);
Paint paintSecond = new Paint();
paintSecond.setStrokeWidth(8);
//将画布的起点坐标移动到圆心位置
canvas.translate(mWidth/2,mHeight/2);
canvas.drawCircle(0,0,15,paintPoint);
canvas.drawLine(0,0,0,-100,paintHouse);
canvas.drawLine(0,0,0,180,paintMinute);
canvas.drawLine(0,0,100,250,paintSecond);
//合并图层
canvas.restore();
}
}
2
3
4
5
6
7
8
9
10
11
12
13
14
15
16
17
18
19
20
21
22
23
24
25
26
27
28
29
30
31
32
33
34
35
36
37
38
39
40
41
42
43
44
45
46
47
48
49
50
51
52
53
54
55
56
57
58
59
60
61
62
63
64
65
66
67
68
69
70
71
72
73
74
75
76
77
78
79
80
81
82
83
84
85
86
87
88
89
90
91
92
1
2
3
4
5
6
7
8
9
10
11
12
13
14
15
16
17
18
19
20
21
22
23
24
25
26
27
28
29
30
31
32
33
34
35
36
37
38
39
40
41
42
43
44
45
46
47
48
49
50
51
52
53
54
55
56
57
58
59
60
61
62
63
64
65
66
67
68
69
70
71
72
73
74
75
76
77
78
79
80
81
82
83
84
85
86
87
88
89
90
91
92
效果

到这,本文就结束了,希望对大家有所帮助,谢谢.

相关文章推荐
- Android 自定义控件-Canvas和Paint绘图详解-手把手带你绘制一个时钟.
- Android:视图绘制(一) ------基本的绘图操作Paint和Canvas
- canvas绘图详解-06-绘制一个五角星-常用绘图原理
- Android自定义控件绘制流程与Paint, Canvas相关API
- Android 2D绘图(Canvas+paint)详解
- android之绘图——Canvas,bitmap,Paint的理解
- Android Canvas绘图详解(图文)
- 初学Android,图形图像之使用Canvas,Paint绘图(二十五)
- android 绘图之Canvas,Paint类
- Android Canvas绘图详解
- 【转】Android Canvas绘图详解
- 通过创建一个位图的XY Chart来学习Android绘图类Rect,Paint,Bitmap,Canvas(附源码)
- Android隐喻(三) 图形绘制: Canvas、SurfaceView、Paint、Surface、SurfaceHolder、Bitmap
- android2D绘图详解----关于Canvas
- Android Canvas绘图详解(图文)
- Android Canvas绘图详解(图文)
- Android绘图基础:Canvas、Paint、Path的简单使用
- Android开发:canvas.drawTextOnPath()无效----Android4.03的又一个bug!!!!(关于Canvas绘制的方方面面) .
- Android Canvas绘图详解(图文)
- 绘图——Android绘图基础:Canvas、Paint等