WPF 图片的滚动播放实现方法之一
2017-05-03 15:41
337 查看
摘要: 此方法还是比较简单的,运用的是ListBox控件实现, 需要开发工具Expression Blend 和VS2010及以上
完成效果

1、先要在窗口中拖一个ListBox的控件
2、这些代码是完成效果ListBox的Xaml代码,所以里面有点多,暂时忽视,注意后面的操作, 当做完了就会跟这个一样了
(1)需要添加两个属性:
ScrollViewer.VerticalScrollBarVisibility="Disabled" //让垂直滚动条消失
ScrollViewer.HorizontalScrollBarVisibility="Hidden" //让水平滚动条隐藏起来
(2)还有个就是让ListBox中的内容也水平展示 需要下面的这个代码:
(3)下面就说明一下其中的图片数据的准备和那个平滑的效果操作方法:
其中准备图片数据有两种方式,第一个是你没有准备好的图片,直接利用生成的实例数据中的图片,这种方式对于增加和删除显示图片响应不好,第二种方式是在后台动态的加载图片,这种增加和删除图片很方便。两种方式选择其中一种,不要混用,要不就乱了!!!
1、 图片准备第一种方式, 用Blend打开你的项目,然后在面板中找到 数据 那个面板,找到图中的指示,创建一 个示例数据,

然后再新创建的示例数据中(默认会有两个Property,我们删除一个,只保留一个),将那个图中所示的修改成图像的属性,那个位置选你的图片所在位置,不选也可以(会生成默认的图片),然后就是将Collection直接拖动到ListBox控件中。

2、图片准备第二种方式,选择这种方式此处看看就行,然后直接看下面平滑效果的实现,然后在后台代码加入就行了,见下面代码片段:(此片段最后会在全部后台代码中包含,去掉注视即可用)
前台代码也要有些改变:
平滑的效果方法(此处要感谢烤地瓜老师,还有一众的人),这个方法是看他们的博客学来的,具体操作方法就是;
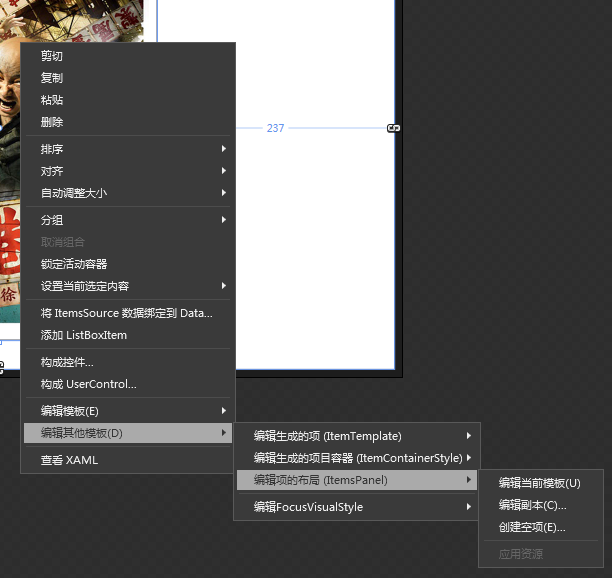
选中ListBox 右键选择 编辑其他模版选项,然后选 编辑项的布局(ItemsPanel),然后再选编辑副本,如图
然后再看图,完成以上操作,找到下图的面板,在找到如下的那个行为,将他拖到[VirtualizingStackPanel]上,就如第一图所示
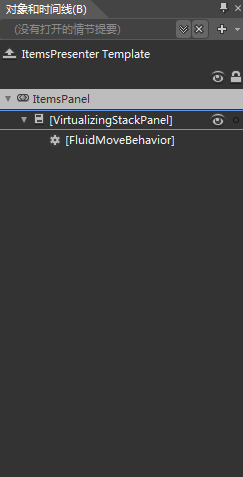

然后就是选中那个FluidMoveBehavior然后再属性面板中的公共属性的那个改成Children,至此完成,
3、还有最后一步,就是写点后台代码,主要就是用了一个定时器
完成效果
1、先要在窗口中拖一个ListBox的控件
2、这些代码是完成效果ListBox的Xaml代码,所以里面有点多,暂时忽视,注意后面的操作, 当做完了就会跟这个一样了
<ListBox x:Name="listBox1" Height="424" Margin="85,8,384,0" VerticalAlignment="Top"
Unloaded="listBox1_Unloaded" Loaded="listBox1_Loaded"
ScrollViewer.VerticalScrollBarVisibility="Disabled"
ScrollViewer.HorizontalScrollBarVisibility="Hidden"
ItemTemplate="{DynamicResource ItemTemplate}" ItemsSource="{Binding Collection}">
<ListBox.ItemsPanel>
<ItemsPanelTemplate>
<VirtualizingStackPanel Orientation="Horizontal">
<i:Interaction.Behaviors>
<ei:FluidMoveBehavior AppliesTo="Children"/>  <!-- 此段形成平滑的效果-->
</i:Interaction.Behaviors>
</VirtualizingStackPanel>
</ItemsPanelTemplate>
</ListBox.ItemsPanel>
</ListBox>
(1)需要添加两个属性:
ScrollViewer.VerticalScrollBarVisibility="Disabled" //让垂直滚动条消失
ScrollViewer.HorizontalScrollBarVisibility="Hidden" //让水平滚动条隐藏起来
(2)还有个就是让ListBox中的内容也水平展示 需要下面的这个代码:
<ListBox.ItemsPanel>
<ItemsPanelTemplate>
<VirtualizingStackPanel Orientation="Horizontal">
</VirtualizingStackPanel>
</ItemsPanelTemplate>
</ListBox.ItemsPanel>
(3)下面就说明一下其中的图片数据的准备和那个平滑的效果操作方法:
其中准备图片数据有两种方式,第一个是你没有准备好的图片,直接利用生成的实例数据中的图片,这种方式对于增加和删除显示图片响应不好,第二种方式是在后台动态的加载图片,这种增加和删除图片很方便。两种方式选择其中一种,不要混用,要不就乱了!!!
1、 图片准备第一种方式, 用Blend打开你的项目,然后在面板中找到 数据 那个面板,找到图中的指示,创建一 个示例数据,
然后再新创建的示例数据中(默认会有两个Property,我们删除一个,只保留一个),将那个图中所示的修改成图像的属性,那个位置选你的图片所在位置,不选也可以(会生成默认的图片),然后就是将Collection直接拖动到ListBox控件中。
2、图片准备第二种方式,选择这种方式此处看看就行,然后直接看下面平滑效果的实现,然后在后台代码加入就行了,见下面代码片段:(此片段最后会在全部后台代码中包含,去掉注视即可用)
前台代码也要有些改变:
<ListBox Height="200" ScrollViewer.VerticalScrollBarVisibility="Disabled" ScrollViewer.HorizontalScrollBarVisibility="Hidden" HorizontalAlignment="Left" Name="listBox1" VerticalAlignment="Top" Width="491" ItemsPanel="{DynamicResource ItemsPanelTemplate1}" Loaded="listBox1_Loaded" Unloaded="listBox1_Unloaded">
<ListBox.ItemTemplate>
<DataTemplate>
<Image Width="100" Height="200" Source="{Binding Path= FullPath}"/>
</DataTemplate>
</ListBox.ItemTemplate>
</ListBox>
using System.IO;
/// <summary>
/// 获取放图片文件夹位置,我是放在debug的目录中,AdvertisingImages为放图片的文件夹
/// </summary>
string currentPath = AppDomain.CurrentDomain.SetupInformation.ApplicationBase + "AdvertisingImages";
public List<Photo> photos = new List<Photo>();
public class Photo
{
public string FullPath { get; set; }
}
public void GetAllImagePath(string path)
{
DirectoryInfo di = new DirectoryInfo(path);
FileInfo[] files = di.GetFiles("*.*", SearchOption.AllDirectories);
if (files != null && files.Length > 0)
{
foreach (var file in files)
{
if (file.Extension == (".jpg") ||
file.Extension == (".png") ||
file.Extension == (".bmp") ||
file.Extension == (".gif"))
{
photos.Add(new Photo()
{
FullPath = file.FullName
});
}
}
}平滑的效果方法(此处要感谢烤地瓜老师,还有一众的人),这个方法是看他们的博客学来的,具体操作方法就是;
选中ListBox 右键选择 编辑其他模版选项,然后选 编辑项的布局(ItemsPanel),然后再选编辑副本,如图
然后再看图,完成以上操作,找到下图的面板,在找到如下的那个行为,将他拖到[VirtualizingStackPanel]上,就如第一图所示
然后就是选中那个FluidMoveBehavior然后再属性面板中的公共属性的那个改成Children,至此完成,
3、还有最后一步,就是写点后台代码,主要就是用了一个定时器
///不要直接全部复制啊///

using System;
using System.Collections.Generic;
using System.Linq;
using System.Text;
using System.Windows;
using System.Windows.Controls;
using System.Windows.Data;
using System.Windows.Documents;
using System.Windows.Input;
using System.Windows.Media;
using System.Windows.Media.Imaging;
using System.Windows.Media.Animation;
using System.Windows.Shapes;
using System.IO;
using System.Windows.Threading;

namespace PictureRollingTest  //此处的命名空间改成你自己
{
/// <summary>
/// Window1.xaml 的交互逻辑
/// </summary>
public partial class Window1 : Window   //还有这里
{
DispatcherTimer timer = new DispatcherTimer();
//string currentPath = AppDomain.CurrentDomain.SetupInformation.ApplicationBase + "AdvertisingImages";
//public List<Photo> photos = new List<Photo>();
public Window1()
{
InitializeComponent();
//GetAllImagePath(currentPath);
//listBox1.ItemsSource = photos;

}

/*public class Photo
{
public string FullPath { get; set; }
}

public void GetAllImagePath(string path)
{
DirectoryInfo di = new DirectoryInfo(path);
FileInfo[] files = di.GetFiles("*.*", SearchOption.AllDirectories);
if (files != null && files.Length > 0)
{
foreach (var file in files)
{
if (file.Extension == (".jpg") ||
file.Extension == (".png") ||
file.Extension == (".bmp") ||
file.Extension == (".gif"))
{
photos.Add(new Photo()
{
FullPath = file.FullName
});
}
}
}
}*/

private void timer_Tick(object sender, EventArgs e)
{
if (listBox1.Items.Count > 0)
{

if (listBox1.SelectedIndex == listBox1.Items.Count - 1)
{
listBox1.SelectedIndex = 0;

}
else
{
listBox1.SelectedIndex += 1;
listBox1.ScrollIntoView(listBox1.Items[listBox1.SelectedIndex]);
}
}
}

//下面这个是ListBox的两个事件Unload和Load
private void listBox1_Unloaded(object sender, RoutedEventArgs e)
{
timer.Stop();
}

private void listBox1_Loaded(object sender, RoutedEventArgs e)
{
timer.Interval = TimeSpan.FromMilliseconds(2000);
timer.Tick += new EventHandler(timer_Tick);
listBox1.SelectedIndex = 0;
timer.Start();
}
}
}

相关文章推荐
- javascript+html5实现仿flash滚动播放图片的方法
- 解析WPF实现音频文件循环顺序播放的解决方法
- WPF中获取TreeView以及ListView获取其本身滚动条的方法,可实现自行调节scoll滚动的位置(可相应获取任何控件中的内部滚动条)
- Android图片滚动,加入自动播放功能,使用自定义属性实现,霸气十足!
- Android图片滚动,加入自动播放功能,使用自定义属性实现,霸气十足!
- Android图片滚动,加入自动播放功能,使用自定义属性实现,霸气十足!
- js实现鼠标悬停图片上时滚动文字说明的方法
- Android图片滚动,加入自动播放功能,使用自定义属性实现,霸气十足!
- Android图片滚动,加入自动播放功能,使用自定义属性实现,霸气十足!
- 解析WPF实现音频文件循环顺序播放的解决方法
- CSS3实现图片滚动播放效果
- Android图片滚动,加入自动播放功能,使用自定义属性实现,霸气十足!
- javascript实现图片循环渐显播放的方法
- 网页特效——图片翻页和图片滚动的实现方法
- 使用WPF Animated GIF实现GIF图片的播放
- 图片滚动特效实现方法的分析(JavaScript)
- CSS3实现图片滚动播放效果
- WPF技术触屏上的应用系列(四): 3D效果图片播放器(图片立体轮放、图片立体轮播、图片倒影立体滚动)效果实现
- 网站中图片滚动效果的实现方法集锦