AspNetCore-MVC实战系列(二)之通过绑定邮箱找回密码
2017-04-28 11:31
585 查看
AspNetCore - MVC实战系列目录
[b]. 爱留图网站诞生[/b]. git源码:https://github.com/shenniubuxing3/LovePicture.Web
[b]. AspNetCore - MVC实战系列(一)之Sqlserver表映射实体模型[/b]
. AspNetCore-MVC实战系列(二)之通过绑定邮箱找回密码
. [b]AspNetCore-MVC实战系列(三)之个人中心[/b]
[b][b][b]. AspNetCore-MVC实战系列(四)之账户设置[/b][/b][/b]
开篇唠嗑
本篇内容写在5.1假期前夕,主要是让大家能在节假日休息充点的时候能有好的干货例子,到目前为止netcore方面的实战例子分享即将进入正轨,谢谢各位朋友多多支持;最近工作安排的新项目即将开始,项目前期就我一人搭建,让我犹豫的是对于公司这个内部系统并且是初建的项目用什么开发方式好呢,最初考虑的是mvc5但是又想了下如果这样还不如直接使用NetCore1.1的MVC呢,因为现在这版本基本也算稳定了可以试试水,可是又有顾虑是mvc项目在上线的时候会影响到其他人的使用(前期不考虑nginx分发),然后目光又转向aspx网站的方式,不得不说这种方式在发布上的确有优势,尤其是在没有分布式的前提下;好吧目前还在考虑中,希望能得到各位朋友的建议。。。注册模块
首先,这里讲解的内容对应的实体和表结构是基于上一篇文章创建的项目这里就不多说了;对于一个注册功能来说,通常需要的属性是:账号,密码,确认密码,验证码(可省略),甚至有些快捷的注册方式就是通过手机号来注册,当然咋们没有短信通道的功能不能发短信,所以采用前者,先来看下Action中设计代码:Register的get路由Action
// GET: Member/Create
public IActionResult Register()
{
return View();
}
Register的post提交注册信息的Action
[HttpPost]
[ValidateAntiForgeryToken]
public async Task<IActionResult> Register([Bind("UserName,UserPwd,ComfirmPwd")] MoRegisterUser loginUser)
{
if (ModelState.IsValid)
{
#region 验证
if (_context.ToUserInfo.Any(b => b.UserName.ToUpper() == loginUser.UserName.Trim().ToUpper()))
{
this.MsgBox("已经存在相同的账号!");
return View(loginUser);
}
#endregion

#region 入库

ToUserInfo userInfo = new ToUserInfo();

userInfo.UserName = loginUser.UserName.Trim();
userInfo.UserPwd = PublicClass._Md5(loginUser.UserPwd.Trim());
userInfo.NickName = userInfo.UserName;
userInfo.Status = (int)EnumHelper.EmUserStatus.启用;
userInfo.CreateTime = DateTime.Now;
userInfo.LevelNum = (int)EmLevelNum.注册;

userInfo.Ips = this.GetUserIp();
userInfo.HeadPhoto = "/images/ailiutu_user.png";
userInfo.Sex = false;

_context.Add(userInfo);
var result = await _context.SaveChangesAsync();
if (result > 0)
{
var moUserInfo = new MoUserInfo
{
Id = userInfo.Id,
UserName = userInfo.UserName,
NickName = userInfo.NickName,
Addr = userInfo.Addr,
Birthday = userInfo.Birthday,

Blog = userInfo.Blog,
CreateTime = userInfo.CreateTime,
Email = userInfo.Email,
HeadPhoto = userInfo.HeadPhoto,
Introduce = userInfo.Introduce,

Ips = userInfo.Ips,
LevelNum = userInfo.LevelNum,
Sex = userInfo.Sex,
Tel = userInfo.Tel,
Status = userInfo.Status,

LoginTime = DateTime.Now
};
HttpContext.Session.Set<MoUserInfo>(HttpContext.Session.SessionKey(), moUserInfo);

if (!string.IsNullOrWhiteSpace(moUserInfo.Ips))
{
_context.ToUserLog.Add(new ToUserLog
{
CodeId = (int)EmLogCode.登录,
CreateTime = DateTime.Now,
Des = $"IP:{moUserInfo.Ips},登录时间:{moUserInfo.LoginTime.ToString("yyyy-MM-dd HH:mm")}",
UserId = userInfo.Id
});
}

_context.ToUserLog.Add(new ToUserLog
{
CodeId = (int)EmLogCode.积分,
CreateTime = DateTime.Now,
Des = $"【注册】  +{(int)EmLevelNum.注册}",
UserId = userInfo.Id
});
await _context.SaveChangesAsync();

return RedirectToAction(nameof(HomeController.Index), "home");
}
#endregion

this.MsgBox("注册失败,请稍后重试。");
return View(loginUser);
}
return View(loginUser);
}
通过Post的Action能够看出注册处理的Action主要操作步骤有以下几点:
. ModelState.IsValid验证提交的信息是否满足model规则设置
. Linq的Any()方法验证是否存在相同账号
. _context.Add()入库注册信息
. HttpContext.Session.Set的扩展方法设置登陆的session
. 记录登陆记录和登陆增加的积分信息
对于一个简单的注册基本就是这样的流程,我们来看看提交注册时的模型实体:
/// <summary>
/// 注册实体
/// </summary>
public class MoRegisterUser
{
[Required(AllowEmptyStrings = false, ErrorMessage = "账号长度范围6-30字符!")]
[Display(Prompt = "邮箱/手机号/6-30字符")]
[RegularExpression(@"[^\s]{6,30}", ErrorMessage = "账号长度范围6-30字符。")]
public string UserName { get; set; }

[Required(AllowEmptyStrings = false, ErrorMessage = "密码长度范围6-20字符!")]
[DataType(DataType.Password)]
[Display(Prompt = "密码长度范围6-20字符!")]
[RegularExpression(@"[^\s]{6,20}", ErrorMessage = "密码长度范围6-20字符。")]
public string UserPwd { get; set; }

[Compare("UserPwd", ErrorMessage = "密码与确认密码不相同!")]
[DataType(DataType.Password)]
[Display(Prompt = "必须与密码相同")]
public string ComfirmPwd { get; set; }
}
这里自定义的注册模型,设置了DataAnnotations,以此来快速设置验证,不用再每个都用js写了,mvc框架帮你做了这些;下面看看View的代码:
<!DOCTYPE html>
<html>
<head>
<meta charset="utf-8" />
<meta name="viewport" content="width=device-width, initial-scale=1.0" />
<title>爱留图 - 绑定邮箱模板</title>
</head>
<body>
<h3>{name} 您好:</h3>
<div style='padding-top:20px;width:100%'>{content}</div>
<div style='padding-top:30px;width:100%'>温馨提示:如果您不是<a href='http://www.lovexins.com:9527'>爱留图</a>用户,请勿点击。</div>
<div style='padding-top:50px;width:100%'>
<a href='http://www.lovexins.com:9527'>
<img style="width:50px;height:50px" src="http://www.lovexins.com:9527/images/ailiutu_user.png" />
<br />
爱留图网
</a>
</div>
<div style='padding-top:5px;width:100%;color:#ccc;border-top:1px solid #ccc'>此为系统邮件请勿回复</div>
</body>
</html>
View Code
有了html模板,咋们还需要把这个文件读取出来,加入到发送邮件内容中,读取html模板:
public static async Task<string> _GetHtmlTpl(EnumHelper.EmEmailTpl tpl, string folderPath = @"D:\F\学习\vs2017\netcore\LovePicture.Web\wwwroot\tpl")
{
var content = string.Empty;
if (string.IsNullOrWhiteSpace(folderPath)) { return content; }

var path = $"{folderPath}/{tpl}.html";
try
{
using (var stream = File.OpenRead(path))
{
using (var reader = new StreamReader(stream))
{
content = await reader.ReadToEndAsync();
}
}
}
catch (Exception ex)
{
throw new Exception(ex.Message);
}
return content;
}
好的到这里,通过用户输入的绑定邮箱,然后发送邮件的功能就完成了,来看看效果吧:
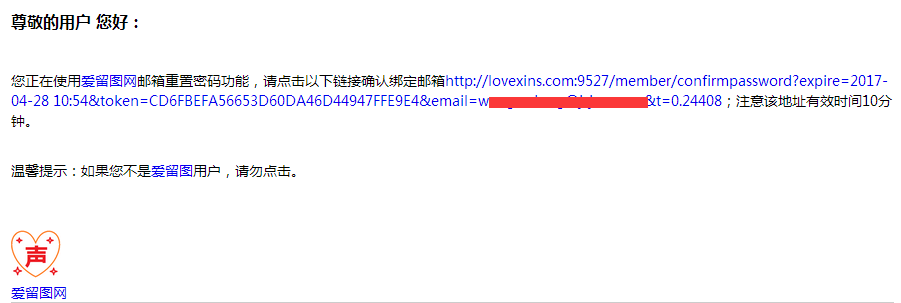
怎么样是不是感觉瞬间逼格提升了很多呢哈哈,电子邮件的推广和用途很多公司都太小看了,我们公司也是哎,什么时候您公司能够重视并且能够像jd那样常常个你发推送邮件,那么估计你离成功不远了嘿嘿;
接受重置密码通知
来继续咋们的讲解,当用户点击重置密码的链接后,我们需要一个接受的地址,这里我的Action取名为ConfirmPassword,接受的参数和我构造重置密码确认链接时候差不多:/// <summary>
/// 接受重置密码通知
/// </summary>
/// <returns></returns>
public IActionResult ConfirmPassword(string expire, string token, string email, string t)
{
if (string.IsNullOrWhiteSpace(expire) || string.IsNullOrWhiteSpace(token) || string.IsNullOrWhiteSpace(email) || !email.Contains("@") || string.IsNullOrWhiteSpace(t))
{
return RedirectToAction(nameof(HomeController.Error), "home", new { msg = "无效的请求。" });
}
else if (t.Length != 7)
{
return RedirectToAction(nameof(HomeController.Error), "home", new { msg = "无效的请求。" });
}
email = email.Trim().ToLower();
if (!DateTime.TryParse(expire, out var expires)) { return RedirectToAction(nameof(HomeController.Error), "home", new { msg = "无效的请求!" }); }
else if (expires.AddMinutes(30) < DateTime.Now)
{
return RedirectToAction(nameof(HomeController.Error), "home", new { msg = "请求已过期,重新操作!" });
}
var compareToken = PublicClass._Md5($"{expire}-{email}-{Request.Host.Host}");
if (!token.Equals(compareToken)) { return RedirectToAction(nameof(HomeController.Error), "home", new { msg = "验证失败,无效的请求!" }); }
var user = _context.ToUserInfo.SingleOrDefault(b => b.Email.ToLower() == email);
if (user == null) { return RedirectToAction(nameof(HomeController.Error), "home", new { msg = "不存在该绑定邮箱的账号!" }); }
else if (user.Status == (int)EnumHelper.EmUserStatus.禁用)
{
return RedirectToAction(nameof(HomeController.Error), "home", new { msg = "该绑定邮箱的账号已被禁用,可以通过发送邮件至:841202396@qq.com联系客服!" });
}
var key = $"checkConfirmPwd{email}";
if (!_cache.TryGetValue<MoUserInfo>(key, out var result))
{
_cache.Set<MoUserInfo>(key, new MoUserInfo { Id = user.Id, Email = email }, TimeSpan.FromMinutes(10));
}
return View(new MoRegisterUser { UserName = email });
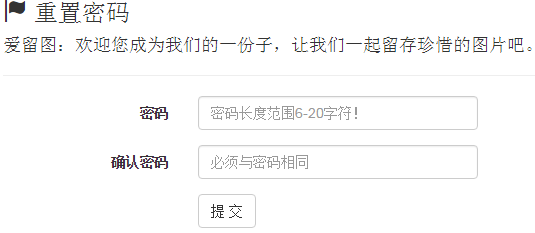
}通过各种安全性的验证(如:链接过期,不存在此用户,token验证失败等),最终会跳转到填写重置密码界面:
重置密码的界面和提交后的处理方式,基本和登陆,注册差不多,所以这里我直接贴出提交重置密码的Action代码:
/// <summary>
/// 提交重置的密码
/// </summary>
/// <param name="user"></param>
/// <returns></returns>
[HttpPost]
[ValidateAntiForgeryToken]
public async Task<IActionResult> ConfirmPassword([Bind("UserName", "UserPwd", "ComfirmPwd")]MoRegisterUser registUser)
{
if (ModelState.IsValid)
{
if (string.IsNullOrWhiteSpace(registUser.UserPwd))
{
this.MsgBox("密码不能为空!");
return View(registUser);
}
else if (string.IsNullOrWhiteSpace(registUser.ComfirmPwd))
{
this.MsgBox("确认密码不能为空!");
return View(registUser);
}
else if (registUser.UserPwd != registUser.ComfirmPwd)
{
this.MsgBox("密码和确认密码不相同!");
return View(registUser);
}

var key = $"checkConfirmPwd{registUser.UserName}";
if (!_cache.TryGetValue<MoUserInfo>(key, out var checkUser))
{
return RedirectToAction(nameof(HomeController.Error), "home", new { msg = "请求已过期,重新操作!" });
}

var user = _context.ToUserInfo.Where(b => b.Id == checkUser.Id && b.Email == checkUser.Email).SingleOrDefault();
if (user == null)
{
_cache.Remove(key);
return RedirectToAction(nameof(HomeController.Error), "home", new { msg = "重置的密码失败,请稍后重试!" });
}

user.UserPwd = PublicClass._Md5(registUser.UserPwd.Trim());
var result = await _context.SaveChangesAsync();
if (result > 0)
{
_cache.Remove(key);
this.MsgBox("重置密码成功!");
}
else { this.MsgBox("重置密码失败!"); }
}
return View(registUser);
}
下面是确认密码界面的View设计
@model LovePicture.Model.MoClass.MoRegisterUser

@{
ViewData["Title"] = "重置密码";
}

<h3><span class="glyphicon glyphicon-flag" aria-hidden="true"></span> 重置密码</h3>
<form name="form_submit" asp-action="ConfirmPassword">
<div class="form-horizontal">
<h4>  爱留图:欢迎您成为我们的一份子,让我们一起留存珍惜的图片吧。</h4>
<hr />
<input type="hidden" name="UserName" value="@Model.UserName"/>
<div asp-validation-summary="ModelOnly" class="text-danger"></div>
<div class="form-group">
<label asp-for="UserPwd" class="col-md-2 control-label">密码</label>
<div class="col-md-10">
<input asp-for="UserPwd" required="required" class="form-control" />
<span asp-validation-for="UserPwd" class="text-danger"></span>
</div>
</div>
<div class="form-group">
<label asp-for="ComfirmPwd" class="col-md-2 control-label">确认密码</label>
<div class="col-md-10">
<input asp-for="ComfirmPwd" class="form-control" />
<span asp-validation-for="ComfirmPwd" class="text-danger"></span>
</div>
</div>

<div class="form-group">
<div class="col-md-offset-2 col-md-10">
<input type="button" value="提 交" name="btnSubmit" class="btn btn-default" />
<span id="msgbox" style="color:red">@ViewData["msgbox"]</span>
</div>
</div>
</div>
</form>
<br />
<div>
<a href="/member/login">有账号去登录</a> | <a href="/member/register">没账号这里注册</a>
</div>
<script src="~/lib/jquery-validation/dist/jquery.validate.min.js"></script>
<script src="~/lib/jquery-validation-unobtrusive/jquery.validate.unobtrusive.min.js"></script>
好的,此此盘文章很长,如果您有耐心读完相信您能有好的收获,一天一进步,别人的经验只要您学习到了同样也是自己的了,就算您没有做过类似的功能或者系统,当您读完后您也有大概的思路了呢;如果帮助,请不吝点个“推荐”,谢谢。

相关文章推荐
- Asp.NEt邮箱验证修改密码通过邮箱找回密码功能
- JAVA实现通过绑定邮箱找回密码功能
- asp.net mvc使用邮箱找回密码功能的详细步骤
- AspNetCore-MVC实战系列(四)之结尾
- JAVA实现通过绑定邮箱找回密码功能
- AspNetCore-MVC实战系列(三)之个人中心
- JAVA实现通过绑定邮箱找回密码功能
- AspNetCore - MVC实战系列(一)
- 通过实例模拟ASP.NET MVC的Model绑定机制:简单类型+复杂类型
- ASP.NET通过回答提示问题以邮件方式找回密码
- 在yii 框架下 使用phpmailer 通过邮箱验证找回密码功能
- 通过邮箱找回密码
- 账号通过邮箱找回密码功能设计
- 通过邮箱找回密码的实现
- jsp网页开发中,通过注册邮箱找回密码,并限制连接的有效时间
- java WEB开发 找回密码 如何通过注册时候的邮箱找回(修改)密码
- C# 通过发送邮箱找回密码
- django 开发忘记密码通过邮箱找回功能示例
- ASP.NET MVC架构与实战系列之四:MVC实例演练
- ASP.NET MVC架构与实战系列之三:MVC控件解析