virtualbox安装centos 7
2017-04-26 14:30
106 查看
安装
安装注意:
1>、如果在新建虚拟电脑的时候,没有64位选项,可能需要进入BIOS开启虚拟化技术,然后重启;
2>、如果是新安装的系统,切记先打补丁再装系统,否则有可能无法启动;
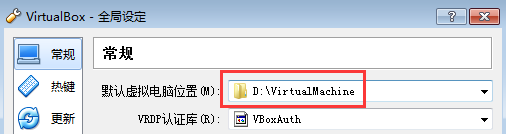
3>、安装之前,可以设置一下虚拟机的安装位置,这样就不会默认安装到C盘,导致C盘空间日益缩小了,如下↓↓↓↓↓↓↓
点击【管理】,弹出全局设定界面:
如果已经安装到C盘,参考后续的【安装完成后的工作】
安装过程
参考: 这里
一些坑
1、网络相关的坑,如下↓↓↓↓↓↓

a.看起来是可以ping通外网,但是仔细一看,ip竟然是网关IP!
b.yum不能正常使用,不管换成阿里、网易、还是官方的yum源,都不可以正常使用yum!
c.无法ping通宿主机!
综合以上3点,说明虚拟机的网络此时是完全无法使用的状态!
解决:
1>、在对应的连接设备配置文件(如:/etc/sysconfig/network-script/ifcfg-enp0s3)中,修改onboot字段的值为yes,然后reboot;
2>、检查路由器配置(我的是小速路由助手),允许虚拟机上网!其中,在路由器管理APP上,虚拟机可能只显示MAC地址,所以需要先在虚拟机上用ip addr命令查看虚拟机当前的MAC地址,然后在路由器管理APP上允许该MAC地址上网。
此坑实在是隐蔽,因为以前都是安装好之后就可以上网的,没想到要去路由器设置白名单才行!
3>、无法ping通宿主机是宿主机的防火墙挡住了,需要修改windows防火墙设置,如下↓↓↓↓↓↓

安装完后的工作
1> 发现数据文件*.vdi被安装在默认的位置了,即:C盘,空间有限,所以想把这些文件的存储位置修改到D盘;
2> 修改方法参考: 这里
大致过程如下:
Shut down VirtualBox, back up your .VirtualBox\VirtualBox.xml file.
Find your existing "Virtualbox VMs" folder, and copy (not move) the whole folder with contents to your new drive E:
Run VirtualBox, then for each VM in turn:
3.1 Right click the VM name and select "Remove" from the popup menu. Answer no to the "physically delete files?" question.
3.1b after removing a VM from the UI you have to close VirtualBox, and leave it closed for long enough for the background VBoxSVC task to time out and terminate also. Then you can start the VirtualBox app again and use Machine|Add to add back the VMs removed in the previous step.
3.2 Select the Machine|Add.. menu item, navigate to the VMs new location on drive E:, and select the .vbox file.
3.3. Repeat for any remaining VMs.
In File|Preferences, set the default machine path to "E:\VirtualBox VMs"
Test each of the VMs. Only after you are sure they all work, delete the old VM containing folder, i.e. delete "C:\VirtualBox VMs".
安装注意:
1>、如果在新建虚拟电脑的时候,没有64位选项,可能需要进入BIOS开启虚拟化技术,然后重启;
2>、如果是新安装的系统,切记先打补丁再装系统,否则有可能无法启动;
3>、安装之前,可以设置一下虚拟机的安装位置,这样就不会默认安装到C盘,导致C盘空间日益缩小了,如下↓↓↓↓↓↓↓
点击【管理】,弹出全局设定界面:
如果已经安装到C盘,参考后续的【安装完成后的工作】
安装过程
参考: 这里
一些坑
1、网络相关的坑,如下↓↓↓↓↓↓
a.看起来是可以ping通外网,但是仔细一看,ip竟然是网关IP!
b.yum不能正常使用,不管换成阿里、网易、还是官方的yum源,都不可以正常使用yum!
c.无法ping通宿主机!
综合以上3点,说明虚拟机的网络此时是完全无法使用的状态!
解决:
1>、在对应的连接设备配置文件(如:/etc/sysconfig/network-script/ifcfg-enp0s3)中,修改onboot字段的值为yes,然后reboot;
2>、检查路由器配置(我的是小速路由助手),允许虚拟机上网!其中,在路由器管理APP上,虚拟机可能只显示MAC地址,所以需要先在虚拟机上用ip addr命令查看虚拟机当前的MAC地址,然后在路由器管理APP上允许该MAC地址上网。
此坑实在是隐蔽,因为以前都是安装好之后就可以上网的,没想到要去路由器设置白名单才行!
3>、无法ping通宿主机是宿主机的防火墙挡住了,需要修改windows防火墙设置,如下↓↓↓↓↓↓
安装完后的工作
1> 发现数据文件*.vdi被安装在默认的位置了,即:C盘,空间有限,所以想把这些文件的存储位置修改到D盘;
2> 修改方法参考: 这里
大致过程如下:
Shut down VirtualBox, back up your .VirtualBox\VirtualBox.xml file.
Find your existing "Virtualbox VMs" folder, and copy (not move) the whole folder with contents to your new drive E:
Run VirtualBox, then for each VM in turn:
3.1 Right click the VM name and select "Remove" from the popup menu. Answer no to the "physically delete files?" question.
3.1b after removing a VM from the UI you have to close VirtualBox, and leave it closed for long enough for the background VBoxSVC task to time out and terminate also. Then you can start the VirtualBox app again and use Machine|Add to add back the VMs removed in the previous step.
3.2 Select the Machine|Add.. menu item, navigate to the VMs new location on drive E:, and select the .vbox file.
3.3. Repeat for any remaining VMs.
In File|Preferences, set the default machine path to "E:\VirtualBox VMs"
Test each of the VMs. Only after you are sure they all work, delete the old VM containing folder, i.e. delete "C:\VirtualBox VMs".

相关文章推荐
- 在Virtualbox的CentOS虚拟机中安装增强功能
- VirtualBox下给Centos安装增强功能
- virtualbox(windows环境下)centos虚拟机安装增强工具
- virtualBox无法安装centos
- centos6.2安装virtualbox创建xp的时候出错
- CentOs下安装virtualbox的增强功能
- VirtualBox安装centos6.0增强工具时报错Building the main Guest Additions modules [失败]
- Win7 使用virtualbox安装centos虚拟机出现“不能为虚拟电脑 centos7 打开一个新任务.”的解决办法。
- centos5.6下virtualbox安装手记
- VirtualBox 安装 CentOS 增强工具
- CentOS5.5中安装VirtualBOX增强工具
- virtualbox安装centos 6之增强工具
- virtualbox centos安装增强工具
- Centos 6 安装中文支持、ipython 以及 virtualbox guestaddtion
- How to install VirtualBox Guest Additions in CentOS 6(在CentOS中安装VirtualBox增强功能)
- centos 安装VirtualBox 出现方框、乱码、汉字不显示的解决办法
- centos 64 安装virtualbox 并支持usb设备
- VirtualBox安装CentOS后如何安装增强功能
- CentOS6.2安装VirtualBOX4.1
- VirtualBox安装Centos,配置网络(主机可以通过SSH连接虚拟机系统,同时虚拟机系统可以访问外网)