[深入理解文件系统之十三] 基于快照的文件系统备份
2017-04-25 13:24
316 查看
在实际生产系统上存储的数据,都是基于某种文件系统的形式组织、存放起来的。对一些关键的数据,就需要备份。通常,有两种方式:
1.基于Linux/unix下的tar/cpio等工具
虽然它也能实现备份,但不足之处在于有IO写入的情况下,可能无法保证文件系统的integrity
(完整性).
2.
frozen-image
虽然备份的时候停下业务、卸载
文件系统就可以了,但是系统管理员一般不愿意停下业务、或者卸载文件系统,因此stable
snapshot技术出现了。(snapshot/frozen-image/point-in-time都是指文件系统中的stable
image).根据重启之后,数据是否还一直,snapshot可以分为non
persistent snapshot 和persistent
snapshot。
下面基于VxFS文件想,介绍一下snapshot的使用示例:
#vxassist
make fs1 100m
#mkfs
-F vxfs /dev/vx/rdsk/fs1 100m
version
4 layout
204800
sectors, 102400 blocks of size 1024, log size 1024 blocks
unlimited
inodes, largefiles not supported
102400
data blocks, 101280 free data blocks
4
allocation units of 32768 blocks, 32768 data blocks
last
allocation unit has 4096 data blocks
#mount
-F vxfs /dev/vx/dsk/fs1 /fs1
#echo
hello > /fs1/fileA
#echo
goodbye > /fs1/fileB
#mkdir
/snap
#vxassist
make snap 10m
#mount
-F vxfs -osnapof=/fs1,snapsize=20480 /dev/vx/dsk/snap /snap #建立快照
#df
-k
...
/dev/vx/dsk/fs1
102400 1135 94943 2% /fs1
/dev/vx/dsk/snap
102400 1135 94936 2% /snap
...
#ls
-l /fs1
total
4
-rw-r--r--
1 root other 6 Jun 7 11:17 fileA
-rw-r--r--
1 root other 8 Jun 7 11:17 fileB
drwxr-xr-x
2 root root 96 Jun 7 11:15 lost+found
#ls
-l /snap
total
4
-rw-r--r--
1 root other 6 Jun 7 11:17 fileA
-rw-r--r--
1 root other 8 Jun 7 11:17 fileB
drwxr-xr-x
2 root root 96 Jun 7 11:15 lost+found
#cat
/fs1/fileA
hello
#cat
/snap/fileA
hello
#rm
/fs1/fileA
#
cat /snap/fileA
hello
#df
-k
...
/dev/vx/dsk/fs1
102400 1134 94944 2% /fs1
/dev/vx/dsk/snap
102400 1135 94936 2% /snap
然后,用户可以利用快照进行备份,在VxFS中可以利用fscat(类似于linux中的dd命令):
#vxassist
make fs1 10m
#vxassist
make fs1-copy 10m
#vxassist
make snap 5m
#mkfs
-F vxfs /dev/vx/rdsk/fs1 10m
version
4 layout
20480
sectors, 10240 blocks of size 1024, log size 1024 blocks
unlimited
inodes, largefiles not supported
10240
data blocks, 9144 free data blocks
1
allocation units of 32768 blocks, 32768 data blocks
last
allocation unit has 10240 data blocks
#mount
-F vxfs /dev/vx/dsk/fs1 /fs1
#echo
hello > /fs1/hello
#echo
goodbye > /fs1/goodbye
#mount
-F vxfs -osnapof=/fs1,snapsize=10240 /dev/vx/dsk/snap /snap
#rm
/fs1/hello
#rm
/fs1/goodbye
#fscat
/dev/vx/dsk/snap > /dev/vx/rdsk/fs1-copy
#场景快照snap的备份,文件系统名称是fs1-copy
删除fs1/hello和fs1/goodbye之后,snap文件中的super
block中的dirty位被设置起来,因此后面他的备份文件系统fs1-copy中的dirty-bit也处于置位状态,在fs1-copy被挂载的时候就会重放出之前的文件:
#
fsck -F vxfs /dev/vx/rdsk/fs1-copy
log
replay in progress
replay
complete - marking super-block as CLEAN
#mount
-F vxfs /dev/vx/dsk/fs1-copy /fs2
#ls
-l /fs2
total
4
-rw-r--r--
1 root other 8 Jun 7 11:37 goodbye
-rw-r--r--
1 root other 6 Jun 7 11:37 hello
drwxr-xr-x
2 root root 96 Jun 7 11:37 lost+found
#cat
/fs2/hello
hello
#cat
/fs2/goodbye
goodbye
VxFS中snapshot的实现
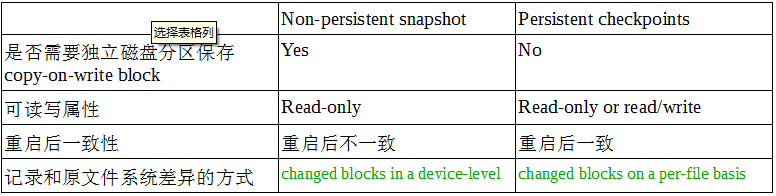
在VxFS里,这些snapshot只是在文件系统被挂载或运行的时候,里面的数据才会存在,因此是non-persistent的。为了改进这个问题,VxFS引入了checkpoints的概念。两者的区别如下表:
Non-persistent
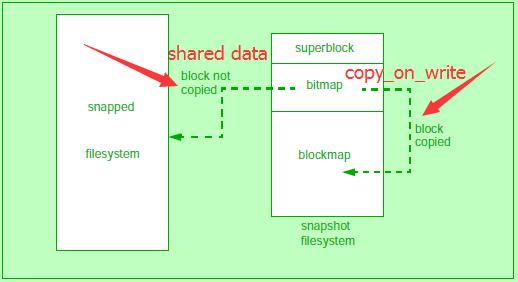
snapshot 只有只读属性的原因是,它的bitmap只记录了变化的block,如果读的话,现有的数据结构(设计)无法支持。
VxFS中checkpoints的用法示例:
#mkfs
-F vxfs /dev/vx/rdsk/fs1 100m
version
4 layout
204800
sectors, 102400 blocks of size 1024, log size 1024 blocks
unlimited
inodes, largefiles not supported
102400
data blocks, 101280 free data blocks
4
allocation units of 32768 blocks, 32768 data blocks
last
allocation unit has 4096 data blocks
#mount
-F vxfs /dev/vx/dsk/fs1 /fs1
#echo
hello > /fs1/hello
#echo
goodbye > /fs1/goodbye
#ls
-l /fs1
total
4
-rw-r--r--
1 root other 8 Jun 9 11:05 goodbye
-rw-r--r--
1 root other 6 Jun 9 11:05 hello
drwxr-xr-x
2 root root 96 Jun 9 11:04 lost+found
#fsckptadm
create ckpt1 /fs1 #创建checkponts1
#rm
/fs1/goodbye
#echo
"hello again" > /fs1/hello
#fsckptadm
create ckpt2 /fs1 #创建checkponts2
#fsckptadm
list /fs1
/fs1
ckpt2:
ctime
= Sun Jun 9 11:06:55 2002
mtme
= Sun Jun 9 11:06:55 2002
flags
= none
ckpt1:
ctime
= Sun Jun 9 11:05:48 2002
mtime
= Sun Jun 9 11:05:48 2002
flags
= none
#mkdir
/ckpt1
#mkdir
/ckpt2
#mount
-F vxfs -ockpt=ckpt1 /dev/vx/dsk/fs1:ckpt1 /ckpt1
#mount
-F vxfs -ockpt=ckpt2 /dev/vx/dsk/fs1:ckpt2 /ckpt2
#ls
-l /fs1
total
2
-rw-r--r--
1 root other 12 Jun 9 11:06 hello
drwxr-xr-x
2 root root 96 Jun 9 11:04 lost+found
#ls
-l /ckpt1
total
4
-rw-r--r--
1 root other 8 Jun 9 11:05 goodbye
-rw-r--r--
1 root other 6 Jun 9 11:05 hello
drwxr-xr-x
2 root root 96 Jun 9 11:04 lost+found
#ls
-l /ckpt2
total
0
-rw-r--r--
1 root other 12 Jun 9 11:06 hello
drwxr-xr-x
2 root root 96 Jun 9 11:04 lost+found
VxFS中checkpoints的实现:(复制indoe/file
descriptor)
VxFS
storage checkpoints are heavily tied to the implementation of VxFS.
The
sectionVxFS
Disk Layout Version 5,
in Chapter 9, describes the various
components
of the VxFS disk layout. VxFS mountable entities are called filesets.
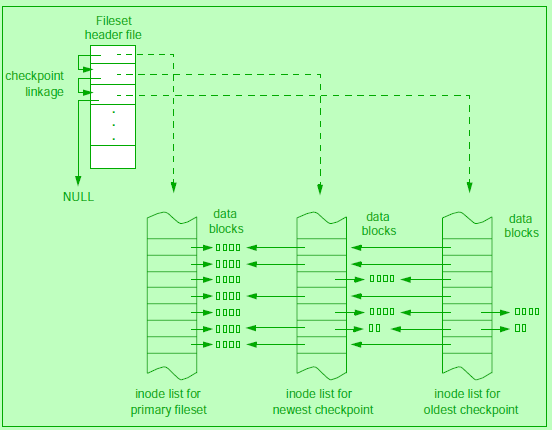
Each
fileset has its own inode list including an inode for the root of the
fileset,
allowing
it to be mounted separately from other filesets. By providing linkage
between
the two filesets, VxFS uses this mechanism to construct a chain of
checkpoints,
as shown in Figure 12.4.
This
linkage is called a clone
chain.
At the head of the clone chain is the primary
fileset.
When a filesystem is created with mkfs,
only the primary fileset is created.
When
a checkpoint is created, the following events occur:
■ A
new fileset header entry is created and linked into the clone chain.
The
primary
fileset will point downstream to the new checkpoint, and the new
checkpoint
will point downstream to the next most recent checkpoint.
Upstream
linkages will be set in the reverse direction. The downstream
pointer
of the oldest checkpoint will be NULL to indicate that it is the
oldest
fileset in the clone chain.
■ An
inode list is created. Each inode in the new checkpoint is an exact
copy
of
the inode in the primary fileset with the exception of the block map.
When
the checkpoint is created, inodes are said to be fully
overlayed.
In
order
to read any data from the inode, the filesystem must walk up the
clone
chain to read the blocks from the inode upstream.
■ The
in-core fileset structures are modified to take into account the new
checkpoint.
This is mainly to link the new fileset into the clone chain.
下面是主要的数据结构关联图:
1.基于Linux/unix下的tar/cpio等工具
虽然它也能实现备份,但不足之处在于有IO写入的情况下,可能无法保证文件系统的integrity
(完整性).
2.
frozen-image
虽然备份的时候停下业务、卸载
文件系统就可以了,但是系统管理员一般不愿意停下业务、或者卸载文件系统,因此stable
snapshot技术出现了。(snapshot/frozen-image/point-in-time都是指文件系统中的stable
image).根据重启之后,数据是否还一直,snapshot可以分为non
persistent snapshot 和persistent
snapshot。
下面基于VxFS文件想,介绍一下snapshot的使用示例:
#vxassist
make fs1 100m
#mkfs
-F vxfs /dev/vx/rdsk/fs1 100m
version
4 layout
204800
sectors, 102400 blocks of size 1024, log size 1024 blocks
unlimited
inodes, largefiles not supported
102400
data blocks, 101280 free data blocks
4
allocation units of 32768 blocks, 32768 data blocks
last
allocation unit has 4096 data blocks
#mount
-F vxfs /dev/vx/dsk/fs1 /fs1
#echo
hello > /fs1/fileA
#echo
goodbye > /fs1/fileB
#mkdir
/snap
#vxassist
make snap 10m
#mount
-F vxfs -osnapof=/fs1,snapsize=20480 /dev/vx/dsk/snap /snap #建立快照
#df
-k
...
/dev/vx/dsk/fs1
102400 1135 94943 2% /fs1
/dev/vx/dsk/snap
102400 1135 94936 2% /snap
...
#ls
-l /fs1
total
4
-rw-r--r--
1 root other 6 Jun 7 11:17 fileA
-rw-r--r--
1 root other 8 Jun 7 11:17 fileB
drwxr-xr-x
2 root root 96 Jun 7 11:15 lost+found
#ls
-l /snap
total
4
-rw-r--r--
1 root other 6 Jun 7 11:17 fileA
-rw-r--r--
1 root other 8 Jun 7 11:17 fileB
drwxr-xr-x
2 root root 96 Jun 7 11:15 lost+found
#cat
/fs1/fileA
hello
#cat
/snap/fileA
hello
#rm
/fs1/fileA
#
cat /snap/fileA
hello
#df
-k
...
/dev/vx/dsk/fs1
102400 1134 94944 2% /fs1
/dev/vx/dsk/snap
102400 1135 94936 2% /snap
然后,用户可以利用快照进行备份,在VxFS中可以利用fscat(类似于linux中的dd命令):
#vxassist
make fs1 10m
#vxassist
make fs1-copy 10m
#vxassist
make snap 5m
#mkfs
-F vxfs /dev/vx/rdsk/fs1 10m
version
4 layout
20480
sectors, 10240 blocks of size 1024, log size 1024 blocks
unlimited
inodes, largefiles not supported
10240
data blocks, 9144 free data blocks
1
allocation units of 32768 blocks, 32768 data blocks
last
allocation unit has 10240 data blocks
#mount
-F vxfs /dev/vx/dsk/fs1 /fs1
#echo
hello > /fs1/hello
#echo
goodbye > /fs1/goodbye
#mount
-F vxfs -osnapof=/fs1,snapsize=10240 /dev/vx/dsk/snap /snap
#rm
/fs1/hello
#rm
/fs1/goodbye
#fscat
/dev/vx/dsk/snap > /dev/vx/rdsk/fs1-copy
#场景快照snap的备份,文件系统名称是fs1-copy
删除fs1/hello和fs1/goodbye之后,snap文件中的super
block中的dirty位被设置起来,因此后面他的备份文件系统fs1-copy中的dirty-bit也处于置位状态,在fs1-copy被挂载的时候就会重放出之前的文件:
#
fsck -F vxfs /dev/vx/rdsk/fs1-copy
log
replay in progress
replay
complete - marking super-block as CLEAN
#mount
-F vxfs /dev/vx/dsk/fs1-copy /fs2
#ls
-l /fs2
total
4
-rw-r--r--
1 root other 8 Jun 7 11:37 goodbye
-rw-r--r--
1 root other 6 Jun 7 11:37 hello
drwxr-xr-x
2 root root 96 Jun 7 11:37 lost+found
#cat
/fs2/hello
hello
#cat
/fs2/goodbye
goodbye
VxFS中snapshot的实现
在VxFS里,这些snapshot只是在文件系统被挂载或运行的时候,里面的数据才会存在,因此是non-persistent的。为了改进这个问题,VxFS引入了checkpoints的概念。两者的区别如下表:
Non-persistent
snapshot 只有只读属性的原因是,它的bitmap只记录了变化的block,如果读的话,现有的数据结构(设计)无法支持。
VxFS中checkpoints的用法示例:
#mkfs
-F vxfs /dev/vx/rdsk/fs1 100m
version
4 layout
204800
sectors, 102400 blocks of size 1024, log size 1024 blocks
unlimited
inodes, largefiles not supported
102400
data blocks, 101280 free data blocks
4
allocation units of 32768 blocks, 32768 data blocks
last
allocation unit has 4096 data blocks
#mount
-F vxfs /dev/vx/dsk/fs1 /fs1
#echo
hello > /fs1/hello
#echo
goodbye > /fs1/goodbye
#ls
-l /fs1
total
4
-rw-r--r--
1 root other 8 Jun 9 11:05 goodbye
-rw-r--r--
1 root other 6 Jun 9 11:05 hello
drwxr-xr-x
2 root root 96 Jun 9 11:04 lost+found
#fsckptadm
create ckpt1 /fs1 #创建checkponts1
#rm
/fs1/goodbye
#echo
"hello again" > /fs1/hello
#fsckptadm
create ckpt2 /fs1 #创建checkponts2
#fsckptadm
list /fs1
/fs1
ckpt2:
ctime
= Sun Jun 9 11:06:55 2002
mtme
= Sun Jun 9 11:06:55 2002
flags
= none
ckpt1:
ctime
= Sun Jun 9 11:05:48 2002
mtime
= Sun Jun 9 11:05:48 2002
flags
= none
#mkdir
/ckpt1
#mkdir
/ckpt2
#mount
-F vxfs -ockpt=ckpt1 /dev/vx/dsk/fs1:ckpt1 /ckpt1
#mount
-F vxfs -ockpt=ckpt2 /dev/vx/dsk/fs1:ckpt2 /ckpt2
#ls
-l /fs1
total
2
-rw-r--r--
1 root other 12 Jun 9 11:06 hello
drwxr-xr-x
2 root root 96 Jun 9 11:04 lost+found
#ls
-l /ckpt1
total
4
-rw-r--r--
1 root other 8 Jun 9 11:05 goodbye
-rw-r--r--
1 root other 6 Jun 9 11:05 hello
drwxr-xr-x
2 root root 96 Jun 9 11:04 lost+found
#ls
-l /ckpt2
total
0
-rw-r--r--
1 root other 12 Jun 9 11:06 hello
drwxr-xr-x
2 root root 96 Jun 9 11:04 lost+found
VxFS中checkpoints的实现:(复制indoe/file
descriptor)
VxFS
storage checkpoints are heavily tied to the implementation of VxFS.
The
sectionVxFS
Disk Layout Version 5,
in Chapter 9, describes the various
components
of the VxFS disk layout. VxFS mountable entities are called filesets.
Each
fileset has its own inode list including an inode for the root of the
fileset,
allowing
it to be mounted separately from other filesets. By providing linkage
between
the two filesets, VxFS uses this mechanism to construct a chain of
checkpoints,
as shown in Figure 12.4.
This
linkage is called a clone
chain.
At the head of the clone chain is the primary
fileset.
When a filesystem is created with mkfs,
only the primary fileset is created.
When
a checkpoint is created, the following events occur:
■ A
new fileset header entry is created and linked into the clone chain.
The
primary
fileset will point downstream to the new checkpoint, and the new
checkpoint
will point downstream to the next most recent checkpoint.
Upstream
linkages will be set in the reverse direction. The downstream
pointer
of the oldest checkpoint will be NULL to indicate that it is the
oldest
fileset in the clone chain.
■ An
inode list is created. Each inode in the new checkpoint is an exact
copy
of
the inode in the primary fileset with the exception of the block map.
When
the checkpoint is created, inodes are said to be fully
overlayed.
In
order
to read any data from the inode, the filesystem must walk up the
clone
chain to read the blocks from the inode upstream.
■ The
in-core fileset structures are modified to take into account the new
checkpoint.
This is mainly to link the new fileset into the clone chain.
下面是主要的数据结构关联图:

相关文章推荐
- 基于文件系统逻辑卷LVM快照备份
- 深入理解linux系统下proc文件系统内容
- 深入理解Lustre文件系统-第8篇 基础结构支持
- 深入理解计算机系统——PE文件(2)
- 深入理解Lustre文件系统-第6篇 OST和obdfilter
- [深入理解文件系统之八]SVR4中的Page Cache
- 深入理解Lustre文件系统-第4篇 LDLM:Lustre分布式锁管理
- [深入理解文件系统之二] 文件描述符、inode和打开文件表
- 深入理解linux系统下proc文件系统内容
- 深入理解linux系统下proc文件系统内容
- 深入理解计算机系统 头文件 csapp.h 如何在linux里使用
- [深入理解文件系统之十二] ext3文件系统的挂载选项和journal
- 深入理解Lustre文件系统-第11篇 Lustre一般化文件系统封装层:fsfilt
- 遍历文件系统目录树的深入理解
- 深入理解Lustre文件系统-第1篇 跟踪调试系统
- 【Linux技术】磁盘的物理组织,深入理解文件系统
- 深入理解linux系统下proc文件系统内容
- 深入理解Lustre文件系统-第6篇 OST和obdfilter
- linux中的热插拔和mdev机制(深入理解嵌入式linux文件系统的制作)
- LINUX 文件系统JBD ----深入理解Fsync