Android Material Design DrawerLayout
2017-04-20 08:19
309 查看
很多应用都是用到滑动菜单,滑动菜单是Android Material Design中常见的效果。所谓的滑动菜单就是将一些菜单选项隐藏起来,而不是放置在主屏幕上,然后可以通过滑动方式将菜单显示出来。这是方式既美观又能节省屏幕空间,还能实现非常好的动画效果,真的是Android开发者居家必器。
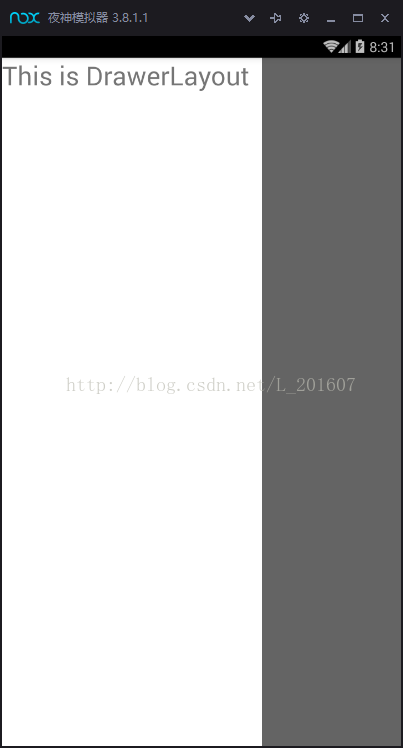
实现这种高端、大气、上档次的滑动菜单效果,需要借助DrawerLayout这个控件。话是这么说,我们看下最简单的效果图吧!
贴上代码供大家参考:
public class
DrawerLayoutActivity extends Activity {
DrawerLayout drawerLayout;
@Override
protected void onCreate(Bundle savedInstanceState) {
super.onCreate(savedInstanceState);
setContentView(R.layout.activity_drawer_layout);
drawerLayout=(DrawerLayout) findViewById(R.id.drawer_Layout);
}
}
是不是很简单呐!只是在使用[b]DrawerLayout控件时我们需要注意以下几个点:[/b]
1.[b]DrawerLayout特殊的布局。在布局中放入两个子控件,第一个子控件是主屏幕显示的内容,第二个子控件是滑动菜单中显示的内容。[/b]
2.DrawerLayout第二个子控件需要将Layout_gravity属性设置了(是必须设置),start表示会根据系统语言进行判断,Left表示滑动菜单在左边,right表示滑动菜单在右边。
3.DrawerLayout抽屉里的宽度不能超过320dp。
好了!DrawerLayout简单归简单,一旦和其他控件一起使用(一般情况下都和其他控件一起使用),就开始复杂,比如:DrawerLayout+List+List点击事件。

DrawerLayout监听打开/关闭抽屉事件:
一般情况下,我们使用DrawerListener来监听事件,该接口提供了四个回调方法供复写,分别是:
onDrawerOpened:当抽屉处于完全打开的状态时该方法会被回调
onDrawerClosed:当抽屉处于完全关闭的状态时该方法会被回调
onDrawerSlide:当抽屉被滑动时该方法会回调
onDrawerStateChanged:当抽屉的状态发生变化时该方法会被回调
使用DrawerListener需要将以上四个方法都实现,但如果你只需要对其中的个别方法增加逻辑话,你可以使用SimpleDrawerListener,它继承自DrawerListener,不需要你实现全部四个方法而是只需复写你需要用到的方法。
如果你的页面包含了Toolbar(ActionBar),那么我更建议你使用ActionBarDrawerToggle。ActionBarDrawerToggle是一个开关,用于打开/关闭DrawerLayout抽屉。ActionBarDrawerToggle 提供了一个方便的方式来配合DrawerLayout和Toolbar(ActionBar),以实现推荐的抽屉功能。即点击ActionBar的home按钮,即可弹出DrawerLayout抽屉。
最后放大招:DrawerLayout+Toolbar,这里为了提高代码的重用性,把布局分开来写,不分开的时候也贴出来。
布局没分开的完整代码:
效果图:
DrawerLayout效果是不是很棒呀!本文涉及的Toolbar,会在下一篇讲解,Android Material Design Toolbar
实现这种高端、大气、上档次的滑动菜单效果,需要借助DrawerLayout这个控件。话是这么说,我们看下最简单的效果图吧!
贴上代码供大家参考:
<?xml version="1.0" encoding="utf-8"?>
<LinearLayout xmlns:android="http://schemas.android.com/apk/res/android"
android:layout_width="match_parent"
android:layout_height="match_parent"
android:orientation="vertical">

<android.support.v4.widget.DrawerLayout
xmlns:android="http://schemas.android.com/apk/res/android"
android:id="@+id/drawer_Layout"
android:layout_width="match_parent"
android:layout_height="match_parent">

<FrameLayout
android:layout_width="match_parent"
android:layout_height="match_parent">

</FrameLayout>

<TextView
android:layout_width="300dp"
android:layout_height="match_parent"
android:text="This is DrawerLayout"
android:layout_gravity="start"
android:textSize="30sp"
android:background="#fff"/>

</android.support.v4.widget.DrawerLayout>

</LinearLayout>
public class
DrawerLayoutActivity extends Activity {
DrawerLayout drawerLayout;
@Override
protected void onCreate(Bundle savedInstanceState) {
super.onCreate(savedInstanceState);
setContentView(R.layout.activity_drawer_layout);
drawerLayout=(DrawerLayout) findViewById(R.id.drawer_Layout);
}
}
是不是很简单呐!只是在使用[b]DrawerLayout控件时我们需要注意以下几个点:[/b]
1.[b]DrawerLayout特殊的布局。在布局中放入两个子控件,第一个子控件是主屏幕显示的内容,第二个子控件是滑动菜单中显示的内容。[/b]
2.DrawerLayout第二个子控件需要将Layout_gravity属性设置了(是必须设置),start表示会根据系统语言进行判断,Left表示滑动菜单在左边,right表示滑动菜单在右边。
3.DrawerLayout抽屉里的宽度不能超过320dp。
好了!DrawerLayout简单归简单,一旦和其他控件一起使用(一般情况下都和其他控件一起使用),就开始复杂,比如:DrawerLayout+List+List点击事件。
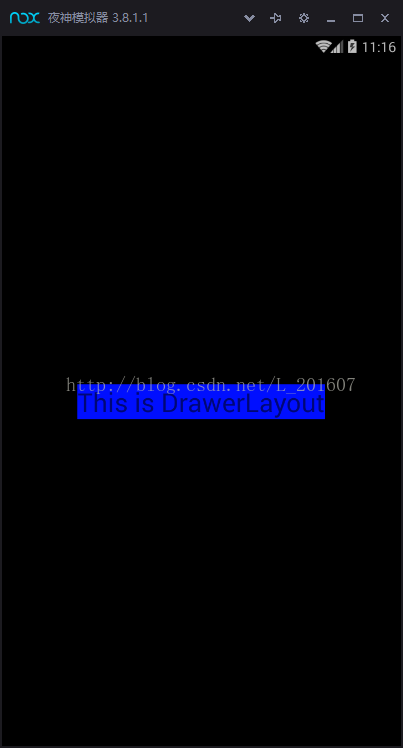
activity_drawer_layout.xml
<?xml version="1.0" encoding="utf-8"?>
<LinearLayout xmlns:android="http://schemas.android.com/apk/res/android"
android:layout_width="match_parent"
android:layout_height="match_parent"
android:orientation="vertical">
<android.support.v4.widget.DrawerLayout
xmlns:android="http://schemas.android.com/apk/res/android"
android:id="@+id/drawer_Layout"
android:layout_width="match_parent"
android:layout_height="match_parent">
<!--内容界面-->
<FrameLayout
android:layout_width="match_parent"
android:layout_height="match_parent"
android:background="#000">
<TextView
android:id="@+id/text_view"
android:layout_width="wrap_content"
android:layout_height="wrap_content"
android:text="This is DrawerLayout"
android:textSize="30sp"
android:background="#000fff"
android:layout_gravity="center" />
</FrameLayout>
<!--侧滑菜单内容-->
<ListView
android:id="@+id/list_view"
android:layout_width="300dp"
android:layout_height="match_parent"
android:layout_gravity="start"
android:textSize="30sp"
android:background="#fff"/>
</android.support.v4.widget.DrawerLayout>
</LinearLayout>
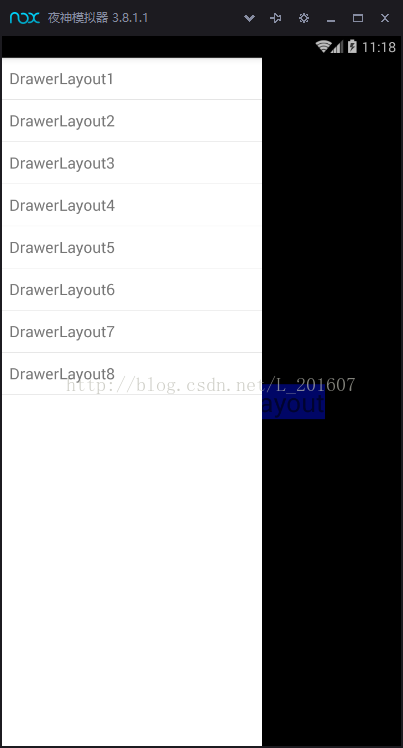
public class DrawerLayoutActivity extends Activity {
DrawerLayout drawerLayout;
private ListView listView;
private TextView textView;
private String data[]={"DrawerLayout1","DrawerLayout2",
"DrawerLayout3","DrawerLayout4",
"DrawerLayout5","DrawerLayout6",
"DrawerLayout7","DrawerLayout8"};
@Override
protected void onCreate(Bundle savedInstanceState) {
super.onCreate(savedInstanceState);
setContentView(R.layout.activity_drawer_layout);
initLayout();
}
public void initLayout(){
drawerLayout=(DrawerLayout) findViewById(R.id.drawer_Layout);
listView=(ListView) findViewById(R.id.list_view);
textView=(TextView) findViewById(R.id.text_view);
ArrayAdapter<String> adapter=new ArrayAdapter<String>(
DrawerLayoutActivity.this,
android.R.layout.simple_list_item_1,data);
listView.setAdapter(adapter);
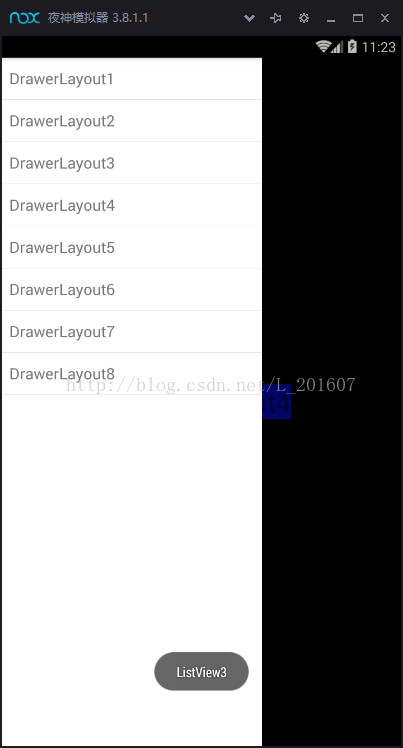
listView.setOnItemClickListener(newAdapterView.OnItemClickListener() {
@Override
public void onItemClick(AdapterView<?> parent,
View view, int position, long id) {
int it=position+1;
textView.setText("DrawerLayout"+it);
Toast.makeText(DrawerLayoutActivity.this,"ListView"+position,Toast.LENGTH_SHORT).show(); } }); } }
DrawerLayout监听打开/关闭抽屉事件:
一般情况下,我们使用DrawerListener来监听事件,该接口提供了四个回调方法供复写,分别是:
onDrawerOpened:当抽屉处于完全打开的状态时该方法会被回调
onDrawerClosed:当抽屉处于完全关闭的状态时该方法会被回调
onDrawerSlide:当抽屉被滑动时该方法会回调
onDrawerStateChanged:当抽屉的状态发生变化时该方法会被回调
使用DrawerListener需要将以上四个方法都实现,但如果你只需要对其中的个别方法增加逻辑话,你可以使用SimpleDrawerListener,它继承自DrawerListener,不需要你实现全部四个方法而是只需复写你需要用到的方法。
如果你的页面包含了Toolbar(ActionBar),那么我更建议你使用ActionBarDrawerToggle。ActionBarDrawerToggle是一个开关,用于打开/关闭DrawerLayout抽屉。ActionBarDrawerToggle 提供了一个方便的方式来配合DrawerLayout和Toolbar(ActionBar),以实现推荐的抽屉功能。即点击ActionBar的home按钮,即可弹出DrawerLayout抽屉。
mDrawerToggle = new ActionBarDrawerToggle(
//持有抽屉的Activity.
this,                /* host Activity */
//DrawerLayout对象.
mDrawerLayout,       /* DrawerLayout object */
//(V4包)将一个Drawable资源作为抽屉指示器.
//注意在V7包的时候,这里传入Toolbar对象
R.drawable.ic_drawer,/*nav drawer icon to replace 'Up' caret*/
//字符串资源描述"打开抽屉"动作.
R.string.drawer_open,/* "open drawer" description */
//字符串资源描述"关闭抽屉"动作.
R.string.drawer_close/* "close drawer" description */
){

/** Called when a drawer has settled in a completely closed state. */
public void onDrawerClosed(View view) {
super.onDrawerClosed(drawerView);
}

/** Called when a drawer has settled in a completely open state. */
public void onDrawerOpened(View drawerView) {
super.onDrawerOpened(drawerView);
}
};
要记住调用
//V4包
drawerLayout.setDrawerListener(mDrawerToggle);
//V7包
drawerLayout.appDrawerListener(mDrawerToggle);
最后放大招:DrawerLayout+Toolbar,这里为了提高代码的重用性,把布局分开来写,不分开的时候也贴出来。
activity_toolbar.xml
<?xml version="1.0" encoding="utf-8"?>
<android.support.v7.widget.Toolbar
android:id="@+id/toolbar"
android:layout_width="match_parent"
android:layout_height="?attr/actionBarSize"
android:background="@color/colorPrimary"
app:theme="@style/ThemeOverlay.AppCompat.Light"
app:popupTheme="@style/ThemeOverlay.AppCompat.Dark.ActionBar"
xmlns:android="http://schemas.android.com/apk/res/android"
xmlns:app="http://schemas.android.com/apk/res-auto">

</android.support.v7.widget.Toolbar>
activity_drawerlayout.xml
<?xml version="1.0" encoding="utf-8"?>
<android.support.v4.widget.DrawerLayout
android:id="@+id/drawer_layout"
android:layout_width="match_parent"
android:layout_height="match_parent"
xmlns:android="http://schemas.android.com/apk/res/android">

<FrameLayout
android:layout_width="match_parent"
android:layout_height="match_parent">

</FrameLayout>

<ListView
android:id="@+id/list_view"
android:layout_width="300dp"
android:layout_gravity="start"
android:layout_height="match_parent"
android:background="#000fff">

</ListView>

</android.support.v4.widget.DrawerLayout>
activity_main.xml
?xml version="1.0" encoding="utf-8"?>
<LinearLayout xmlns:android="http://schemas.android.com/apk/res/android"
android:layout_width="match_parent"
android:layout_height="match_parent"
android:orientation="vertical">
<!--Toolbar-->
<include layout="@layout/activity_toolbar"/>
<!--DrawerLayout-->
<include layout="@layout/activity_drawerlayout"/>
</LinearLayout>
布局没分开的完整代码:
<?xml version="1.0" encoding="utf-8"?>
<LinearLayout xmlns:android="http://schemas.android.com/apk/res/android"
xmlns:tools="http://schemas.android.com/tools"
android:layout_width="match_parent"
android:layout_height="match_parent"
android:orientation="vertical"
xmlns:app="http://schemas.android.com/apk/res-auto"
tools:context="com.xhm.demo.drawerlayouttoolbar.MainActivity">

<android.support.v4.widget.DrawerLayout
android:id="@+id/drawer_layout"
android:layout_width="match_parent"
android:layout_height="match_parent">

<FrameLayout
android:layout_width="match_parent"
android:layout_height="match_parent">

<android.support.v7.widget.Toolbar
android:id="@+id/toolbar"
android:layout_width="match_parent"
android:layout_height="?attr/actionBarSize"
android:background="@color/colorPrimary"
app:theme="@style/ThemeOverlay.AppCompat.Light"
app:popupTheme="@style/ThemeOverlay.AppCompat.Dark.ActionBar">

</android.support.v7.widget.Toolbar>

</FrameLayout>

<ListView
android:id="@+id/list_view"
android:layout_width="300dp"
android:layout_gravity="start"
android:layout_height="match_parent"
android:background="#000fff">

</ListView>

</android.support.v4.widget.DrawerLayout>
</LinearLayout>
Activity.java
public class MainActivity extends AppCompatActivity {
private DrawerLayout mDrawerLayout;
private ListView mListView;
private Toolbar mToolbar;
private ActionBarDrawerToggle mDrawerToggle;
private String[] data ={"Drawer1","Drawer2",
"Drawer3","Drawer4","Drawer5","Drawer6",
"Drawer7","Drawer8","Drawer9"};
@Override
protected void onCreate(Bundle savedInstanceState) {
super.onCreate(savedInstanceState);
setContentView(R.layout.activity_main);
initLayout();
mToolbar.setTitle("Toolbar");//设置Toolbar标题
//设置标题颜色
mToolbar.setTitleTextColor(Color.parseColor("#ffffff"));
setSupportActionBar(mToolbar);
//设置还回键可用
getSupportActionBar().setHomeButtonEnabled(true);
getSupportActionBar().setDisplayHomeAsUpEnabled(true);
mDrawerToggle=new ActionBarDrawerToggle(this,
mDrawerLayout,mToolbar,
R.string.open,R.string.close){
@Override
public void onDrawerOpened(View drawerView) {
super.onDrawerOpened(drawerView);
}
@Override
public void onDrawerClosed(View drawerView) {
super.onDrawerClosed(drawerView);
}
};
mDrawerToggle.syncState();
mDrawerLayout.addDrawerListener(mDrawerToggle);
}
public void initLayout(){
mDrawerLayout=(DrawerLayout) findViewById(R.id.drawer_layout);
mListView=(ListView) findViewById(R.id.list_view);
mToolbar=(Toolbar) findViewById(R.id.toolbar);
ArrayAdapter<String> adapter=new ArrayAdapter<String>(this
,android.R.layout.simple_list_item_1,data);
mListView.setAdapter(adapter);
}
/**
* 加载Toolbar布局文件夹
* @param menu
* @return
*/
@Override
public boolean onCreateOptionsMenu(Menu menu) {
getMenuInflater().inflate(R.menu.toolbar,menu);
return true;
}
/**
* 处理Toolbar图标点击事件
* @param item
* @return
*/
@Override
public boolean onOptionsItemSelected(MenuItem item) {
switch (item.getItemId()){
case R.id.share:
break;
case R.id.delete:
break;
case R.id.more:
break;
}
return true;
}
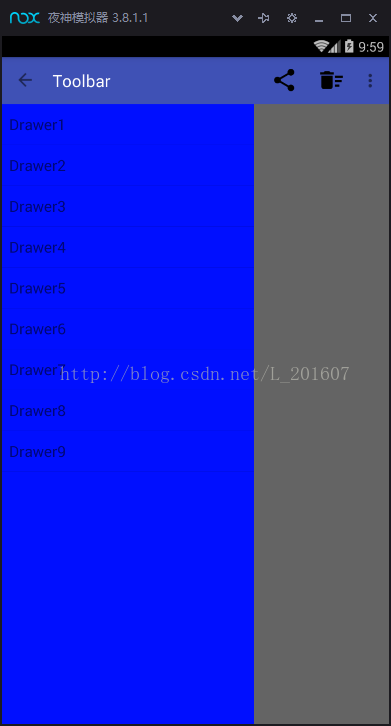
}效果图:
DrawerLayout效果是不是很棒呀!本文涉及的Toolbar,会在下一篇讲解,Android Material Design Toolbar

相关文章推荐
- Android Material Design:基于CoordinatorLayout实现向上滚动导航条ToolBar滚出、向下滚动导航条滚出
- Android Material Design TabLayout属性app:tabMode和app: tabGravity
- Android Material Design(4) CoordinatorLayout,AppBarLayout,Toolbar以及TabLayout的使用
- Android Material Design :LinearLayoutCompat添加分割线divider
- Android Material Design -TextInputLayout
- Android Study Material Design 十三 之CoordinatorLayout交互动画
- Android Material Design AppBarLayout使用
- android toolbar+drawerlayout实现侧滑 metrlt design
- material design drawerlayout 出现的toolbar上的入口自定义
- Android Study Material Design 六 之:TextInputLayout学习及分析部分源码
- Android Study Material Design 九 之 Hello TabLayout
- Android Material Design CollapsingToolbarLayout使用
- Android Material Design CoordinatorLayout使用
- Android Material Design之TextInputLayout、TextInputEditText解析
- Material DesignDrawerLayout的旋转箭头的实现方式。
- Material DesignDrawerLayout的旋转箭头的实现方式。
- Android Material Design:CoordinatorLayout与NestedScrollView
- Android DrawerLayout 高仿QQ5.2双向侧滑菜单
- AndroidDrawerLayout+fragment布局实现左右侧滑
- Android DrawerLayout 高仿QQ5.2双向侧滑菜单