centos7 ssh安全加固与ssh公私秘钥远程连接
2017-04-15 10:24
459 查看
该操作在新系统部署前设置完毕。。。。
假设该用户为rms,具体操作如下
#yum install openssh openssh-devel -y
# systemctl start sshd.service
# systemctl enable sshd.service
1、编辑/etc/ssh/sshd_config这个文件
1.1、修改默认访问端口
#Port 22
Port 2200
# sed -i '/^#Port/s/#//g' /etc/ssh/sshd_config
# sed -i '/^Port/s/22/2200/g' /etc/ssh/sshd_config
# grep -i '^Port' /etc/ssh/sshd_config
1.2、设置允许登录ssh服务器的用户
添加远程用户
# useradd rms
# echo "wXEN**********" | passwd --stdin rms
#vim /etc/ssh/sshd_config
AllowUsers rms
或
# echo "AllowUsers rms" >> /etc/ssh/sshd_config
查看结果
# grep -i 'AllowUsers' /etc/ssh/sshd_config
1.3、禁止root登录
#PermitRootLogin yes
PermitRootLogin no
# sed -i '/^#PermitRootLogin/s/#//g' /etc/ssh/sshd_config
# sed -i '/^PermitRootLogin/s/yes/no/g' /etc/ssh/sshd_config
# grep -i 'PermitRootLogin' /etc/ssh/sshd_config
1.4、修改最大登录尝试次数(可选)
#MaxAuthTries 6
1.5、防火墙放行
# firewall-cmd --permanent --add-port=2200/tcp --zone=public
# firewall-cmd --permanent --add-port=2200/udp --zone=public
success
# firewall-cmd --reload
success
1.6、重启sshd服务,liunx远程连接测试
# systemctl restart sshd.service
# ssh -p 2200 rms@ip地址
二、ssh秘钥认证方式(公钥与私钥)
1、禁用密码验证,开启秘钥认真
1.1、无id_rsa密码配置:
普通用户或管理员用户生成ssh的秘钥:以普通用户rms为例
ssh-keygen -t rsa
Generating public/private rsa key pair.
Enter file in which to save the key (/home/rms/.ssh/id_rsa):
Enter passphrase (empty for no passphrase):
Enter same passphrase again:
Your identification has been saved in /home/rms/.ssh/id_rsa.
Your public key has been saved in /home/rms/.ssh/id_rsa.pub.
The key fingerprint is:
8b:c2:97:52:b8:e0:97:cc:84:54:ef:2e:5c:6b:1b:bb rms@ecloud
The key's randomart image is:
+--[ RSA 2048]----+
| . |
| . . |
| . . |
| . . o |
| o o + S |
| . B * + . |
| . % O . |
| . * + |
| E. |
+-----------------+
# cp /home/rms/.ssh/id_rsa /home/rms/
# chmod +755 /home/rms/id_rsa
客户端下载并备份后,即可删除。。。(用于类似于xshell添加秘钥远程连接登录)
# rm -rf /home/rms/id_rsa
导入认证文件authorized_keys:
# cat /home/rms/.ssh/id_rsa.pub >>/home/rmsxcp/.ssh/authorized_keys
# cat /home/rms/.ssh/authorized_keys
ssh-rsa AAAAB3NzaC1yc2EAAAADAQABAAABAQDPKpeVAQGyExheRIagOF469Z14ZAHD0MJx/KV3Np31Pergi+dGGPYE8vR3S6myWD9SseAa0Umq0QbQNFW9kBhliI61q5iwGj0iwKe25XI4+tKez7ajToTYccHakqiCIfhdQPsBdePY+8gshJETbECxsNac0SAjHlqT2hfsaYcN2mu2PdBGmS8/1Ldi/oY889LLMY69bwnXwSpaBZHbGyABKPyGp/LNLjNYRQx+H9e3Iiswyb7kXdSQCzclCimH50Xe3omDZhQla3LUGUPrK8daNOuN rms@ecloud
sshd配置文件设置
vim /etc/ssh/sshd_config
修改下面几处:
RSAAuthentication yes
PubkeyAuthentication yes #启用PublicKey认证。
AuthorizedKeysFile .ssh/authorized_keys #PublicKey文件路径。
PasswordAuthentication no #不适用密码认证登录。
1.2、、有id_rsa密码配置:
普通用户或管理员用户生成ssh的秘钥:
$ ssh-keygen -t rsa -N efWRfB
Generating public/private rsa key pair.
Enter file in which to save the key (/home/rms/.ssh/id_rsa): /home/rms/.ssh/rkey
Created directory '/home/rms/.ssh'.
Your identification has been saved in /home/rms/.ssh/rmskey.
Your public key has been saved in /home/rms/.ssh/rmskey.pub.
The key fingerprint is:
8b:35:68:2e:6b:e3:21:c8:3b:73:1f:17:1a:82:d6:84 rms@ecloud
The key's randomart image is:
+--[ RSA 2048]----+
| |
| . |
| E . |
| + . |
| o o .o.S |
|o. .ooo.o |
|... ooo.. |
| o.oo+o |
| .+o+o |
+-----------------+
追加秘钥到authorized_keys文件里面(注意是双向右的方向符哦>>)
$ cat /home/rms/.ssh/rkey.pub >>/home/rms/.ssh/authorized_keys
$ ls /home/rms/.ssh/
authorized_keys rkey rkey.pub
备份公私秘钥:
# mv /home/rms/.ssh/rmskey* /root/.ssh/
# cat /home/rms/.ssh/authorized_keys
ssh-rsa AAAAB3NzaC1yc2EAAAADAQABAAABAQDPKpeVAQGyExheRIagOF469Z14ZAHD0MJx/KV3Np31Pergi+dGGPYE8vR3S6myWD9SseAa0Umq0QbQNFW9kBhliI61q5iwGj0iwKe25XI4+tKez7ajToTYccHakqiCIfhdQPsBdePY+8gshJETbECxsNac0SAjHlqT2hfsaYcN2mu2PdBGmS8/1Ldi/oY889LLMY69bwnXwSpaBZHbGyABKPyGp/LNLjNYRQx+H9e3Iiswyb7kXdSQCzclC rms@ecloud
ssh-rsa AAAAB3NzaC1yc2EAAAADAQABAAABAQDTQPMKsc9Ika4aIq1yONvT/6GNMiOe2qpPmwCmqPrelmQCiEFJbvC5lbTts0JtK8u+4EkFSi7NJg8qotGGZmpD7USm7aS50jsIgcmtr8DUuTXdQcNmkEyQnEiC5NR7pDyYxPa2IQEPJI8+31uSHMtaz1swa9h3A/FTjY8hlmHL6lWkRvdazsClpxc0UvQzHJ6PYxzWm2tComACcifUDP95PNkJzsfEcyNRBESHedZ7sbXHKoqeKDF2d9pOyT82DZHXet rms@ecloud
vim /etc/ssh/sshd_config
修改下面几处:
RSAAuthentication yes
PubkeyAuthentication yes #启用PublicKey认证。
AuthorizedKeysFile .ssh/authorized_keys #PublicKey文件路径。
PasswordAuthentication no #不适用密码认证登录。
命令操作如下
# sed -i '/^#RSAAuthentication/s/#//g' /etc/ssh/sshd_config
# grep -i 'RSAAuthentication' /etc/ssh/sshd_config
RSAAuthentication yes
# sed -i '/^#PubkeyAuthentication/s/#//g' /etc/ssh/sshd_config
# grep -i 'PubkeyAuthentication' /etc/ssh/sshd_config
PubkeyAuthentication yes
# grep -i 'AuthorizedKeysFile' /etc/ssh/sshd_config
AuthorizedKeysFile .ssh/authorized_keys #默认
# PAM authentication, then enable this but set PasswordAuthentication
# sed -i '/^PasswordAuthentication/s/yes/no/g' /etc/ssh/sshd_config
# grep -i '^PasswordAuthentication' /etc/ssh/sshd_config
PasswordAuthentication no
# systemctl restart sshd
1步骤配置完成后,进行下面2步骤的操作
下载Linux生成的私钥,导入相应的ssh客户端。
2、、windows使用xshell、xftp的操作
导入id_rsa:(有密码就填密码,空密码保留空即可)


注意:一点要保存好id_rsa文件,防止下次的重新导入,同时,也要保存创建秘钥时候的密码。。。。。
xftp的配置同理:
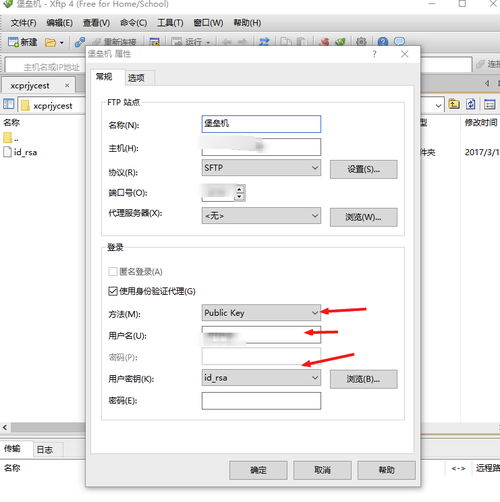
通过密码可以正常登陆后,我们需要保留私有密码到安全的地方,并在服务器端删除,防止别人拷贝并利用,以及下次ssh重新导入。(一定要备份后,再删除)
# ll /home/rms/.ssh/
总用量 20
-rw-r--r--. 1 root root 790 3月 17 22:24 authorized_keys
-rw-------. 1 rms rms 1675 3月 17 21:21 id_rsa
-rw-r--r--. 1 rms rms 395 3月 17 21:21 id_rsa.pub
-rw-------. 1 rms rms 1766 3月 17 21:59 keyblj
-rw-r--r--. 1 rms rms 395 3月 17 21:59 keyblj.pub
# rm -rf /home/rms/.ssh/id_rsa
# rm -rf /home/rms/.ssh/keyblj
# ll /home/rms/.ssh/
总用量 12
-rw-r--r--. 1 root root 790 3月 17 22:24 authorized_keys
-rw-r--r--. 1 rms rms 395 3月 17 21:21 id_rsa.pub
-rw-r--r--. 1 rms rms 395 3月 17 21:59 keyblj.pub
(4)注意:如果你是通过普通用户登陆的话,authorized_keys文件必须具备读权限,即644,否则,ssh远程登陆不了的;如果是root用的话,可以修改为600权限,或400的权限。。
普通用户:
# chmod 644 /home/rms/.ssh/authorized_keys
root用户:
# chmod 600 /home/rms/.ssh/authorized_keys
ssh安全加固
一、设置普通用户ssh远程端口登录(比如xshell)假设该用户为rms,具体操作如下
#yum install openssh openssh-devel -y
# systemctl start sshd.service
# systemctl enable sshd.service
1、编辑/etc/ssh/sshd_config这个文件
1.1、修改默认访问端口
#Port 22
Port 2200
# sed -i '/^#Port/s/#//g' /etc/ssh/sshd_config
# sed -i '/^Port/s/22/2200/g' /etc/ssh/sshd_config
# grep -i '^Port' /etc/ssh/sshd_config
1.2、设置允许登录ssh服务器的用户
添加远程用户
# useradd rms
# echo "wXEN**********" | passwd --stdin rms
#vim /etc/ssh/sshd_config
AllowUsers rms
或
# echo "AllowUsers rms" >> /etc/ssh/sshd_config
查看结果
# grep -i 'AllowUsers' /etc/ssh/sshd_config
1.3、禁止root登录
#PermitRootLogin yes
PermitRootLogin no
# sed -i '/^#PermitRootLogin/s/#//g' /etc/ssh/sshd_config
# sed -i '/^PermitRootLogin/s/yes/no/g' /etc/ssh/sshd_config
# grep -i 'PermitRootLogin' /etc/ssh/sshd_config
1.4、修改最大登录尝试次数(可选)
#MaxAuthTries 6
1.5、防火墙放行
# firewall-cmd --permanent --add-port=2200/tcp --zone=public
# firewall-cmd --permanent --add-port=2200/udp --zone=public
success
# firewall-cmd --reload
success
1.6、重启sshd服务,liunx远程连接测试
# systemctl restart sshd.service
# ssh -p 2200 rms@ip地址
二、ssh秘钥认证方式(公钥与私钥)
1、禁用密码验证,开启秘钥认真
1.1、无id_rsa密码配置:
普通用户或管理员用户生成ssh的秘钥:以普通用户rms为例
ssh-keygen -t rsa
Generating public/private rsa key pair.
Enter file in which to save the key (/home/rms/.ssh/id_rsa):
Enter passphrase (empty for no passphrase):
Enter same passphrase again:
Your identification has been saved in /home/rms/.ssh/id_rsa.
Your public key has been saved in /home/rms/.ssh/id_rsa.pub.
The key fingerprint is:
8b:c2:97:52:b8:e0:97:cc:84:54:ef:2e:5c:6b:1b:bb rms@ecloud
The key's randomart image is:
+--[ RSA 2048]----+
| . |
| . . |
| . . |
| . . o |
| o o + S |
| . B * + . |
| . % O . |
| . * + |
| E. |
+-----------------+
# cp /home/rms/.ssh/id_rsa /home/rms/
# chmod +755 /home/rms/id_rsa
客户端下载并备份后,即可删除。。。(用于类似于xshell添加秘钥远程连接登录)
# rm -rf /home/rms/id_rsa
导入认证文件authorized_keys:
# cat /home/rms/.ssh/id_rsa.pub >>/home/rmsxcp/.ssh/authorized_keys
# cat /home/rms/.ssh/authorized_keys
ssh-rsa AAAAB3NzaC1yc2EAAAADAQABAAABAQDPKpeVAQGyExheRIagOF469Z14ZAHD0MJx/KV3Np31Pergi+dGGPYE8vR3S6myWD9SseAa0Umq0QbQNFW9kBhliI61q5iwGj0iwKe25XI4+tKez7ajToTYccHakqiCIfhdQPsBdePY+8gshJETbECxsNac0SAjHlqT2hfsaYcN2mu2PdBGmS8/1Ldi/oY889LLMY69bwnXwSpaBZHbGyABKPyGp/LNLjNYRQx+H9e3Iiswyb7kXdSQCzclCimH50Xe3omDZhQla3LUGUPrK8daNOuN rms@ecloud
sshd配置文件设置
vim /etc/ssh/sshd_config
修改下面几处:
RSAAuthentication yes
PubkeyAuthentication yes #启用PublicKey认证。
AuthorizedKeysFile .ssh/authorized_keys #PublicKey文件路径。
PasswordAuthentication no #不适用密码认证登录。
1.2、、有id_rsa密码配置:
普通用户或管理员用户生成ssh的秘钥:
$ ssh-keygen -t rsa -N efWRfB
Generating public/private rsa key pair.
Enter file in which to save the key (/home/rms/.ssh/id_rsa): /home/rms/.ssh/rkey
Created directory '/home/rms/.ssh'.
Your identification has been saved in /home/rms/.ssh/rmskey.
Your public key has been saved in /home/rms/.ssh/rmskey.pub.
The key fingerprint is:
8b:35:68:2e:6b:e3:21:c8:3b:73:1f:17:1a:82:d6:84 rms@ecloud
The key's randomart image is:
+--[ RSA 2048]----+
| |
| . |
| E . |
| + . |
| o o .o.S |
|o. .ooo.o |
|... ooo.. |
| o.oo+o |
| .+o+o |
+-----------------+
追加秘钥到authorized_keys文件里面(注意是双向右的方向符哦>>)
$ cat /home/rms/.ssh/rkey.pub >>/home/rms/.ssh/authorized_keys
$ ls /home/rms/.ssh/
authorized_keys rkey rkey.pub
备份公私秘钥:
# mv /home/rms/.ssh/rmskey* /root/.ssh/
# cat /home/rms/.ssh/authorized_keys
ssh-rsa AAAAB3NzaC1yc2EAAAADAQABAAABAQDPKpeVAQGyExheRIagOF469Z14ZAHD0MJx/KV3Np31Pergi+dGGPYE8vR3S6myWD9SseAa0Umq0QbQNFW9kBhliI61q5iwGj0iwKe25XI4+tKez7ajToTYccHakqiCIfhdQPsBdePY+8gshJETbECxsNac0SAjHlqT2hfsaYcN2mu2PdBGmS8/1Ldi/oY889LLMY69bwnXwSpaBZHbGyABKPyGp/LNLjNYRQx+H9e3Iiswyb7kXdSQCzclC rms@ecloud
ssh-rsa AAAAB3NzaC1yc2EAAAADAQABAAABAQDTQPMKsc9Ika4aIq1yONvT/6GNMiOe2qpPmwCmqPrelmQCiEFJbvC5lbTts0JtK8u+4EkFSi7NJg8qotGGZmpD7USm7aS50jsIgcmtr8DUuTXdQcNmkEyQnEiC5NR7pDyYxPa2IQEPJI8+31uSHMtaz1swa9h3A/FTjY8hlmHL6lWkRvdazsClpxc0UvQzHJ6PYxzWm2tComACcifUDP95PNkJzsfEcyNRBESHedZ7sbXHKoqeKDF2d9pOyT82DZHXet rms@ecloud
vim /etc/ssh/sshd_config
修改下面几处:
RSAAuthentication yes
PubkeyAuthentication yes #启用PublicKey认证。
AuthorizedKeysFile .ssh/authorized_keys #PublicKey文件路径。
PasswordAuthentication no #不适用密码认证登录。
命令操作如下
# sed -i '/^#RSAAuthentication/s/#//g' /etc/ssh/sshd_config
# grep -i 'RSAAuthentication' /etc/ssh/sshd_config
RSAAuthentication yes
# sed -i '/^#PubkeyAuthentication/s/#//g' /etc/ssh/sshd_config
# grep -i 'PubkeyAuthentication' /etc/ssh/sshd_config
PubkeyAuthentication yes
# grep -i 'AuthorizedKeysFile' /etc/ssh/sshd_config
AuthorizedKeysFile .ssh/authorized_keys #默认
# PAM authentication, then enable this but set PasswordAuthentication
# sed -i '/^PasswordAuthentication/s/yes/no/g' /etc/ssh/sshd_config
# grep -i '^PasswordAuthentication' /etc/ssh/sshd_config
PasswordAuthentication no
# systemctl restart sshd
1步骤配置完成后,进行下面2步骤的操作
下载Linux生成的私钥,导入相应的ssh客户端。
2、、windows使用xshell、xftp的操作
导入id_rsa:(有密码就填密码,空密码保留空即可)
注意:一点要保存好id_rsa文件,防止下次的重新导入,同时,也要保存创建秘钥时候的密码。。。。。
xftp的配置同理:
通过密码可以正常登陆后,我们需要保留私有密码到安全的地方,并在服务器端删除,防止别人拷贝并利用,以及下次ssh重新导入。(一定要备份后,再删除)
# ll /home/rms/.ssh/
总用量 20
-rw-r--r--. 1 root root 790 3月 17 22:24 authorized_keys
-rw-------. 1 rms rms 1675 3月 17 21:21 id_rsa
-rw-r--r--. 1 rms rms 395 3月 17 21:21 id_rsa.pub
-rw-------. 1 rms rms 1766 3月 17 21:59 keyblj
-rw-r--r--. 1 rms rms 395 3月 17 21:59 keyblj.pub
# rm -rf /home/rms/.ssh/id_rsa
# rm -rf /home/rms/.ssh/keyblj
# ll /home/rms/.ssh/
总用量 12
-rw-r--r--. 1 root root 790 3月 17 22:24 authorized_keys
-rw-r--r--. 1 rms rms 395 3月 17 21:21 id_rsa.pub
-rw-r--r--. 1 rms rms 395 3月 17 21:59 keyblj.pub
(4)注意:如果你是通过普通用户登陆的话,authorized_keys文件必须具备读权限,即644,否则,ssh远程登陆不了的;如果是root用的话,可以修改为600权限,或400的权限。。
普通用户:
# chmod 644 /home/rms/.ssh/authorized_keys
root用户:
# chmod 600 /home/rms/.ssh/authorized_keys

相关文章推荐
- 远程连接CentOS7被拒绝的问题,SSH and Telnet Connection refused
- centos7安装SSH远程连接服务器及FTP服务器
- Ssh root权限连接不上远程主机,错误提示:publickey 秘钥
- Python使用paramiko库远程安全连接SSH
- SSH不输入密码连接远程Linux主机
- Linux下通过EXPECT脚本自动执行ssh远程连接
- 开源Granados介绍 - SSH连接远程Linux服务器(C#)
- 用SSH保护你的VNC远程连接
- 将SSH与PHP相连接 确保传输数据的安全
- 使用ssh安全地远程登录服务器----视频下载
- SSH不输入密码连接远程Linux主机
- 远程网络连接(IPC)安全防范研究
- 基于 SSH 的远程操作以及安全,快捷的数据传输
- 远程连接Ubuntu9 服务器 (putty)ssh 连接
- 远程连接Linux (Ubuntu配置SSH服务) 端口22
- (3)windows远程连接ubuntu8——SSH服务
- 用SSH保护你的VNC远程连接
- 安全连接:用SSH来替代Telnet
- 通过SecureCRT SSH远程连接服务器并使用Zmodem传送文件
- SSH连接远程Linux服务器(C#)