Power Cycling Test -----Test enviroment setup
2017-04-08 10:47
288 查看
1.Hardware
Before starting the power cycling test,we need to complete the whole system configuration:Hardware & Software .
We must need to considerate all of the tests include reboot&DC&AC stress when we built the system,so in this part i will descript what the system is .
Now ,let's see the below system architecture
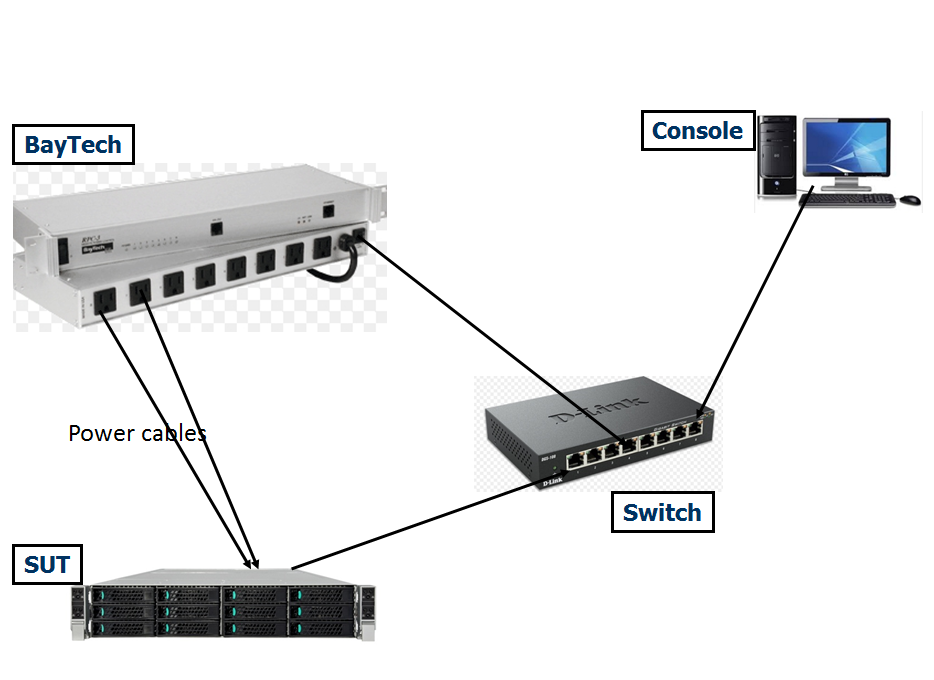
There are 4 phycial machines in this system, but only AC stress will use the Baytech ,DC and reboot stress just need the other 3 machine.
AC Hareware requirement :SUT (it means 'system under test'), Baytech ,Switch ,Console with ITAS tool.
DC Hareware requirement :SUT (it means 'system under test'),Switch ,Console with ITAS tool.
Sometime we don'n need to use the switch via PNP connection,eg:SUT----Console .But when we test many SUT, we have to make use of the switch.
Reboot Hareware requirement :SUT (it means 'system under test'),Switch ,Console with ITAS tool.
Sometime we don'n need to use the switch via PNP connection,eg:SUT----Console .But when we test many SUT, we have to make use of the switch.
2.software
ITAS is an intel Internal tool for the server test,it means Intel Test Application Suite.
We need to intall the ITAS tool to manage the system, and most of our test is base on the console with ITAS tool.
The installing steps can be refer to the ITAS userguide, but we need to pay attention to some confusions
ITAS Software requirements:
Windows based OS installation (Windows 7 x86)
TCL/TK installed version 8.5 with threading support
After install the above two features,it's very important to use adminstractor account to login the OS,
found the ITAS shotcut on the desktop ,right click the application file > Open
In the popup that appears, choose “Select a program from a list of installed programs” then click ok
In the next popup window, choose “Browse button (bottom right of screen)”
Browse to “C:\TCL\bin” directory and select the “wish85” .exe > click “Open” then “Ok”
ITAS Configuration:
Note : all of machine must set into the same tree directory.
1. Adding Servers:
The server object is your device under test; you will enter the address of one or more of the server’s baseboard management controllers (BMC) addresses.
In the user and password fields you will enter the login name and password used to access the BMC via IPMI
You can have multiple entries for each interface (Channel) An example would be:
SERVER MyServer-Channel-1 192.168.10.10 root root
SERVER MyServer-Channel-3 192.168.10.20 administrator password
2.Adding RPC Controllers:
ITAS currently supports the BayTech RPC controllers to do AC power cycling.
These are SNMP
enabled controllers and allow ITAS to control them via Ethernet. The serial
controlled versions of the BayTech devices are not supported. There are no plans
to add serial control to the existing framework.
Additional
devices will be added on a need
basis.
Adding a PRC
device is the same process as the Server device only you will enter the read
community in the USER/RCOM/ID field
and the write community in the PASS/WCOM/ID field.
Before starting the power cycling test,we need to complete the whole system configuration:Hardware & Software .
We must need to considerate all of the tests include reboot&DC&AC stress when we built the system,so in this part i will descript what the system is .
Now ,let's see the below system architecture
There are 4 phycial machines in this system, but only AC stress will use the Baytech ,DC and reboot stress just need the other 3 machine.
AC Hareware requirement :SUT (it means 'system under test'), Baytech ,Switch ,Console with ITAS tool.
DC Hareware requirement :SUT (it means 'system under test'),Switch ,Console with ITAS tool.
Sometime we don'n need to use the switch via PNP connection,eg:SUT----Console .But when we test many SUT, we have to make use of the switch.
Reboot Hareware requirement :SUT (it means 'system under test'),Switch ,Console with ITAS tool.
Sometime we don'n need to use the switch via PNP connection,eg:SUT----Console .But when we test many SUT, we have to make use of the switch.
2.software
ITAS is an intel Internal tool for the server test,it means Intel Test Application Suite.
We need to intall the ITAS tool to manage the system, and most of our test is base on the console with ITAS tool.
The installing steps can be refer to the ITAS userguide, but we need to pay attention to some confusions
ITAS Software requirements:
Windows based OS installation (Windows 7 x86)
TCL/TK installed version 8.5 with threading support
After install the above two features,it's very important to use adminstractor account to login the OS,
found the ITAS shotcut on the desktop ,right click the application file > Open
In the popup that appears, choose “Select a program from a list of installed programs” then click ok
In the next popup window, choose “Browse button (bottom right of screen)”
Browse to “C:\TCL\bin” directory and select the “wish85” .exe > click “Open” then “Ok”
ITAS Configuration:
Note : all of machine must set into the same tree directory.
1. Adding Servers:
The server object is your device under test; you will enter the address of one or more of the server’s baseboard management controllers (BMC) addresses.
In the user and password fields you will enter the login name and password used to access the BMC via IPMI
You can have multiple entries for each interface (Channel) An example would be:
SERVER MyServer-Channel-1 192.168.10.10 root root
SERVER MyServer-Channel-3 192.168.10.20 administrator password
2.Adding RPC Controllers:
ITAS currently supports the BayTech RPC controllers to do AC power cycling.
These are SNMP
enabled controllers and allow ITAS to control them via Ethernet. The serial
controlled versions of the BayTech devices are not supported. There are no plans
to add serial control to the existing framework.
Additional
devices will be added on a need
basis.
Adding a PRC
device is the same process as the Server device only you will enter the read
community in the USER/RCOM/ID field
and the write community in the PASS/WCOM/ID field.

相关文章推荐
- Power Cycling Test -----Reboot
- Power Cycling Test -----DC
- Power Cycling Test -----AC
- setup and test samba server
- Informatica powercenter8.6安装在win7上,create domain时,报错,infasetup.bat
- Oracle Application Object Library AOL/J Setup Test Suite
- 使用 Spring + Mockito+PowerMock +spring-test-dbunit+hsqldb 进行单元测试可实现100%覆盖率
- power of the test
- Setup TAHI environment for IPv6 test
- 用NUnit为.NET程序做测试 --- 常用测试属性之一 SetUp TearDown TestFixtureSetUp TestFixtureTearDown
- Setup GCS dev enviroment
- Setup TAHI environment for IPv6 test
- RobotFramework环境配置二十五:Test Setup & Teardown 问题
- NUnit TestFixtureSetup 和 TestFixtureTearDown
- [Ruby on Rails] Setup Enviroment
- setup django 4 test
- android测试类--Method setUp in android.test.AndroidTestCase not mocked
- 基于Spring的PowerMockito TestCase
- unittest中合理使用setUp与tearDown
- [翻译]NUnit---TearDown and SetUpFixture and Test Attributes(二十)