Java JDK代理、CGLIB、AspectJ代理分析比较
2017-03-31 20:19
393 查看
前言
什么是代理,在Design patterns In java这个本书中是这样描述的,简单的说就是为某个对象提供一个代理,以控制对这个对象的访问。在不修改源代码的基础上做方法增强,代理是一种设计模式,又简单的分为两种。
静态代理:代理类和委托类在代码运行前关系就确定了,也就是说在代理类的代码一开始就已经存在了。
动态代理:动态代理类的字节码在程序运行时的时候生成。
静态代理
先来看一个静态代理的例子,Calculator是一个计算器的接口类,定义了一个加法的接口方法,由CalculatorImpl类实现真正的加法操作.现在如果我们想对这个方法做一层静态的代理,这儿实现了一个简单的代理类实现了计算接口Calculator,构造函数传入的参数是真正的实现类,但是在调用这个代理类的add方法的时候我们在CalculatorImpl的实现方法执行的前后分别做了一些操作。这样的代理方式就叫做静态代理(可以理解成一个简单的装饰模式)。很明显静态代理的缺点,由于我们需要事先实现代理类,那么每个方法我都都需要去实现。如果我们要实现很多的代理类,那么工作量就太大了。动态代理的产生就是这样而来的。
public interface Calculator {
//需要代理的接口
public int add(int a,int b);
//接口实现类,执行真正的a+b操作
public static class CalculatorImpl implements Calculator{
@Override
public int add(int a, int b) {
System.out.println("doing ");
return a+b;
}
}
//静态代理类的实现.代码已经实现好了.
public static class CalculatorProxy implements Calculator{
private Calculator calculator;
public CalculatorProxy(Calculator calculator) {
this.calculator=calculator;
}
@Override
public int add(int a, int b) {
//执行一些操作
System.out.println("begin ");
int result = calculator.add(a, b);
System.out.println("end ");
return result;
}
}
}
动态代理
使用动态代理可以让代理类在程序运行的时候生成代理类,我们只需要为一类代理写一个具体的实现类就行了,所以实现动态代理要比静态代理简单许多,省了不少重复的工作。在JDK的方案中我们只需要这样做可以实现动态代理了。public class ProxyFactory implements InvocationHandler {
private Class<?> target;
private Object real;
//委托类class
public ProxyFactory(Class<?> target){
this.target=target;
}
//实际执行类bind
public Object bind(Object real){
this.real=real;
//利用JDK提供的Proxy实现动态代理
return Proxy.newProxyInstance(target.getClassLoader(),new Class[]{target},this);
}
@Override
public Object invoke(Object o, Method method, Object[] args) throws Throwable {
//代理环绕
System.out.println("begin");
//执行实际的方法
Object invoke = method.invoke(real, args);
System.out.println("end");
return invoke;
}
public static void main(String[] args) {
Calculator proxy =(Calculator) new ProxyFactory(Calculator.class).bind(new Calculator.CalculatorImpl());
proxy.add(1,2);
}
}利用JDK的proxy实现代理动态代理,有几个关键点,一个就是InvocationHandler接口,这个方法中的invoke方法是执行代理时会执行的方法。所以我们所有代理需要执行的逻辑都会写在这里面,invo参数里面的method可以使用java 反射调用真实的实现类的方法,我们在这个方法周围做一些代理逻辑工作就可以了。上面的代码会把Calculator接口的所有方法全部在程序运行时代理。不用我们一个个的去写静态代理的方法。
JDK动态代理的原理
先看Proxy.newProxyInstance(...)方法中的具体实现(省略大部分方法)。在下面的代码中会通过getProxyClass0(...)方法得到class对象,然后给把InvocationHandler已构造参数实例化代理对象。思路还是挺清晰的,但是如果要一探究竟我们还是得知道代理对象到底是什么样的,如何实现的代理呢?
public static Object newProxyInstance(ClassLoader loader,Class<?>[] interfaces,InvocationHandler h)throws IllegalArgumentException
{
//......
/*
*得到代理的对象的class对象。
*/
Class<?> cl = getProxyClass0(loader, intfs);
/*
* 给class 对象构造函数传入InvocationHandler 实例化对象
*/
//.....
return newInstance(cons, ih);
//....
}
在
getProxyClass0(..)方法中有下面这段代码.顾名思义这段代码应该是对代理的字节码做了缓存.这是显而易见的,我们不会每次调用都去生成代理对象。需要对代理对象缓存。我们发现缓存是用的一个叫
WeakCache的类。我们不探究这个类具体的工作是怎样的,我们只需要看我们的字节码是如何生成的.注释中
ProxyClassFactory这个类应该是我们需要寻找的类。
// If the proxy class defined by the given loader implementing
// the given interfaces exists, this will simply return the cached copy;
// otherwise, it will create the proxy class via the ProxyClassFactory
return proxyClassCache.get(loader, interfaces);
从ProxyClassFactory中下面的方法可以看到具体生成字节流的方法是
ProxyGenerator.generateProxyClass(..).最后通过native方法生成Class对象。同时对class对象的包名称有一些规定比如命名为
com.meituan.Utils$proxy0。要想得到字节码实例我们需要先下载这部分字节流,然后通过反编译得到java代码。
if (proxyPkg == null) {
//包名称,如com.meituan.com.Utils 用。分割
// if no non-public proxy interfaces, use com.sun.proxy package
proxyPkg = ReflectUtil.PROXY_PACKAGE + ".";
}
/*
* Choose a name for the proxy class to generate. proxyClassNamePrefix=`$proxy`  前缀默认是包名称加$proxy +自增的号码
*/
long num = nextUniqueNumber.getAndIncrement();
String proxyName = proxyPkg + proxyClassNamePrefix + num;
byte[] proxyClassFile = ProxyGenerator.generateProxyClass(proxyName, interfaces);
//native 方法
return defineClass0(loader, proxyName,proxyClassFile, 0, proxyClassFile.length);
用
ProxyGenerator.generateProxyClass(..)方法生成字节流,然后写进硬盘.假设我把proxyName定义为
Calcultor$ProxyCode.我们先在https://bitbucket.org/mstrobel/procyon/downloads 下载一个反编译的jar包。然后运行下面的代码,我们得到了一个
Calcultor$ProxyCode.class的文件.然后在目录下使用命令
java
-jar procyon-decompiler-0.5.29.jar Calcultor$ProxyCode.class
就能得到
Calcultor$ProxyCode.java文件。 当然也可以实现在线反编译http://javare.cn/网站反编译然后下载文件
public static void main(String[] args) {
//传入Calculator接口
ProxyUtils.generateClassFile(Calculator.class,"Calcultor$ProxyCode");
}
public static void generateClassFile(Class clazz,String proxyName)
{
//根据类信息和提供的代理类名称,生成字节码
byte[] classFile = ProxyGenerator.generateProxyClass(proxyName,new Class[]{clazz});
String paths = clazz.getResource(".").getPath();
System.out.println(paths);
FileOutputStream out = null;

//保留到硬盘中
out = new FileOutputStream(paths+proxyName+".class");
out.write(classFile);
out.flush();
//...
下面的代码是就是反编译过来的
Calcultor$ProxyCode类。可以发现这个类实现了我们需要代理的接口
Calculator。且他的构造函数确实是需要传递一个
InvocationHandler对象,那么现在的情况就是我们的生成了一个代理类,这个代理类是我们需要代理的接口的实现类。我们的接口中定义了add和reduce方法,在这个代理类中帮我们实现了,并且全部变成了final的。同时覆盖了一些Object类中的方法。那我们现在以reduce这个方法举例,方法中会调用
InvocationHandler类中的invoke方法(也就是我们实现的逻辑的地方)。同时把自己的
Method对象,参数列表等传入进去。
public final class Calcultor$ProxyCode extends Proxy implements Calculator {
private static Method m1;
private static Method m4;
private static Method m0;
private static Method m3;
private static Method m2;

public Calcultor$ProxyCode(InvocationHandler var1) throws  {
super(var1);
}

public final boolean equals(Object var1) throws  {
try {
return ((Boolean)super.h.invoke(this, m1, new Object[]{var1})).booleanValue();
} catch (RuntimeException | Error var3) {
throw var3;
} catch (Throwable var4) {
throw new UndeclaredThrowableException(var4);
}
}

public final int reduce(int var1, int var2) throws  {
try {
return ((Integer)super.h.invoke(this, m4, new Object[]{Integer.valueOf(var1), Integer.valueOf(var2)})).intValue();
} catch (RuntimeException | Error var4) {
throw var4;
} catch (Throwable var5) {
throw new UndeclaredThrowableException(var5);
}
}

public final int hashCode() throws  {
try {
return ((Integer)super.h.invoke(this, m0, (Object[])null)).intValue();
} catch (RuntimeException | Error var2) {
throw var2;
} catch (Throwable var3) {
throw new UndeclaredThrowableException(var3);
}
}

public final int add(int var1, int var2) throws  {
try {
return ((Integer)super.h.invoke(this, m3, new Object[]{Integer.valueOf(var1), Integer.valueOf(var2)})).intValue();
} catch (RuntimeException | Error var4) {
throw var4;
} catch (Throwable var5) {
throw new UndeclaredThrowableException(var5);
}
}

public final String toString() throws  {
try {
return (String)super.h.invoke(this, m2, (Object[])null);
} catch (RuntimeException | Error var2) {
throw var2;
} catch (Throwable var3) {
throw new UndeclaredThrowableException(var3);
}
}

static {
try {
//static静态块加载每个方法的Method对象
m1 = Class.forName("java.lang.Object").getMethod("equals", new Class[]{Class.forName("java.lang.Object")});
m4 = Class.forName("jdkproxy.Calculator").getMethod("reduce", new Class[]{Integer.TYPE, Integer.TYPE});
m0 = Class.forName("java.lang.Object").getMethod("hashCode", new Class[0]);
m3 = Class.forName("jdkproxy.Calculator").getMethod("add", new Class[]{Integer.TYPE, Integer.TYPE});
m2 = Class.forName("java.lang.Object").getMethod("toString", new Class[0]);
} catch (NoSuchMethodException var2) {
throw new NoSuchMethodError(var2.getMessage());
} catch (ClassNotFoundException var3) {
throw new NoClassDefFoundError(var3.getMessage());
}
}
}
JDK动态代理小结
现在我们对JDK代理有个简单的源码级别的认识,理清楚一下思路:JDK会帮我们在运行时生成一个代理类,这个代理类实际上就是我们需要代理的接口的实现类。实现的方法里面会调用InvocationHandler类中的invoke方法,并且同时传入自身被调用的方法的的Method对象和参数列表方便我们编码实现方法的调用。比如我们调用reduce方法,那么我们就可以通过
Method.Invoke(Object
obj, Object... args)
调用我们具体的实现类,再在周围做一些代理做的事儿。就实现了动态代理。我们对JDK的特性做一些简单的认识:
JDK动态代理只能代理有接口的类,并且是能代理接口方法,不能代理一般的类中的方法
提供了一个使用InvocationHandler作为参数的构造方法。在代理类中做一层包装,业务逻辑在invoke方法中实现
重写了Object类的
equals、hashCode、toString,它们都只是简单的调用了InvocationHandler的invoke方法,即可以对其进行特殊的操作,也就是说JDK的动态代理还可以代理上述三个方法
在invoke方法中我们甚至可以不用
Method.invoke方法调用实现类就返回。这种方式常常用在
RPC框架中,在invoke方法中发起通信调用远端的接口等
CGLIB代理
JDK中提供的生成动态代理类的机制有个鲜明的特点是:某个类必须有实现的接口,而生成的代理类也只能代理某个类接口定义的方法。那么如果一个类没有实现接口怎么办呢?这就有CGLIB的诞生了,前面说的JDK的代理类的实现方式是实现相关的接口成为接口的实现类,那么我们自然而然的可以想到用继承的方式实现相关的代理类。CGLIB就是这样做的。一个简单的CGLIB代理是这样实现的:
Enhancer enhancer=new Enhancer();
enhancer.setSuperclass(Calculator.class);
enhancer.setCallback(new MethodInterceptor() {
//类似invokerhanddler的invoke方法
@Override
public Object intercept(Object o, Method method, Object[] objects, MethodProxy methodProxy) throws Throwable {
System.out.println("begin");
Object invoke = methodProxy.invoke(new Calculator.CalculatorImpl(), objects);
System.out.println("end");
return invoke;
}
});
Calculator proxy =(Calculator) enhancer.create();
proxy.add(1,2);
CGLIB代理原理分析
通过在执行动态代理的代码前面加上一行代码就可以得到生成的代理对象.代理对象的class文件会生成在你定义的路径下。类似Calculator$CalculatorImpl$$EnhancerByCGLIB$$58419779.class这样结构。
System.setProperty(DebuggingClassWriter.DEBUG_LOCATION_PROPERTY, "${your path}");之后我们通过反编译得到反编译后的java文件。就上面的例子而言我们传入的superclass是一个接口,并不是实现类。那我们得到的代理类会长成这样:
//如果是接口代理类还是通过实现接口的方式
public class Calculator$$EnhancerByCGLIB$$40fd3cad implements Calculator, Factory{
//...
}
如果传入的并不是接口,而是实现类的话,就会得到下面的代理类:
//如果是普通的类,会采用继承的方式实现
public class Calculator$CalculatorImpl$$EnhancerByCGLIB$$58419779 extends CalculatorImpl implements Factory {
//...
}
但是不管是传入的接口还是传入的代理类,代码的实体都是长得差不多的:
ublic class Calculator$CalculatorImpl$$EnhancerByCGLIB$$2849428a extends CalculatorImpl implements Factory {

private boolean CGLIB$BOUND;
private static final ThreadLocal CGLIB$THREAD_CALLBACKS;
private static final Callback[] CGLIB$STATIC_CALLBACKS;
private MethodInterceptor CGLIB$CALLBACK_0;
private InvocationHandler CGLIB$CALLBACK_1;
private static final Method CGLIB$say4$1$Method;
private static final MethodProxy CGLIB$say4$1$Proxy;
private static final Object[] CGLIB$emptyArgs;
private static final Method CGLIB$reduce$2$Method;
private static final MethodProxy CGLIB$reduce$2$Proxy;
private static final Method CGLIB$finalize$3$Method;
private static final MethodProxy CGLIB$finalize$3$Proxy;
//省略 clone等  定义

//初始化
static void CGLIB$STATICHOOK1() {
CGLIB$THREAD_CALLBACKS = new ThreadLocal();
CGLIB$emptyArgs = new Object[0];
Class var0 = Class.forName("jdkproxy.Calculator$CalculatorImpl$$EnhancerByCGLIB$$2849428a");
Class var1;
Method[] var10000 = ReflectUtils.findMethods(new String[]{"say4", "()V", "reduce", "(II)I"}, (var1 = Class.forName("jdkproxy.Calculator$CalculatorImpl")).getDeclaredMethods());
CGLIB$say4$1$Method = var10000[0];
CGLIB$say4$1$Proxy = MethodProxy.create(var1, var0, "()V", "say4", "CGLIB$say4$1");
CGLIB$reduce$2$Method = var10000[1];
CGLIB$reduce$2$Proxy = MethodProxy.create(var1, var0, "(II)I", "reduce", "CGLIB$reduce$2");
var10000 = ReflectUtils.findMethods(new String[]{"finalize", "()V", "equals", "(Ljava/lang/Object;)Z", "toString", "()Ljava/lang/String;", "hashCode", "()I", "clone", "()Ljava/lang/Object;"}, (var1 = Class.forName("java.lang.Object")).getDeclaredMethods());
CGLIB$finalize$3$Method = var10000[0];
CGLIB$finalize$3$Proxy = MethodProxy.create(var1, var0, "()V", "finalize", "CGLIB$finalize$3");
CGLIB$equals$4$Method = var10000[1];
CGLIB$equals$4$Proxy = MethodProxy.create(var1, var0, "(Ljava/lang/Object;)Z", "equals", "CGLIB$equals$4");
CGLIB$toString$5$Method = var10000[2];
CGLIB$toString$5$Proxy = MethodProxy.create(var1, var0, "()Ljava/lang/String;", "toString", "CGLIB$toString$5");
CGLIB$hashCode$6$Method = var10000[3];
CGLIB$hashCode$6$Proxy = MethodProxy.create(var1, var0, "()I", "hashCode", "CGLIB$hashCode$6");
CGLIB$clone$7$Method = var10000[4];
CGLIB$clone$7$Proxy = MethodProxy.create(var1, var0, "()Ljava/lang/Object;", "clone", "CGLIB$clone$7");
CGLIB$add$0 = Class.forName("jdkproxy.Calculator$CalculatorImpl").getDeclaredMethod("add", new Class[]{Integer.TYPE, Integer.TYPE});
}
//非接口中的方法,在实现类中定义的
final void CGLIB$say4$1() {
super.say4();
}

public final void say4() {
MethodInterceptor var10000 = this.CGLIB$CALLBACK_0;
if(this.CGLIB$CALLBACK_0 == null) {
CGLIB$BIND_CALLBACKS(this);
var10000 = this.CGLIB$CALLBACK_0;
}

if(var10000 != null) {
var10000.intercept(this, CGLIB$say4$1$Method, CGLIB$emptyArgs, CGLIB$say4$1$Proxy);
} else {
super.say4();
}
}
//绑定MethodInterceptor callback的方法会额外实现一个和原方法一模一样的方法
final int CGLIB$reduce$2(int var1, int var2) {
return super.reduce(var1, var2);
}

public final int reduce(int var1, int var2) {
MethodInterceptor var10000 = this.CGLIB$CALLBACK_0;
if(this.CGLIB$CALLBACK_0 == null) {
CGLIB$BIND_CALLBACKS(this);
var10000 = this.CGLIB$CALLBACK_0;
}

if(var10000 != null) {
//调用MethodInterceptor中的intercept方法
Object var3 = var10000.intercept(this, CGLIB$reduce$2$Method, new Object[]{new Integer(var1), new Integer(var2)}, CGLIB$reduce$2$Proxy);
return var3 == null?0:((Number)var3).intValue();
} else {
return super.reduce(var1, var2);
}
}

final void CGLIB$finalize$3() throws Throwable {
super.finalize();
}

protected final void finalize() throws Throwable {
MethodInterceptor var10000 = this.CGLIB$CALLBACK_0;
if(this.CGLIB$CALLBACK_0 == null) {
CGLIB$BIND_CALLBACKS(this);
var10000 = this.CGLIB$CALLBACK_0;
}

if(var10000 != null) {
var10000.intercept(this, CGLIB$finalize$3$Method, CGLIB$emptyArgs, CGLIB$finalize$3$Proxy);
} else {
super.finalize();
}
}
//省略 clone等

//得到MethodProxy对象
public static MethodProxy CGLIB$findMethodProxy(Signature var0) {
String var10000 = var0.toString();
switch(var10000.hashCode()) {
case -1574182249:
if(var10000.equals("finalize()V")) {
return CGLIB$finalize$3$Proxy;
}
break;
//省略
}

return null;
}

public final int add(int var1, int var2) {
try {
InvocationHandler var10000 = this.CGLIB$CALLBACK_1;
if(this.CGLIB$CALLBACK_1 == null) {
CGLIB$BIND_CALLBACKS(this);
var10000 = this.CGLIB$CALLBACK_1;
}
//调用invokeHandler中的invoke方法
return ((Number)var10000.invoke(this, CGLIB$add$0, new Object[]{new Integer(var1), new Integer(var2)})).intValue();
} catch (Error | RuntimeException var3) {
throw var3;
} catch (Throwable var4) {
throw new UndeclaredThrowableException(var4);
}
}
//...
//为每个方法绑定callback 根据实现fitler的不同会加载不同的callback
private static final void CGLIB$BIND_CALLBACKS(Object var0) {
Calculator$CalculatorImpl$$EnhancerByCGLIB$$2849428a var1 = (Calculator$CalculatorImpl$$EnhancerByCGLIB$$2849428a)var0;
if(!var1.CGLIB$BOUND) {
var1.CGLIB$BOUND = true;
Object var10000 = CGLIB$THREAD_CALLBACKS.get();
if(var10000 == null) {
var10000 = CGLIB$STATIC_CALLBACKS;
if(CGLIB$STATIC_CALLBACKS == null) {
return;
}
}

Callback[] var10001 = (Callback[])var10000;
var1.CGLIB$CALLBACK_1 = (InvocationHandler)((Callback[])var10000)[1];
var1.CGLIB$CALLBACK_0 = (MethodInterceptor)var10001[0];
}

}

public void setCallback(int var1, Callback var2) {
switch(var1) {
case 0:
this.CGLIB$CALLBACK_0 = (MethodInterceptor)var2;
break;
case 1:
this.CGLIB$CALLBACK_1 = (InvocationHandler)var2;
}

}

public Callback[] getCallbacks() {
CGLIB$BIND_CALLBACKS(this);
return new Callback[]{this.CGLIB$CALLBACK_0, this.CGLIB$CALLBACK_1};
}
//初始化我们定义的 callback
public void setCallbacks(Callback[] var1) {
this.CGLIB$CALLBACK_0 = (MethodInterceptor)var1[0];
this.CGLIB$CALLBACK_1 = (InvocationHandler)var1[1];
}

static {
CGLIB$STATICHOOK1();
}
}
上面这一份代码整个代理的流程仿佛是差不多的,都是在调用方法的时候router到InvokeHandler或者MethodInterceptor。为什么会有两种呢,因为CGLIB提供了filter的机制,可以让不同的方法代理到不同的callback中,如下面这样:
enhancer.setCallbacks(new Callback[]{new MethodInterceptor() {
//...
},new InvocationHandler() {
//...
}});
enhancer.setCallbackFilter(new CallbackFilter() {
@Override
public int accept(Method method) {
//返回的下标和在Callback数组中的下标对应,下面表达的是reduce方法绑定MethodInterceptor
if(method.getName().equals("reduce")) return 1;
return 0;
}
});
这两种callback不一样的地方很显而易见, MethodInterceptor的方法参数多了一个MethodProxy对象,在使用这个对象的时候的时候有两个方法可以让我们调用:
public Object invoke(Object obj, Object[] args) throws Throwable {
//...
this.init();
MethodProxy.FastClassInfo e = this.fastClassInfo;
return e.f1.invoke(e.i1, obj, args);//f1 i1
//...
}
public Object invokeSuper(Object obj, Object[] args) throws Throwable {
//...

this.init();
MethodProxy.FastClassInfo e = this.fastClassInfo;
return e.f2.invoke(e.i2, obj, args);//f2 i2
//...
}
private static class FastClassInfo {
FastClass f1;//委托类
FastClass f2;//代理类
int i1;//委托类方法索引
int i2;//代理类方法索引

private FastClassInfo() {
}
}
FastClass是Cglib实现的一种通过给方法建立下标索引来访问方法的策略,为了绕开反射。 上面的描述代表MethodPeoxy可以根据对方法建立索引调用方法,而不需要使用传统Method的invoke反射调用,提高了性能,当然额外的得多生成一些类信息,比如在最开始的代理类中我们也可以看到MethodProxy也是有通过索引来做的,这样的话做到了FastClass,FastClass大致是这样实现的:
class FastTest {
public int getIndex(String signature){
//方法签名做hash
switch(signature.hashCode()){
case 3078479:
return 1;
case 3108270:
return 2;
}
return -1;
}

public Object invoke(int index, Object o, Object[] ol){
//根据index调用方法,
Test t = (Test) o;
switch(index){
case 1:
t.f();
case 2:
t.g();
}

}
}
所以在使用MethodInterceptor的时候可以这样使用:
public Object intercept(Object o, Method method, Object[] objects, MethodProxy methodProxy) throws Throwable {
//传入o 也就是代理对象本身,如果不传入o会抛出类似
//java.lang.ClassCastException: jdkproxy.Calculator$CalculatorImpl cannot be cast to jdkproxy.Calculator$CalculatorImpl$$EnhancerByCGLIB$$8e994f7f
//这样的异常
//
Object o1 = methodProxy.invokeSuper(o, objects);
return o1;
}
实际上调用的就是绑定了MethodInterceptor callback接口然后在代理类中额外生成的类如上面所标注的
final int CGLIB$reduce$2(int var1, int var2)方便MethodProxy调用,但有个前提是你传入的superclass不能是接口,super.xxx(*)会调用失败,会抛出
NoSuchMethodError错误。
小结
CGlib可以传入接口也可以传入普通的类,接口使用实现的方式,普通类使用会使用继承的方式生成代理类.由于是继承方式,如果是 static方法,private方法,final方法等描述的方法是不能被代理的
做了方法访问优化,使用建立方法索引的方式避免了传统Method的方法反射调用.
提供callback 和filter设计,可以灵活地给不同的方法绑定不同的callback。编码更方便灵活。
CGLIB会默认代理Object中
finalize,
equals,
toString,
hashCode,
clone等方法。比JDK代理多了
finalize和
clone。
AspectJ静态编译织入
前面两种都是说的在代码运行时动态的生成class文件达到动态代理的目的,那我们现在回到静态代理,静态代理唯一的缺点就是我们需要对每一个方法编写我们的代理逻辑,造成了工作的繁琐和复杂。AspectJ就是为了解决这个问题,在编译成class字节码的时候在方法周围加上业务逻辑。复杂的工作由特定的编译器帮我们做。AOP有切面(Aspect)、连接点(joinpoint)、通知(advice)、切入点(Pointcut)、目标对象(target)等概念,这里不详细介绍这些概念.
如何做ASpectj开发,这里使用的是maven插件,详细使用文档http://www.mojohaus.org/aspectj-maven-plugin/examples/differentTestAndCompile.html:
<plugin>
<groupId>org.codehaus.mojo</groupId>
<artifactId>aspectj-maven-plugin</artifactId>
<version>1.5</version>
<executions>
<execution>
<goals>
<goal>compile</goal>
<goal>test-compile</goal>
</goals>
</execution>
</executions>
<configuration>
<weaveDependencies>
<!--是否要植入jar-->
<!--<weaveDependency>-->
<!--<groupId>com.meituan.inf</groupId>-->
<!--<artifactId>xmd-common-log4j2</artifactId>-->
<!--</weaveDependency>-->

</weaveDependencies>

<source>1.6</source>
<target>1.6</target>
<encoding>UTF-8</encoding>
<complianceLevel>1.6</complianceLevel>
<verbose>true</verbose>
<showWeaveInfo>true</showWeaveInfo>
</configuration>
</plugin>
然后编写Aspectj的文件.可以编写.ajc文件,或者使用java文件也可以,Aspectj语法可以参考http://sishuok.com/forum/posts/list/281.html 此文章:
//表示对实现了Mtrace接口的类,并且参数数Integer 同时方法中有@RequestMapping 注解的方法插入代理
@Pointcut("execution(* com.meituan.deploy.Mtrace+.*(java.lang.Integer)) && @annotation(org.springframework.web.bind.annotation.RequestMapping)")
public void zhiru2() {

}
@Before(value = "zhiru2()")//前面植入
public void doBeforeTask2(JoinPoint point) {
//方法调用前植入
System.out.println("=========BEFORE=========");
}

@After("zhiru2()")//后面植入
public void after(JoinPoint point) {
//方法调用后植入
System.out.println("===========AFTER=======");
}
@AfterThrowing("zhiru2()")
public void afterthrowing(JoinPoint point) {
System.out.println("===========throwing=======");
}
@AfterReturning("zhiru2()")
public void afterRutuen(JoinPoint point) {
System.out.println("===========return=======");
}
编写好ASpectj文件之后,编译代码就能够得到静态织入的class文件了,接下来简单的介绍一下AspectJ是在哪个地方植入代码到class文件的.
AspectJ原理分析
反编译过后得到的java代码如下:@RequestMapping({"/hello"})
public ModelAndView helloMyMethodName(Integer name) throws SQLException {
JoinPoint var2 = Factory.makeJP(ajc$tjp_0, this, this, name);
Object var7;
try {
Object var5;
try {
//调用before
Aspectj.aspectOf().doBeforeTask2(var2);
System.out.println(name);
Util.report("xiezhaodong");
var5 = null;
} catch (Throwable var8) {
Aspectj.aspectOf().after(var2);
throw var8;
}
//调用after
Aspectj.aspectOf().after(var2);
var7 = var5;
} catch (Throwable var9) {
//调用抛出异常
Aspectj.aspectOf().afterthrowing(var2);
throw var9;
}
//调用return
Aspectj.aspectOf().afterRutuen(var2);
return (ModelAndView)var7;
}
@RequestMapping({"/hello2"})
public ModelAndView helloMyMethodName222(String name) throws SQLException {
return new ModelAndView("hello", "name", name);
}上面两个方法都实现了@ RequestMapping注解,类也实现类Mtrace接口。但是因为传入参数的类型不同,所以只有第一个方法被织入了代理的方法,在真正的方法快周围分表调用了
before、
after、
afterThrowing、
afterRutnrn等方法。Aspectj简单的原理就是这样.更加深入的原理解析暂时就不做了。
小结
Aspectj并不是动态的在运行时生成代理类,而是在编译的时候就植入代码到class文件由于是静态织入的,所以性能相对来说比较好
Aspectj不受类的特殊限制,不管方法是
private、或者
static、或者
final的,都可以代理
Aspectj不会代理除了限定方法之外任何其他诸如
toString(),
clone()等方法
Spring
Aop中的代理
Spring代理实际上是对JDK代理和CGLIB代理做了一层封装,并且引入了AOP概念:Aspect、advice、joinpoint等等,同时引入了AspectJ中的一些注解@pointCut,
@after,
@before等等.Spring
Aop严格的来说都是动态代理,所以实际上Spring代理和Aspectj的关系并不大.
Spring代理中
org.springframework.aop.framework.ProxyFactory是关键,一个简单的使用API编程的Spring AOP代理如下:
ProxyFactory proxyFactory =new ProxyFactory(Calculator.class, new MethodInterceptor() {
@Override
public Object invoke(MethodInvocation invocation) throws Throwable {
return null;
}
});
proxyFactory.setOptimize(false);
//得到代理对象
proxyFactory.getProxy();
在调用
getProxy()时,会优先得到一个默认的
DefaultAopProxyFactory.这个类主要是决定到底是使用JDK代理还是CGLIB代理:
public AopProxy createAopProxy(AdvisedSupport config) throws AopConfigException {
//optimize 优化,如上列代码编程true会默认进入if
//ProxyTargetClass 是否对具体类进行代理
//判断传入的class 是否有接口。如果没有也会进入选择
if (config.isOptimize() || config.isProxyTargetClass() || hasNoUserSuppliedProxyInterfaces(config)) {
Class targetClass = config.getTargetClass();
if (targetClass == null) {
throw new AopConfigException("TargetSource cannot determine target class: " +
"Either an interface or a target is required for proxy creation.");
}
//如果目标是接口的话还是默认使用JDK
if (targetClass.isInterface()) {
return new JdkDynamicAopProxy(config);
}
return CglibProxyFactory.createCglibProxy(config);
}
else {
return new JdkDynamicAopProxy(config);
}
}
可以看见一些必要的信息,我们在使用Spring AOP的时候通常会在XML配置文件中设置
<aop:aspectj-autoproxy proxy-target-class="true">来使用CGlib代理。现在我们可以发现只要三个参数其中一个为true,便可以有机会选择使用CGLIB代理。但是是否一定会使用还是得看传入的class到底是个怎样的类。如果是接口,就算开启了这几个开关,最后还是会自动选择JDK代理。
JdkDynamicAopProxy这个类实现了
InvokeHandler接口,最后调用getProxy():
public Object getProxy(ClassLoader classLoader) {
//...
//返回代理对象
return Proxy.newProxyInstance(classLoader, proxiedInterfaces, this);
}
那么JdkDynamicAopProxy中的invoke方法就是最核心的方法了(实现了InvokeHandler接口):
/**
* Implementation of {@code InvocationHandler.invoke}.
* <p>Callers will see exactly the exception thrown by the target,
* unless a hook method throws an exception.
*/
public Object invoke(Object proxy, Method method, Object[] args) throws Throwable {
MethodInvocation invocation;
Object oldProxy = null;
boolean setProxyContext = false;

TargetSource targetSource = this.advised.targetSource;
Class targetClass = null;
Object target = null;

try {
//是否实现equals和hashCode,否则不代理。因为JDK代理会默认代理这两个方法
if (!this.equalsDefined && AopUtils.isEqualsMethod(method)) {
// The target does not implement the equals(Object) method itself.
return equals(args[0]);
}
if (!this.hashCodeDefined && AopUtils.isHashCodeMethod(method)) {
// The target does not implement the hashCode() method itself.
return hashCode();
}
//不能代理adviser接口和子接口自身
if (!this.advised.opaque && method.getDeclaringClass().isInterface() &&
method.getDeclaringClass().isAssignableFrom(Advised.class)) {
// Service invocations on ProxyConfig with the proxy config...
return AopUtils.invokeJoinpointUsingReflection(this.advised, method, args);
}

Object retVal;
//代理类和ThreadLocal绑定
if (this.advised.exposeProxy) {
// Make invocation available if necessary.
oldProxy = AopContext.setCurrentProxy(proxy);
setProxyContext = true;
}

//合一从TargetSource得到一个实例对象,可实现接口获得
target = targetSource.getTarget();
if (target != null) {
targetClass = target.getClass();
}

// Get the interception chain for this method.
//得到拦截器链
List<Object> chain = this.advised.getInterceptorsAndDynamicInterceptionAdvice(method, targetClass);

// Check whether we have any advice. If we don't, we can fallback on direct
// reflective invocation of the target, and avoid creating a MethodInvocation.
//如果没有定义拦截器链。直接调用方法不进行代理
if (chain.isEmpty()) {
// We can skip creating a MethodInvocation: just invoke the target directly
// Note that the final invoker must be an InvokerInterceptor so we know it does
// nothing but a reflective operation on the target, and no hot swapping or fancy proxying.
retVal = AopUtils.invokeJoinpointUsingReflection(target, method, args);
}
else {
// We need to create a method invocation...
invocation = new ReflectiveMethodInvocation(proxy, target, method, args, targetClass, chain);
//执行拦截器链。通过proceed递归调用
// Proceed to the joinpoint through the interceptor chain.
retVal = invocation.proceed();
}

// Massage return value if necessary.
Class<?> returnType = method.getReturnType();
if (retVal != null && retVal == target && returnType.isInstance(proxy) &&
!RawTargetAccess.class.isAssignableFrom(method.getDeclaringClass())) {
// Special case: it returned "this" and the return type of the method
// is type-compatible. Note that we can't help if the target sets
// a reference to itself in another returned object.
//如果返回值是this 直接返回代理对象本身
retVal = proxy;
} else if (retVal == null && returnType != Void.TYPE && returnType.isPrimitive()) {
throw new AopInvocationException("Null return value from advice does not match primitive return type for: " + method);
}
return retVal;
}
finally {
if (target != null && !targetSource.isStatic()) {
// Must have come from TargetSource.
targetSource.releaseTarget(target);
}
if (setProxyContext) {
// Restore old proxy.
AopContext.setCurrentProxy(oldProxy);
}
}
}
下面来分析整个代理的拦截器是怎么运行的,
ReflectiveMethodInvocation这个类的
proceed()方法负责递归调用所有的拦截的织入。
public Object proceed() throws Throwable {
//list的索引从-1开始。
if (this.currentInterceptorIndex == this.interceptorsAndDynamicMethodMatchers.size() - 1) {
//所有interceptor都被执行完了,直接执行原方法
return invokeJoinpoint();
}
//得到一个interceptor。不管是before还是after等织入,都不受在list中的位置影响。
Object interceptorOrInterceptionAdvice =
this.interceptorsAndDynamicMethodMatchers.get(++this.currentInterceptorIndex);
//....
//调用invoke方法
return ((MethodInterceptor) interceptorOrInterceptionAdvice).invoke(this);
}
}
需要注意的是invoke方法中传入的是
this。在
MethodInvocation中又可以调用
procced来实现递归调用。比如像下面这样:
new MethodInterceptor() {
@Override
public Object invoke(MethodInvocation invocation) throws Throwable {
Object re= invocation.proceed();
return re;
}
}
那么要实现织入,只需要控制织入的代码和调用
proceed方法的位置,在Spring中的
before织入是这样实现的:
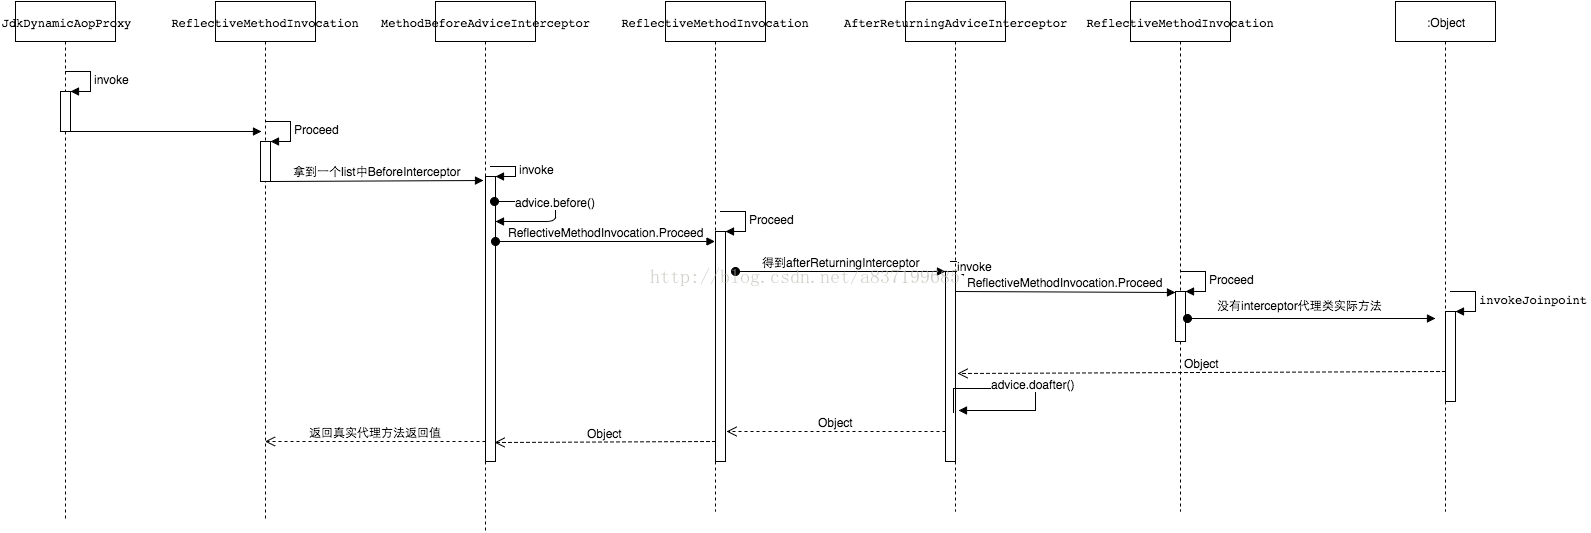
public class MethodBeforeAdviceInterceptor implements MethodInterceptor, Serializable {

private MethodBeforeAdvice advice;

public Object invoke(MethodInvocation mi) throws Throwable {
//调用before实际代码
this.advice.before(mi.getMethod(), mi.getArguments(), mi.getThis() );
//继续迭代
return mi.proceed();
}afterRuturning是这样实现的:
public class AfterReturningAdviceInterceptor implements MethodInterceptor, AfterAdvice, Serializable {

private final AfterReturningAdvice advice;

public Object invoke(MethodInvocation mi) throws Throwable {
Object retVal = mi.proceed();
//只要控制和mi.proceed()调用的位置关系就可以实现任何状态的织入效果
this.advice.afterReturning(retVal, mi.getMethod(), mi.getArguments(), mi.getThis());
return retVal;
}
下面这幅流程图是一个一个包含上述一个before织入和一个afterReturning织入的流程图:
要实现这种环绕的模式其实很简单,下面提供一个最简单的实现,利用迭代的思想很简单的实现了链式调用。并且可扩展性非常高。和AspectJ的直接静态织入改变代码结构的方式来分别织入before、after等来说。这种方式设计更优雅。但是在
SpringMVC中拦截器却并不是这种方式实现的,哈哈。
public interface MethodInterceptor {

Object invoke(Invocation invocation);

public static class beforeMethodInterceptor implements MethodInterceptor{
private String name;
public beforeMethodInterceptor(String name) {
this.name=name;
}

@Override
public Object invoke(Invocation invocation) {
System.out.println("before method "+name);

return invocation.proceed();
}
}
public static class AfterRuturningMethodInterceptor implements MethodInterceptor{
@Override
public Object invoke(Invocation invocation) {
Object proceed = invocation.proceed();
System.out.println("afterRuturning method 1");
return proceed;
}
}
public static class AfterMethodInterceptor implements MethodInterceptor{
@Override
public Object invoke(Invocation invocation) {
try {
return   invocation.proceed();
}finally {
System.out.println("after");
}

}
}
}
public interface Invocation {
Object proceed();
public static class MethodInvocation implements Invocation{
private List<MethodInterceptor> list;
private int index=-1;
private int ListSize=0;
public MethodInvocation(List<MethodInterceptor> list) {
this.list=list;
ListSize=list.size();
}
@Override
public Object proceed() {
if(index==ListSize-1){
System.out.println("执行方法实体");
return "返回值";
}
MethodInterceptor methodInterceptor = list.get(++index);
return methodInterceptor.invoke(this);
}
}
}
小结
Spring AOP封装了JDK和CGLIB的动态代理实现,同时引入了AspectJ的编程方式和注解。使得可以使用标准的AOP编程规范来编写代码外,还提供了多种代理方式选择。可以根据需求来选择最合适的代理模式。同时Spring也提供了XML配置的方式实现AOP配置。可以说是把所有想要的都做出来了,Spring是在平时编程中使用动态代理的不二选择.

相关文章推荐
- Java JDK代理、CGLIB、AspectJ代理分析比较
- Java JDK代理、CGLIB、AspectJ代理分析比较
- JAVA JDK CGLIB 动态代理 比较
- 好记性不如烂笔头48-java拦截器-JDK自带动态代理和CGLIB效率比较(3)
- Java之代理(jdk静态代理,jdk动态代理,cglib动态代理,aop,aspectj)
- Java之代理(jdk静态代理,jdk动态代理,cglib动态代理,aop,aspectj)
- Java之代理(jdk静态代理,jdk动态代理,cglib动态代理,aop,aspectj)
- Java之代理(jdk静态代理,jdk动态代理,cglib动态代理,aop,aspectj)
- Java之代理(jdk静态代理,jdk动态代理,cglib动态代理,aop,aspectj)
- Java之代理(jdk静态代理,jdk动态代理,cglib动态代理,aop,aspectj)
- Java之代理(jdk静态代理,jdk动态代理,cglib动态代理,aop,aspectj)
- java动态代理(JDK和cglib)
- java动态代理(JDK和cglib)
- java动态代理(JDK和cglib)
- 网摘-java静态代理和动态代理例子(jdk动态代理和cglib动态代理)
- java动态代理(JDK和cglib)
- java动态代理(JDK和cglib)
- java动态代理(JDK和cglib)
- java动态代理(JDK和cglib)
- java动态代理(JDK和cglib)