在Ubuntu 16.04上安装和使用服务器监控报警系统Shinken
2017-03-17 10:38
603 查看
第一步 安装 Shinken 服务器
Shinken 是一个 Python 框架,我们可以通过 pip 安装或者从源码来安装它,在这一步中,我们将用源代码编译安装 Shinken。
在我们开始安装 Shinken 之前还需要完成几个步骤。
安装一些新的 Python 软件包并创建一个名为 shinken 的系统用户:
sudo apt-get install python-setuptools python-pip python-pycurl
useradd -m -s /bin/bash shinken
从 GitHub 仓库下载 Shinken 源代码:
git clone https://github.com/naparuba/shinken.git
cd shinken/
然后用以下命令安装 Shinken:
git checkout 2.4.3
python setup.py install
然后,为了得到更好的效果,我们还需要从 Ubuntu 软件库中安装 python-cherrypy3 软件包:
sudo apt-get install python-cherrypy3
到这里,Shinken 已经成功安装,接下来我们将 Shinken 添加到系统启动项并且启动它:
update-rc.d shinken defaults
systemctl start shinken
第二步 安装 Shinken Webui2
Webui2 是 Shinken 的 Web 界面(在 shinken.io 可以找到)。最简单的安装 Shinken webui2 的方法是使用shinken CLI 命令(必须作为 shinken 用户执行)。
切换到 shinken 用户:
su - shinken
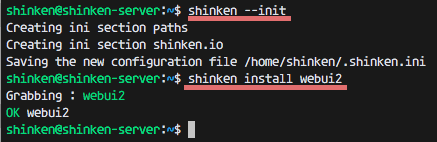
初始化 shiken 配置文件,下面的命令将会创建一个新的配置文件 .shinken.ini :
shinken --init
接下来用 shinken CLI 命令来安装 webui2,最好网络能fanqiang:
shinken install webui2
至此 webui2 已经安装好,但是我们还需要安装 MongoDB 和用 pip 来安装另一个 Python 软件包。在 root 下运行如下命令:
sudo apt-get install mongodb
pip install pymongo>=3.0.3 requests arrow bottle==0.12.8
接下来,切换到 shinken 目录下并且通过编辑 broker-master.cfg 文件来添加这个新的 webui2 模块:
cd /etc/shinken/brokers/
vim broker-master.cfg
在第 40 行添加一个模块选项:
modules webui2
保存文件并且退出编辑器。
现在进入 contacts 目录下编辑 admin.cfg 来进行管理配置。
cd /etc/shinken/contacts/
vim admin.cfg
按照如下修改:
contact_name admin # Username 'admin'
password yourpass # Pass 'mypass'
保存和退出。
第三步 安装 Nagios 插件和 Shinken 软件包
在这一步中,我们将安装 Nagios 插件和一些 Perl 模块。然后从 shinken.io 安装其他的软件包来实现监视。
安装 Nagios 插件和安装 Perl 模块所需要的 cpanminus:
sudo apt-get install nagios-plugins* cpanminus
用 cpanm 命令来安装 Perl 模块。
cpanm Net::SNMP
cpanm Time::HiRes
cpanm DBI
perl -e 'use Net::SNMP;'#如果提示can't locate Net/SNMP.pm in @Inc,则进行下一步
sudo apt-get intall libnet-snmp-perl
现在我们创建一个 utils.pm 文件的链接到 shinken 的目录,并且为 Log_File_Health 创建了一个新的日志目录 。
chmod u+s /usr/lib/nagios/plugins/check_icmp
ln -s /usr/lib/nagio
1b2a3
s/plugins/utils.pm /var/lib/shinken/libexec/
mkdir -p /var/log/rhosts/
touch /var/log/rhosts/remote-hosts.log
然后,从 shinken.io 安装 shinken 软件包 ssh 和 linux-snmp 来监视 SSH 和 SNMP :
su - shinken
shinken install ssh
shinken install linux-snmp
第四步 添加一个 Linux 主机 host-one
我们将添加一个新的将被监控的 Linux 主机,IP 地址为 192.168.1.121,主机名为 host-one 的 Ubuntu 16.04。
连接到 host-one 主机:
ssh host1@192.168.1.121
从 Ubuntu 软件库中安装 snmp 和snmpd 软件包:
sudo apt-get install snmp snmpd
然后,用 vim 编辑 snmpd.conf 配置文件:
vim /etc/snmp/snmpd.conf
注释掉第 15 行并取消注释第 17 行(localhost也要这样):
#agentAddress udp:127.0.0.1:161
agentAddress udp:161,udp6:[::1]:161
注释掉第 51 和 53 行,然后加一行新的配置,如下:
#rocommunity mypass default -V systemonly
#rocommunity6 mypass default -V systemonly
rocommunity mypass
保存并退出。
现在用 systemctl 命令来启动 snmpd 服务:
systemctl start snmpd
在 shinken 服务器上通过在 hosts 文件夹下创建新的文件来定义一个新的主机:
cd /etc/shinken/hosts/
vim host-one.cfg
粘贴如下配置信息:
define host{
use generic-host,linux-snmp,ssh
contact_groups admins
host_name host-one
address 192.168.1.121
_SNMPCOMMUNITY mypass # SNMP Pass Config on snmpd.conf
}
保存并退出。
在 shinken 服务器上编辑 SNMP 配置文件。
vim /etc/shinken/resource.d/snmp.cfg
将 public 改为 mypass -必须和你在客户端 snmpd 配置文件中使用的密码相同:
$SNMPCOMMUNITYREAD$=mypass
保存并退出。
现在将服务端和客户端都重启:
reboot
现在 Linux 主机已经被成功地添加到 shinken 服务器中了。
第五步 访问 Shinken Webui2
在端口 7677 访问 Shinken webui2 (将 URL 中的 IP 替换成你自己的 IP 地址):
http://192.168.1.120:7767
用管理员用户和密码登录(你在 admin.cfg 文件中设置的)

第6步 Shinken 的常见问题
NTP 服务器相关的问题
当你得到如下的 NTP 错误提示
TimeSync - CRITICAL ( NTP CRITICAL: No response from the NTP server)
TimeSync - CRITICAL ( NTP CRITICAL: Offset unknown )
为了解决这个问题,在所有 Linux 主机上安装 ntp。
sudo apt-get install ntp ntpdate
编辑 ntp 配置文件:
vim /etc/ntp.conf
注释掉所有 pools 并替换为:
#pool 0.ubuntu.pool.ntp.org iburst
#pool 1.ubuntu.pool.ntp.org iburst
#pool 2.ubuntu.pool.ntp.org iburst
#pool 3.ubuntu.pool.ntp.org iburst
pool 0.id.pool.ntp.org
pool 1.asia.pool.ntp.org
pool 2.asia.pool.ntp.org
然后,在新的一行添加如下限制规则:
# Local users may interrogate the ntp server more closely.
restrict 127.0.0.1
restrict 192.168.1.120 #shinken server IP address
restrict ::1
NOTE: 192.168.1.120 is the Shinken server IP address.
保存并退出。
启动 ntp 并且检查 Shinken 面板。
ntpd
check_netint.pl Not Found 问题
从 github 仓库下载源代码到 shinken 的库目录下:
cd /var/lib/shinken/libexec/
wget https://raw.githubusercontent.com/Sysnove/shinken-plugins/master/check_netint.pl
chmod +x check_netint.pl
chown shinken:shinken check_netint.pl
网络占用的问题
这是错误信息:
ERROR : Unknown interface eth\d+
检查你的网络接口并且编辑 linux-snmp 模版。
在我的 Ununtu 服务器,网卡是 “enp0s8”,而不是 eth0,所以我遇到了这个错误。
vim 编辑 linux-snmp 模版:
vim /etc/shinken/packs/linux-snmp/templates.cfg
在第 24 行添加网络接口信息:
_NET_IFACES eth\d+|em\d+|enp0s8
保存并退出。
附上另一片文章:
This should get you going with everything you need to get started. Now lets start setting up shinken.
Update the line:
modules
To
modules webui
This will load the webui module on 7767 but I run it behind nginx with a proxypass so I can have a nice easy url to remember.
This one is easy, just modify /etc/shinken/resource.d/snmp.cfg with your SNMP community string.
Also, easy. Just modify /etc/shinken/resource.d/mysql.cfg with a user and password that we will set up on the monitored host in a short time.
If all went well when we start up shinken everything will just work. If not, I recommend checking the logs at /var/logs/shinken/* as they can normally tell you what is missing or broken.
Shinken 是一个 Python 框架,我们可以通过 pip 安装或者从源码来安装它,在这一步中,我们将用源代码编译安装 Shinken。
在我们开始安装 Shinken 之前还需要完成几个步骤。
安装一些新的 Python 软件包并创建一个名为 shinken 的系统用户:
sudo apt-get install python-setuptools python-pip python-pycurl
useradd -m -s /bin/bash shinken
从 GitHub 仓库下载 Shinken 源代码:
git clone https://github.com/naparuba/shinken.git
cd shinken/
然后用以下命令安装 Shinken:
git checkout 2.4.3
python setup.py install
然后,为了得到更好的效果,我们还需要从 Ubuntu 软件库中安装 python-cherrypy3 软件包:
sudo apt-get install python-cherrypy3
到这里,Shinken 已经成功安装,接下来我们将 Shinken 添加到系统启动项并且启动它:
update-rc.d shinken defaults
systemctl start shinken
第二步 安装 Shinken Webui2
Webui2 是 Shinken 的 Web 界面(在 shinken.io 可以找到)。最简单的安装 Shinken webui2 的方法是使用shinken CLI 命令(必须作为 shinken 用户执行)。
切换到 shinken 用户:
su - shinken
初始化 shiken 配置文件,下面的命令将会创建一个新的配置文件 .shinken.ini :
shinken --init
接下来用 shinken CLI 命令来安装 webui2,最好网络能fanqiang:
shinken install webui2
至此 webui2 已经安装好,但是我们还需要安装 MongoDB 和用 pip 来安装另一个 Python 软件包。在 root 下运行如下命令:
sudo apt-get install mongodb
pip install pymongo>=3.0.3 requests arrow bottle==0.12.8
接下来,切换到 shinken 目录下并且通过编辑 broker-master.cfg 文件来添加这个新的 webui2 模块:
cd /etc/shinken/brokers/
vim broker-master.cfg
在第 40 行添加一个模块选项:
modules webui2
保存文件并且退出编辑器。
现在进入 contacts 目录下编辑 admin.cfg 来进行管理配置。
cd /etc/shinken/contacts/
vim admin.cfg
按照如下修改:
contact_name admin # Username 'admin'
password yourpass # Pass 'mypass'
保存和退出。
第三步 安装 Nagios 插件和 Shinken 软件包
在这一步中,我们将安装 Nagios 插件和一些 Perl 模块。然后从 shinken.io 安装其他的软件包来实现监视。
安装 Nagios 插件和安装 Perl 模块所需要的 cpanminus:
sudo apt-get install nagios-plugins* cpanminus
用 cpanm 命令来安装 Perl 模块。
cpanm Net::SNMP
cpanm Time::HiRes
cpanm DBI
perl -e 'use Net::SNMP;'#如果提示can't locate Net/SNMP.pm in @Inc,则进行下一步
sudo apt-get intall libnet-snmp-perl
现在我们创建一个 utils.pm 文件的链接到 shinken 的目录,并且为 Log_File_Health 创建了一个新的日志目录 。
chmod u+s /usr/lib/nagios/plugins/check_icmp
ln -s /usr/lib/nagio
1b2a3
s/plugins/utils.pm /var/lib/shinken/libexec/
mkdir -p /var/log/rhosts/
touch /var/log/rhosts/remote-hosts.log
然后,从 shinken.io 安装 shinken 软件包 ssh 和 linux-snmp 来监视 SSH 和 SNMP :
su - shinken
shinken install ssh
shinken install linux-snmp
第四步 添加一个 Linux 主机 host-one
我们将添加一个新的将被监控的 Linux 主机,IP 地址为 192.168.1.121,主机名为 host-one 的 Ubuntu 16.04。
连接到 host-one 主机:
ssh host1@192.168.1.121
从 Ubuntu 软件库中安装 snmp 和snmpd 软件包:
sudo apt-get install snmp snmpd
然后,用 vim 编辑 snmpd.conf 配置文件:
vim /etc/snmp/snmpd.conf
注释掉第 15 行并取消注释第 17 行(localhost也要这样):
#agentAddress udp:127.0.0.1:161
agentAddress udp:161,udp6:[::1]:161
注释掉第 51 和 53 行,然后加一行新的配置,如下:
#rocommunity mypass default -V systemonly
#rocommunity6 mypass default -V systemonly
rocommunity mypass
保存并退出。
现在用 systemctl 命令来启动 snmpd 服务:
systemctl start snmpd
在 shinken 服务器上通过在 hosts 文件夹下创建新的文件来定义一个新的主机:
cd /etc/shinken/hosts/
vim host-one.cfg
粘贴如下配置信息:
define host{
use generic-host,linux-snmp,ssh
contact_groups admins
host_name host-one
address 192.168.1.121
_SNMPCOMMUNITY mypass # SNMP Pass Config on snmpd.conf
}
保存并退出。
在 shinken 服务器上编辑 SNMP 配置文件。
vim /etc/shinken/resource.d/snmp.cfg
将 public 改为 mypass -必须和你在客户端 snmpd 配置文件中使用的密码相同:
$SNMPCOMMUNITYREAD$=mypass
保存并退出。
现在将服务端和客户端都重启:
reboot
现在 Linux 主机已经被成功地添加到 shinken 服务器中了。
第五步 访问 Shinken Webui2
在端口 7677 访问 Shinken webui2 (将 URL 中的 IP 替换成你自己的 IP 地址):
http://192.168.1.120:7767
用管理员用户和密码登录(你在 admin.cfg 文件中设置的)
第6步 Shinken 的常见问题
NTP 服务器相关的问题
当你得到如下的 NTP 错误提示
TimeSync - CRITICAL ( NTP CRITICAL: No response from the NTP server)
TimeSync - CRITICAL ( NTP CRITICAL: Offset unknown )
为了解决这个问题,在所有 Linux 主机上安装 ntp。
sudo apt-get install ntp ntpdate
编辑 ntp 配置文件:
vim /etc/ntp.conf
注释掉所有 pools 并替换为:
#pool 0.ubuntu.pool.ntp.org iburst
#pool 1.ubuntu.pool.ntp.org iburst
#pool 2.ubuntu.pool.ntp.org iburst
#pool 3.ubuntu.pool.ntp.org iburst
pool 0.id.pool.ntp.org
pool 1.asia.pool.ntp.org
pool 2.asia.pool.ntp.org
然后,在新的一行添加如下限制规则:
# Local users may interrogate the ntp server more closely.
restrict 127.0.0.1
restrict 192.168.1.120 #shinken server IP address
restrict ::1
NOTE: 192.168.1.120 is the Shinken server IP address.
保存并退出。
启动 ntp 并且检查 Shinken 面板。
ntpd
check_netint.pl Not Found 问题
从 github 仓库下载源代码到 shinken 的库目录下:
cd /var/lib/shinken/libexec/
wget https://raw.githubusercontent.com/Sysnove/shinken-plugins/master/check_netint.pl
chmod +x check_netint.pl
chown shinken:shinken check_netint.pl
网络占用的问题
这是错误信息:
ERROR : Unknown interface eth\d+
检查你的网络接口并且编辑 linux-snmp 模版。
在我的 Ununtu 服务器,网卡是 “enp0s8”,而不是 eth0,所以我遇到了这个错误。
vim 编辑 linux-snmp 模版:
vim /etc/shinken/packs/linux-snmp/templates.cfg
在第 24 行添加网络接口信息:
_NET_IFACES eth\d+|em\d+|enp0s8
保存并退出。
附上另一片文章:
Install shinken on monitoring server
Prereqs
yum install perl-App-cpanminus gcc mysql55 mysql-devel sqlite nagios-plugins*
pip install cherrypy
cpanm Net::SNMP
cpanm Time::HiRes
cpanm DBI
cpanm DBD::mysql
ln -s /usr/lib64/nagios/ /usr/lib/nagios
chmod u+s /usr/lib/nagios/plugins/check_icmp
mkdir /usr/local/lib64/perl
ln -s /usr/lib/nagios/plugins/utils.pm /usr/local/lib64/perl/utils.pm
This should get you going with everything you need to get started. Now lets start setting up shinken.
Setup
yum update
adduser shinken
pip install --upgrade pip
pip install shinken
su - shinken
shinken --init
shinken install webui auth-cfg-password sqlitedb linux-snmp mysql http https ssh smtp
Configure broker-master
vim /etc/shinken/brokers/broker-master.cfg
Update the line:
modules
To
modules webui
This will load the webui module on 7767 but I run it behind nginx with a proxypass so I can have a nice easy url to remember.
Setup host config
vim /etc/shinken/hosts/server.cfg
define host{
use                     linux-snmp,https,ssh,mysql
contact_groups		admins
host_name               domain.com # Domain you are monitoring
address                 1.2.3.4 # Put the server your monitoring here
}
Setup SNMP Community String
This one is easy, just modify /etc/shinken/resource.d/snmp.cfg with your SNMP community string.
Setup MySQL Credentials
Also, easy. Just modify /etc/shinken/resource.d/mysql.cfg with a user and password that we will set up on the monitored host in a short time.
Setting up the monitored host
yum install net-snmp net-snmp-libs net-snmp-utils
systemctl start snmpd.service
systemctl enable snmpd.service
Configure snmpd
vim /etc/snmp/snmpd.conf
com2sec AllUser         default         somepassword
group   AllGroup        v2c             AllUser
view    AllView         included        .1
access  AllGroup        ""      any     noauth  exact   AllView         none    none
Setup MySQL
mysql
GRANT usage ON *.* TO 'shinken'@'1.2.3.4' IDENTIFIED BY 'password';
flush privileges;
Starting it up
If all went well when we start up shinken everything will just work. If not, I recommend checking the logs at /var/logs/shinken/* as they can normally tell you what is missing or broken.service shinken start

相关文章推荐
- 在 Ubuntu 16.04 上安装和使用服务器监控报警系统 Shinken
- 在 Ubuntu 16.04 上安装和使用服务器监控报警系统 Shinken
- Linux系统使用--ubuntu16.04 firefox浏览器安装flash player插件
- Mysql安装,使用Navicat for Mysql连接装在虚拟机Ubuntu16.04上的mysql服务器
- Linux系统使用--ubuntu 16.04安装与下载KDE(kubuntu-desktop)以及相关并发意外状况的处理
- 在Ubuntu16.04系统为Apache服务器安装Let's Encrypt证书
- 支持全平台的服务器监控报警系统 Shinken
- Ubuntu使用dpkg安装软件依赖问题解决 ubuntu-tweak ubuntu 16.04 LTS 系统清理
- Ubuntu 16.04系统上NFS的安装与使用
- Ubuntu使用dpkg安装软件依赖问题解决 ubuntu-tweak ubuntu 16.04 LTS 系统清理
- Ubuntu 16.04系统上NFS的安装与使用
- Ubuntu使用dpkg安装软件依赖问题解决 ubuntu-tweak ubuntu 16.04 LTS 系统清理
- Ubuntu16.04安装部署监控系统Zabbix2.4
- 支持全平台的服务器监控报警系统 Shinken
- Ubuntu16.04系统安装+codeblocks安装+虚拟机配置:使用心得
- 支持全平台的服务器监控报警系统 Shinken
- ubuntu9.10 系统安装、配置、使用指南
- 使用Windows 系统性能监控来报警磁盘空间不足
- 用Ubuntu Linux系统架设cacti监控服务器
- 安装 Ubuntu 9.10 服务器版本系统全过程