MySQL 命令行工具之 mysqldump 深入研究
2017-03-15 11:13
204 查看
原文链接:
http://www.cnblogs.com/digdeep/p/4898622.html
http://www.cnblogs.com/digdeep/p/4906032.html
mysqldump 是MySQL的一个命令行工具,用于逻辑备份。可以将数据库和表的结构,以及表中的数据分别导出成:create database, create table, insert into的sql语句。当然也可以导出 存储过程,触发器,函数,调度事件(events)。不管是程序员,还是DBA都会经常使用的一个工具。
1. mysqldump --help
mysqldump 的选项很多,我们看一下他的帮助文档:

mysqldump
--help
总体看来,帮助文档分成了两个部分。前一个部分是对各种选项的说明,后一个部分是mysqldump的各种选项的默认值。
mysqldump拥有超多的选项,这样说明它很灵活,功能强大。为了好理解,可以将他的众多的选项和参数,根据他们的功能分为几个类别来介绍。
在此之前,我们还要搞清楚mysqldump的所有的默认选项的值,它们的含义。
2. mysqldump 默认选项:
mysqldump
这些默认值,有的是 false, 有的是 true,有的没有默认值。
我们要关注的是 默认为 true,也就是 mysqldump 默认给我打开的选择,它们的具体含义如下:
如果要关闭这些打开的默认选项时,需要明确指定:mysqldump -uxxx -p aazj --extended-insert=0 Users > Users.sql; =0 表示关闭选项。
上面这些默认选项,最好结合一个例子来理解:
mysqldump
2. mysqldump 登录服务器的相关选项
Default options are read from the following files in the given order:
/etc/my.cnf /etc/mysql/my.cnf /usr/local/mysql/etc/my.cnf ~/.my.cnf
The following groups are read: mysqldump client
The following options may be given as the first argument:
--no-defaults Don't read default options from any option file, except for login file.
--defaults-file=# Only read default options from the given file #.
--defaults-extra-file=# Read this file after the global files are read.
--defaults-group-suffix=# Also read groups with concat(group, suffix)
--login-path=# Read this path from the login file.
1)mysqldump 作为一个客户端工具,它会去上诉目录中寻找 my.cnf 文件,然后读取该文件中 [mysqldump] 和 [client] 下面的选项;
2)那些 defaults 相关的选项都是为了另外指定 配置文件和登录文件,极少使用;
-u, --user=name User for login if not current user.
-p, --password[=name] Password to use when connecting to server. If password is not given it's solicited on the tty.
-h, --host=name Connect to host.
-P, --port=# Port number to use for connection.
--protocol=name The protocol to use for connection (tcp, socket, pipe, memory).
--max-allowed-packet=# The maximum packet length to send to or receive from server.
--net-buffer-length=# The buffer size for TCP/IP and socket communication.
3)这几个选项指定 登录的用户名,密码,mysqld IP地址,端口,连接使用的协议等等。
一般常用的是 -h192.168.2.xx -uxxx -p ,如果mysqld默认端口不是3306,则需要使用 -Pxxx 指定端口.
--max-allowed-packet 我们一般配置在my.cnf中。--net-buffer-length 是为了优化网络连接的socket buffer.
使用示例: mysqldump -h192.168.1.20 -uxxx -p -P3057
3. mysqldump 选择备份内容的相关选项
我们可以选择备份所有数据库,某几个数据库,某一个数据库,某一个数据库中的某几个表,某一个数据库中的一个表;
可以选择是否备份 存储过程和函数,触发器,调度事件.
1)选择导出的数据库 和 表:
-A, --all-databases Dump all the databases. This will be same as --databases with all databases selected.
-B, --databases Dump several databases. Note the difference in usage; in this case no tables are given. All name arguments are
regarded as database names. 'USE db_name;' will be included in the output.
database [tables] 导出数据库 database 中的表结构 和 表中数据;
2)选择是否导出 建库,建表语句,是否导出 表中的数据:
-n, --no-create-db Suppress the CREATE DATABASE ... IF NOT EXISTS statement that normally is output for each dumped database if
--all-databases or --databases is given. (不导出建库语句: CREATE DATABASE,也就是不导库结构)
-t, --no-create-info Don't write table creation info. (不导出建表语句)
-d, --no-data No row information. (不导出数据,有时我们仅仅需要导出表结构,也就是建表语句就行了)
3)选择是否导出 存储过程和函数,触发器,调度事件:
-R, --routines Dump stored routines (functions and procedures). (导出存储过程和函数)
--triggers Dump triggers for each dumped table. (Defaults to on; use --skip-triggers to disable.) (导出触发器)
--skip-triggers 不导出触发器
-E, --events Dump events. 导出调度事件(根据备份的目的进行选择,如果是搭建slave,那么就不要导出events.)
4)指定不导出 某个库的某个表:
--ignore-table=name Do not dump the specified table. To specify more than one table to ignore, use the directive multiple times,
once for each table. Each table must be specified with both database and table names,
e.g., --ignore-table=database.table. (在导出数据库时,排除某个或者某几个表不导出)
5) 按照 where 条件导出:
-w, --where='where_condition' Dump only selected records. Quotes are mandatory.
6)使用示例:
Dumping structure and contents of MySQL databases and tables.
Usage: mysqldump [OPTIONS] database [tables]
OR mysqldump [OPTIONS] --databases [OPTIONS] DB1 [DB2 DB3...]
OR mysqldump [OPTIONS] --all-databases [OPTIONS]
1> 导出单表的结构和数据:mysqldump -uxxx -p db1 tb1 > tb1.sql; 导出数据库 db1 中的 表 tb1 的表结构 和 表中数据;
2> 导出多表的结构和数据:mysqldump -uxxx -p db1 tb1 tb2 > tb1_tb2.sql; 导出数据库 db1 中的 表 tb1、tb2 的表结构 和 表中数据;
3> 导出单表的结构:mysqldump -uxxx -p --no-data db1 tb1 > tb1.sql; 导出数据库 db1 中的 表 tb1 的表结构; 其实也可以使用: show create table tb1
4> 我们无法使用 mysqldump 到达 只导出某个或某几个表的数据,而不导出建表语句的目的。
但是我们可以使用 select * from table into outfile 'file.sql', 比如:select * from Users into outfile '/tmp/Users.sql'; 注意需要对目录的写权限。
5> 导出单个库中库结构、表结构、表数据:mysqldump -uxxx -p --databases db1 > db1.sql
6> 导出多个库中库结构、表结构、表数据:mysqldump -uxxx -p --databases db1 db2 > db1_db2.sql
7> 导出单个库中库结构、表结构、不要表数据:mysqldump -uxxx -p --no-data --databases db1 > db1.sql
8> 导出单个库中数据,不要库结构和表结构:mysqldump -uxxx -p --no-create-db --no-create-info --databases db1 > db1.sql
9> 导出多个库中库结构、表结构、不要表数据:mysqldump -uxxx -p --no-data --databases db1 db2 > db1_db2.sql
10> 导出数据库中所有 库 的库结构,表结构,数据:mysqldump -uxxx -p --all-databases > all.sql
11> 导出数据库中所有 库 的库结构,表结构,不要数据:mysqldump -uxxx -p --all-databases --no-data > all.sql
12> 导出单个库中库结构、表结构、表数据,排除某个表:mysqldump -uxxx -p --databases db1 --ignore-table=db1.test >
db1.sql
4. mysqldump 事务 和 数据一致性(锁) 的相关选项
在使用mysqldump逻辑备份时,事务和数据一致性的选项时至关重要的。
1) --single-transaction
Creates a consistent snapshot by dumping all tables in a single transaction. Works ONLY
for tables stored in storage engines which
support multiversioning (currently only InnoDB does); the dump is NOT guaranteed to be consistent for other storage engines.
While a --single-transaction dump is in process, to ensure a valid dump file (correct table contents and binary log position), no other
connection should use the following statements: ALTER TABLE, DROP TABLE, RENAME TABLE, TRUNCATE TABLE, as consistent
snapshot is not isolated from them. Option automatically turns off --lock-tables.
--single-transaction 可以得到一致性的导出结果。他是通过将导出行为放入一个事务中达到目的的。
它有一些要求:只能是 innodb 引擎;导出的过程中,不能有任何人执行 alter table, drop table, rename table, truncate table等DDL语句。
实际上DDL会被事务所阻塞,因为事务持有表的metadata lock 的共享锁,而DDL会申请metadata lock的互斥锁,所以阻塞了。
--single-transaction 会自动关闭 --lock-tables 选项;上面我们说到mysqldump默认会打开了--lock-tables,它会在导出过程中锁定所有表。
因为 --single-transaction 会自动关闭--lock-tables,所以单独使用--single-transaction是不会使用锁的。与 --master-data 合用才有锁。
2)--lock-tables
该选项默认打开的,上面已经说到了。它的作用是在导出过程中锁定所有表。--single-transaction 和 --lock-all-tables 都会将该选项关闭。
3)--lock-all-tables
Locks all tables across all databases. This is achieved by taking a global read lock for the duration of the whole dump.
Automatically turns --single-transaction and --lock-tables off. 启用该选项,会自动关闭 --single-transaction 和 --lock-tables.
上面三个选项中,只有 --lock-tables 默认是打开的;打开 --single-transaction 或者 打开 --lock-all-tables 都将关闭 --lock-tables. 而--lock-all-tables会自动关闭 --single-transaction 和 --lock-tables。所以三者是互斥的。我们应该一次只启用其中一个选项。
4)--flush-logs
Flush logs file in server before starting dump. Note that if you dump many databases at once (using the option --databases= or
--all-databases), the logs will be flushed for each database dumped. The exception is when using --lock-all-tables or
--master-data: in this case the logs will be flushed only once, corresponding to the moment all tables are locked. So if you want your
dump and the log flush to happen at the same exact moment you should use --lock-all-tables or --master-data with --flush-logs.
为了获得导出数据和刷新日志的一致性(同时发生),必须将 --flush-logs 选项和 --lock-all-tables 或者 --master-data 一起使用:
mysqldump --flush-logs --lock-all-tables; mysqldump --flush-logs --master-data=2 ;
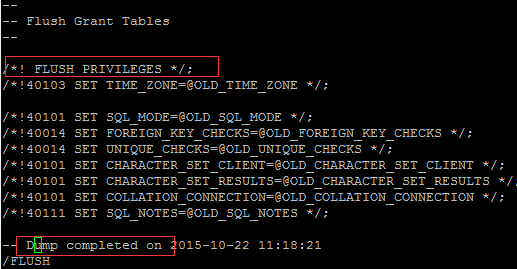
5)--flush-privileges
Emit a FLUSH PRIVILEGES statement after dumping the mysql database. This option should be used any time the dump contains the
mysql database and any other database that depends on the data in the mysql database for proper restore.
如何导出包含了mysql数据,就应该启用该选项。该选项会在导出的 mysql 数据库的后面加上 flush privileges 语句,因为在向mysql数据库inert了语句
之后,必须使用 flush privileges,不然权限不生效。下面是例子:
6) --master-data[=#]
This causes the binary log position and filename to be appended to the output. If equal to 1, will print it as a
CHANGE MASTER
command; if equal to 2, that command will be prefixed with a comment symbol. This option will turn --lock-all-tables on, unless
--single-transaction is specified too (in which case a global read lock is only taken a short time at the beginning of the dump;
don't
forget to read about --single-transaction below). In all cases, any action on logs will happen at the exact moment of the dump.
Option automatically turns --lock-tables off.
所以为了获得一致性的备份数据和在备份是同时刷新binary日志,我们应该如下结合使用这些选项(完美组合):
mysqldump -uxxx -pxxx --single-transaction --master-data=2 --flush-logs --routines --databases db1 > db1.sql;
(其中 --flush-logs 不是必须的; 搭建slave时,不要导出events,但是需要导出rountines.)
其中被 --master-data 打开的 --lock-all-tables 选项,又被 --single-transaction 关闭掉了。--flush-logs 借助于 --master-data 可以达到即使一次导出多个数据库时,其 flush 的二进制日志也是在同一个时间点的,不是每一个数据库flush一次的。并且这个时间点
和 --master-data 记录的 binary log position 和 binary log file是同一个时间点,这些都是利用了 --single-transaction 和 [b]--master-data 合用时短暂的使用一个全局的读锁来达到目的的。[/b]
5. mysqldump 复制 的相关选项
1) --master-data[=#]
This causes the binary log position and filename to be appended to the output. If equal to 1, will print it as a CHANGE MASTER
command; if equal to 2, that command will be prefixed with a comment symbol. This option will turn --lock-all-tables on, unless
--single-transaction is specified too (in which case a global read lock is only taken a short time at the beginning of the dump;
don't forget to read about --single-transaction below). In all cases, any action on logs will happen at the exact moment of the dump.
Option automatically turns --lock-tables off.
该选项,上面已经介绍了。--master-data=1 表示会导出 change master to 语句,--master-data=2 该语句放在注释中,默认是为 0 。
一般会和 --single-transaction一起使用,用于搭建master-slave环境。
下面是 --master-data=1 和 --master-data=2 的比较:
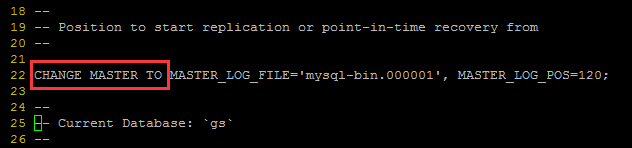

在导出文件的前30行左右可以看到 change master to 语句。可以使用 head -n 30 db1.sql 查看
2) --dump-slave[=#]
This causes the binary log position and filename of the master to be appended to the dumped data output. Setting the value to 1, will
printit as a CHANGE MASTER command in the dumped data output; if equal to 2, that command will be prefixed with a comment
symbol. This option will turn --lock-all-tables on, unless --single-transaction is specified too (in which case a global read lock is only
taken a short time at the beginning of the dump - don't forget to read about --single-transaction below). In all cases any action on
logs will happen at the exact moment of the dump.Option automatically turns --lock-tables off.
--dump-slave 和 --master-data 几乎一样。区别只是--dump-slave用于slave建立下一级的slave;而 --master-data用于master建立slave;
如果在 master 上使用 --dump-slave 会报错:mysqldump: Couldn't execute 'START SLAVE': The server is not configured as slave;
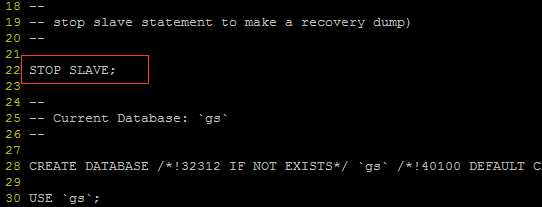
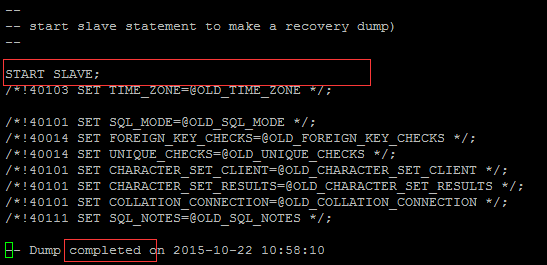
3) --apply-slave-statements
Adds 'STOP SLAVE' prior to 'CHANGE MASTER' and 'START SLAVE' to bottom of dump.
在 change master 导出 stop slave 语句, 在 change master 之后导出 start slave语句。其实是一个自动化的处理。和 --master-data=1 类似。
如下图所示:开头有 stop slave, 结尾有 start slave语句:
4)--include-master-host-port
Adds 'MASTER_HOST=<host>, MASTER_PORT=<port>' to 'CHANGE MASTER TO..' in dump produced with --dump-slave.
该选择要结合 --dump-slave=1/2 使用。会在导出中加入 host。
5)--include-master-host-port
Adds 'MASTER_HOST=<host>, MASTER_PORT=<port>' to 'CHANGE MASTER TO..' in dump produced with --dump-slave.
该选择要结合 --dump-slave=1/2 使用。会在导出中加入mysql的 port。
6)--delete-master-logs
Delete logs on master after backup. This automatically enables --master-data.
在备份之后,删除 master上的binary log。该选项会自动打开 --master-data 选项(等于2)。该选项一般不用。日志一般不能随便删除。
7)--set-gtid-purged[=name]
Add 'SET @@GLOBAL.GTID_PURGED' to the output. Possible values for this option are ON, OFF and AUTO. If ON is used and GTIDs
are not enabled on the server, an error is generated. If OFF is used, this option does nothing. If AUTO is used and GTIDs are enabled
on the server, 'SET @@GLOBAL.GTID_PURGED' is added to the output. If GTIDs are disabled, AUTO does nothing. If no value is
supplied then the default (AUTO) value will be considered.
该选项用于启用了GTID特性的环境。
6. mysqldump 字符集 的相关选项
1)--set-charset
Add 'SET NAMES default_character_set' to the output. (Defaults to on; use --skip-set-charset to disable.)
--set-charset=1/0 开启和关闭。也可以使用 --skip-set-charset 关闭。
该选项我们上面已经说到了。表示是否生成 /*!40101 SET NAMES utf8 */;
2)-N, --no-set-names
Same as --skip-set-charset. 关闭 --set-charset. 不生成 /*!40101 SET NAMES utf8 */; 语句。
3)--default-character-set=name
Set the default character set.
该选项上面也涉及到了。指定语句:/*!40101 SET NAMES utf8 */;中的字符集;可能你需要改成 --default-character-set=utf8mb4
7. mysqldump 控制是否生成 DDL 语句 的相关选项
--add-drop-database Add a DROP DATABASE before each create.
--add-drop-table Add a DROP TABLE before each create. (Defaults to on; use --skip-add-drop-table to disable.)
--add-drop-trigger Add a DROP TRIGGER before each create.
--no-create-db,-n
--no-create-info,-t
8. mysqldump 导出格式 的相关选项
1)--compatible=name
Change the dump to be compatible with a given mode. By default tables are dumped in a format optimized for MySQL.
Legal modes are: ansi, mysql323, mysql40, postgresql, oracle, mssql, db2, maxdb, no_key_options, no_table_options,
no_field_options. One can use several modes separated by commas. Note: Requires MySQL server version 4.1.0 or higher.
This option is ignored with earlier server versions.
导出sql语句的兼容格式。如果我们需要从MySQL导出,然后导入到其它数据库,则可使用该选项。--compatible=oracle/postgresql/mssql
2)-Q, --quote-names
Quote table and column names with backticks (`). (Defaults to on; use --skip-quote-names to disable.)
将表名和列名使用 ``包裹。以防他们是关键字时报错。
9. mysqldump 错误处理的相关选项
1)-f, --force Continue even if we get an SQL error.
2)--log-error=name Append warnings and errors to given file.
10. mysqldump 实现原理
为了探求 mysqldump 的备份是如何实现的,我们需要在 my.cnf 中的[mysqld] 参数段加入:
这样我们就可以通过观察 general.log 的输出,来了解 mysqldump 的备份是如何实现的。
1)--lock-tables 是如何实现的:
先执行:mysqldump -uroot -p --databases gs --lock-tables > gs_l.sql, 然后查看 general.log:
1> 第一步: SHOW CREATE DATABASE IF NOT EXISTS `gs`; 导出了建库语句;
2> 第二步:show tables; 获得数据库中所有表名,然后锁住:LOCK
TABLES `tb1` READ /*!32311 LOCAL */,`user` READ /*!32311 LOCAL
*/
使用的是 lock
table tb1 read local, tb2 read local, tb3 read local; 语句
3> 第三步:show create table 'tb1'; 导出了 tb1 的建表语句;
4> 第四步:show fields from `tb1`; SELECT /*!40001 SQL_NO_CACHE */ * FROM
`tb1`; 导出了表中的数据;
......
5> 最后导出了 trigger, 最后的最后 unlock tables; 结束。
可以看到 --lock-tables 在导出一个数据库时,会在整个导出过程 lock read local 所有的表。该锁不会阻止其它session读和插入。
2)--lock-all-tables 的实现:
先执行:mysqldump -uroot -p --databases gs --lock-all-tables > gs_l.sql, 在查看 general.log:
它的实现使用了 FLUSH TABLES; FLUSH TABLES WITH READ LOCK; 语句。在最后没有看到解锁语句。
它请求发起一个全局的读锁,会阻止对所有表的写入操作,以此来确保数据的一致性。备份完成后,该会话断开,会自动解锁。
3)--single-transaction 的实现:
先执行: mysqldump -uroot -p --databases gs --single-transaction > gs_l.sql,在查看 general.log:
基本过程是:
1> 先改变事务隔离级别:SET SESSION TRANSACTION ISOLATION LEVEL REPEATABLE READ
2> 开始事务:START TRANSACTION /*!40100 WITH CONSISTENT SNAPSHOT */
3> unlock tables;
4> 导出建库语句; SHOW CREATE DATABASE IF NOT EXISTS `gs`
5> 打开一个 savepoint: SAVEPOINT sp;
6> 导出 表 tb1 的结构和数据;
7> ROLLBACK TO SAVEPOINT sp; 回滚到savepoint;
对其它表重复该过程;
8> 最后 realease savepoint p; 释放savepoint;
整个过程,没有任何锁。RR隔离级别保证在事务中只读取本事务之前的一致性的数据。 rollback to savepoint sp; 保证了对数据库中的数据没有影响。
4)--master-data 的实现:
先执行:mysqldump -uroot -p --databases gs --master-data=1 > gs_l.sql,在查看general.log:
发现了 --lock-all-tables一样,就多了一句:show master status;
5)--single-transaction 和 --master-data 结合使用:
先执行:mysqldump -uroot -p --databases gs --master-data=1 > gs_l.sql,在查看general.log:
发现 --single-transaction 单独使用 与 --single-transaction 和 --master-data 结合使用 的区别如下图:

--single-transaction 和 --master-data 结合使用时,在导出开始,会短暂的持有一个全局的读锁,锁定时:刷新数据到磁盘、设置隔离级别为RR、开始事务、输出 binary log 的位置和文件名,然后解锁。这样就保证了:show master status 输出的 binary log 的位置和文件名 和 后面 导出的数据是同一个时间点的(同一个lsn),所以才能使用该备份
和 利用 change master to 构造一个 slave,成功的连接上 master.
可以看到这里使用了两次 flush tables:
FLUSH /*! 40101 LOCAL */ TABLES
FLUSH TABLES WITH READ LOCK
其原因是 第一次 flush 是不需要锁表的,第一次将所有数据刷新到磁盘之后,第二次 FLUSH TABLES WITH READ LOCK 时就会只有很少量的数据需要刷新到磁盘,所以第一次 flush 是为了尽量的 减少 第二次 fush 持有锁的时间。
11. mysqldump 与 锁
1)--lock-tables 会在整个导出过程 lock read local 所有的表。该锁不会阻止其它session读和插入,但是显然阻塞了update。
2)--lock-all-tables 它请求发起一个全局的读锁,会阻止对所有表的写入操作(insert,update,delete),以此来确保数据的一致性。备份完成后,该会话断开,会自动解锁。
3)--single-transaction 和 --master-data 结合使用时,也是在开始时,会短暂的请求一个全局的读锁,会阻止对所有表的写入操作。
4)--single-transaction 单独使用,不会有任何锁。但是测试表明: 它也需要对备份的表持有 metadata lock 的共享锁。
而我们知道,一般的事务,持有的是 行锁,还有 metadata lock 的共享锁。所以实际上,mysqldump不论你使用哪些选项,都不会阻塞事务的执行。
因为它们对锁的申请,没有任何排它性。而不像DDL一样需要持有 metadata lock 上的独占锁(排它锁)。当然DDL也会阻塞mysqldump。
mysqldump 一定需要表上的
metadata lock 共享锁。然后,要么需要所有备份表上的local读锁(lock table tb1 read local),要么需要的是所有备份表上的全局读锁(FLUSH
TABLES WITH READ LOCK;),要么短暂持有全局锁。
参考:http://imysql.cn/2008_10_24_deep_into_mysqldump_options
http://www.cnblogs.com/digdeep/p/4898622.html
http://www.cnblogs.com/digdeep/p/4906032.html
mysqldump 是MySQL的一个命令行工具,用于逻辑备份。可以将数据库和表的结构,以及表中的数据分别导出成:create database, create table, insert into的sql语句。当然也可以导出 存储过程,触发器,函数,调度事件(events)。不管是程序员,还是DBA都会经常使用的一个工具。
1. mysqldump --help
mysqldump 的选项很多,我们看一下他的帮助文档:
mysqldump
--help
总体看来,帮助文档分成了两个部分。前一个部分是对各种选项的说明,后一个部分是mysqldump的各种选项的默认值。
mysqldump拥有超多的选项,这样说明它很灵活,功能强大。为了好理解,可以将他的众多的选项和参数,根据他们的功能分为几个类别来介绍。
在此之前,我们还要搞清楚mysqldump的所有的默认选项的值,它们的含义。
2. mysqldump 默认选项:
mysqldump
这些默认值,有的是 false, 有的是 true,有的没有默认值。
我们要关注的是 默认为 true,也就是 mysqldump 默认给我打开的选择,它们的具体含义如下:
add-drop-table                    TRUE 表示在生成表结构语句之前,生成对应的 DROP TABLE IF EXISTS `table_name`; 语句
add-locks                         TRUE 表示在生成表中数据的 insert into `table_name` values(...) 之前生成 LOCK TABLES `tab` WRITE;语句
comments                          TRUE 表示生成备注,就是所有 -- 开头的说明,比如:-- Dumping data for  for table `tab`. 最好还是启用;
create-options                    TRUE 表示在生成表结构时会生成:ENGINE=InnoDB AUTO_INCREMENT=827 DEFAULT CHARSET=utf8; 附加建表选项
default-character-set             utf8 指定语句:/*!40101 SET NAMES utf8 */;中的字符集;可能你需要改成 --default-character-set=utf8mb4
disable-keys                      TRUE 表示生产 insert 语句之前,生成:/*!40000 ALTER TABLE `tbl` DISABLE KEYS */; 可以加快insert速度;
extended-insert                   TRUE 表示生产的insert是insert into `tbl` values(...),(...),数据行按照net-buffer-length分割合并成多个batch insert
lock-tables                       TRUE 表示在导出的过程中会锁定所有表;
max-allowed-packet                25165824 最大支持 24M 的数据包;
net-buffer-length                 1046528  1M大小的socket buffer
quick                             TRUE 表示在导出语句时,不缓存,直接输出到控制台或者文件中;
quote-names                       TRUE 表示对表名和列名使用 `` 符号包裹;防止它们是关键字时会出错;
set-charset                       TRUE default-character-set=utf8指定字符集,而--set-charset=1/0 表示是否生成/*!40101 SET NAMES utf8 */;
dump-date                         TRUE 表示是否在导出文件的末尾生成导出时间:-- Dump completed on 2015-09-15 11:15:10
secure-auth                       TRUE 表示登录判断密码时使用新的加密算法,拒绝就的加密算法
triggers                          TRUE 表示生成触发器脚本;
tz-utc                            TRUE 表示是否生成:/*!40103 SET @OLD_TIME_ZONE=@@TIME_ZONE */; /*!40103 SET TIME_ZONE='+00:00' */;
如果要关闭这些打开的默认选项时,需要明确指定:mysqldump -uxxx -p aazj --extended-insert=0 Users > Users.sql; =0 表示关闭选项。
上面这些默认选项,最好结合一个例子来理解:
mysqldump
2. mysqldump 登录服务器的相关选项
Default options are read from the following files in the given order:
/etc/my.cnf /etc/mysql/my.cnf /usr/local/mysql/etc/my.cnf ~/.my.cnf
The following groups are read: mysqldump client
The following options may be given as the first argument:
--no-defaults Don't read default options from any option file, except for login file.
--defaults-file=# Only read default options from the given file #.
--defaults-extra-file=# Read this file after the global files are read.
--defaults-group-suffix=# Also read groups with concat(group, suffix)
--login-path=# Read this path from the login file.
1)mysqldump 作为一个客户端工具,它会去上诉目录中寻找 my.cnf 文件,然后读取该文件中 [mysqldump] 和 [client] 下面的选项;
2)那些 defaults 相关的选项都是为了另外指定 配置文件和登录文件,极少使用;
-u, --user=name User for login if not current user.
-p, --password[=name] Password to use when connecting to server. If password is not given it's solicited on the tty.
-h, --host=name Connect to host.
-P, --port=# Port number to use for connection.
--protocol=name The protocol to use for connection (tcp, socket, pipe, memory).
--max-allowed-packet=# The maximum packet length to send to or receive from server.
--net-buffer-length=# The buffer size for TCP/IP and socket communication.
3)这几个选项指定 登录的用户名,密码,mysqld IP地址,端口,连接使用的协议等等。
一般常用的是 -h192.168.2.xx -uxxx -p ,如果mysqld默认端口不是3306,则需要使用 -Pxxx 指定端口.
--max-allowed-packet 我们一般配置在my.cnf中。--net-buffer-length 是为了优化网络连接的socket buffer.
使用示例: mysqldump -h192.168.1.20 -uxxx -p -P3057
3. mysqldump 选择备份内容的相关选项
我们可以选择备份所有数据库,某几个数据库,某一个数据库,某一个数据库中的某几个表,某一个数据库中的一个表;
可以选择是否备份 存储过程和函数,触发器,调度事件.
1)选择导出的数据库 和 表:
-A, --all-databases Dump all the databases. This will be same as --databases with all databases selected.
-B, --databases Dump several databases. Note the difference in usage; in this case no tables are given. All name arguments are
regarded as database names. 'USE db_name;' will be included in the output.
database [tables] 导出数据库 database 中的表结构 和 表中数据;
2)选择是否导出 建库,建表语句,是否导出 表中的数据:
-n, --no-create-db Suppress the CREATE DATABASE ... IF NOT EXISTS statement that normally is output for each dumped database if
--all-databases or --databases is given. (不导出建库语句: CREATE DATABASE,也就是不导库结构)
-t, --no-create-info Don't write table creation info. (不导出建表语句)
-d, --no-data No row information. (不导出数据,有时我们仅仅需要导出表结构,也就是建表语句就行了)
3)选择是否导出 存储过程和函数,触发器,调度事件:
-R, --routines Dump stored routines (functions and procedures). (导出存储过程和函数)
--triggers Dump triggers for each dumped table. (Defaults to on; use --skip-triggers to disable.) (导出触发器)
--skip-triggers 不导出触发器
-E, --events Dump events. 导出调度事件(根据备份的目的进行选择,如果是搭建slave,那么就不要导出events.)
4)指定不导出 某个库的某个表:
--ignore-table=name Do not dump the specified table. To specify more than one table to ignore, use the directive multiple times,
once for each table. Each table must be specified with both database and table names,
e.g., --ignore-table=database.table. (在导出数据库时,排除某个或者某几个表不导出)
5) 按照 where 条件导出:
-w, --where='where_condition' Dump only selected records. Quotes are mandatory.
6)使用示例:
Dumping structure and contents of MySQL databases and tables.
Usage: mysqldump [OPTIONS] database [tables]
OR mysqldump [OPTIONS] --databases [OPTIONS] DB1 [DB2 DB3...]
OR mysqldump [OPTIONS] --all-databases [OPTIONS]
1> 导出单表的结构和数据:mysqldump -uxxx -p db1 tb1 > tb1.sql; 导出数据库 db1 中的 表 tb1 的表结构 和 表中数据;
2> 导出多表的结构和数据:mysqldump -uxxx -p db1 tb1 tb2 > tb1_tb2.sql; 导出数据库 db1 中的 表 tb1、tb2 的表结构 和 表中数据;
3> 导出单表的结构:mysqldump -uxxx -p --no-data db1 tb1 > tb1.sql; 导出数据库 db1 中的 表 tb1 的表结构; 其实也可以使用: show create table tb1
4> 我们无法使用 mysqldump 到达 只导出某个或某几个表的数据,而不导出建表语句的目的。
但是我们可以使用 select * from table into outfile 'file.sql', 比如:select * from Users into outfile '/tmp/Users.sql'; 注意需要对目录的写权限。
5> 导出单个库中库结构、表结构、表数据:mysqldump -uxxx -p --databases db1 > db1.sql
6> 导出多个库中库结构、表结构、表数据:mysqldump -uxxx -p --databases db1 db2 > db1_db2.sql
7> 导出单个库中库结构、表结构、不要表数据:mysqldump -uxxx -p --no-data --databases db1 > db1.sql
8> 导出单个库中数据,不要库结构和表结构:mysqldump -uxxx -p --no-create-db --no-create-info --databases db1 > db1.sql
9> 导出多个库中库结构、表结构、不要表数据:mysqldump -uxxx -p --no-data --databases db1 db2 > db1_db2.sql
10> 导出数据库中所有 库 的库结构,表结构,数据:mysqldump -uxxx -p --all-databases > all.sql
11> 导出数据库中所有 库 的库结构,表结构,不要数据:mysqldump -uxxx -p --all-databases --no-data > all.sql
12> 导出单个库中库结构、表结构、表数据,排除某个表:mysqldump -uxxx -p --databases db1 --ignore-table=db1.test >
db1.sql
4. mysqldump 事务 和 数据一致性(锁) 的相关选项
在使用mysqldump逻辑备份时,事务和数据一致性的选项时至关重要的。
1) --single-transaction
Creates a consistent snapshot by dumping all tables in a single transaction. Works ONLY
for tables stored in storage engines which
support multiversioning (currently only InnoDB does); the dump is NOT guaranteed to be consistent for other storage engines.
While a --single-transaction dump is in process, to ensure a valid dump file (correct table contents and binary log position), no other
connection should use the following statements: ALTER TABLE, DROP TABLE, RENAME TABLE, TRUNCATE TABLE, as consistent
snapshot is not isolated from them. Option automatically turns off --lock-tables.
--single-transaction 可以得到一致性的导出结果。他是通过将导出行为放入一个事务中达到目的的。
它有一些要求:只能是 innodb 引擎;导出的过程中,不能有任何人执行 alter table, drop table, rename table, truncate table等DDL语句。
实际上DDL会被事务所阻塞,因为事务持有表的metadata lock 的共享锁,而DDL会申请metadata lock的互斥锁,所以阻塞了。
--single-transaction 会自动关闭 --lock-tables 选项;上面我们说到mysqldump默认会打开了--lock-tables,它会在导出过程中锁定所有表。
因为 --single-transaction 会自动关闭--lock-tables,所以单独使用--single-transaction是不会使用锁的。与 --master-data 合用才有锁。
2)--lock-tables
该选项默认打开的,上面已经说到了。它的作用是在导出过程中锁定所有表。--single-transaction 和 --lock-all-tables 都会将该选项关闭。
3)--lock-all-tables
Locks all tables across all databases. This is achieved by taking a global read lock for the duration of the whole dump.
Automatically turns --single-transaction and --lock-tables off. 启用该选项,会自动关闭 --single-transaction 和 --lock-tables.
上面三个选项中,只有 --lock-tables 默认是打开的;打开 --single-transaction 或者 打开 --lock-all-tables 都将关闭 --lock-tables. 而--lock-all-tables会自动关闭 --single-transaction 和 --lock-tables。所以三者是互斥的。我们应该一次只启用其中一个选项。
4)--flush-logs
Flush logs file in server before starting dump. Note that if you dump many databases at once (using the option --databases= or
--all-databases), the logs will be flushed for each database dumped. The exception is when using --lock-all-tables or
--master-data: in this case the logs will be flushed only once, corresponding to the moment all tables are locked. So if you want your
dump and the log flush to happen at the same exact moment you should use --lock-all-tables or --master-data with --flush-logs.
为了获得导出数据和刷新日志的一致性(同时发生),必须将 --flush-logs 选项和 --lock-all-tables 或者 --master-data 一起使用:
mysqldump --flush-logs --lock-all-tables; mysqldump --flush-logs --master-data=2 ;
5)--flush-privileges
Emit a FLUSH PRIVILEGES statement after dumping the mysql database. This option should be used any time the dump contains the
mysql database and any other database that depends on the data in the mysql database for proper restore.
如何导出包含了mysql数据,就应该启用该选项。该选项会在导出的 mysql 数据库的后面加上 flush privileges 语句,因为在向mysql数据库inert了语句
之后,必须使用 flush privileges,不然权限不生效。下面是例子:
6) --master-data[=#]
This causes the binary log position and filename to be appended to the output. If equal to 1, will print it as a
CHANGE MASTER
command; if equal to 2, that command will be prefixed with a comment symbol. This option will turn --lock-all-tables on, unless
--single-transaction is specified too (in which case a global read lock is only taken a short time at the beginning of the dump;
don't
forget to read about --single-transaction below). In all cases, any action on logs will happen at the exact moment of the dump.
Option automatically turns --lock-tables off.
所以为了获得一致性的备份数据和在备份是同时刷新binary日志,我们应该如下结合使用这些选项(完美组合):
mysqldump -uxxx -pxxx --single-transaction --master-data=2 --flush-logs --routines --databases db1 > db1.sql;
(其中 --flush-logs 不是必须的; 搭建slave时,不要导出events,但是需要导出rountines.)
其中被 --master-data 打开的 --lock-all-tables 选项,又被 --single-transaction 关闭掉了。--flush-logs 借助于 --master-data 可以达到即使一次导出多个数据库时,其 flush 的二进制日志也是在同一个时间点的,不是每一个数据库flush一次的。并且这个时间点
和 --master-data 记录的 binary log position 和 binary log file是同一个时间点,这些都是利用了 --single-transaction 和 [b]--master-data 合用时短暂的使用一个全局的读锁来达到目的的。[/b]
5. mysqldump 复制 的相关选项
1) --master-data[=#]
This causes the binary log position and filename to be appended to the output. If equal to 1, will print it as a CHANGE MASTER
command; if equal to 2, that command will be prefixed with a comment symbol. This option will turn --lock-all-tables on, unless
--single-transaction is specified too (in which case a global read lock is only taken a short time at the beginning of the dump;
don't forget to read about --single-transaction below). In all cases, any action on logs will happen at the exact moment of the dump.
Option automatically turns --lock-tables off.
该选项,上面已经介绍了。--master-data=1 表示会导出 change master to 语句,--master-data=2 该语句放在注释中,默认是为 0 。
一般会和 --single-transaction一起使用,用于搭建master-slave环境。
下面是 --master-data=1 和 --master-data=2 的比较:
在导出文件的前30行左右可以看到 change master to 语句。可以使用 head -n 30 db1.sql 查看
2) --dump-slave[=#]
This causes the binary log position and filename of the master to be appended to the dumped data output. Setting the value to 1, will
printit as a CHANGE MASTER command in the dumped data output; if equal to 2, that command will be prefixed with a comment
symbol. This option will turn --lock-all-tables on, unless --single-transaction is specified too (in which case a global read lock is only
taken a short time at the beginning of the dump - don't forget to read about --single-transaction below). In all cases any action on
logs will happen at the exact moment of the dump.Option automatically turns --lock-tables off.
--dump-slave 和 --master-data 几乎一样。区别只是--dump-slave用于slave建立下一级的slave;而 --master-data用于master建立slave;
如果在 master 上使用 --dump-slave 会报错:mysqldump: Couldn't execute 'START SLAVE': The server is not configured as slave;
3) --apply-slave-statements
Adds 'STOP SLAVE' prior to 'CHANGE MASTER' and 'START SLAVE' to bottom of dump.
在 change master 导出 stop slave 语句, 在 change master 之后导出 start slave语句。其实是一个自动化的处理。和 --master-data=1 类似。
如下图所示:开头有 stop slave, 结尾有 start slave语句:
4)--include-master-host-port
Adds 'MASTER_HOST=<host>, MASTER_PORT=<port>' to 'CHANGE MASTER TO..' in dump produced with --dump-slave.
该选择要结合 --dump-slave=1/2 使用。会在导出中加入 host。
5)--include-master-host-port
Adds 'MASTER_HOST=<host>, MASTER_PORT=<port>' to 'CHANGE MASTER TO..' in dump produced with --dump-slave.
该选择要结合 --dump-slave=1/2 使用。会在导出中加入mysql的 port。
6)--delete-master-logs
Delete logs on master after backup. This automatically enables --master-data.
在备份之后,删除 master上的binary log。该选项会自动打开 --master-data 选项(等于2)。该选项一般不用。日志一般不能随便删除。
7)--set-gtid-purged[=name]
Add 'SET @@GLOBAL.GTID_PURGED' to the output. Possible values for this option are ON, OFF and AUTO. If ON is used and GTIDs
are not enabled on the server, an error is generated. If OFF is used, this option does nothing. If AUTO is used and GTIDs are enabled
on the server, 'SET @@GLOBAL.GTID_PURGED' is added to the output. If GTIDs are disabled, AUTO does nothing. If no value is
supplied then the default (AUTO) value will be considered.
该选项用于启用了GTID特性的环境。
6. mysqldump 字符集 的相关选项
1)--set-charset
Add 'SET NAMES default_character_set' to the output. (Defaults to on; use --skip-set-charset to disable.)
--set-charset=1/0 开启和关闭。也可以使用 --skip-set-charset 关闭。
该选项我们上面已经说到了。表示是否生成 /*!40101 SET NAMES utf8 */;
2)-N, --no-set-names
Same as --skip-set-charset. 关闭 --set-charset. 不生成 /*!40101 SET NAMES utf8 */; 语句。
3)--default-character-set=name
Set the default character set.
该选项上面也涉及到了。指定语句:/*!40101 SET NAMES utf8 */;中的字符集;可能你需要改成 --default-character-set=utf8mb4
7. mysqldump 控制是否生成 DDL 语句 的相关选项
--add-drop-database Add a DROP DATABASE before each create.
--add-drop-table Add a DROP TABLE before each create. (Defaults to on; use --skip-add-drop-table to disable.)
--add-drop-trigger Add a DROP TRIGGER before each create.
--no-create-db,-n
--no-create-info,-t
8. mysqldump 导出格式 的相关选项
1)--compatible=name
Change the dump to be compatible with a given mode. By default tables are dumped in a format optimized for MySQL.
Legal modes are: ansi, mysql323, mysql40, postgresql, oracle, mssql, db2, maxdb, no_key_options, no_table_options,
no_field_options. One can use several modes separated by commas. Note: Requires MySQL server version 4.1.0 or higher.
This option is ignored with earlier server versions.
导出sql语句的兼容格式。如果我们需要从MySQL导出,然后导入到其它数据库,则可使用该选项。--compatible=oracle/postgresql/mssql
2)-Q, --quote-names
Quote table and column names with backticks (`). (Defaults to on; use --skip-quote-names to disable.)
将表名和列名使用 ``包裹。以防他们是关键字时报错。
9. mysqldump 错误处理的相关选项
1)-f, --force Continue even if we get an SQL error.
2)--log-error=name Append warnings and errors to given file.
10. mysqldump 实现原理
为了探求 mysqldump 的备份是如何实现的,我们需要在 my.cnf 中的[mysqld] 参数段加入:
general_log=on
general_log_file=general.log
这样我们就可以通过观察 general.log 的输出,来了解 mysqldump 的备份是如何实现的。
1)--lock-tables 是如何实现的:
先执行:mysqldump -uroot -p --databases gs --lock-tables > gs_l.sql, 然后查看 general.log:
3 Init DB   gs
3 Query     SHOW CREATE DATABASE IF NOT EXISTS `gs`
3 Query     show tables
3 Query     LOCK TABLES `tb1` READ /*!32311 LOCAL */,`user` READ /*!32311 LOCAL */
3 Query     show table status like 'tb1'
3 Query     SET SQL_QUOTE_SHOW_CREATE=1
3 Query     SET SESSION character_set_results = 'binary'
3 Query     show create table `tb1`
3 Query     SET SESSION character_set_results = 'utf8'
3 Query     show fields from `tb1`
3 Query     SELECT /*!40001 SQL_NO_CACHE */ * FROM `tb1`
3 Query     SET SESSION character_set_results = 'binary'
3 Query     use `gs`
3 Query     select @@collation_database
3 Query     SHOW TRIGGERS LIKE 'tb1'
3 Query     SET SESSION character_set_results = 'utf8'
3 Query     show table status like 'user'
3 Query     SET SQL_QUOTE_SHOW_CREATE=1
3 Query     SET SESSION character_set_results = 'binary'
3 Query     show create table `user`
3 Query     SET SESSION character_set_results = 'utf8'
3 Query     show fields from `user`
3 Query     SELECT /*!40001 SQL_NO_CACHE */ * FROM `user`
3 Query     SET SESSION character_set_results = 'binary'
3 Query     use `gs`
3 Query     select @@collation_database
3 Query     SHOW TRIGGERS LIKE 'user'
3 Query     SET SESSION character_set_results = 'utf8'
3 Query     UNLOCK TABLES
3 Quit
1> 第一步: SHOW CREATE DATABASE IF NOT EXISTS `gs`; 导出了建库语句;
2> 第二步:show tables; 获得数据库中所有表名,然后锁住:LOCK
TABLES `tb1` READ /*!32311 LOCAL */,`user` READ /*!32311 LOCAL
*/
使用的是 lock
table tb1 read local, tb2 read local, tb3 read local; 语句
3> 第三步:show create table 'tb1'; 导出了 tb1 的建表语句;
4> 第四步:show fields from `tb1`; SELECT /*!40001 SQL_NO_CACHE */ * FROM
`tb1`; 导出了表中的数据;
......
5> 最后导出了 trigger, 最后的最后 unlock tables; 结束。
可以看到 --lock-tables 在导出一个数据库时,会在整个导出过程 lock read local 所有的表。该锁不会阻止其它session读和插入。
2)--lock-all-tables 的实现:
先执行:mysqldump -uroot -p --databases gs --lock-all-tables > gs_l.sql, 在查看 general.log:
151022 14:34:13     4 Connect   root@localhost on
4 Query     /*!40100 SET @@SQL_MODE='' */
4 Query     /*!40103 SET TIME_ZONE='+00:00' */
4 Query     FLUSH TABLES
4 Query     FLUSH TABLES WITH READ LOCK
4 Query     SHOW VARIABLES LIKE 'gtid\_mode'
... ...
4 Init DB   gs
4 Query     SHOW CREATE DATABASE IF NOT EXISTS `gs`
4 Query     show tables
... ...4 Query     SELECT /*!40001 SQL_NO_CACHE */ * FROM `tb1`
4 Query     SET SESSION character_set_results = 'binary'
4 Query     use `gs`
4 Query     select @@collation_database
... ...
4 Query     show fields from `user`
4 Query     SELECT /*!40001 SQL_NO_CACHE */ * FROM `user`
4 Query     SET SESSION character_set_results = 'binary'
4 Query     use `gs`
4 Query     select @@collation_database
4 Query     SHOW TRIGGERS LIKE 'user'
4 Query     SET SESSION character_set_results = 'utf8'
4 Quit
它的实现使用了 FLUSH TABLES; FLUSH TABLES WITH READ LOCK; 语句。在最后没有看到解锁语句。
它请求发起一个全局的读锁,会阻止对所有表的写入操作,以此来确保数据的一致性。备份完成后,该会话断开,会自动解锁。
3)--single-transaction 的实现:
先执行: mysqldump -uroot -p --databases gs --single-transaction > gs_l.sql,在查看 general.log:
151022 14:41:34     5 Connect   root@localhost on
5 Query     /*!40100 SET @@SQL_MODE='' */
5 Query     /*!40103 SET TIME_ZONE='+00:00' */
5 Query     SET SESSION TRANSACTION ISOLATION LEVEL REPEATABLE READ
5 Query     START TRANSACTION /*!40100 WITH CONSISTENT SNAPSHOT */
5 Query     SHOW VARIABLES LIKE 'gtid\_mode'
5 Query     UNLOCK TABLES
... ...
5 Init DB   gs
5 Query     SHOW CREATE DATABASE IF NOT EXISTS `gs`
5 Query     SAVEPOINT sp
......
5 Query     show create table `tb1`
......5 Query     SELECT /*!40001 SQL_NO_CACHE */ * FROM `tb1`
......
5 Query     ROLLBACK TO SAVEPOINT sp
......
5 Query     show create table `user`
.....5 Query     SELECT /*!40001 SQL_NO_CACHE */ * FROM `user`
......
5 Query     ROLLBACK TO SAVEPOINT sp
5 Query     RELEASE SAVEPOINT sp
5 Quit
基本过程是:
1> 先改变事务隔离级别:SET SESSION TRANSACTION ISOLATION LEVEL REPEATABLE READ
2> 开始事务:START TRANSACTION /*!40100 WITH CONSISTENT SNAPSHOT */
3> unlock tables;
4> 导出建库语句; SHOW CREATE DATABASE IF NOT EXISTS `gs`
5> 打开一个 savepoint: SAVEPOINT sp;
6> 导出 表 tb1 的结构和数据;
7> ROLLBACK TO SAVEPOINT sp; 回滚到savepoint;
对其它表重复该过程;
8> 最后 realease savepoint p; 释放savepoint;
整个过程,没有任何锁。RR隔离级别保证在事务中只读取本事务之前的一致性的数据。 rollback to savepoint sp; 保证了对数据库中的数据没有影响。
4)--master-data 的实现:
先执行:mysqldump -uroot -p --databases gs --master-data=1 > gs_l.sql,在查看general.log:
151022 14:57:45     6 Connect   root@localhost on
6 Query     /*!40100 SET @@SQL_MODE='' */
6 Query     /*!40103 SET TIME_ZONE='+00:00' */
6 Query     FLUSH /*!40101 LOCAL */ TABLES
6 Query     FLUSH TABLES WITH READ LOCK
6 Query     SHOW VARIABLES LIKE 'gtid\_mode'
6 Query     SHOW MASTER STATUS
发现了 --lock-all-tables一样,就多了一句:show master status;
5)--single-transaction 和 --master-data 结合使用:
先执行:mysqldump -uroot -p --databases gs --master-data=1 > gs_l.sql,在查看general.log:
151022 15:00:56     7 Connect   root@localhost on
7 Query     /*!40100 SET @@SQL_MODE='' */
7 Query     /*!40103 SET TIME_ZONE='+00:00' */
7 Query     FLUSH /*!40101 LOCAL */ TABLES
7 Query     FLUSH TABLES WITH READ LOCK
7 Query     SET SESSION TRANSACTION ISOLATION LEVEL REPEATABLE READ
7 Query     START TRANSACTION /*!40100 WITH CONSISTENT SNAPSHOT */
7 Query     SHOW VARIABLES LIKE 'gtid\_mode'
7 Query     SHOW MASTER STATUS
7 Query     UNLOCK TABLES
......
7 Init DB   gs
7 Query     SHOW CREATE DATABASE IF NOT EXISTS `gs`
7 Query     SAVEPOINT sp

7 Query     show create table `tb1`
7 Query     SELECT /*!40001 SQL_NO_CACHE */ * FROM `tb1`

7 Query     ROLLBACK TO SAVEPOINT sp

7 Query     show create table `user`
7 Query     SELECT /*!40001 SQL_NO_CACHE */ * FROM `user`

7 Query     ROLLBACK TO SAVEPOINT sp
7 Query     RELEASE SAVEPOINT sp
7 Quit
发现 --single-transaction 单独使用 与 --single-transaction 和 --master-data 结合使用 的区别如下图:
--single-transaction 和 --master-data 结合使用时,在导出开始,会短暂的持有一个全局的读锁,锁定时:刷新数据到磁盘、设置隔离级别为RR、开始事务、输出 binary log 的位置和文件名,然后解锁。这样就保证了:show master status 输出的 binary log 的位置和文件名 和 后面 导出的数据是同一个时间点的(同一个lsn),所以才能使用该备份
和 利用 change master to 构造一个 slave,成功的连接上 master.
可以看到这里使用了两次 flush tables:
FLUSH /*! 40101 LOCAL */ TABLES
FLUSH TABLES WITH READ LOCK
其原因是 第一次 flush 是不需要锁表的,第一次将所有数据刷新到磁盘之后,第二次 FLUSH TABLES WITH READ LOCK 时就会只有很少量的数据需要刷新到磁盘,所以第一次 flush 是为了尽量的 减少 第二次 fush 持有锁的时间。
11. mysqldump 与 锁
1)--lock-tables 会在整个导出过程 lock read local 所有的表。该锁不会阻止其它session读和插入,但是显然阻塞了update。
2)--lock-all-tables 它请求发起一个全局的读锁,会阻止对所有表的写入操作(insert,update,delete),以此来确保数据的一致性。备份完成后,该会话断开,会自动解锁。
3)--single-transaction 和 --master-data 结合使用时,也是在开始时,会短暂的请求一个全局的读锁,会阻止对所有表的写入操作。
4)--single-transaction 单独使用,不会有任何锁。但是测试表明: 它也需要对备份的表持有 metadata lock 的共享锁。
而我们知道,一般的事务,持有的是 行锁,还有 metadata lock 的共享锁。所以实际上,mysqldump不论你使用哪些选项,都不会阻塞事务的执行。
因为它们对锁的申请,没有任何排它性。而不像DDL一样需要持有 metadata lock 上的独占锁(排它锁)。当然DDL也会阻塞mysqldump。
mysqldump 一定需要表上的
metadata lock 共享锁。然后,要么需要所有备份表上的local读锁(lock table tb1 read local),要么需要的是所有备份表上的全局读锁(FLUSH
TABLES WITH READ LOCK;),要么短暂持有全局锁。
参考:http://imysql.cn/2008_10_24_deep_into_mysqldump_options

相关文章推荐
- MySQL 命令行工具之 mysqldump 深入研究
- MySQLDUMPMySQL工具深入研究
- MySQL和phpMyAdmin工具與UTF8中文亂碼的終極研究
- MySQL数据的导出和导入工具:mysqldump
- MySQL 数据库命令行工具
- mysql工具之一:mysqldump的基本用法
- 深入研究Mysql字符集设置以及排序方式
- MySQL数据的导出和导入工具:mysqldump
- MySQL数据的导出和导入工具:mysqldump(备份数据库的命令)
- [MySQL] MySQL备份工具之mysqldump
- MySQL的mysqldump工具的基本用法
- MySQL 数据库命令行工具
- MySQL的mysqldump工具导入导出数据库
- MySQL数据的导出和导入工具:mysqldump(备份数据库的命令)
- MySQL数据的导出和导入工具:mysqldump
- MySQL数据的导出和导入工具:mysqldump
- MySQL数据的导出和导入工具:mysqldump
- MySQL数据的导出和导入工具:mysqldump ,source
- MySQL数据的导出和导入工具:mysqldump(备份数据库的命令)
- MySQL数据的导出和导入工具:mysqldump(备份数据库的命令)