Asp.Net Core Authentication Middleware And Generate Token
2017-03-12 01:46
671 查看

写在前面
本文版权归博客园和作者吴双本人共同所有 转载和爬虫请注明原文地址 cnblogs.com/tdwsAfter using OWIN for months for basic OAuth authentication, it’s apparent that Microsoft is abandoning OWIN . This isn’t necessarily a bad thing. .NET Core is built on a similar structure as that which was implemented in OWIN. Essentially, we have a familiar middleware pipeline.
这句话出自老外的博客,在使用Owin的OAuth身份认证几个月后,发现微软在逐渐放弃OWIN,这未必是一件坏事情,.NET Core在一个和OWIN所实现的相似结构之上。我们有一个和OWIN极为相似的中间件管道。
想必了解或者使用过OWIN的朋友们,在做.NET Core应用的时候都会有如上描述的这种感觉。就我个人的理解,微软在早几年推出OWIN的时候,就希望将管道留给用户,就以Startup.cs为管道配置和应用入口,OWIN脱离了Asp.Net管道事件,我们可以将任何中间件在管道中随意插拔。在OWIN中为我们提供了完备的认证流程,和一套完整的规范。比如 Microsoft.Owin.Security.OAuth等,在使用OWIN时,我们可以使用OWIN的默认实现,也可以实现其接口,自定义我们自己的实现方式。有关Microsoft OWIN的内容,不是本篇分享的主题,推荐腾飞的 MVC5 - ASP.NET Identity登录原理 - Claims-based认证和OWIN 和蟋蟀哥的 ASP.NET WebApi OWIN 实现 OAuth 2.0 。
Token
本篇分享主要关注在.NET Core的认证机制。无论我们是使用WebApi还是MvcWeb App,了解微软的认证机制总是有好处的。认证是应用API服务器识别用户身份的过程,token是更现代的认证方式,简化权限管理,降低服务器负载。在认证过程中,最重要的就是拿到token, token包含或者应该包含什么信息呢?1.这个人是谁?
2.这个人可以用此token访问什么样的内容?(scope)
3.token的过期时间 (expire)
4.谁发行的token。
5.其他任何你希望加入的声明(Claims)
那我们为什么要使用token呢?使用session或者用redis来实现stateServer不好吗?
1.token是低(无)状态的,Statelessness
2.token可以与移动端应用紧密结合
3.支持多平台服务器和分布式微服务
拿到token后如何带入HTTP请求传给后台?
答案是两种方式,Cookies和Authorization Header。那么什么时候放到Cookies中,什么时候又放到Authentication中呢?第一,如果是在Web应用,则放到Cookies当中,并且应该是HttpOnly的,js不能直接对其进行操作,安全性会比将其存在Web Stroage中好一些,因为在Web Storage当中的内容,可以很容的被潜在的XSS脚本攻击并获取。在HttpOnly的cookies当中会相对安全一些,不过也有潜在的CSRF跨站伪造请求的危险,不过这种hack的手段成功率是很低的,有兴趣的朋友可以自行看一下CSRF原理。
第二,如果是手机移动端应用的话,那一定是存储在App本地,并由Authorization Header带到后台并得到身份认证。
WebApp Cookies Authentication
上一段前两周写的最原始的小Demo吧,没有数据库访问等,可根据demo自行改变 ,现在的新代码已经加入了很多业务在其中startup.cs代码
using Microsoft.AspNetCore.Authentication.Cookies;
using Microsoft.AspNetCore.Builder;
using Microsoft.AspNetCore.Hosting;
using Microsoft.AspNetCore.Http;
using Microsoft.AspNetCore.Http.Authentication;
using Microsoft.Extensions.Configuration;
using Microsoft.Extensions.DependencyInjection;
using Microsoft.Extensions.Logging;
using System.Collections.Generic;
using System.Security.Claims;
using Wings.AuthenticationApp.Middleware;
namespace Wings.AuthenticationApp
{
public class Startup
{
public Startup(IHostingEnvironment env)
{
var builder = new ConfigurationBuilder()
.SetBasePath(env.ContentRootPath)
.AddJsonFile("appsettings.json", optional: false, reloadOnChange: true)
.AddJsonFile($"appsettings.{env.EnvironmentName}.json", optional: true)
.AddEnvironmentVariables();
Configuration = builder.Build();
}
public IConfigurationRoot Configuration { get; }
// This method gets called by the runtime. Use this method to add services to the container.
public void ConfigureServices(IServiceCollection services)
{
// Add framework services.
services.AddMvc();
}
// This method gets called by the runtime. Use this method to configure the HTTP request pipeline.
public void Configure(IApplicationBuilder app, IHostingEnvironment env, ILoggerFactory loggerFactory)
{
loggerFactory.AddConsole(Configuration.GetSection("Logging"));
loggerFactory.AddDebug();
app.UseCookieAuthentication(CookieAuthMiddleware.GetOptions());
app.UseOwin();
app.UseCors(a => { a.AllowAnyOrigin(); });
app.UseMvc();
// Listen for login and logout requests
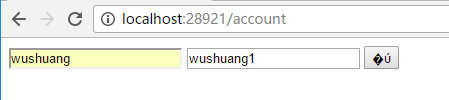
app.Map("/login", builder =>
{
builder.Run(async context =>
{
var name = context.Request.Form["name"];
var pwd = context.Request.Form["pwd"];
if (name == "wushuang" && pwd == "wushuang")
{
var claims = new List<Claim>() { new Claim("name", name), new Claim("role", "admin") };
var identity = new ClaimsIdentity(claims, "password");
var principal = new ClaimsPrincipal(identity);
await context.Authentication.SignInAsync(CookieAuthenticationDefaults.AuthenticationScheme, principal);
context.Response.Redirect("http://www.baidu.com");
}
else
{
await context.Authentication.SignOutAsync(CookieAuthenticationDefaults.AuthenticationScheme);
context.Response.Redirect("http://www.google.com");
}
});
});
//app.Map("/logout", builder =>
//{
// builder.Run(async context =>
// {
// // Sign the user out / clear the auth cookie
// await context.Authentication.SignOutAsync(CookieAuthenticationDefaults.AuthenticationScheme);
// // Perform a simple redirect after logout
// context.Response.Redirect("/");
// });
//});
}
}
}下面是Middleware---->CookieAuthMiddleware.cs的代码,
using Microsoft.AspNetCore.Authentication.Cookies;
using Microsoft.AspNetCore.Builder;
using Microsoft.AspNetCore.Http;
using System;
using System.Collections.Generic;
using System.Linq;
using System.Security.Claims;
using System.Security.Principal;
using System.Threading.Tasks;
namespace Wings.AuthenticationApp.Middleware
{
public class CookieAuthMiddleware
{
public static CookieAuthenticationOptions GetOptions()
{
return new CookieAuthenticationOptions
{
AutomaticAuthenticate = true,
AutomaticChallenge = true,
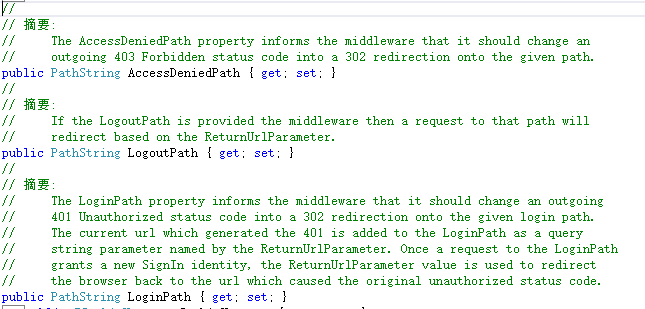
LoginPath = new PathString("/login"),
LogoutPath = new PathString("/logout"),
AccessDeniedPath = new PathString("/test"),
CookieHttpOnly = false, //默认就是True了
CookieName = "wings_access_token",
SlidingExpiration = true,
CookieManager = new ChunkingCookieManager()
};
}
}
public static class IdentityExtension
{
public static string FullName(this IIdentity identity)
{
var claim = ((ClaimsIdentity)identity).FindFirst("name");
return (claim != null) ? claim.Value : string.Empty;
}
public static string Role(this IIdentity identity)
{
var claim = ((ClaimsIdentity)identity).FindFirst("role");
return (claim != null) ? claim.Value : string.Empty;
}
}
}对应如上demo,简单测试一下,结果如下:
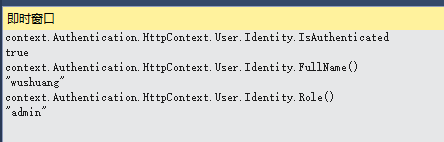
首先使用错误的密码,来请求token endpoint,接下来我们看一下即使窗口,当有请求进入的时候,我用如下代码判断用户的认证情况,拿到的结果必然是false:

接下来,我使用正确的账号密码,来打入token,判断结果一定为true,所以我使用自定义的拓展方法,来获取下,该用户token的信息:
如上demo没有加入一些容错机制,请注意。在用户认证成功后,可以进入带有Authorize Attribute的Action,否则401.如下是几个重要参数的解释
自定义Authentication Middle生产Token
Startup.csusing System;
using System.Collections.Generic;
using System.Linq;
using System.Threading.Tasks;
using Microsoft.AspNetCore.Builder;
using Microsoft.AspNetCore.Hosting;
using Microsoft.Extensions.Configuration;
using Microsoft.Extensions.DependencyInjection;
using Microsoft.Extensions.Logging;
using Wings.TokenAuth.Middleware;
using System.Security.Claims;
using Microsoft.IdentityModel.Tokens;
using System.Text;
using Microsoft.Extensions.Options;
namespace Wings.TokenAuth
{
public class Startup
{
public Startup(IHostingEnvironment env)
{
var builder = new ConfigurationBuilder()
.SetBasePath(env.ContentRootPath)
.AddJsonFile("appsettings.json", optional: false, reloadOnChange: true)
.AddJsonFile($"appsettings.{env.EnvironmentName}.json", optional: true)
.AddEnvironmentVariables();
Configuration = builder.Build();
}
public IConfigurationRoot Configuration { get; }
// This method gets called by the runtime. Use this method to add services to the container.
public void ConfigureServices(IServiceCollection services)
{
// Add framework services.
services.AddMvc();
}
// The secret key every token will be signed with.
// In production, you should store this securely in environment variables
// or a key management tool. Don't hardcode this into your application!
private static readonly string secretKey = "mysupersecret_secretkey!123";
public void Configure(IApplicationBuilder app, IHostingEnvironment env, ILoggerFactory loggerFactory)
{
loggerFactory.AddConsole(LogLevel.Debug);
loggerFactory.AddDebug();
app.UseStaticFiles();
// Add JWT generation endpoint:
var signingKey = new SymmetricSecurityKey(Encoding.ASCII.GetBytes(secretKey));
var options = new TokenProviderOptions
{
Audience = "ExampleAudience",
Issuer = "ExampleIssuer",
SigningCredentials = new SigningCredentials(signingKey, SecurityAlgorithms.HmacSha256),
};
app.UseMiddleware<TokenProviderMiddleware>(Options.Create(options));
app.UseMvc();
}
}
}TokenProviderOptions.cs
using Microsoft.AspNetCore.Http;
using Microsoft.Extensions.Options;
using Microsoft.IdentityModel.Tokens;
using Newtonsoft.Json;
using System;
using System.Collections.Generic;
using System.IdentityModel.Tokens.Jwt;
using System.Linq;
using System.Security.Claims;
using System.Threading.Tasks;
namespace Wings.TokenAuth.Middleware
{
public class TokenProviderOptions
{
public string Path { get; set; } = "/token";
public string Issuer { get; set; }
public string Audience { get; set; }
public TimeSpan Expiration { get; set; } = TimeSpan.FromMinutes(5);
public SigningCredentials SigningCredentials { get; set; }
}
public class TokenProviderMiddleware
{
private readonly RequestDelegate _next;
private readonly TokenProviderOptions _options;
public TokenProviderMiddleware(
RequestDelegate next,
IOptions<TokenProviderOptions> options)
{
_next = next;
_options = options.Value;
}
public Task Invoke(HttpContext context)
{
// If the request path doesn't match, skip
if (!context.Request.Path.Equals(_options.Path, StringComparison.Ordinal))
{
//use new JwtSecurityTokenHandler().ValidateToken() to valid token
return _next(context);
}
// Request must be POST with Content-Type: application/x-www-form-urlencoded
if (!context.Request.Method.Equals("POST")
|| !context.Request.HasFormContentType)
{
context.Response.StatusCode = 400;
return context.Response.WriteAsync("Bad request.");
}
return GenerateToken(context);
}
private async Task GenerateToken(HttpContext context)
{
var username = context.Request.Form["username"];
var password = context.Request.Form["password"];
var identity = await GetIdentity(username, password);
if (identity == null)
{
context.Response.StatusCode = 400;
await context.Response.WriteAsync("Invalid username or password.");
return;
}
var now = DateTime.UtcNow;
// Specifically add the jti (random nonce), iat (issued timestamp), and sub (subject/user) claims.
// You can add other claims here, if you want:
var claims = new Claim[]
{
new Claim(JwtRegisteredClaimNames.Sub, username),
new Claim(JwtRegisteredClaimNames.Jti, Guid.NewGuid().ToString()),
new Claim(JwtRegisteredClaimNames.Iat, ToUnixEpochDate(now).ToString(), ClaimValueTypes.Integer64)
};
// Create the JWT and write it to a string
var jwt = new JwtSecurityToken(
issuer: _options.Issuer,
audience: _options.Audience,
claims: claims,
notBefore: now,
expires: now.Add(_options.Expiration),
signingCredentials: _options.SigningCredentials);
var encodedJwt = new JwtSecurityTokenHandler().WriteToken(jwt);
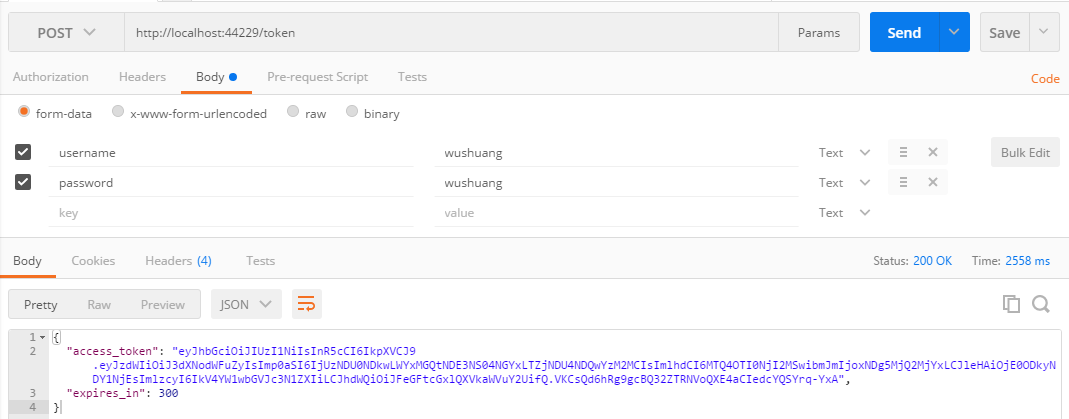
var response = new
{
access_token = encodedJwt,
expires_in = (int)_options.Expiration.TotalSeconds
};
// Serialize and return the response
context.Response.ContentType = "application/json";
await context.Response.WriteAsync(JsonConvert.SerializeObject(response, new JsonSerializerSettings { Formatting = Formatting.Indented }));
}
private Task<ClaimsIdentity> GetIdentity(string username, string password)
{
// DON'T do this in production, obviously!
if (username == "wushuang" && password == "wushuang")
{
return Task.FromResult(new ClaimsIdentity(new System.Security.Principal.GenericIdentity(username, "Token"), new Claim[] { }));
}
// Credentials are invalid, or account doesn't exist
return Task.FromResult<ClaimsIdentity>(null);
}
public static long ToUnixEpochDate(DateTime date)
=> (long)Math.Round((date.ToUniversalTime() - new DateTimeOffset(1970, 1, 1, 0, 0, 0, TimeSpan.Zero)).TotalSeconds);
}
}下面上测试结果:
使用错误的账户和密码请求token

使用正确的账户和密码来请求,返回结果如下:
如果,您认为阅读这篇博客让您有些收获,不妨点击一下右下加【推荐】按钮。
如果,您希望更容易地发现我的新博客,不妨点击下方红色【关注】的。
因为,我的分享热情也离不开您的肯定支持。
感谢您的阅读,我将持续输出分享,我是蜗牛, 保持学习,谨记谦虚。不端不装,有趣有梦。
参考文章和论文,不仅限于如下几篇,感谢国外大佬们有深度的分享:
http://stackoverflow.com/questions/29055477/oauth-authorization-service-in-asp-net-core https://stormpath.com/blog/token-authentication-asp-net-core https://docs.microsoft.com/en-us/aspnet/core/fundamentals/middleware#fundamentals-middleware https://docs.microsoft.com/en-us/aspnet/core/security/authentication/cookie#controlling-cookie-options https://stormpath.com/blog/token-authentication-asp-net-core

相关文章推荐
- Asp.Net Core Authentication Middleware And Generate Token
- [转]Migrating HTTP handlers and modules to ASP.NET Core middleware
- asp.net core AuthenticationMiddleware 在WebApi中的的使用
- User Authentication with Angular and ASP.NET Core
- ASP.NET Core应用针对静态文件请求的处理[5]: DefaultFilesMiddleware中间件如何显示默认页面
- Asp.Net MVC webAPI Token based authentication
- 菜鸟入门【ASP.NET Core】8:Middleware管道介绍、自己动手构建RequestDelegate管道
- [ASP.NET Core] Middleware
- [ASP.NET Core] Static File Middleware
- ASP.NET Core 运行原理解剖[3]:Middleware-请求管道的构成
- 用Middleware给ASP.NET Core Web API添加自己的授权验证
- ASP.NET 5 and .NET Core RC Ready for Production
- Building Secure ASP.NET Applications: Authentication, Authorization, and Secure Communication
- [转]在ASP.NET Core使用Middleware模拟Custom Error Page功能
- ASP.NET Core中间件(Middleware)实现WCF SOAP服务端解析
- Building Secure ASP.NET Applications: Authentication, Authorization, and Secure Communication
- Handling session and authentication timeouts in ASP.Net
- Screen Scraping, ViewState, and Authentication using ASP.Net
- Building Secure ASP.NET Applications: Authentication, Authorization, and Secure Communication
- ASP.NET Core 2.0系列学习笔记-Middleware中间件