jQuery弹出窗口简单实现代码
2017-03-09 16:38
706 查看
今天讲了Jquery的弹出窗口的组成和用法:
先把引用文件的代码写好:
// 每个弹窗的标识
var x =0;
var idzt = new Array();
var Window = function(config){
//ID不重复
idzt[x] = "zhuti"+x; //弹窗ID
//初始化,接收参数
this.config = {
width : config.width || 300, //宽度
height : config.height || 200, //高度
buttons : config.buttons || '', //默认无按钮
title : config.title || '标题', //标题
content : config.content || '内容', //内容
isMask : config.isMask == false?false:config.isMask || true, //是否遮罩
isDrag : config.isDrag == false?false:config.isDrag || true, //是否移动
};
//加载弹出窗口
var w = ($(window).width()-this.config.width)/2;
var h = ($(window).height()-this.config.height)/2;
var nr = "<div class='zhuti' id='"+idzt[x]+"' bs='"+x+"' style='width:"+this.config.width+"px; height:"+this.config.height+"px; background-color:white; left:"+w+"px; top:"+h+"px;'></div>";
$("body").append(nr);
//加载弹窗标题
var content ="<div id='title"+x+"' class='title' bs='"+x+"'>"+this.config.title+"<div id='close"+x+"' class='close' bs='"+x+"'>×</div></div>";
//加载弹窗内容
var nrh = this.config.height - 75;
content = content+"<div id='content"+x+"' bs='"+x+"' class='content' style='width:100%; height:"+nrh+"px;'>"+this.config.content+"</div>";
//加载按钮
content = content+"<div id='btnx"+x+"' bs='"+x+"' class='btnx'>"+this.config.buttons+"</div>";
//将标题、内容及按钮添加进窗口
$('#'+idzt[x]).html(content);
//创建遮罩层
if(this.config.isMask)
{
var zz = "<div id='zz'></div>";
$("body").append(zz);
$("#zz").css('display','block');
}
//最大最小限制,以免移动到页面外
var maxX = $(window).width()-this.config.width;
var maxY = $(window).height()-this.config.height;
var minX = 0,
minY = 0;
//窗口移动
if(this.config.isDrag)
{
//鼠标移动弹出窗
$(".title").bind("mousedown",function(e){
var n = $(this).attr("bs"); //取标识
//使选中的到最上层
$(".zhuti").css("z-index",3);
$('#'+idzt
).css("z-index",4);
//取初始坐标
var endX = 0, //移动后X坐标
endY = 0, //移动后Y坐标
startX = parseInt($('#'+idzt
).css("left")), //弹出层的初始X坐标
startY = parseInt($('#'+idzt
).css("top")), //弹出层的初始Y坐标
downX = e.clientX, //鼠标按下时,鼠标的X坐标
downY = e.clientY; //鼠标按下时,鼠标的Y坐标
//绑定鼠标移动事件
$("body").bind("mousemove",function(es){
endX = es.clientX - downX + startX; //X坐标移动
endY = es.clientY - downY + startY; //Y坐标移动
//最大最小限制
if(endX > maxX)
{
endX = maxX;
} else if(endX < 0)
{
endX = 0;
}
if(endY > maxY)
{
endY = maxY;
} else if(endY < 0)
{
endY = 0;
}
$('#'+idzt
).css("top",endY+"px");
$('#'+idzt
).css("left",endX+"px");
window.getSelection ? window.getSelection().removeAllRanges():document.selection.empty(); //取消选中文本
});
});
//鼠标按键抬起,释放移动事件
$("body").bind("mouseup",function(){
$("body").unbind("mousemove");
});
}
//关闭窗口
$(".close").click(function(){
var m = this.getAttribute("bs"); //找标识
$('#'+idzt[m]).remove(); //移除弹窗
$('#zz').remove(); //移除遮罩
})
x++; //标识增加
}
这个JS文件把弹出窗口的内容,样式,位置,按钮,以及遮罩层都做了处理,在引用前好好看看里面的代码,最好都能弄懂,里面也做了详细的注释,希望可以帮的你。
下面是CSS样式表:
.zhuti
{
position:absolute;
z-index:3;
font-size:14px;
border-radius:5px;
box-shadow:0 0 5px white;
overflow:hidden;
color:#333;
}
.title
{
background-color:#3498db;
vertical-align:middle;
height:35px;
width:100%;
line-height:35px;
text-indent:1em;
}
.close{
float:right;
width:35px;
height:35px;
font-weight:bold;
line-height:35px;
vertical-align:middle;
color:white;
font-size:18px;
}
.close:hover
{
cursor:pointer;
}
.content
{
text-indent:1em;
padding-top:10px;
}
.btnx
{
height:30px;
width:100%;
text-indent:1em;
}
.btn
{
height:28px;
width:80px;
float:left;
margin-left:20px;
color:#333;
}
#zz
{
width:100%;
height:100%;
opacity:0.15;
display:none;
background-color:#ccc;
z-index:2;
position:absolute;
top:0px;
left:0px;
}
这个样式表把每个标签和所需要的样式都写好了,这样就能节省主要页面的代码量,并且让主页面看起来非常的整齐,如果要改,只需要在CSS样式表中修改即可,注意:不管要引用什么文件,必须把Jquery文件放在最前面!!!
下面是主页面代码:
<!DOCTYPE html PUBLIC "-//W3C//DTD XHTML 1.0 Transitional//EN" "http://www.w3.org/TR/xhtml1/DTD/xhtml1-transitional.dtd">
<html xmlns="http://www.w3.org/1999/xhtml">
<head>
<meta http-equiv="Content-Type" content="text/html; charset=utf-8" />
<title>无标题文档</title>
<script type="text/javascript" src="jquery-1.11.2.min.js">
</script>
<script type="text/javascript" src="tanchuang.js">
</script>
<link href="tanchuang.css" rel="external nofollow" rel="stylesheet" type="text/css" />
<style type="text/css">
*{
margin: 0px auto;
}
</style>
</head>
<body style="background-color:#999">
<div style="width:200px; margin-top:10px">
<input type="button" value="弹出窗口" id="btntc" style="width:100px; height:30px; font-size:18px;" />
</div>
</body>
<script type="text/javascript">
$(document).ready(function(e) {
$('#btntc').click(function(){
var html = "<div style='color:red'>这是测试的弹窗</div>";
var button ="<input type='button' value='确定' /><input type='button' value='取消' />";
var win = new Window({
width : 400, //宽度
height : 300, //高度
title : '测试弹窗', //标题
content : html, //内容
isMask : false, //是否遮罩
buttons : button, //按钮
isDrag:true, //是否移动
});
})
});
</script>
</html>
同样的,主页面里面也加了详细的注释,这样便于日后的理解,希望可以帮的自己和大家。让我们看看效果吧:

点击弹出窗口之后的效果:
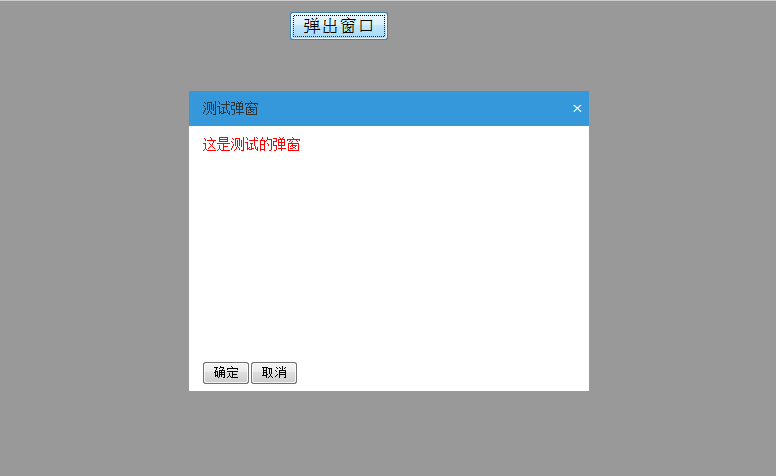

我们可以看到每个弹出窗口都可以移动,并且可以弹出无数个窗口,如果把遮罩层改成true,那样就不能再出现第二个弹出窗口了。
一定要记住遮罩层的实用,这样可以避免很多BUG如果要引用弹出窗口一定要测试好了再使用,以防出现问题,切记!
以上就是本文的全部内容,希望对大家的学习有所帮助,也希望大家多多支持脚本之家。
您可能感兴趣的文章:

相关文章推荐
- jQuery实现弹出窗口弹出div层的实例代码
- 基于jQuery实现Div窗口震动特效代码-代码简单
- jquery实现弹出窗口效果的实例代码
- jQuery+jqmodal弹出窗口实现代码分明
- jQuery实现的AJAX简单弹出层效果代码
- jquery 弹出登录窗口实现代码
- jquery实现弹出窗口效果的实例代码
- jQuery弹出窗口打开链接的实现代码
- jquery实现弹出确认是否删除的一个简单代码
- jquery实现弹出窗口效果的实例代码
- jquery实现简单实用的弹出层效果代码
- js弹出窗口简单实现代码
- 基于Jquery+div+css实现弹出登录窗口(代码超简单)
- jQuery+jqmodal弹出窗口实现代码分明
- 基于jQuery实现Div窗口震动特效代码-代码简单
- jquery实现简单实用的弹出层效果代码
- jQuery实现的AJAX简单弹出层效果代码
- jquery 弹出登录窗口实现代码
- jQuery实现简单弹出窗口
- 基于Jquery+div+css实现弹出登录窗口(代码超简单)