eclipse 使用maven 构建springboot 程序
2017-03-09 12:55
686 查看
1、创建Maven工程
打开Eclipse,点击File->New->Other,在弹出对话框中,选中Maven Project。 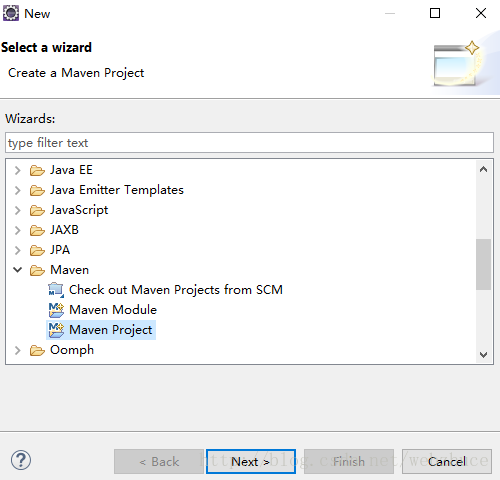
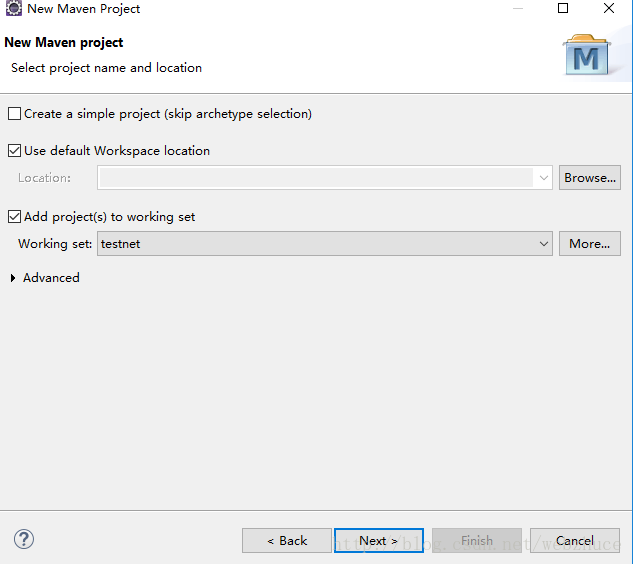
点击Next按钮,出现下图,根据自己需要设置,可以使用默认的。
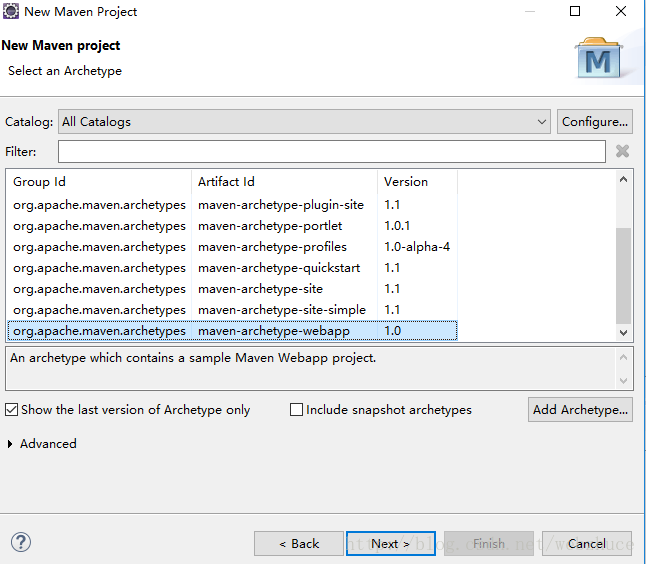
再点击Next按钮,出现下图,选中图中背景为蓝色的项。
再点击Next按钮,设置Group Id和Artifact Id,其他项可以不用设置。

点击Finish按钮,完成项目的创建。
2、编写pom.xml
在parent部分使用spring-boost-starter-parent。spring-boost-starter-parent是重要的默认的父工程,它提供了dependency-management部分。<parent> <groupId>org.springframework.boot</groupId> <artifactId>spring-boot-starter-parent</artifactId> <version>1.4.3.RELEASE</version> </parent>1
2
3
4
5
1
2
3
4
5
如果我们向pom.xml添加spring-boot-starter-web依赖(在parent这部分之后):
<dependencies> <dependency> <groupId>org.springframework.boot</groupId> <artifactId>spring-boot-starter-web</artifactId> </dependency> </dependencies>1
2
3
4
5
6
1
2
3
4
5
6
此时pom.xml如下所示:
<project xmlns="http://maven.apache.org/POM/4.0.0" xmlns:xsi="http://www.w3.org/2001/XMLSchema-instance"
xsi:schemaLocation="http://maven.apache.org/POM/4.0.0 http://maven.apache.org/xsd/maven-4.0.0.xsd"> <modelVersion>4.0.0</modelVersion>
<groupId>com.wlsq.accounts</groupId>
<artifactId>WlsqAccounts</artifactId>
<version>0.0.1-SNAPSHOT</version>
<parent>
<groupId>org.springframework.boot</groupId>
<artifactId>spring-boot-starter-parent</artifactId>
<version>1.4.3.RELEASE</version>
</parent>
<dependencies>
<dependency>
<groupId>org.springframework.boot</groupId>
<artifactId>spring-boot-starter-web</artifactId>
</dependency>
<dependency>
<groupId>junit</groupId>
<artifactId>junit</artifactId>
<version>3.8.1</version>
<scope>test</scope>
</dependency>
</dependencies>
</project>
3、测试Spring Boot 应用
在src/main/java目录下,新建一个com.zzg.apple包,然后在包下面新建一个类。package com.wlsq.app;
import org.springframework.boot.SpringApplication;
import org.springframework.boot.autoconfigure.EnableAutoConfiguration;
import org.springframework.web.bind.annotation.RequestMapping;
import org.springframework.web.bind.annotation.RestController;
@RestController
@EnableAutoConfiguration
public class AppleApplication {
@RequestMapping("/")
String home() {
return "欢迎使用SpringBoot!";
}
public static void main(String[] args) {
SpringApplication.run(AppleApplication.class, args);
}
}启动程序,右键AppleApplication.java文件,选择run as -> Java Application。
如果没有报错的话,在浏览器中输入: http://localhost:8080/


相关文章推荐
- eclipse 使用maven构建 springboot +swagger
- eclipse 使用maven 构建springboot+dubbo+zookeeper 构建soa服务(面向服务架构)
- eclipse 使用maven 构建springboot +lombok
- eclipse 使用maven 构建springboot+注入servlet
- eclipse 使用maven 构建 springboot+mybatis
- eclipse 使用maven 构建springboot 读取多个配置文件
- 使用Maven构建Spring Boot 第一课之Hello world 程序
- 使用Maven插件构建SpringBoot项目,生成Docker镜像push到DockerHub上
- 使用spring boot快速构建spring框架的maven项目
- 使用Maven插件构建SpringBoot项目,生成Docker镜像push到DockerHub上
- Eclipse使用maven搭建简单spring boot application Hello World
- eclipse 使用maven 集成springboot + retrofit
- 使用eclipse构建springboot项目的解决的一些问题
- eclipse 使用maven 搭建 springboot+mybatis + 多数据源
- 使用maven构建一个Spring Boot项目
- 微服务框架(一)--Eclipse使用maven创建spring boot项目
- 在Eclipse中使用Maven构建Spring项目
- Maven快速使用教程(二) spring boot 项目构建
- 使用Eclipse maven创建spring boot应用程序
- eclipse 使用maven 构建springbooot+mysql +freemarker 简单web 项目