GraphicsLab Project之Screen Space Ambient Occlusion(SSAO)
2017-03-04 16:57
489 查看
作者:i_dovelemon
日期:2017 / 03 / 4
来源:CSDN
主题:SSAO
文章中将只会提出使用OpenGL的哪种技术来实现,不会给出具体的使用OpenGL指令的方式,这些内容可以自行通过网络搜索到,或者可以查看GraphicsLab项目的源码来了解。
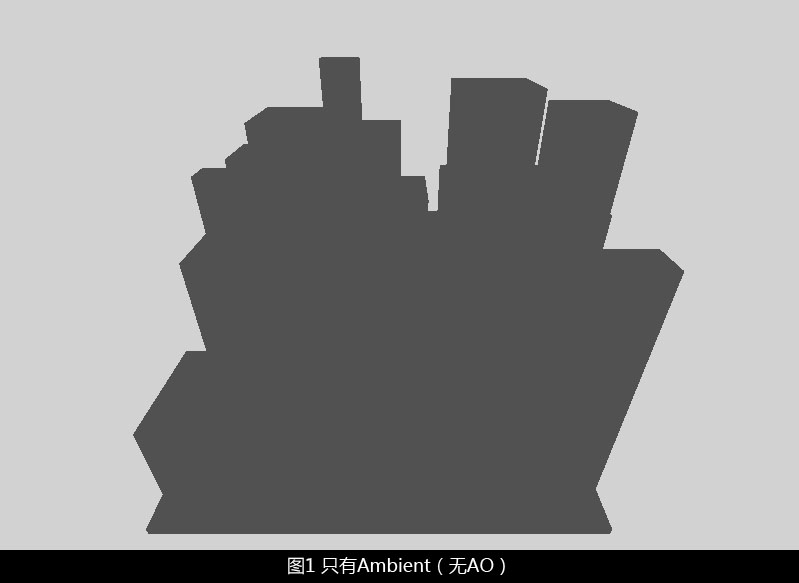
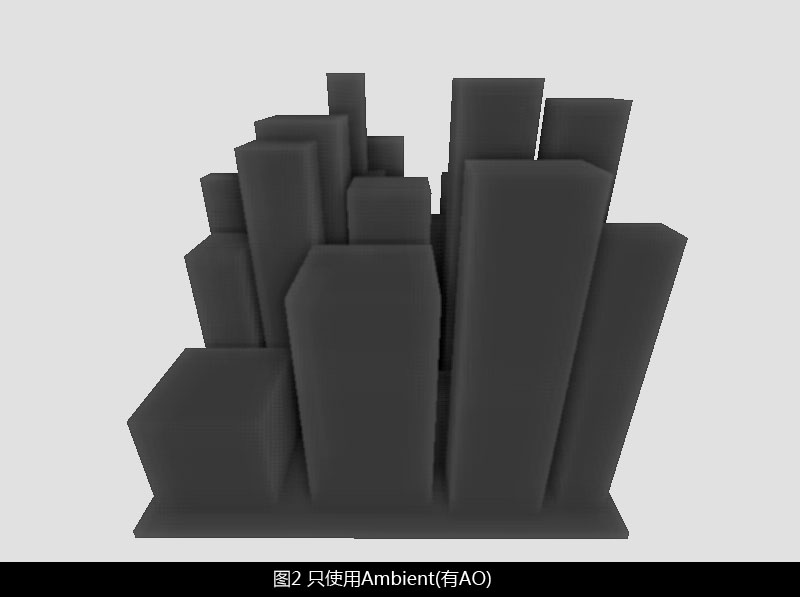
从上图可以看到,对于只有简单Ambient着色的物体来说,就是一个扁平的色块,没有任何的明暗对比,所以看不出来任何的立体效果。但是,在现实世界中,由于物体本身的遮挡关系,必然会导致有些地方接受到的光要少,有些地方较多,也就是会形成一种明暗对比关系,而Ambient Occlusion就是为了体现这种由于遮挡而产生明暗对比关系的效果而提出的。同样的图片,在经过AO处理之后(即本文将要介绍的SSAO算法),将会更加有立体的感觉:
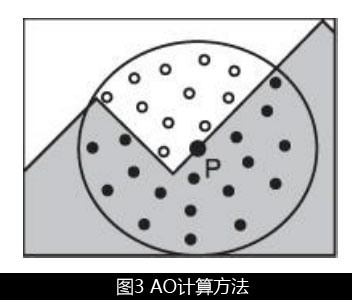
上图所示,我们要计算点P的AO值,可以在一定区域内采样指定数目的深度值,然后判断:采样深度值大于点P的时候,表示该采样点不会遮挡点P,反之则会遮挡。通过未遮挡采样像素的数目占总采样像素的比例来决定点P的AO值(这里是很粗糙的做法,读者自己实现的时候,可以加上距离衰减之类的控制)。
通过上面的描述,我们就大体的知道了如果计算每一个屏幕空间中像素的AO值。而该计算的条件是:一张Depth Map,一种采样内核。下面,我们就分别来讲述下,如何获取这些信息。
Space中,物体的Z值是线性变化的,而在NDC中1/Z值是线性变化的,为了方便以后我们进行深度值的比较,可以保存下Camera Space中的Z坐标值。
下面我们一一的来给出相应的代码,首先是创建深度图,创建FBO,然后绑定FBO的代码:
接下来,我们来看下depth shader的代码:
从shader中我们可以看出,我保存的是Camera Space(View space)中的Z值,并且我通过除以远裁剪面来归一化[0,1]范围之间,便于我们可以通过肉眼观察纹理。
创建好了基础条件之后,我们就来进行绘制,如下是绘制的代码:
通过上面几步的操作,我们就能够获取到一张Depth Map,下面是获取到的Depth Map:

当我们想从Depth Map中计算AO值的时候,我们势必要通过采样操作来获取信息。当然,想要结果越好,采样的次数越多越好,不过采样次数过多,就会导致运行时间过长,帧数必然会要下降。所以我们可以选择合适的采样次数,对于SSAO,一般的采样次数为8,16,24。我们这里选用16次的采样次数。
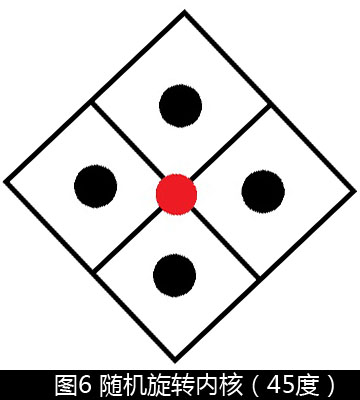
16次的采样虽然能够保证我们的算法能够快速的运行,但是在结果上却不是十分的理想,也就是说采样次数还是太低了。对于这种问题,我们可以通过随机旋转采样内核(Randomly Rotate Kernel)来模拟更高的采样次数。对于一个给定的采样内核,它的采样分布点是确定的,如下图所示:
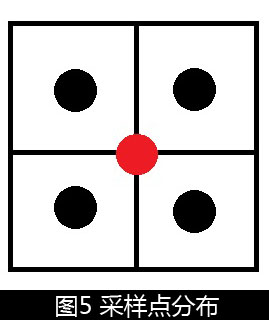
图中红色的点表示我们需要计算的AO值,周围的黑点,表示我们将要采样的点(这里只做举例说明,并不是我们的算法中就是使用这种采样内核)。对于同一个采样内核来说,相对于红色点,周围的黑色点的位置是固定不变的。当使用随机旋转内核的时候,对于不同的红色点,我们使用不同的随机旋转角度讲上图的内核进行旋转,得到一个新的采样内核,如下图所示,将上图旋转了45度:
通过上面的手段,我们就能够在同样的采样次数下,对每一个像素都使用不同的旋转角度的采样内核来模拟更高次数的采样。
但是,很不幸,由于进行了随机旋转,会导致最终的画面出现很多的噪音,所以我们需要去噪。对于图像处理来说,常用的去噪就是通过对画面进行模糊来实现。但是如果使用模糊的半径过大,就会导致我们最终的AO Map会变的模糊,缺失细节;所以我们将使用4*4的模糊区域来实现。
为了让模糊去噪的效果更加明显,我们可以按照模糊区域4×4重复的使用随机旋转内核。这句话的意思是说,将屏幕划分为多个4×4的平铺展开的区域,每一个区域内部的16个像素分别使用不同随机角度的旋转内核;其他的4×4区域也将使用同样的方法,同样的随机旋转内核来进行。这样就能够保证画面的噪音具有4×4的固定模式,这样4×4的模糊就能够很好的去除噪音了。
从上面的描述中我们能够看到,想要构建这里的采样内核,我们需要16个随机旋转角度,所以我们将生成一张4×4的纹理贴图,这张贴图里面,保存了16个随机旋转角度的sin和cos值,便于我们在shader中构建旋转矩阵对内核进行旋转。
如果读者细心的阅读了我的文章,就会发现我到现在还没有讲解我在算法中到底用了哪个采样内核,我只是告诉了你需要对采样内核进行随机的旋转从而去模拟更高次数的采样效果,并没有给出具体要用哪种采样内核。其实这里的选择有很多,我这里暂时选取了和Crytek在ShaderX7中给出的Cube Corner类似的采样内核,即按照正方形中心点到四个顶点的方向,使用不同的偏移来进行采样。
下面将给出部分代码,便于读者理解。
首先是准备工作:
首先是随机旋转角度纹理的生成。我这里是通过对投影矩阵和相机矩阵的所有数据值进行处理,然后生成一个种子来产生随机数:
接下来看看获取初始AO Map的代码:
以及使用的shader:
好了,我们获取了基本的AO Map,接下来做的就是对它进行模糊,这里我使用的是Gaussian Blur,前面关于Glow效果的文章中已经介绍过这个模糊算法,原理这里就不在讲解,代码如下:
相关shader文件:
[2] https://en.wikipedia.org/wiki/Kernel_(image_processing) About Kernel
[3] http://www.sunandblackcat.com/tipFullView.php?l=eng&topicid=35 About Randomly Rotate Kernel
日期:2017 / 03 / 4
来源:CSDN
主题:SSAO
引言
GraphicsLab项目已经进行了一段时间,期间经过了几次代码重构,现在的框架要比我初次编写的框架更加容易让我实验一些新的算法。今天,就来和大家讨论下最近集成到框架里面的一个新算法:Screen Space Ambient Occlusion。文章中将只会提出使用OpenGL的哪种技术来实现,不会给出具体的使用OpenGL指令的方式,这些内容可以自行通过网络搜索到,或者可以查看GraphicsLab项目的源码来了解。
Ambient Occlusion
在讲解具体的算法之前,我们先来了解下什么是Ambient Occlusion(AO)。我们知道,在实时渲染当中,光照模型主要是以Diffuse+Specular+Ambient的形式来进行光照计算。而其中的Ambient项主要模拟的是从环境中反射到物体上的光照。对于实时渲染来说,这种由周围环境反射到物体上的光照很难精确的计算出来,所以在光照模型中,Ambient项对于一个模型来说就是一个固定的颜色。也就是说,如果在不考虑Diffuse和Specular的情况下,仅仅使用Ambient来对物体进行着色的话,你会得到类似如下所示的一种很扁平的光照结果:从上图可以看到,对于只有简单Ambient着色的物体来说,就是一个扁平的色块,没有任何的明暗对比,所以看不出来任何的立体效果。但是,在现实世界中,由于物体本身的遮挡关系,必然会导致有些地方接受到的光要少,有些地方较多,也就是会形成一种明暗对比关系,而Ambient Occlusion就是为了体现这种由于遮挡而产生明暗对比关系的效果而提出的。同样的图片,在经过AO处理之后(即本文将要介绍的SSAO算法),将会更加有立体的感觉:
Screen Space Ambeint Occlusion
传统的AO计算方法,是通过对模型上每一个点投射多个射线的方法,并以此来统计哪些射线被遮挡,哪些射线指向了空白区域。但是这种方法计算量过高,会随着场景复杂度的提高而提高,无法在实时计算中使用。Crytek提出的该算法,它仅仅依靠深度信息,在屏幕空间计算屏幕上每一个像素的AO值,生成一张屏幕空间的AO贴图,当我们在渲染物体的时候,就可以在这张贴图上查找对应像素的AO值。AO计算方法
SSAO算法是对中心像素的周围进行采样,然后判断哪些采样像素会遮挡中心像素,哪些不会遮挡。下图即这个过程的示意图:上图所示,我们要计算点P的AO值,可以在一定区域内采样指定数目的深度值,然后判断:采样深度值大于点P的时候,表示该采样点不会遮挡点P,反之则会遮挡。通过未遮挡采样像素的数目占总采样像素的比例来决定点P的AO值(这里是很粗糙的做法,读者自己实现的时候,可以加上距离衰减之类的控制)。
通过上面的描述,我们就大体的知道了如果计算每一个屏幕空间中像素的AO值。而该计算的条件是:一张Depth Map,一种采样内核。下面,我们就分别来讲述下,如何获取这些信息。
Depth Map
首先要获得Depth Map,我们需要有一种能够渲染到纹理的技术,该技术可以通过OpenGL中的FBO来实现。我们创建一张深度纹理,然后将该纹理绑定到FBO上。然后,我们就可以简单的绘制下场景,这个时候绘制的场景我们仅仅需要的是Depth信息,所以可以关闭对Color Buffer的写入。当关闭对Color Buffer的写入的时候,系统会以更加快速的方式来绘制。除此之外,我们还需要明确的一点是,我们在Depth Map中,保存的不是NDC下的Z坐标,而是在Camera Space中的Z坐标值。由于在CameraSpace中,物体的Z值是线性变化的,而在NDC中1/Z值是线性变化的,为了方便以后我们进行深度值的比较,可以保存下Camera Space中的Z坐标值。
下面我们一一的来给出相应的代码,首先是创建深度图,创建FBO,然后绑定FBO的代码:
void RenderImp::PrepareDepthMap() {
// Create depth map
texture::Texture* depth_map = texture::Texture::CreateFloat16DepthTexture(m_Width, m_Height);
if (depth_map != NULL) {
m_DepthMap = texture::Mgr::AddTexture(depth_map);
} else {
GLB_SAFE_ASSERT(false);
}

// Create render target
m_DepthTarget = RenderTarget::Create(m_Width, m_Height);
if (m_DepthTarget != NULL) {
m_DepthTarget->AttachDepthTexture(depth_map);
} else {
GLB_SAFE_ASSERT(false);
}

// Create shader
m_DepthShader = shader::Mgr::AddShader("..\\glb\\shader\\depth.vs", "..\\glb\\shader\\depth.ps");
}
接下来,我们来看下depth shader的代码:
depth.vs
//----------------------------------------------------
// Declaration: Copyright (c), by i_dovelemon, 2016. All right reserved.
// Author: i_dovelemon[1322600812@qq.com]
// Date: 2017 / 02 / 16
// Brief: Depth map
//----------------------------------------------------
#version 330

in vec3 glb_Pos;

uniform mat4 glb_ProjM;
uniform mat4 glb_ViewM;
uniform mat4 glb_WorldM;

out float vs_DepthInViewSpace;

void main() {
vec4 pos_in_view_space = glb_ViewM * glb_WorldM * vec4(glb_Pos, 1.0);
gl_Position = glb_ProjM * pos_in_view_space;
vs_DepthInViewSpace = pos_in_view_space.z / pos_in_view_space.w;
}
depth.ps
//----------------------------------------------------
// Declaration: Copyright (c), by i_dovelemon, 2017. All right reserved.
// Author: i_dovelemon[1322600812@qq.com]
// Date: 2017 / 02 / 16
// Brief: Depth map
//----------------------------------------------------
#version 330

// Input attributes
in float vs_DepthInViewSpace;

uniform float glb_FarClip;

void main() {
// Note: In opengl, camera look at -z axis
// so the depth value in view space is negative value
gl_FragDepth = -vs_DepthInViewSpace / glb_FarClip;
}
从shader中我们可以看出,我保存的是Camera Space(View space)中的Z值,并且我通过除以远裁剪面来归一化[0,1]范围之间,便于我们可以通过肉眼观察纹理。
创建好了基础条件之后,我们就来进行绘制,如下是绘制的代码:
void RenderImp::DrawDepthMap() {
// Render Target
render::Device::SetRenderTarget(m_DepthTarget->GetRenderTargetObj());

// Draw Buffer
render::Device::SetDrawColorBuffer(render::COLORBUF_NONE);

// Clear
render::Device::SetClearDepth(1.0f);
render::Device::Clear(CLEAR_DEPTH);

// Shader
shader::Program* program = shader::Mgr::GetShader(m_DepthShader);
std::vector<uniform::UniformEntry>& uniforms = program->GetUniforms();
render::Device::SetShader(program->GetShader());
render::Device::SetShaderLayout(program->GetShaderLayout());

// Scene uniforms
for (int32_t j = 0; j < static_cast<int32_t>(uniforms.size()); j++) {
uniform::UniformEntry entry = uniforms[j];
if (entry.flag) {
// TODO: for now, id is the index of the uniform picker table
uniform::Wrapper uniform_wrapper = uniform::kUniformPickers[entry.id].picker(NULL);
SetUniform(entry.location, uniform_wrapper);
}
}

for (int32_t i = 0; i < static_cast<int32_t>(m_ShaderGroups.size()); i++) {
std::vector<Object*> objs = m_ShaderGroups[i].GetObjects();

// Objects
for (int32_t j = 0; j < static_cast<int32_t>(objs.size()); j++) {
Object* obj = objs[j];

// Check if cast shadow & enable depth
if (obj->GetModel()->IsCastShadow() && obj->IsDepthTestEnable()) {
// Object Uniform
for (int32_t k = 0; k < static_cast<int32_t>(uniforms.size()); k++) {
uniform::UniformEntry entry = uniforms[k];
if (!entry.flag) {
// TODO: for now, id is the index of the uniform picker table
uniform::Wrapper uniform_wrapper = uniform::kUniformPickers[entry.id].picker(obj);
SetUniform(entry.location, uniform_wrapper);
}
}

// Vertex Buffer
int32_t mesh_id = obj->GetModel()->GetMeshId();
uint32_t vao = mesh::Mgr::GetMeshById(mesh_id)->GetVAO();
uint32_t vbo = mesh::Mgr::GetMeshById(mesh_id)->GetVBO();
VertexLayout layout = mesh::Mgr::GetMeshById(mesh_id)->GetVertexLayout();
int32_t num = mesh::Mgr::GetMeshById(mesh_id)->GetVertexNum();
render::Device::SetVertexArray(vao);
render::Device::SetVertexBuffer(vbo);
render::Device::SetVertexLayout(layout);

if (obj->IsCullFaceEnable()) {
render::Device::SetCullFaceEnable(true);
render::Device::SetCullFaceMode(obj->GetCullFaceMode());
} else {
render::Device::SetCullFaceEnable(false);
}

if (obj->IsDepthTestEnable()) {
render::Device::SetDepthTestEnable(true);
} else {
render::Device::SetDepthTestEnable(false);
}

// Draw
render::Device::Draw(render::PT_TRIANGLES, 0, num);
}
}
}

// Reset render target
render::Device::SetRenderTarget(0);
}
通过上面几步的操作,我们就能够获取到一张Depth Map,下面是获取到的Depth Map:
采样内核
在AO计算方法一节中,我们说过AO值的计算方法,需要一张Depth Map,需要一种采样内核。Depth Map前面的章节已经解决,接下来我们就需要选用一种采样内核。什么是采样内核,根据wiki上面关于kernel的描述,我们可以认为是一种权重的分布函数,不同的采样内核会有不同的权重分布,导致在不同的采样点有不同的权重值。当我们想从Depth Map中计算AO值的时候,我们势必要通过采样操作来获取信息。当然,想要结果越好,采样的次数越多越好,不过采样次数过多,就会导致运行时间过长,帧数必然会要下降。所以我们可以选择合适的采样次数,对于SSAO,一般的采样次数为8,16,24。我们这里选用16次的采样次数。
16次的采样虽然能够保证我们的算法能够快速的运行,但是在结果上却不是十分的理想,也就是说采样次数还是太低了。对于这种问题,我们可以通过随机旋转采样内核(Randomly Rotate Kernel)来模拟更高的采样次数。对于一个给定的采样内核,它的采样分布点是确定的,如下图所示:
图中红色的点表示我们需要计算的AO值,周围的黑点,表示我们将要采样的点(这里只做举例说明,并不是我们的算法中就是使用这种采样内核)。对于同一个采样内核来说,相对于红色点,周围的黑色点的位置是固定不变的。当使用随机旋转内核的时候,对于不同的红色点,我们使用不同的随机旋转角度讲上图的内核进行旋转,得到一个新的采样内核,如下图所示,将上图旋转了45度:
通过上面的手段,我们就能够在同样的采样次数下,对每一个像素都使用不同的旋转角度的采样内核来模拟更高次数的采样。
但是,很不幸,由于进行了随机旋转,会导致最终的画面出现很多的噪音,所以我们需要去噪。对于图像处理来说,常用的去噪就是通过对画面进行模糊来实现。但是如果使用模糊的半径过大,就会导致我们最终的AO Map会变的模糊,缺失细节;所以我们将使用4*4的模糊区域来实现。
为了让模糊去噪的效果更加明显,我们可以按照模糊区域4×4重复的使用随机旋转内核。这句话的意思是说,将屏幕划分为多个4×4的平铺展开的区域,每一个区域内部的16个像素分别使用不同随机角度的旋转内核;其他的4×4区域也将使用同样的方法,同样的随机旋转内核来进行。这样就能够保证画面的噪音具有4×4的固定模式,这样4×4的模糊就能够很好的去除噪音了。
从上面的描述中我们能够看到,想要构建这里的采样内核,我们需要16个随机旋转角度,所以我们将生成一张4×4的纹理贴图,这张贴图里面,保存了16个随机旋转角度的sin和cos值,便于我们在shader中构建旋转矩阵对内核进行旋转。
如果读者细心的阅读了我的文章,就会发现我到现在还没有讲解我在算法中到底用了哪个采样内核,我只是告诉了你需要对采样内核进行随机的旋转从而去模拟更高次数的采样效果,并没有给出具体要用哪种采样内核。其实这里的选择有很多,我这里暂时选取了和Crytek在ShaderX7中给出的Cube Corner类似的采样内核,即按照正方形中心点到四个顶点的方向,使用不同的偏移来进行采样。
下面将给出部分代码,便于读者理解。
首先是准备工作:
void RenderImp::PrepareAOMap() {
// Create random rotate map
texture::Texture* random_rotate_map = texture::Texture::CreateFloat16Texture(4, 4);
if (random_rotate_map != NULL) {
m_RandRotateMap = texture::Mgr::AddTexture(random_rotate_map);
} else {
GLB_SAFE_ASSERT(false);
}

// Create ao map
texture::Texture* ao_map = texture::Texture::CreateFloat16Texture(m_Width, m_Height);
if (ao_map != NULL) {
m_AOMap = texture::Mgr::AddTexture(ao_map);
} else {
GLB_SAFE_ASSERT(false);
}

// Create temp biblur map
texture::Texture* biblur_map = texture::Texture::CreateFloat16Texture(m_Width, m_Height);
if (biblur_map != NULL) {
m_BiBlurMap = texture::Mgr::AddTexture(biblur_map);
} else {
GLB_SAFE_ASSERT(false);
}

// Create render target
m_AORenderTarget = RenderTarget::Create(m_Width, m_Height);
if (m_AORenderTarget != NULL) {
m_AORenderTarget->AttachColorTexture(render::COLORBUF_COLOR_ATTACHMENT0, ao_map);
m_AORenderTarget->AttachColorTexture(render::COLORBUF_COLOR_ATTACHMENT1, biblur_map);
} else {
GLB_SAFE_ASSERT(false);
}

// Create shader
m_AOShader = shader::Mgr::AddShader("..\\glb\\shader\\ssao.vs", "..\\glb\\shader\\ssao.ps");
m_BiBlurHShader = shader::Mgr::AddShader("..\\glb\\shader\\biblur.vs", "..\\glb\\shader\\biblurh.ps");
m_BiBlurVShader = shader::Mgr::AddShader("..\\glb\\shader\\biblur.vs", "..\\glb\\shader\\biblurv.ps");
}
首先是随机旋转角度纹理的生成。我这里是通过对投影矩阵和相机矩阵的所有数据值进行处理,然后生成一个种子来产生随机数:
void RenderImp::GenRandRotateMap() {
// Build rand seed
float seed = 0.0f;
Matrix proj = m_Perspective[Render::PRIMARY_PERS].m;
Matrix view = scene::Scene::GetCamera(scene::Scene::GetCurCamera())->GetViewMatrix();
for (int32_t i = 0; i < 16; i++) {
seed += proj.GetData()[i];
seed += view.GetData()[i];
}
srand(floor(seed * 1000));

// Build random rotate vector
Vector rand_rotate_v[16];
for (int32_t i = 0; i < 16; i++) {
int32_t angle = rand() % 360;
float sinv = sin(angle / 180.0f * 3.1415926f);
float cosv = cos(angle / 180.0f * 3.1415926f);
rand_rotate_v[i].x = sinv;
rand_rotate_v[i].y = cosv;
rand_rotate_v[i].z = 0.0f;
rand_rotate_v[i].w = 0.0f;
}

// Update to pixels
float pixels[16 * 4];
for (int32_t i = 0; i < 16; i++) {
pixels[i * 4 + 0] = rand_rotate_v[i].x;
pixels[i * 4 + 1] = rand_rotate_v[i].y;
pixels[i * 4 + 2] = rand_rotate_v[i].z;
pixels[i * 4 + 3] = rand_rotate_v[i].w;
}
texture::Mgr::GetTextureById(m_RandRotateMap)->UpdateTexture(pixels);
}
接下来看看获取初始AO Map的代码:
void RenderImp::DrawAO() {
// Render Target
render::Device::SetRenderTarget(m_AORenderTarget->GetRenderTargetObj());

// Draw Buffer
render::Device::SetDrawColorBuffer(render::COLORBUF_COLOR_ATTACHMENT0);

// Clear
render::Device::SetClearDepth(1.0f);
render::Device::SetClearColor(1.0f, 1.0f, 1.0f);
render::Device::Clear(CLEAR_DEPTH | CLEAR_COLOR);

// Shader
shader::Program* program = shader::Mgr::GetShader(m_AOShader);
std::vector<uniform::UniformEntry>& uniforms = program->GetUniforms();
render::Device::SetShader(program->GetShader());
render::Device::SetShaderLayout(program->GetShaderLayout());

// Texture
render::Device::SetTexture(render::TS_DEPTH, texture::Mgr::GetTextureById(m_DepthMap)->GetTexObj(), 0);
render::Device::SetTexture(render::TS_RANDOM_ROTATE, texture::Mgr::GetTextureById(m_RandRotateMap)->GetTexObj(), 1);

// Scene uniforms
for (int32_t j = 0; j < static_cast<int32_t>(uniforms.size()); j++) {
uniform::UniformEntry entry = uniforms[j];
if (entry.flag) {
// TODO: for now, id is the index of the uniform picker table
uniform::Wrapper uniform_wrapper = uniform::kUniformPickers[entry.id].picker(NULL);
SetUniform(entry.location, uniform_wrapper);
}
}

// Vertex Buffer
uint32_t vao = m_ScreenMesh->GetVAO();
uint32_t vbo = m_ScreenMesh->GetVBO();
VertexLayout layout = m_ScreenMesh->GetVertexLayout();
int32_t num = m_ScreenMesh->GetVertexNum();
render::Device::SetVertexArray(vao);
render::Device::SetVertexBuffer(vbo);
render::Device::SetVertexLayout(layout);

// Draw
render::Device::Draw(render::PT_TRIANGLES, 0, num);

// Reset render target
render::Device::SetRenderTarget(0);
}
以及使用的shader:
ssao.vs
//----------------------------------------------------
// Declaration: Copyright (c), by i_dovelemon, 2017. All right reserved.
// Author: i_dovelemon[1322600812@qq.com]
// Date: 2017 / 02 / 18
// Brief: SSAO
//----------------------------------------------------
#version 330

in vec3 glb_Pos;
in vec2 glb_TexCoord;

out vec2 vs_TexCoord;

void main() {
gl_Position = vec4(glb_Pos, 1.0);
vs_TexCoord = glb_TexCoord;
}
ssao.ps
//----------------------------------------------------
// Declaration: Copyright (c), by i_dovelemon, 2017. All right reserved.
// Author: i_dovelemon[1322600812@qq.com]
// Date: 2017 / 02 / 18
// Brief: SSAO
//----------------------------------------------------
#version 330

// Input
in vec2 vs_TexCoord;

// uniform
uniform sampler2D glb_RandRotateMap;
uniform sampler2D glb_DepthMap;
uniform float glb_ScreenWidth;
uniform float glb_ScreenHeight;
uniform float glb_FarClip;

// Output
out vec3 oColor;

const vec3 kCubeCorner[8] = {
vec3(1.0, 1.0, 1.0),
vec3(1.0, 1.0, -1.0),
vec3(1.0, -1.0, -1.0),
vec3(1.0, -1.0, 1.0),
vec3(-1.0, 1.0, 1.0),
vec3(-1.0, 1.0, -1.0),
vec3(-1.0, -1.0, 1.0),
vec3(-1.0, -1.0, -1.0),
};

void main() {
// Calculate rotate matrix
vec2 rotate_tex_coord = vs_TexCoord * vec2(glb_ScreenWidth, glb_ScreenHeight) / 4.0;
vec2 rotate = texture2D(glb_RandRotateMap, rotate_tex_coord).rg;
mat4 rot_z;
rot_z[0][0] = rotate.y;rot_z[0][1] = -rotate.x;rot_z[0][2] = 0.0;rot_z[0][3] = 0.0;
rot_z[1][0] = rotate.x;rot_z[1][1] = rotate.y;rot_z[1][2] = 0.0;rot_z[1][3] = 0.0;
rot_z[2][0] = 0.0;rot_z[2][1] = 0.0;rot_z[2][2] = 1.0;rot_z[2][3] = 0.0;
rot_z[3][0] = 0.0;rot_z[3][1] = 0.0;rot_z[3][2] = 0.0;rot_z[3][3] = 1.0;

mat4 rot_y;
rot_y[0][0] = rotate.y;rot_y[0][1] = 0.0;rot_y[0][2] = rotate.x;rot_y[0][3] = 0.0;
rot_y[1][0] = 0.0;rot_y[1][1] = 1.0;rot_y[1][2] = 0.0;rot_y[1][3] = 0.0;
rot_y[2][0] = -rotate.x;rot_y[2][1] = 0.0;rot_y[2][2] = rotate.y;rot_y[2][3] = 0.0;
rot_y[3][0] = 0.0;rot_y[3][1] = 0.0;rot_y[3][2] = 0.0;rot_y[3][3] = 1.0;

mat4 rot_x;
rot_x[0][0] = 1.0;rot_x[0][1] = 0.0;rot_x[0][2] = 0.0;rot_x[0][3] = 0.0;
rot_x[1][0] = 0.0;rot_x[1][1] = rotate.y;rot_x[1][2] = -rotate.x;rot_x[1][3] = 0.0;
rot_x[2][0] = 0.0;rot_x[2][1] = rotate.x;rot_x[2][2] = rotate.y;rot_x[2][3] = 0.0;
rot_x[3][0] = 0.0;rot_x[3][1] = 0.0;rot_x[3][2] = 0.0;rot_x[3][3] = 1.0;

mat4 rot_zxy = rot_y * rot_x * rot_z;

// Get current pixel's depth value in view space
float depth = texture2D(glb_DepthMap, vs_TexCoord).r * glb_FarClip;

// Accumulate the accessibility
float offset = 0.01f;
const float offset_scale = 1.0 + 2.4 / 16;
float accessibility = 0.0;

for (int i = 0; i < 2; i++) {
for (int j = 0; j < 8; j++) {
vec3 sampler_v = kCubeCorner[j];
sampler_v = (rot_zxy * vec4(sampler_v, 0.0)).xyz;
sampler_v = normalize(sampler_v);
sampler_v *= offset;
offset *= offset_scale;
sampler_v.xy += vs_TexCoord;
float sampler_depth = texture2D(glb_DepthMap, sampler_v.xy).r * glb_FarClip;
if (sampler_v.z * glb_FarClip + depth > sampler_depth) {  // Invalid
continue;
}

accessibility += 1.0;
}
}

accessibility /= 16.0;

oColor = vec3(accessibility, accessibility, accessibility);
}
好了,我们获取了基本的AO Map,接下来做的就是对它进行模糊,这里我使用的是Gaussian Blur,前面关于Glow效果的文章中已经介绍过这个模糊算法,原理这里就不在讲解,代码如下:
void RenderImp::BiBlurH() {
// Render Target
render::Device::SetRenderTarget(m_AORenderTarget->GetRenderTargetObj());

// Draw Buffer
render::Device::SetDrawColorBuffer(render::COLORBUF_COLOR_ATTACHMENT1);

// Clear
render::Device::SetClearDepth(1.0f);
render::Device::SetClearColor(1.0f, 1.0f, 1.0f);
render::Device::Clear(CLEAR_DEPTH | CLEAR_COLOR);

// Shader
shader::Program* program = shader::Mgr::GetShader(m_BiBlurHShader);
std::vector<uniform::UniformEntry>& uniforms = program->GetUniforms();
render::Device::SetShader(program->GetShader());
render::Device::SetShaderLayout(program->GetShaderLayout());

// Texture
render::Device::SetTexture(render::TS_DEPTH, texture::Mgr::GetTextureById(m_DepthMap)->GetTexObj(), 0);
render::Device::SetTexture(render::TS_AO_MAP, texture::Mgr::GetTextureById(m_AOMap)->GetTexObj(), 1);

// Scene uniforms
for (int32_t j = 0; j < static_cast<int32_t>(uniforms.size()); j++) {
uniform::UniformEntry entry = uniforms[j];
if (entry.flag) {
// TODO: for now, id is the index of the uniform picker table
uniform::Wrapper uniform_wrapper = uniform::kUniformPickers[entry.id].picker(NULL);
SetUniform(entry.location, uniform_wrapper);
}
}

// Vertex Buffer
uint32_t vao = m_ScreenMesh->GetVAO();
uint32_t vbo = m_ScreenMesh->GetVBO();
VertexLayout layout = m_ScreenMesh->GetVertexLayout();
int32_t num = m_ScreenMesh->GetVertexNum();
render::Device::SetVertexArray(vao);
render::Device::SetVertexBuffer(vbo);
render::Device::SetVertexLayout(layout);

// Draw
render::Device::Draw(render::PT_TRIANGLES, 0, num);

// Reset render target
render::Device::SetRenderTarget(0);
}

void RenderImp::BiBlurV() {
// Render Target
render::Device::SetRenderTarget(m_AORenderTarget->GetRenderTargetObj());

// Draw Buffer
render::Device::SetDrawColorBuffer(render::COLORBUF_COLOR_ATTACHMENT0);

// Clear
render::Device::SetClearDepth(1.0f);
render::Device::SetClearColor(1.0f, 1.0f, 1.0f);
render::Device::Clear(CLEAR_DEPTH | CLEAR_COLOR);

// Shader
shader::Program* program = shader::Mgr::GetShader(m_BiBlurVShader);
std::vector<uniform::UniformEntry>& uniforms = program->GetUniforms();
render::Device::SetShader(program->GetShader());
render::Device::SetShaderLayout(program->GetShaderLayout());

// Texture
render::Device::SetTexture(render::TS_DEPTH, texture::Mgr::GetTextureById(m_DepthMap)->GetTexObj(), 0);
render::Device::SetTexture(render::TS_BI_BLUR_MAP, texture::Mgr::GetTextureById(m_BiBlurMap)->GetTexObj(), 1);

// Scene uniforms
for (int32_t j = 0; j < static_cast<int32_t>(uniforms.size()); j++) {
uniform::UniformEntry entry = uniforms[j];
if (entry.flag) {
// TODO: for now, id is the index of the uniform picker table
uniform::Wrapper uniform_wrapper = uniform::kUniformPickers[entry.id].picker(NULL);
SetUniform(entry.location, uniform_wrapper);
}
}

// Vertex Buffer
uint32_t vao = m_ScreenMesh->GetVAO();
uint32_t vbo = m_ScreenMesh->GetVBO();
VertexLayout layout = m_ScreenMesh->GetVertexLayout();
int32_t num = m_ScreenMesh->GetVertexNum();
render::Device::SetVertexArray(vao);
render::Device::SetVertexBuffer(vbo);
render::Device::SetVertexLayout(layout);

// Draw
render::Device::Draw(render::PT_TRIANGLES, 0, num);

// Reset render target
render::Device::SetRenderTarget(0);
}
相关shader文件:
biblur.vs
//--------------------------------------------------------------------
// Declaration: Copyright (c), by i_dovelemon, 2017. All right reserved.
// Author: i_dovelemon[1322600812@qq.com]
// Date: 2017 / 02 / 24
// Brief: Bilateral Filter Blur
//--------------------------------------------------------------------
#version 330

in vec3 glb_Pos;
in vec2 glb_TexCoord;
out vec2 vs_texcoord;

void main() {
gl_Position = vec4(glb_Pos, 1.0);
vs_texcoord = glb_TexCoord;
}
biblurv.ps
//--------------------------------------------------------------------
// Declaration: Copyright (c), by i_dovelemon, 2017. All right reserved.
// Author: i_dovelemon[1322600812@qq.com]
// Date: 2017 / 02 / 24
// Brief: Bilaterial Filter Blur V-Pass
// TODO: do not know how to combine depth coefficient now
//--------------------------------------------------------------------
#version 330

in vec2 vs_texcoord;
out vec3 color;

uniform sampler2D glb_BiBlurMap;
uniform float glb_ScreenHeight;

const float kGaussNum[2] = {
0.36166444368093026,
0.3191677781595349,
};

void main() {
color = texture2D(glb_BiBlurMap, vs_texcoord).xyz * kGaussNum[0];
float step = 1.0 / glb_ScreenHeight;

for (int i = 1; i < 2; i++) {
if (vs_texcoord.y - i * step >= 0.0) {
color += texture2D(glb_BiBlurMap, vec2(vs_texcoord.x, vs_texcoord.y - i * step)).xyz * kGaussNum[i];
}

if (vs_texcoord.y + i * step <= 1.0) {
color += texture2D(glb_BiBlurMap, vec2(vs_texcoord.x, vs_texcoord.y + i * step)).xyz * kGaussNum[i];
}
}
}
biblurh.ps
//--------------------------------------------------------------------
// Declaration: Copyright (c), by i_dovelemon, 2017. All right reserved.
// Author: i_dovelemon[1322600812@qq.com]
// Date: 2017 / 02 / 24
// Brief: Bilaterial Filter Blur H-Pass
// TODO: do not know how to combine depth coefficient now
//--------------------------------------------------------------------
#version 330

in vec2 vs_texcoord;
out vec3 color;

uniform sampler2D glb_DepthMap;
uniform sampler2D glb_AOMap;
uniform float glb_ScreenWidth;
uniform float glb_FarClip;

const float kGaussNum[2] = {
0.36166444368093026,
0.3191677781595349,
};

void main() {
float cur_pixel_depth = texture2D(glb_DepthMap, vs_texcoord).r * glb_FarClip;
color = texture2D(glb_AOMap, vs_texcoord).xyz * kGaussNum[0] * 1.0;
float step = 1.0 / glb_ScreenWidth;

for (int i = 1; i < 2; i++) {
if (vs_texcoord.x - i * step >= 0.0) {
float temp_depth = texture2D(glb_DepthMap, vec2(vs_texcoord.x - i * step, vs_texcoord.y)).r * glb_FarClip;
float cof = 1.0 / (0.01 + abs(cur_pixel_depth - temp_depth));
//color += texture2D(glb_AOMap, vec2(vs_texcoord.x - i * step, vs_texcoord.y)).xyz * kGaussNum[i] * cof;
color += texture2D(glb_AOMap, vec2(vs_texcoord.x - i * step, vs_texcoord.y)).xyz * kGaussNum[i];
}

if (vs_texcoord.x + i * step <= 1.0) {
float temp_depth = texture2D(glb_DepthMap, vec2(vs_texcoord.x + i * step, vs_texcoord.y)).r * glb_FarClip;
float cof = 1.0 / (0.01 + abs(cur_pixel_depth - temp_depth));
//color += texture2D(glb_AOMap, vec2(vs_texcoord.x + i * step, vs_texcoord.y)).xyz * kGaussNum[i] * cof;
color += texture2D(glb_AOMap, vec2(vs_texcoord.x + i * step, vs_texcoord.y)).xyz * kGaussNum[i];
}
}
}
总结
这篇文章只是我自己对于SSAO的一些简单理解,其中有很多简化的操作,目的是为了理解SSAO的核心的概念。如果读者是为了寻求更高质量的AO算法的话,这篇文章将不适合你。后面,将会在基于此算法的基础上慢慢的改进,提高AO的质量,毕竟图形算法大多都是通过先搭建一个基础,然后根据需要,慢慢的改进它,最后找到一个比较适合的方案。参考文献
[1] http://www.realtimerendering.com/blog/shaderx7/ ShaderX7: Advance Rendering Techniques 6.1 Screen Space Ambient Occlusion[2] https://en.wikipedia.org/wiki/Kernel_(image_processing) About Kernel
[3] http://www.sunandblackcat.com/tipFullView.php?l=eng&topicid=35 About Randomly Rotate Kernel

相关文章推荐
- SSAO (Screen Space Ambient Occlusion) with D3DX9
- SSAO (Screen Space Ambient Occlusion) with D3DX10
- Unity3D图像后处理特效——Screen Space Ambient Occlusion (SSAO) image effect
- Screen Space Ambient Occlusion(SSAO)
- Screen Space Ambient Occlusion(SSAO)
- Unity3D图像后处理特效——Screen Space Ambient Occlusion (SSAO) image effect
- Screen Space Ambient Occlusion
- Screen Space Ambient Occlusion
- TSSAO Temporal Screen-Space Ambient Occlusion (Unity3d 5 示例实现)
- TSSAO Temporal Screen-Space Ambient Occlusion (Unity3d 5 示例实现)
- GraphicsLab Project之Parallel Split Shadow Map(PSSM)
- screen space directional occlusion(SSDO) in Unity5
- GraphicsLab Project之Normal Mapping
- Screen Space Directional Occlusion
- [gpu pro]screen space directional occlusion
- Directx11教程四十一之SSAO(ScreenSpaceAmcientOccusion,屏幕空间环境遮挡)
- GraphicsLab Project之辉光(Glare,Glow)效果
- GraphicsLab Project之HDR渲染
- screen space directional occlusion(SSDO) in Unity5
- ScreenSpaceShadowMask Blur推荐