Android 7.0系统启动流程分析
2017-02-27 00:31
701 查看
随着Android版本的升级,aosp项目中的代码也有了些变化,本文基于Android 7.0分析Android系统启动流程.当我们按下电源键后,整个Android设备大体经过了一下过程:
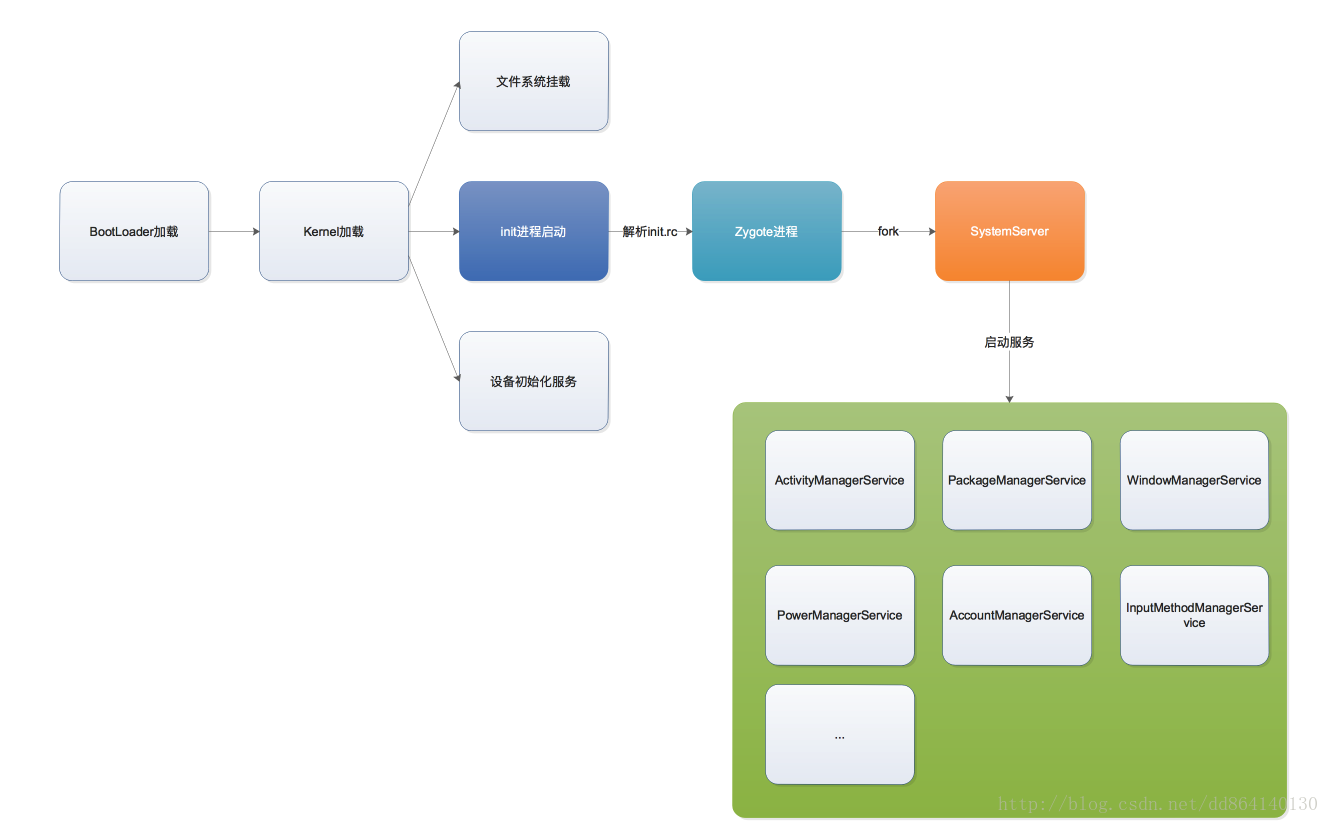
今天我们只想来分析init进程及其后的过程,也就是下图所示部分:

init进程在/system/core/init/init.cpp
init.rc文件在/system/core/rootdir下
init.rc文件由parser.cpp解析,在/system/core/init/init_parser.cpp
在init.rc中,Zygote进程被启动.Zygote进程是其他所有进程的孵化器.init.rc通过include引入init.zygote.rc,这里以init.zygote64.rc为例:
对个脚本简单分析:
后面的onrestart表示zygote重启时需要执行的动作.
位于/frameworks/base/cmds/app_process/app_main.cpp,其入口函数是main():
上述代码总体比较简单,主要是处理相关参数,并创建AppRuntime,由于在init.rc文件中,app_process启动参数被设置为
在/frameworks/base/cmds/app_process/app_main.cpp:
AppRuntime继承AndroidRuntime,而AndroidRuntime位于
/frameworks/base/core/jni/AndroidRuntime.cpp.
而start()方法便是定义在AndroidRuntime的虚方法:
在start()方法中主要做三件事情:
1. 调用startVM()函数启动虚拟机
2. 调用startReg()注册JNI方法
3. 调用com.android.internal.os.ZygoteInit.java类的main函数.
rameworks/base/core/Java/com/android/internal/os/ZygoteInit.java,我们直接来看他的main方法:
这里的main()方法中主要做了三件事情
1. 通过
2. 通过
3. 最后通过通过
方法主要通过文件描述符创建socket,该文件描述代表/dev/socket/zygote文件,现在看看开头init.rc中的配置:
这里首先通过Zygote.forkSystemServer()创建一个系统服务进程.与该方法相似还有forkAndSpecialize(),用于创建一个普通应用进程.进程创建成功后返回pid为0.由于此处生成的新进程和Zygote进程一模一样,也就是说这个新进程中同样包含了刚才创建的Socket,但是该Socket在此处无效,因此要将其关闭.接下来调用handleSystemServerProcess()处理刚才新建的进程即SystemServer进程,需要注意此时已经工作在SystemServer进程中了:
该函数继续调用RuntimeInit.zygoteInit()进一步执行启动SystemServer组件的操作.继续来看 RuntimeInit.zygoteInit()的具体实现,它在
/frameworks/base/core/java/com/android/internal/os/RuntimeInit.java文件中:
在该方法中主要调用了三个方法:
commonInit():为当前进程的VM设置未捕获异常处理器
nativeZygoteInit():Binder驱动初始化,该方法完成后,就可以通过该Binder进行进程通信
applicationInit():主要用调用com.android.server.SystemServer类的main()方法
由于commonInit()方法比较简单,在此就不做分析.
nativeZygoteInit()是一个本地方法,其对应实现在frameworks/base/core/jni/AndroidRuntime.cpp中:
这里的gCurRuntime是AppRuntime的指针,在frameworks/base/core/jni/AndroidRuntime.cpp中定义,并在AndroidRuntime的够赞函数中初始化:
继续来看onZygoteInit():
这里调用ProcessState::startThreadPool()方法启动线程池,这个线程池就是用来和Binder驱动程序进程交互的.(Binder驱动本质就是一个文件,位于/dev/binder),关于线程池具体创建的过程暂不做说明.
现在来看applicationInit():
这里继续调用了invokeStaticMain()进行后续工作:
此时要执行的是com.android.server.SystemServer的中mian()方法.此外真正执行的过程是在Zygote.MethodAndArgsCaller的run()方法中:
MethodAndArgsCaller继承Exception并实现Runnable接口,作为一个异常他被ZygoteInit.main()捕获并处理:
现在SystemServer的
在main()方法中调用了run()方法继续启动操作.在run方法中这三个方法非常重要:
startBootstrapServices():启动引导服务,比如AMS,PMS等
startCoreServices():启动核心服务,比如BatteryService等
startOtherServices():启动其他服务,比如NetworkStatsService等.
关于SystemService的具体执行过程,在此不做细解.
该方法非常简单:不断的处理来自客户端AMS的请求,然后交给runOnce().此处可见Android 7.0应用启动流程分析
到现在为止,整个SystemServer进程的启动流程已经明确看,用一张顺序图大体的表示上述的整个流程:
Zygote进程会首先创建一个SystemSever进程,然后由SystemServer负责启动系统关键服务,如ActivityManagerService或者PackageManagerService等.
今天我们只想来分析init进程及其后的过程,也就是下图所示部分:
init进程
init进程会解析init.rc文件(关于init.rc中的语法,可以参见之前写的深入分析AIL语言及init.rc文件),加载相关分区,并启动相关服务.init进程在/system/core/init/init.cpp
init.rc文件在/system/core/rootdir下
init.rc文件由parser.cpp解析,在/system/core/init/init_parser.cpp
在init.rc中,Zygote进程被启动.Zygote进程是其他所有进程的孵化器.init.rc通过include引入init.zygote.rc,这里以init.zygote64.rc为例:
service zygote /system/bin/app_process64 -Xzygote /system/bin --zygote --start-system-server
class main
priority -20
user root
group root readproc
socket zygote stream 660 root system
onrestart write /sys/android_power/request_state wake
onrestart write /sys/power/state on
onrestart restart audioserver
onrestart restart cameraserver
onrestart restart media
onrestart restart netd
writepid /dev/cpuset/foreground/tasks
对个脚本简单分析:
service zygote /system/bin/app_process64:service命令告诉init进程要创建一个名字为zygote的进程,这个zygote进程执行的程序是/system/bin/app_process64,后面是传给app_process64程序的参数.
socket zygote stream 660 root system:表示zygote进程需要一个名为”zygote”的socket,该socket用来实现进程间的通信.当新启动一个应用时,ActivityManagerService想向该Socket发起请求,请求zygote进程fork出一个新的进程.
后面的onrestart表示zygote重启时需要执行的动作.
Zygote进程启动
上面说到init进程会根据init.rc执行相关的操作,其中有一项就是创建Zygote进程.Zygote进程所对应的程序是/system/bin/app_process,位于/frameworks/base/cmds/app_process/app_main.cpp,其入口函数是main():
int main(int argc, char* const argv[])
{
if (prctl(PR_SET_NO_NEW_PRIVS, 1, 0, 0, 0) < 0) {
LOG_ALWAYS_FATAL("PR_SET_NO_NEW_PRIVS failed: %s", strerror(errno));
}

if (!LOG_NDEBUG) {
String8 argv_String;
for (int i = 0; i < argc; ++i) {
argv_String.append("\"");
argv_String.append(argv[i]);
argv_String.append("\" ");
}
ALOGV("app_process main with argv: %s", argv_String.string());
}

AppRuntime runtime(argv[0], computeArgBlockSize(argc, argv));
// Process command line arguments
// ignore argv[0]
argc--;
argv++;
const char* spaced_commands[] = { "-cp", "-classpath" };

bool known_command = false;

int i;
for (i = 0; i < argc; i++) {
if (known_command == true) {
runtime.addOption(strdup(argv[i]));
ALOGV("app_process main add known option '%s'", argv[i]);
known_command = false;
continue;
}

for (int j = 0;
j < static_cast<int>(sizeof(spaced_commands) / sizeof(spaced_commands[0]));
++j) {
if (strcmp(argv[i], spaced_commands[j]) == 0) {
known_command = true;
ALOGV("app_process main found known command '%s'", argv[i]);
}
}

if (argv[i][0] != '-') {
break;
}
if (argv[i][1] == '-' && argv[i][2] == 0) {
++i; // Skip --.
break;
}

runtime.addOption(strdup(argv[i]));
ALOGV("app_process main add option '%s'", argv[i]);
}

// Parse runtime arguments.  Stop at first unrecognized option.
bool zygote = false;
bool startSystemServer = false;
bool application = false;
String8 niceName;
String8 className;

++i;  // Skip unused "parent dir" argument.
while (i < argc) {
const char* arg = argv[i++];
if (strcmp(arg, "--zygote") == 0) {
zygote = true;
niceName = ZYGOTE_NICE_NAME;
} else if (strcmp(arg, "--start-system-server") == 0) {
//init.zygote64.rc中接受的参数,表示启动SystemServer组件
startSystemServer = true;
} else if (strcmp(arg, "--application") == 0) {
application = true;
} else if (strncmp(arg, "--nice-name=", 12) == 0) {
niceName.setTo(arg + 12);
} else if (strncmp(arg, "--", 2) != 0) {
className.setTo(arg);
break;
} else {
--i;
break;
}
}

Vector<String8> args;
if (!className.isEmpty()) {

args.add(application ? String8("application") : String8("tool"));
runtime.setClassNameAndArgs(className, argc - i, argv + i);

if (!LOG_NDEBUG) {
String8 restOfArgs;
char* const* argv_new = argv + i;
int argc_new = argc - i;
for (int k = 0; k < argc_new; ++k) {
restOfArgs.append("\"");
restOfArgs.append(argv_new[k]);
restOfArgs.append("\" ");
}
ALOGV("Class name = %s, args = %s", className.string(), restOfArgs.string());
}
} else {
// We're in zygote mode.
maybeCreateDalvikCache();

if (startSystemServer) {
args.add(String8("start-system-server"));
}

char prop[PROP_VALUE_MAX];
if (property_get(ABI_LIST_PROPERTY, prop, NULL) == 0) {
LOG_ALWAYS_FATAL("app_process: Unable to determine ABI list from property %s.",
ABI_LIST_PROPERTY);
return 11;
}

String8 abiFlag("--abi-list=");
abiFlag.append(prop);
args.add(abiFlag);

// In zygote mode, pass all remaining arguments to the zygote
// main() method.
for (; i < argc; ++i) {
args.add(String8(argv[i]));
}
}

if (!niceName.isEmpty()) {
runtime.setArgv0(niceName.string(), true /* setProcName */);
}

if (zygote) {
//此处见到了我们熟悉的ZygoteInit,但该方法的具体实现在//AndroidRuntime.start()
runtime.start("com.android.internal.os.ZygoteInit", args, zygote);
} else if (className) {
runtime.start("com.android.internal.os.RuntimeInit", args, zygote);
} else {
fprintf(stderr, "Error: no class name or --zygote supplied.\n");
app_usage();
LOG_ALWAYS_FATAL("app_process: no class name or --zygote supplied.");
}
}
上述代码总体比较简单,主要是处理相关参数,并创建AppRuntime,由于在init.rc文件中,app_process启动参数被设置为
--zygote --start-system-server,因此会执行
runtime.start("com.android.internal.os.ZygoteInit", args, zygote),现在我们来看看AppRuntime的具体实现,它同样在在/frameworks/base/cmds/app_process/app_main.cpp:
class AppRuntime : public AndroidRuntime
{
public:
AppRuntime(char* argBlockStart, const size_t argBlockLength)
: AndroidRuntime(argBlockStart, argBlockLength)
, mClass(NULL)
{
}

void setClassNameAndArgs(const String8& className, int argc, char * const *argv) {
mClassName = className;
for (int i = 0; i < argc; ++i) {
mArgs.add(String8(argv[i]));
}
}

virtual void onVmCreated(JNIEnv* env)
{
if (mClassName.isEmpty()) {
return; // Zygote. Nothing to do here.
}

char* slashClassName = toSlashClassName(mClassName.string());
mClass = env->FindClass(slashClassName);
if (mClass == NULL) {
ALOGE("ERROR: could not find class '%s'\n", mClassName.string());
}
free(slashClassName);

mClass = reinterpret_cast<jclass>(env->NewGlobalRef(mClass));
}

virtual void onStarted()
{
sp<ProcessState> proc = ProcessState::self();
ALOGV("App process: starting thread pool.\n");
proc->startThreadPool();

AndroidRuntime* ar = AndroidRuntime::getRuntime();
ar->callMain(mClassName, mClass, mArgs);

IPCThreadState::self()->stopProcess();
}

virtual void onZygoteInit()
{
sp<ProcessState> proc = ProcessState::self();
ALOGV("App process: starting thread pool.\n");
proc->startThreadPool();
}

virtual void onExit(int code)
{
if (mClassName.isEmpty()) {
// if zygote
IPCThreadState::self()->stopProcess();
}

AndroidRuntime::onExit(code);
}

String8 mClassName;
Vector<String8> mArgs;
jclass mClass;
};
AppRuntime继承AndroidRuntime,而AndroidRuntime位于
/frameworks/base/core/jni/AndroidRuntime.cpp.
而start()方法便是定义在AndroidRuntime的虚方法:
//这里的className的值就是com.android.intrnal.os.ZygoteInit
void AndroidRuntime::start(const char* className, const Vector<String8>& options, bool zygote)
{
//...省略多行代码

static const String8 startSystemServer("start-system-server");

for (size_t i = 0; i < options.size(); ++i) {
if (options[i] == startSystemServer) {
/* track our progress through the boot sequence */
const int LOG_BOOT_PROGRESS_START = 3000;
LOG_EVENT_LONG(LOG_BOOT_PROGRESS_START,  ns2ms(systemTime(SYSTEM_TIME_MONOTONIC)));
}
}

const char* rootDir = getenv("ANDROID_ROOT");
if (rootDir == NULL) {
rootDir = "/system";
if (!hasDir("/system")) {
LOG_FATAL("No root directory specified, and /android does not exist.");
return;
}
setenv("ANDROID_ROOT", rootDir, 1);
}

//1. 启动虚拟机
if (startVm(&mJavaVM, &env, zygote) != 0) {
return;
}
onVmCreated(env);

//2. 调用startReg()注册JNI方法
if (startReg(env) < 0) {
ALOGE("Unable to register all android natives\n");
return;
}

jclass stringClass;
jobjectArray strArray;
jstring classNameStr;

stringClass = env->FindClass("java/lang/String");
assert(stringClass != NULL);
strArray = env->NewObjectArray(options.size() + 1, stringClass, NULL);
assert(strArray != NULL);
classNameStr = env->NewStringUTF(className);
assert(classNameStr != NULL);
env->SetObjectArrayElement(strArray, 0, classNameStr);

for (size_t i = 0; i < options.size(); ++i) {
jstring optionsStr = env->NewStringUTF(options.itemAt(i).string());
assert(optionsStr != NULL);
env->SetObjectArrayElement(strArray, i + 1, optionsStr);
}

char* slashClassName = toSlashClassName(className);
jclass startClass = env->FindClass(slashClassName);
if (startClass == NULL) {
ALOGE("JavaVM unable to locate class '%s'\n", slashClassName);
} else {
//3. 本质就是调用com.android.intrnal.os.ZygoteInit类的main函数
jmethodID startMeth = env->GetStaticMethodID(startClass, "main",
"([Ljava/lang/String;)V");
if (startMeth == NULL) {
ALOGE("JavaVM unable to find main() in '%s'\n", className);
/* keep going */
} else {
env->CallStaticVoidMethod(startClass, startMeth, strArray);

#if 0
if (env->ExceptionCheck())
threadExitUncaughtException(env);
#endif
}
}
free(slashClassName);

// 省略多行代码
}
在start()方法中主要做三件事情:
1. 调用startVM()函数启动虚拟机
2. 调用startReg()注册JNI方法
3. 调用com.android.internal.os.ZygoteInit.java类的main函数.
走进ZygoteInit
关于前两者就不细说了,重点来关注我们熟悉的ZygoteInit.java.它在rameworks/base/core/Java/com/android/internal/os/ZygoteInit.java,我们直接来看他的main方法:
public static void main(String argv[]) {
ZygoteServer zygoteServer = new ZygoteServer();
ZygoteHooks.startZygoteNoThreadCreation();
try {
Os.setpgid(0, 0);
} catch (ErrnoException ex) {
throw new RuntimeException("Failed to setpgid(0,0)", ex);
}

try {
Trace.traceBegin(Trace.TRACE_TAG_DALVIK, "ZygoteInit");
RuntimeInit.enableDdms();
// Start profiling the zygote initialization.
SamplingProfilerIntegration.start();

boolean startSystemServer = false;
String socketName = "zygote";
String abiList = null;
for (int i = 1; i < argv.length; i++) {
if ("start-system-server".equals(argv[i])) {
startSystemServer = true;
} else if (argv[i].startsWith(ABI_LIST_ARG)) {
abiList = argv[i].substring(ABI_LIST_ARG.length());
} else if (argv[i].startsWith(SOCKET_NAME_ARG)) {
socketName = argv[i].substring(SOCKET_NAME_ARG.length());
} else {
throw new RuntimeException("Unknown command line argument: " + argv[i]);
}
}

if (abiList == null) {
throw new RuntimeException("No ABI list supplied.");
}
//创建名为zygote的socket
zygoteServer.registerServerSocket(socketName);
Trace.traceBegin(Trace.TRACE_TAG_DALVIK, "ZygotePreload");
//省略多行参数
SamplingProfilerIntegration.writeZygoteSnapshot();

// Do an initial gc to clean up after startup
Trace.traceBegin(Trace.TRACE_TAG_DALVIK, "PostZygoteInitGC");
gcAndFinalize();
Trace.traceEnd(Trace.TRACE_TAG_DALVIK);
Trace.setTracingEnabled(false);
Zygote.nativeUnmountStorageOnInit();

ZygoteHooks.stopZygoteNoThreadCreation();
//由于在init.rc中设置了start-system-server参数,因此
//这里将启动SystemServer,可见SystemServer由Zygote创        //建的第一个进程
if (startSystemServer) {
//启动SystemServer组件
startSystemServer(abiList, socketName, zygoteServer);
}

Log.i(TAG, "Accepting command socket connections");
//等待ActivityManagerService请求
zygoteServer.runSelectLoop(abiList);

zygoteServer.closeServerSocket();
} catch (Zygote.MethodAndArgsCaller caller) {
caller.run();
} catch (Throwable ex) {
Log.e(TAG, "System zygote died with exception", ex);
zygoteServer.closeServerSocket();
throw ex;
}
}
这里的main()方法中主要做了三件事情
1. 通过
registerServerSocket()来创建Socket,它将作为服务端用来和作为客户端的ActivityManagerService进行通信
2. 通过
startSystemServer()方法来启动SystemServer
3. 最后通过通过
runSelectLoop方法使得刚才创建的Socket进入无限循环,以等待来自ActivityManagerService请求
Zygote中Socket创建
首先来看resiterServerSocket()它在:
void registerServerSocket(String socketName) {
if (mServerSocket == null) {
int fileDesc;
final String fullSocketName = ANDROID_SOCKET_PREFIX + socketName;
try {
String env = System.getenv(fullSocketName);
//从环境变量env中获取文件描述符,
fileDesc = Integer.parseInt(env);
} catch (RuntimeException ex) {
throw new RuntimeException(fullSocketName + " unset or invalid", ex);
}

try {
//通过文件描述符创建socket,该描述符代表/dev/socket/zygote文件.
FileDescriptor fd = new FileDescriptor();
fd.setInt$(fileDesc);
mServerSocket = new LocalServerSocket(fd);
} catch (IOException ex) {
throw new RuntimeException(
"Error binding to local socket '" + fileDesc + "'", ex);
}
}
}
方法主要通过文件描述符创建socket,该文件描述代表/dev/socket/zygote文件,现在看看开头init.rc中的配置:
socket zygote stream 660 root system
Zygote启动SystemServer
现在来看startSystemServer()方法:private static boolean startSystemServer(String abiList, String socketName, ZygoteServer zygoteServer)
throws Zygote.MethodAndArgsCaller, RuntimeException {
long capabilities = posixCapabilitiesAsBits(
OsConstants.CAP_IPC_LOCK,
OsConstants.CAP_KILL,
OsConstants.CAP_NET_ADMIN,
OsConstants.CAP_NET_BIND_SERVICE,
OsConstants.CAP_NET_BROADCAST,
OsConstants.CAP_NET_RAW,
OsConstants.CAP_SYS_MODULE,
OsConstants.CAP_SYS_NICE,
OsConstants.CAP_SYS_RESOURCE,
OsConstants.CAP_SYS_TIME,
OsConstants.CAP_SYS_TTY_CONFIG,
OsConstants.CAP_WAKE_ALARM
);
if (!SystemProperties.getBoolean(PROPERTY_RUNNING_IN_CONTAINER, false)) {
capabilities |= posixCapabilitiesAsBits(OsConstants.CAP_BLOCK_SUSPEND);
}
/* Hardcoded command line to start the system server */
String args[] = {
"--setuid=1000",
"--setgid=1000",
"--setgroups=1001,1002,1003,1004,1005,1006,1007,1008,1009,1010,1018,1021,1032,3001,3002,3003,3006,3007,3009,3010",
"--capabilities=" + capabilities + "," + capabilities,
"--nice-name=system_server",
"--runtime-args",
"com.android.server.SystemServer",
};
ZygoteConnection.Arguments parsedArgs = null;
int pid;
try {
parsedArgs = new ZygoteConnection.Arguments(args);
ZygoteConnection.applyDebuggerSystemProperty(parsedArgs);
ZygoteConnection.applyInvokeWithSystemProperty(parsedArgs);
//创建子进程
pid = Zygote.forkSystemServer(
parsedArgs.uid, parsedArgs.gid,
parsedArgs.gids,
parsedArgs.debugFlags,
null,
parsedArgs.permittedCapabilities,
parsedArgs.effectiveCapabilities);
} catch (IllegalArgumentException ex) {
throw new RuntimeException(ex);
}
//pid=0表示子进程,此处就是SystemServer进程
if (pid == 0) {
//用于处理系统中有两个Zygote进程的情况,由于通常我们不会配置两个Zygote,因此暂时不关注
if (hasSecondZygote(abiList)) {
waitForSecondaryZygote(socketName);
}
//Zygote创建的子进程(此处就是SystemServer)不需要使用Zygote中创建的Socket文件描述符,因此通过closeServerSocket()关闭它.
zygoteServer.closeServerSocket();
handleSystemServerProcess(parsedArgs);
}
return true;
}这里首先通过Zygote.forkSystemServer()创建一个系统服务进程.与该方法相似还有forkAndSpecialize(),用于创建一个普通应用进程.进程创建成功后返回pid为0.由于此处生成的新进程和Zygote进程一模一样,也就是说这个新进程中同样包含了刚才创建的Socket,但是该Socket在此处无效,因此要将其关闭.接下来调用handleSystemServerProcess()处理刚才新建的进程即SystemServer进程,需要注意此时已经工作在SystemServer进程中了:
private static void handleSystemServerProcess(
ZygoteConnection.Arguments parsedArgs)
throws Zygote.MethodAndArgsCaller {
//省略多行代码,此处invokeWith为null
if (parsedArgs.invokeWith != null) {
String[] args = parsedArgs.remainingArgs;

if (systemServerClasspath != null) {
//省略多行代码
} else {

ClassLoader cl = null;
if (systemServerClasspath != null) {
//为SysteServer进程创建PathClassLoader类加载器
cl = createSystemServerClassLoader(systemServerClasspath,
parsedArgs.targetSdkVersion);

Thread.currentThread().setContextClassLoader(cl);
}

RuntimeInit.zygoteInit(parsedArgs.targetSdkVersion, parsedArgs.remainingArgs, cl);
}

}
该函数继续调用RuntimeInit.zygoteInit()进一步执行启动SystemServer组件的操作.继续来看 RuntimeInit.zygoteInit()的具体实现,它在
/frameworks/base/core/java/com/android/internal/os/RuntimeInit.java文件中:
public static final void zygoteInit(int targetSdkVersion, String[] argv, ClassLoader classLoader)
throws Zygote.MethodAndArgsCaller {
//...省略多行代码

commonInit();
nativeZygoteInit();
applicationInit(targetSdkVersion, argv, classLoader);
}
在该方法中主要调用了三个方法:
commonInit():为当前进程的VM设置未捕获异常处理器
nativeZygoteInit():Binder驱动初始化,该方法完成后,就可以通过该Binder进行进程通信
applicationInit():主要用调用com.android.server.SystemServer类的main()方法
由于commonInit()方法比较简单,在此就不做分析.
nativeZygoteInit()是一个本地方法,其对应实现在frameworks/base/core/jni/AndroidRuntime.cpp中:
static void com_android_internal_os_RuntimeInit_nativeZygoteInit(JNIEnv* env, jobject clazz)
{
gCurRuntime->onZygoteInit();
}
这里的gCurRuntime是AppRuntime的指针,在frameworks/base/core/jni/AndroidRuntime.cpp中定义,并在AndroidRuntime的够赞函数中初始化:
//定义
static AndroidRuntime* gCurRuntime = NULL;

...

//在frameworks/base/cmds/app_process/app_main.cpp的main()方法中被调用
AndroidRuntime::AndroidRuntime(char* argBlockStart, const size_t argBlockLength) :
mExitWithoutCleanup(false),
mArgBlockStart(argBlockStart),
mArgBlockLength(argBlockLength)
{
SkGraphics::Init();
mOptions.setCapacity(20);

assert(gCurRuntime == NULL);
gCurRuntime = this;
}
继续来看onZygoteInit():
virtual void onZygoteInit()
{
sp<ProcessState> proc = ProcessState::self();
ALOGV("App process: starting thread pool.\n");
proc->startThreadPool();
}
这里调用ProcessState::startThreadPool()方法启动线程池,这个线程池就是用来和Binder驱动程序进程交互的.(Binder驱动本质就是一个文件,位于/dev/binder),关于线程池具体创建的过程暂不做说明.
现在来看applicationInit():
private static void applicationInit(int targetSdkVersion, String[] argv, ClassLoader classLoader)
throws ZygoteInit.MethodAndArgsCaller {
//省略多行代码
invokeStaticMain(args.startClass, args.startArgs, classLoader);
}
这里继续调用了invokeStaticMain()进行后续工作:
private static void invokeStaticMain(String className, String[] argv, ClassLoader classLoader)
throws ZygoteInit.MethodAndArgsCaller {
Class<?> cl;

try {
cl = Class.forName(className, true, classLoader);
} catch (ClassNotFoundException ex) {
throw new RuntimeException(
"Missing class when invoking static main " + className,
ex);
}

Method m;
try {
m = cl.getMethod("main", new Class[] { String[].class });
} catch (NoSuchMethodException ex) {
//...
} catch (SecurityException ex) {
//...
}

// 省略多行代码

/*
* This throw gets caught in ZygoteInit.main(), which responds
* by invoking the exception's run() method. This arrangement
* clears up all the stack frames that were required in setting
* up the process.
*/
throw new ZygoteInit.MethodAndArgsCaller(m, argv);
}
此时要执行的是com.android.server.SystemServer的中mian()方法.此外真正执行的过程是在Zygote.MethodAndArgsCaller的run()方法中:
public static class MethodAndArgsCaller extends Exception
implements Runnable {
/** method to call */
private final Method mMethod;

/** argument array */
private final String[] mArgs;

public MethodAndArgsCaller(Method method, String[] args) {
mMethod = method;
mArgs = args;
}

public void run() {
try {
mMethod.invoke(null, new Object[] { mArgs });
} catch (IllegalAccessException ex) {
throw new RuntimeException(ex);
} catch (InvocationTargetException ex) {
//省略多行代码
}
}
}
MethodAndArgsCaller继承Exception并实现Runnable接口,作为一个异常他被ZygoteInit.main()捕获并处理:
public static void main(String argv[]) {
// ...
try {
//...省略多行代码
startSystemServer(abiList, socketName);
} catch (MethodAndArgsCaller caller) {
caller.run();
} catch (Throwable ex) {
//...
}
}
现在SystemServer的
main()已经被调用,我们顺着来看一下实现:
public class SystemServer{

public static void main(String[] args) {
new SystemServer().run();
}

private void run() {
try {
//...省略一些初始化操作

android.os.Process.setThreadPriority(
android.os.Process.THREAD_PRIORITY_FOREGROUND);
android.os.Process.setCanSelfBackground(false);
//初始化主线程Looper
Looper.prepareMainLooper();

//创建SystemServiceManager对象
mSystemServiceManager = new SystemServiceManager(mSystemContext);
LocalServices.addService(SystemServiceManager.class, mSystemServiceManager);
} finally {
Trace.traceEnd(Trace.TRACE_TAG_SYSTEM_SERVER);
}

// 启动关键服务
startBootstrapServices();
//启动核心服务
startCoreServices();
//启动其他服务
startOtherServices();
//...省略多行代码

//启动消息循环
Looper.loop();

}

}
在main()方法中调用了run()方法继续启动操作.在run方法中这三个方法非常重要:
startBootstrapServices():启动引导服务,比如AMS,PMS等
startCoreServices():启动核心服务,比如BatteryService等
startOtherServices():启动其他服务,比如NetworkStatsService等.
关于SystemService的具体执行过程,在此不做细解.
Socket循环监听
到目前为止,关于ZygoteServer.registerServerSocket()和
startSystemServer()的大体流程我们已经弄清除,接下来就是
ZygoteServer.runSelectLoop()方法:
void runSelectLoop(String abiList) throws Zygote.MethodAndArgsCaller {
ArrayList<FileDescriptor> fds = new ArrayList<FileDescriptor>();
ArrayList<ZygoteConnection> peers = new ArrayList<ZygoteConnection>();

fds.add(mServerSocket.getFileDescriptor());
peers.add(null);

while (true) {
StructPollfd[] pollFds = new StructPollfd[fds.size()];
for (int i = 0; i < pollFds.length; ++i) {
pollFds[i] = new StructPollfd();
pollFds[i].fd = fds.get(i);
pollFds[i].events = (short) POLLIN;
}
try {
Os.poll(pollFds, -1);
} catch (ErrnoException ex) {
throw new RuntimeException("poll failed", ex);
}
for (int i = pollFds.length - 1; i >= 0; --i) {
if ((pollFds[i].revents & POLLIN) == 0) {
continue;
}
if (i == 0) {
//监听Socket链接,如果你做过Socket编程就发现此处充当了服务端Socket
ZygoteConnection newPeer = acceptCommandPeer(abiList);
peers.add(newPeer);
fds.add(newPeer.getFileDesciptor());
} else {
//重点关注runOnce()方法
boolean done = peers.get(i).runOnce(this);
if (done) {
peers.remove(i);
fds.remove(i);
}
}
}
}
}该方法非常简单:不断的处理来自客户端AMS的请求,然后交给runOnce().此处可见Android 7.0应用启动流程分析
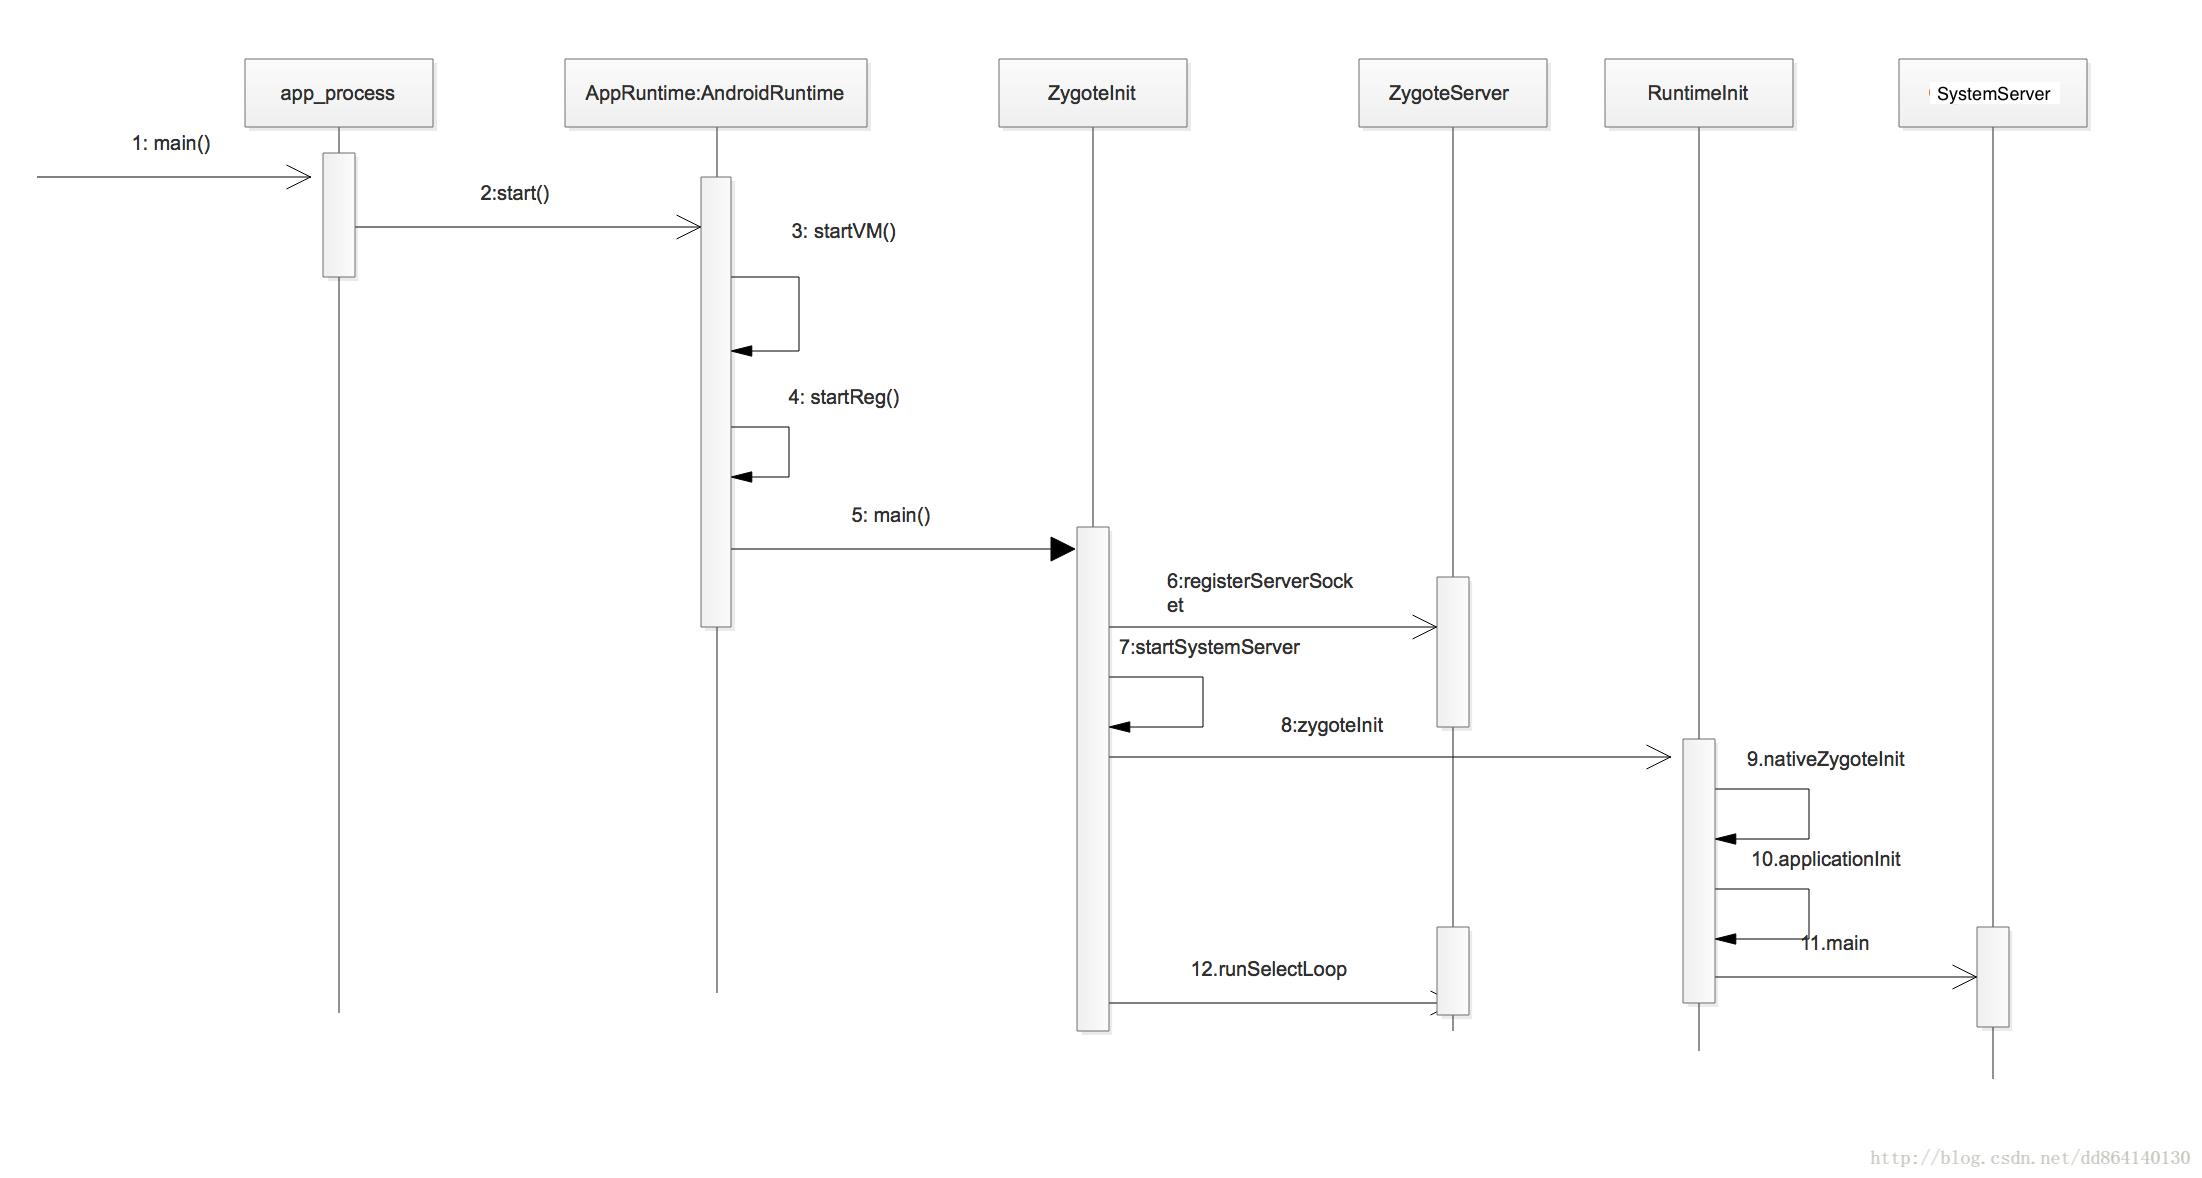
到现在为止,整个SystemServer进程的启动流程已经明确看,用一张顺序图大体的表示上述的整个流程:
总结
系统启动时init进程会创建Zygote进程,Zygote进程负责后续Android应用框架层的其他进程的创建和启动.Zygote进程会首先创建一个SystemSever进程,然后由SystemServer负责启动系统关键服务,如ActivityManagerService或者PackageManagerService等.

相关文章推荐
- Android 7.0系统启动流程分析
- Android系统启动流程分析之安装应用
- Android OTA升级原理和流程分析(三)---Android系统的三种启动模式
- Android系统启动流程分析之安装应用
- Android 系统7.0上 屏幕背光流程分析
- Android系统应用---SystemUI之一:SystemUI概述和创建启动流程分析
- Android系统启动流程分析(一)
- Android 7.0 Launcher3的启动和加载流程分析
- Android系统启动流程分析
- Android OTA升级原理和流程分析(三)---Android系统的三种启动模式
- android系统启动流程启动画面学习之init和init.rc分析
- Android 系统7.0上 屏幕背光流程分析
- Android OTA升级原理和流程分析(三)---Android系统的三种启动模式
- Android 7.0 Gallery图库源码分析2 - 分析启动流程
- Android系统启动流程分析之启动应用
- android系统启动流程启动画面学习之init和init.rc分析
- Android 5.0 Camera系统源码分析(1):CameraService启动流程
- Android系统启动流程源码分析
- Android OTA升级原理和流程分析(三)---Android系统的三种启动模式
- android系统启动流程之init.rc详细分析笔记