Android使用百度地图SDK实现定位功能
2017-02-23 22:34
369 查看
百度地图的sdk在地图和定位方面是非常有用的开发工具。我们应该学会如何使用它,最近的小项目中使用到了定位功能,于是自然想到了使用百度地图sdk。接下来讲一下怎么使用它的定位sdk实现简单的定位功能。
首先你需要登录百度账号,注册成为开发者。链接如下:
http://lbsyun.baidu.com/
然后,我们选择Android定位SDK
http://lbsyun.baidu.com/index.php?title=android-locsdk
接着,第一步你需要获取秘钥:
在Andoird Studio 中不像Eclipse中那样能够直接查看,我们首先打开命令行,然后cd到 .android路径下
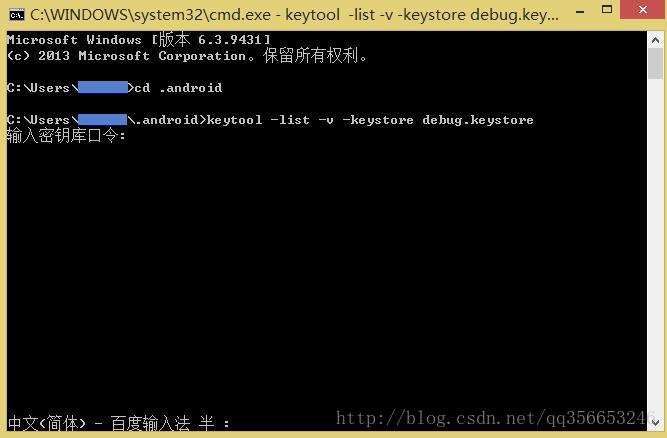
然后敲入keytool -list -v -keystore debug.keystore 之后输入口令: android,正常情况下,你会看见以下图片显示的内容,其中就有我们需要的SHA1值

但是如果出现 keytool不是内部命令…的话,说明你的Path还未配置,将你JDK中的bin路径在环境变量中新加到path变量中即可。
再然后,你需要获取你的应用的包名,在build.gradle中查看即可有 aoolicationId一项 直接复制引号中的内容到百度网页上即可。还要复制上面SHA1值,(建议将SHA1值保存到记事本中,以后还会用到)此时 点击提交 你就可以获得一个百度地图提供的AK值,如下图所示啦。

将上面的Ak值复制,然后复制到你应用的Manifest.xml中,
然后你去 http://lbsyun.baidu.com/index.php?title=android-locsdk/geosdk-android-download 点击下载demo
接着 我们来试下实现定位功能,进入代码模式,可以新建一个工程,然后将用到的libs从demo中直接复制,目录的话 就放在app下 和build,src同级。
布局文件只需要一个
然后,将demo中的location.service包复制到自己的工程下(此处略,自己找到复制就好)
然后将demo中的locationActivity复制过来,可以直接使用
接着最后复制LocationApplication
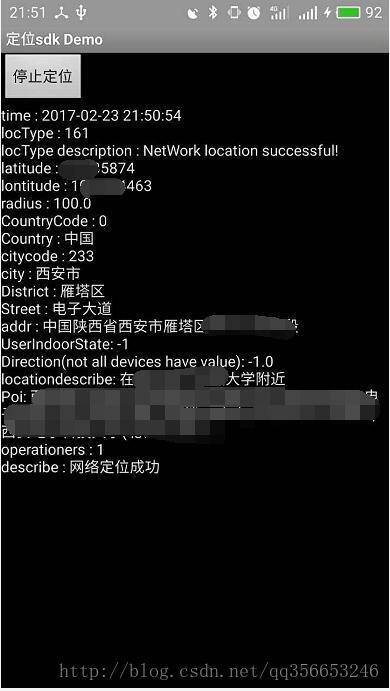
记得将manifest中的ak值配置好,我们来看看最后的结果吧
这样你就可以将想要的值用在自己的程序中了。大家加油!
<本博客部分内容参考百度地图api官方教程!>
首先你需要登录百度账号,注册成为开发者。链接如下:
http://lbsyun.baidu.com/
然后,我们选择Android定位SDK
http://lbsyun.baidu.com/index.php?title=android-locsdk
接着,第一步你需要获取秘钥:
在Andoird Studio 中不像Eclipse中那样能够直接查看,我们首先打开命令行,然后cd到 .android路径下
然后敲入keytool -list -v -keystore debug.keystore 之后输入口令: android,正常情况下,你会看见以下图片显示的内容,其中就有我们需要的SHA1值
但是如果出现 keytool不是内部命令…的话,说明你的Path还未配置,将你JDK中的bin路径在环境变量中新加到path变量中即可。
再然后,你需要获取你的应用的包名,在build.gradle中查看即可有 aoolicationId一项 直接复制引号中的内容到百度网页上即可。还要复制上面SHA1值,(建议将SHA1值保存到记事本中,以后还会用到)此时 点击提交 你就可以获得一个百度地图提供的AK值,如下图所示啦。
将上面的Ak值复制,然后复制到你应用的Manifest.xml中,
<meta-data
android:name="com.baidu.lbsapi.API_KEY"
android:value="这里复制你刚获取的AK值" />  <!--http://lbsyun.baidu.com/apiconsole/key-->

<!-- meta-data需要写在application中 -->
然后你去 http://lbsyun.baidu.com/index.php?title=android-locsdk/geosdk-android-download 点击下载demo
接着 我们来试下实现定位功能,进入代码模式,可以新建一个工程,然后将用到的libs从demo中直接复制,目录的话 就放在app下 和build,src同级。
布局文件只需要一个
<?xml version="1.0" encoding="utf-8"?>
<LinearLayout xmlns:android="http://schemas.android.com/apk/res/android"
android:layout_width="match_parent"
android:layout_height="match_parent"
android:orientation="vertical" >

<Button
android:id="@+id/btn_loc"
android:layout_width="wrap_content"
android:layout_height="wrap_content"
android:text="开始定位" />

<TextView
android:id="@+id/textView1"
android:layout_width="match_parent"
android:layout_height="200dp"
android:layout_weight="2.89"
android:scrollbars="vertical"
android:textColor="#ffffffff"
android:text=" "/>

</LinearLayout>
然后,将demo中的location.service包复制到自己的工程下(此处略,自己找到复制就好)
然后将demo中的locationActivity复制过来,可以直接使用
//你的包名;

import android.app.Activity;
import android.os.Bundle;
import android.text.method.ScrollingMovementMethod;
import android.view.View;
import android.view.View.OnClickListener;
import android.widget.Button;
import android.widget.TextView;

import com.baidu.location.BDLocation;
import com.baidu.location.BDLocationListener;
import com.baidu.location.Poi;
import com.example.guofang.baidumap_1.location.service.LocationService;

/***
* 单点定位示例,用来展示基本的定位结果,配置在LocationService.java中
* 默认配置也可以在LocationService中修改
* 默认配置的内容自于开发者论坛中对开发者长期提出的疑问内容
*
* @author baidu
*
*/
public class LocationActivity extends Activity {
private LocationService locationService;
private TextView LocationResult;
private Button startLocation;

@Override
protected void onCreate(Bundle savedInstanceState) {
// TODO Auto-generated method stub
super.onCreate(savedInstanceState);
// -----------demo view config ------------
setContentView(R.layout.activity_main);
LocationResult = (TextView) findViewById(R.id.textView1);

4000
LocationResult.setMovementMethod(ScrollingMovementMethod.getInstance());
startLocation = (Button) findViewById(R.id.btn_loc);

}

/**
* 显示请求字符串
*
* @param str
*/
public void logMsg(String str) {
final String s = str;
try {
if (LocationResult != null){
new Thread(new Runnable() {
@Override
public void run() {
LocationResult.post(new Runnable() {
@Override
public void run() {
LocationResult.setText(s);
}
});

}
}).start();
}
//LocationResult.setText(str);
} catch (Exception e) {
e.printStackTrace();
}
}

/***
* Stop location service
*/
@Override
protected void onStop() {
// TODO Auto-generated method stub
locationService.unregisterListener(mListener); //注销掉监听
locationService.stop(); //停止定位服务
super.onStop();
}

@Override
protected void onStart() {
// TODO Auto-generated method stub
super.onStart();
// -----------location config ------------
locationService = ((LocationApplication) getApplication()).locationService;
//获取locationservice实例,建议应用中只初始化1个location实例,然后使用,可以参考其他示例的activity,都是通过此种方式获取locationservice实例的
locationService.registerListener(mListener);
//注册监听
int type = getIntent().getIntExtra("from", 0);
if (type == 0) {
locationService.setLocationOption(locationService.getDefaultLocationClientOption());
} else if (type == 1) {
locationService.setLocationOption(locationService.getOption());
}
startLocation.setOnClickListener(new OnClickListener() {

@Override
public void onClick(View v) {
if (startLocation.getText().toString().equals(getString(R.string.startlocation))) {
locationService.start();// 定位SDK
// start之后会默认发起一次定位请求,开发者无须判断isstart并主动调用request
startLocation.setText(getString(R.string.stoplocation));
} else {
locationService.stop();
startLocation.setText(getString(R.string.startlocation));
}
}
});
}

/*****
*
* 定位结果回调,重写onReceiveLocation方法,可以直接拷贝如下代码到自己工程中修改
*
*/
private BDLocationListener mListener = new BDLocationListener() {

@Override
public void onReceiveLocation(BDLocation location) {
// TODO Auto-generated method stub
if (null != location && location.getLocType() != BDLocation.TypeServerError) {
StringBuffer sb = new StringBuffer(256);
sb.append("time : ");
/**
* 时间也可以使用systemClock.elapsedRealtime()方法 获取的是自从开机以来,每次回调的时间;
* location.getTime() 是指服务端出本次结果的时间,如果位置不发生变化,则时间不变
*/
sb.append(location.getTime());
sb.append("\nlocType : ");// 定位类型
sb.append(location.getLocType());
sb.append("\nlocType description : ");// *****对应的定位类型说明*****
sb.append(location.getLocTypeDescription());
sb.append("\nlatitude : ");// 纬度
sb.append(location.getLatitude());
sb.append("\nlontitude : ");// 经度
sb.append(location.getLongitude());
sb.append("\nradius : ");// 半径
sb.append(location.getRadius());
sb.append("\nCountryCode : ");// 国家码
sb.append(location.getCountryCode());
sb.append("\nCountry : ");// 国家名称
sb.append(location.getCountry());
sb.append("\ncitycode : ");// 城市编码
sb.append(location.getCityCode());
sb.append("\ncity : ");// 城市
sb.append(location.getCity());
sb.append("\nDistrict : ");// 区
sb.append(location.getDistrict());
sb.append("\nStreet : ");// 街道
sb.append(location.getStreet());
sb.append("\naddr : ");// 地址信息
sb.append(location.getAddrStr());
sb.append("\nUserIndoorState: ");// *****返回用户室内外判断结果*****
sb.append(location.getUserIndoorState());
sb.append("\nDirection(not all devices have value): ");
sb.append(location.getDirection());// 方向
sb.append("\nlocationdescribe: ");
sb.append(location.getLocationDescribe());// 位置语义化信息
sb.append("\nPoi: ");// POI信息
if (location.getPoiList() != null && !location.getPoiList().isEmpty()) {
for (int i = 0; i < location.getPoiList().size(); i++) {
Poi poi = (Poi) location.getPoiList().get(i);
sb.append(poi.getName() + ";");
}
}
if (location.getLocType() == BDLocation.TypeGpsLocation) {// GPS定位结果
sb.append("\nspeed : ");
sb.append(location.getSpeed());// 速度 单位:km/h
sb.append("\nsatellite : ");
sb.append(location.getSatelliteNumber());// 卫星数目
sb.append("\nheight : ");
sb.append(location.getAltitude());// 海拔高度 单位:米
sb.append("\ngps status : ");
sb.append(location.getGpsAccuracyStatus());// *****gps质量判断*****
sb.append("\ndescribe : ");
sb.append("gps定位成功");
} else if (location.getLocType() == BDLocation.TypeNetWorkLocation) {// 网络定位结果
// 运营商信息
if (location.hasAltitude()) {// *****如果有海拔高度*****
sb.append("\nheight : ");
sb.append(location.getAltitude());// 单位:米
}
sb.append("\noperationers : ");// 运营商信息
sb.append(location.getOperators());
sb.append("\ndescribe : ");
sb.append("网络定位成功");
} else if (location.getLocType() == BDLocation.TypeOffLineLocation) {// 离线定位结果
sb.append("\ndescribe : ");
sb.append("离线定位成功,离线定位结果也是有效的");
} else if (location.getLocType() == BDLocation.TypeServerError) {
sb.append("\ndescribe : ");
sb.append("服务端网络定位失败,可以反馈IMEI号和大体定位时间到loc-bugs@baidu.com,会有人追查原因");
} else if (location.getLocType() == BDLocation.TypeNetWorkException) {
sb.append("\ndescribe : ");
sb.append("网络不同导致定位失败,请检查网络是否通畅");
} else if (location.getLocType() == BDLocation.TypeCriteriaException) {
sb.append("\ndescribe : ");
sb.append("无法获取有效定位依据导致定位失败,一般是由于手机的原因,处于飞行模式下一般会造成这种结果,可以试着重启手机");
}
logMsg(sb.toString());
}
}

public void onConnectHotSpotMessage(String s, int i){
}
};
}
接着最后复制LocationApplication
//package  你的包名;

import android.app.Application;
import android.app.Service;
import android.os.Vibrator;

import com.example.guofang.baidumap_1.location.service.LocationService;
import com.baidu.mapapi.SDKInitializer;

/**
* 主Application,所有百度定位SDK的接口说明请参考线上文档:http://developer.baidu.com/map/loc_refer/index.html
*
* 百度定位SDK官方网站:http://developer.baidu.com/map/index.php?title=android-locsdk
*
* 直接拷贝com.baidu.location.service包到自己的工程下,简单配置即可获取定位结果,也可以根据demo内容自行封装
*/
public class LocationApplication extends Application {
public LocationService locationService;
public Vibrator mVibrator;
@Override
public void onCreate() {
super.onCreate();
/***
* 初始化定位sdk,建议在Application中创建
*/
locationService = new LocationService(getApplicationContext());
mVibrator =(Vibrator)getApplicationContext().getSystemService(Service.VIBRATOR_SERVICE);
SDKInitializer.initialize(getApplicationContext());

}
}
记得将manifest中的ak值配置好,我们来看看最后的结果吧
这样你就可以将想要的值用在自己的程序中了。大家加油!
<本博客部分内容参考百度地图api官方教程!>

相关文章推荐
- Android使用百度地图SDK实现定位功能
- Android:使用百度地图SDK定位当前具体位置(类似QQ发表说说的选择地点功能)
- Android开发,MapBox的使用及部分功能实现(一)----- 初始化、标记、定位、styleurl
- android使用百度地图、定位SDK实现地图和定位功能!(最新、可用+吐槽)
- android使用百度地图、定位SDK实现地图和定位功能!(最新、可用+吐槽)
- android使用百度地图、定位SDK实现地图和定位功能!(最新、可用+吐槽)
- android使用百度地图、定位SDK实现地图和定位功能!(最新、可用+吐槽)
- android studio 使用百度地图sdk实现定位功能,与实现过程中的问题解决
- Adb-For-Test 使用 adb 命令实现元素定位等功能,用来辅助 android 测试
- 使用百度地图SDK实现定位功能,定位你当前的位置
- 安卓开发使用百度地图sdk实现定位,添加marker,城市切换等功能
- Android使用百度地图SDK实现定位与方向传感器匹配
- Android--百度地图定位功能的具体实现<百度地图SDK版本 v3.7.3>
- Android开发,MapBox地图详细介绍、使用、部分功能实现(初始化、标记、定位、styleurl)
- 使用百度地图sdk实现定位功能
- Android应用程序实现定位功能(使用百度定位SDK)
- Android使用AsyncTask实现可以断点续传的DownloadManager功能
- Android之使用Http协议实现文件上传功能
- android 首次使用app时的使用教程的功能的实现
- Android应用自动更新功能实现使用AsyncTask!