linux下Jenkins自动构建android
2017-02-23 21:47
288 查看
from:https://www.digitalocean.com/community/tutorials/how-to-build-android-apps-with-jenkins
In this article, Jenkins will be setup to build Android apps. Jenkins will already need to be installed, so if it hasn't been installed yet, please follow the steps here first.
For this article, I assume your project uses version control like Git or Subversion. I will mostly talk about the new build system called Gradle, but this article can also be used to set up an Ant build.
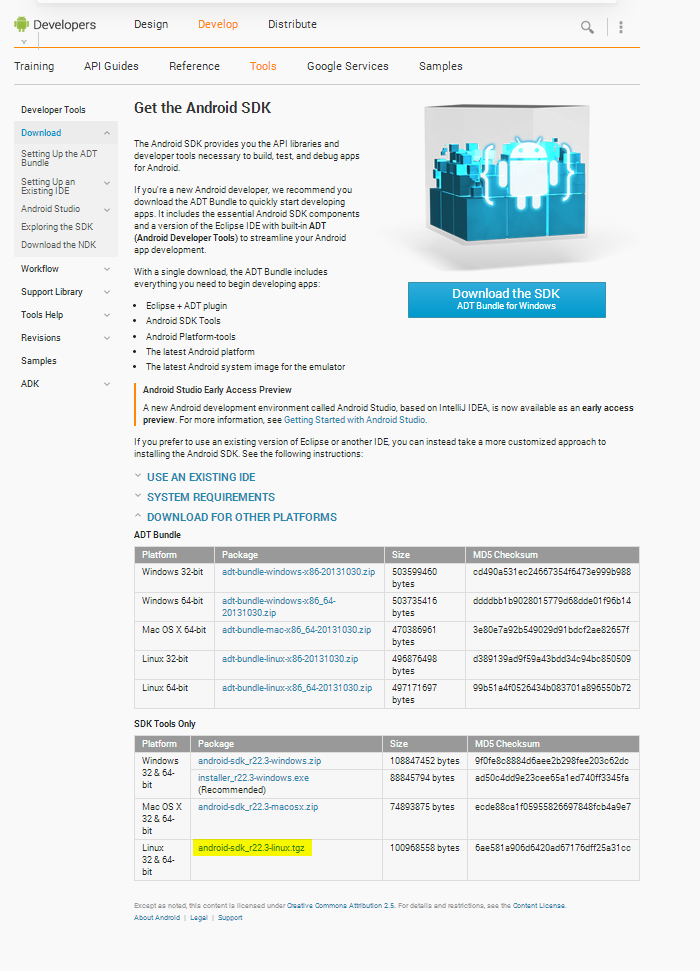
To begin, the Android SDK should be installed. To find the download location, visit the Android
SDK download page. Then click Download for other platforms and copy the link of the Linux version (SDK Tools only).
After you have copied the link, switch over to the SSH session. CD into /opt and download the Android SDK:
At time of writing, the following command should be executed:
Then unzip the file:
You can now remove the file you just downloaded:
Now some environment variables will need to be set. Edit /etc/profile.d/android.sh (
Then reload the file:
If you are going to use Git, also install Git:
To build your project, the Android SDK will need a few packages. First, update the SDK itself (a few licenses will need to be accepted):
This will install all Android versions, so it will quite a long time. Read more if you do not wish to install all packages.
If you only want to install specific parts, more information on updating the SDK is available in thisStackOverflow
question.
The packages you will most likely need are installed by the following command (replacing the "19" in
However, this won't install the build tools needed for Gradle. For that, execute the following command:
In this list, find the first item called Android SDK Build-tools, version xx.xx.xx. Remember the number that is listed before the item and execute the following:
Also do this for Android Support Repository and Android Support Library.
If you know your project will be using a specific version of the build tools, look for that item in the list. It can be seen in the build.gradle file as the buildToolsVersion:
Also install the appropriate platform version that can be seen in the build.gradle as compileSdkVersion.
Now, for the Android SDK to be accessible by Jenkins, execute the following:
Also, if you are on a 64-bit OS, install the 32-bit libraries:
Then reboot your Droplet:
If your project is still built by Eclipse, a build script will need to be created. The easiest option is to do this right from Eclipse, by going to File -> Export, then selecting Android -> Generate Gradle build files. Then select the project and click Finish.
This should create a Gradle project, which can be built by Jenkins.
If you don't want to use Gradle, Apache Ant can still be used. You can skip this step if you don't know what this is or when the Gradle project export fails. The only step needed is to execute the following command on a PC with the Android SDK installed:
Jenkins also needs to be configured. First, a JDK needs to be installed. To do this, visit Manage Jenkins -> Configure System. Then find JDK and click Add JDK. You need to have an Oracle account. To enter your credentials, click on Please enter your username/password
in the JDK section. If you don't have one, follow the link in the next screen. When you've entered those, go back to the JDK configuration. Enter a name – I recommend naming it after the Java version. Then check Install automatically and select the most recent
Java SE Development Kit version. This should install the JDK later on.
If you are using Ant, execute the same steps in the Ant section.
Now visit Manage Jenkins -> Manage Plugins -> Available. Check the following plugins and click Install without restart:
Gradle Plugin (not needed if using Ant)
Git Plugin (if using Git)
Android Emulator Plugin (if you want to use an emulator)
This will automatically install a few other plugins. If you are going to use Gradle, execute the same steps as for the JDK to install Gradle automatically. At the time of writing, you will need Gradle 0.9. This is not needed if you are using the Gradle wrapper,
i.e. you have a gradlew file in your project that is checked in to source control.
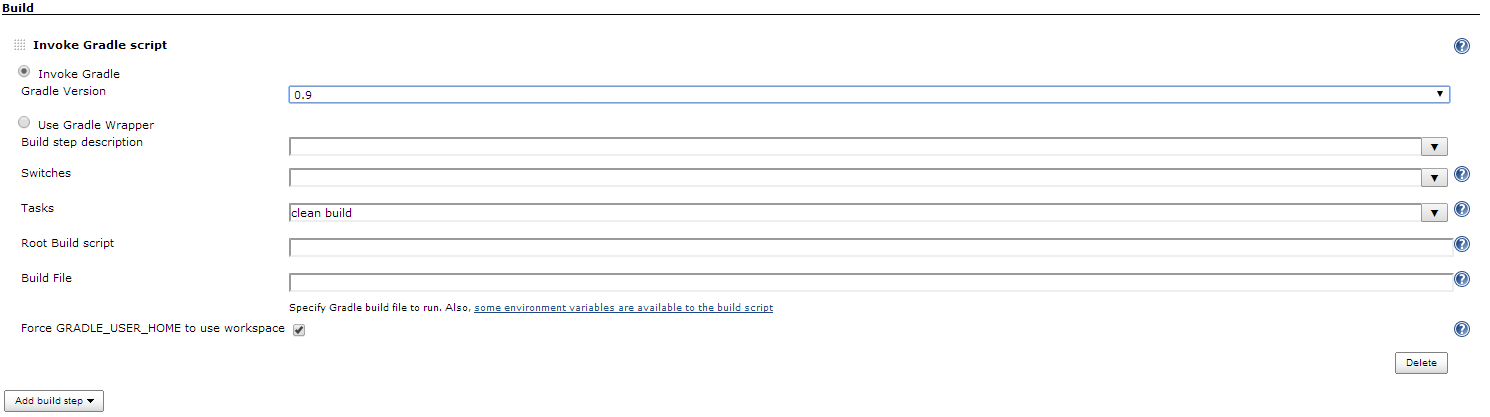
Now, the job can be setup. Click New Job, give it a name and select Build a free-style software project. Then click OK. In the section Source Code Management, select the version control system your project is using and give the information. Then in the Build
section, add Invoke Gradle script if using Gradle and Invoke Ant if using Ant. Fill in all paramters. For Gradle this will be the most likely parameters:
And for Ant these:

This will build the project, but the APK files will not be saved yet. To configure this, add the Post-build action called Archive the artifacts. For files to archive type
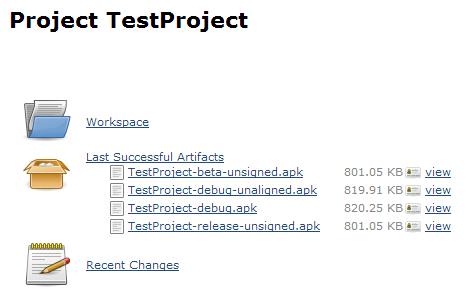
Click Save and the building can start! Click Build now. The JDK will be installed and after a while the build will have finished! On the page of the project, there is a heading called Last Successful Artifacts. Here all the APK files generated will be showed:
The first Android project has been built on your Jenkins instance. Congratulations!
The Jenkins instance can hold more than 1 job, so create more and develop more Android apps!
Gradle can also sign the apps automatically, but this sensitive information should be stored in the build.gradle file, which is not recommended. This is an example of a complete build.gradle that can be used in combination with Jenkins:
Submitted by: Koen Vlaswinkel
In this article, Jenkins will be setup to build Android apps. Jenkins will already need to be installed, so if it hasn't been installed yet, please follow the steps here first.
For this article, I assume your project uses version control like Git or Subversion. I will mostly talk about the new build system called Gradle, but this article can also be used to set up an Ant build.
Installing the software needed
To begin, the Android SDK should be installed. To find the download location, visit the AndroidSDK download page. Then click Download for other platforms and copy the link of the Linux version (SDK Tools only).
After you have copied the link, switch over to the SSH session. CD into /opt and download the Android SDK:
cd /opt
wget <link you copied here>
At time of writing, the following command should be executed:
wget http://dl.google.com/android/android-sdk_r22.3-linux.tgz
Then unzip the file:
tar zxvf <filename of the just downloaded file>
You can now remove the file you just downloaded:
rm <filename of the just downloaded file>
Now some environment variables will need to be set. Edit /etc/profile.d/android.sh (
nano /etc/profile.d/android.sh) and add the following:
export ANDROID_HOME="/opt/android-sdk-linux"
export PATH="$ANDROID_HOME/tools:$ANDROID_HOME/platform-tools:$PATH"
Then reload the file:
source /etc/profile
If you are going to use Git, also install Git:
sudo apt-get install git-core
Configuring the Android SDK
To build your project, the Android SDK will need a few packages. First, update the SDK itself (a few licenses will need to be accepted):android update sdk --no-ui
This will install all Android versions, so it will quite a long time. Read more if you do not wish to install all packages.
If you only want to install specific parts, more information on updating the SDK is available in thisStackOverflow
question.
The packages you will most likely need are installed by the following command (replacing the "19" in
android-19with the most recent Android SDK version:
android update sdk -u --filter platform-tools,android-19
However, this won't install the build tools needed for Gradle. For that, execute the following command:
android list sdk --all
In this list, find the first item called Android SDK Build-tools, version xx.xx.xx. Remember the number that is listed before the item and execute the following:
android update sdk -u --all --filter <number>
Also do this for Android Support Repository and Android Support Library.
If you know your project will be using a specific version of the build tools, look for that item in the list. It can be seen in the build.gradle file as the buildToolsVersion:
android {
buildToolsVersion "18.1.1"
compileSdkVersion 18
}
Also install the appropriate platform version that can be seen in the build.gradle as compileSdkVersion.
Now, for the Android SDK to be accessible by Jenkins, execute the following:
sudo chmod -R 755 /opt/android-sdk-linux
Also, if you are on a 64-bit OS, install the 32-bit libraries:
sudo apt-get install ia32-libs
Then reboot your Droplet:
sudo shutdown -r now
Configuring your Android project
If your project is still built by Eclipse, a build script will need to be created. The easiest option is to do this right from Eclipse, by going to File -> Export, then selecting Android -> Generate Gradle build files. Then select the project and click Finish.This should create a Gradle project, which can be built by Jenkins.
If you don't want to use Gradle, Apache Ant can still be used. You can skip this step if you don't know what this is or when the Gradle project export fails. The only step needed is to execute the following command on a PC with the Android SDK installed:
android update project -p .
Configuring Jenkins
Jenkins also needs to be configured. First, a JDK needs to be installed. To do this, visit Manage Jenkins -> Configure System. Then find JDK and click Add JDK. You need to have an Oracle account. To enter your credentials, click on Please enter your username/passwordin the JDK section. If you don't have one, follow the link in the next screen. When you've entered those, go back to the JDK configuration. Enter a name – I recommend naming it after the Java version. Then check Install automatically and select the most recent
Java SE Development Kit version. This should install the JDK later on.
If you are using Ant, execute the same steps in the Ant section.
Now visit Manage Jenkins -> Manage Plugins -> Available. Check the following plugins and click Install without restart:
Gradle Plugin (not needed if using Ant)
Git Plugin (if using Git)
Android Emulator Plugin (if you want to use an emulator)
This will automatically install a few other plugins. If you are going to use Gradle, execute the same steps as for the JDK to install Gradle automatically. At the time of writing, you will need Gradle 0.9. This is not needed if you are using the Gradle wrapper,
i.e. you have a gradlew file in your project that is checked in to source control.
Setting up the Job
Now, the job can be setup. Click New Job, give it a name and select Build a free-style software project. Then click OK. In the section Source Code Management, select the version control system your project is using and give the information. Then in the Buildsection, add Invoke Gradle script if using Gradle and Invoke Ant if using Ant. Fill in all paramters. For Gradle this will be the most likely parameters:
And for Ant these:
This will build the project, but the APK files will not be saved yet. To configure this, add the Post-build action called Archive the artifacts. For files to archive type
**/*.apk.
Click Save and the building can start! Click Build now. The JDK will be installed and after a while the build will have finished! On the page of the project, there is a heading called Last Successful Artifacts. Here all the APK files generated will be showed:
What more?
The first Android project has been built on your Jenkins instance. Congratulations!The Jenkins instance can hold more than 1 job, so create more and develop more Android apps!
Gradle can also sign the apps automatically, but this sensitive information should be stored in the build.gradle file, which is not recommended. This is an example of a complete build.gradle that can be used in combination with Jenkins:
buildscript {
repositories {
mavenCentral()
}
dependencies {
classpath 'com.android.tools.build:gradle:0.7.+'
}
}
apply plugin: 'android'

repositories {
mavenCentral()
flatDir {
dirs 'libs'
}
}

android {
compileSdkVersion 19
buildToolsVersion '19.0.1'

signingConfigs {
release {
storeFile file("keystores/release.keystore")
storePassword "your-keystore-password"
keyAlias "your-alias"
keyPassword "your-alias-password"
}
}

buildTypes {
release {
zipAlign true
signingConfig signingConfigs.release
}
debug {
zipAlign true
}
}
}

dependencies {
compile 'com.android.support:appcompat-v7:19.0.0'
compile 'com.android.support:support-v4:19.0.0'
}
Submitted by: Koen Vlaswinkel

相关文章推荐
- 在linux环境下tomcat+jenkins+ant+svn自动构建Android
- 使用阿里云服务器搭建Android自动构建平台Jenkins
- 使用Jenkins自动构建Android问题总结
- Windows下简易Jenkins构建Android自动打包 - Ant
- 使用Jenkins进行android项目的自动构建(4)
- 使用Jenkins进行android项目的自动构建(2)
- Linux下配置Jenkins+Android+Ant自动化构建环境(一)
- Unityd3d:用jenkins 自动构建Unity-android打包成apk
- Jenkins + Unity + Android构建基于Unity的自动编译环境
- Linux下配置Jenkins+Android自动化构建环境(二)
- [置顶] jenkins 构建 Android应用时出现类似“The SDK directory '/root/android-sdk-linux' does not exist.”的解决方案
- jmeter+jenkins+ant 自动构建接口任务(linux)-各种
- 使用Jenkins进行android项目的自动构建(3)
- Jenkins+Gradle 实现android端app自动构建
- Jenkins-android自动构建
- 使用Jenkins进行android项目的自动构建(6)
- 使用Jenkins进行android项目的自动构建(1)
- 使用Jenkins进行android项目的自动构建(5)
- CMAKE 在Linux下 构建android 编译、打包、发布环境