Ubantu和CentOS设置静态ip
2017-02-16 20:02
453 查看
Ubantu设置ip:1、sudo vim /etc/NetworkManager/NetworkManager.conf将false改成true2、修改配置文件/etc/network/interfaces
sudo vim /etc/network/interfaces
添加以下内容:(具体ip根据nat下面的地址来配喔)
auto eth0 //设置自动启动eth0接口
iface eth0 inet static //配置静态IP
address 192.168.66.106 //IP地址
netmask 255.255.255.128 //子网掩码
gateway 192.168.66.2 //网关和nat配置中要一致,下面的dns也得这样dns-nameservers 192.168.66.2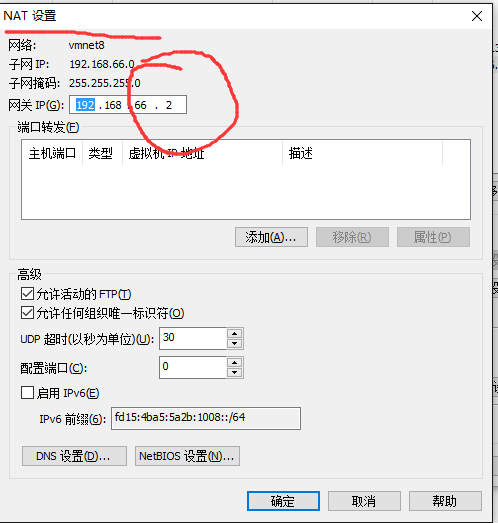 3、重启网络,使配置生效:sudo /etc/init.d/networking restart
4、重启机器:sudo shutdown -r now
SUBSYSTEM=="net", ACTION=="add", DRIVERS=="?*", ATTR{address}=="eth0-MAC", ATTR{type}=="1", KERNEL=="eth*", NAME="eth0"# PCI device 0x8086:0x100f (e1000)
SUBSYSTEM=="net", ACTION=="add", DRIVERS=="?*", ATTR{address}=="eth1-MAC", ATTR{type}=="1", KERNEL=="eth*", NAME="eth1"删除以上eth0的信息,将eth1的信息中的eth1-〉eth0# PCI device 0x8086:0x100f (e1000)
SUBSYSTEM=="net", ACTION=="add", DRIVERS=="?*", ATTR{address}=="eth1-MAC", ATTR{type}=="1", KERNEL=="eth*", NAME="eth0"再将ifcfg-eth0中的MAC地址改成上面eth1-MAC地址,然后配置IP等信息,重启服务器,就可以了。
sudo vim /etc/network/interfaces
添加以下内容:(具体ip根据nat下面的地址来配喔)
auto eth0 //设置自动启动eth0接口
iface eth0 inet static //配置静态IP
address 192.168.66.106 //IP地址
netmask 255.255.255.128 //子网掩码
gateway 192.168.66.2 //网关和nat配置中要一致,下面的dns也得这样dns-nameservers 192.168.66.2
3、重启网络,使配置生效:sudo /etc/init.d/networking restart4、重启机器:sudo shutdown -r now
CentOS设置静态Ip:
(设置前先把 NetworkManager 服务关掉,否则会自动帮你设置ip很烦 临时命令: service NetworkManager stop
永久:chkconfig NetworkManager off
)
1、root用户编辑ifcfg-eth0
vi /etc/sysconfig/network-scripts/ifcfg-eth0
修改内容如下:
DEVICE=eth0
BOOTPROTO=static
ONBOOT=yes
IPADDR=192.168.66.106
GATEWAY=192.168.66.2
NETMASK=255.255.255.0
DNS1=192.168.66.2
2、修改网关配置① vi /etc/sysconfig/network
NETWORKING=yes
HOSTNAME=localhost.localdomain
GATEWAY=192.168.66.2
② 修改主机名和IP的映射关系(注意这里是加上 下面,而不是把上面的127.0.0.1给替换了)
1 vim /etc/hosts3、root用户 重启网络,使配置生效/etc/init.d/network restart4.VMware克隆CentOS6.4后 eth0无法初始化/找不到eth0的问题修改/etc/udev/rules.d/70-persistent-net.rules //保存网卡MAC地址等信息的配置文件# PCI device 0x8086:0x100f (e1000)
SUBSYSTEM=="net", ACTION=="add", DRIVERS=="?*", ATTR{address}=="eth0-MAC", ATTR{type}=="1", KERNEL=="eth*", NAME="eth0"# PCI device 0x8086:0x100f (e1000)
SUBSYSTEM=="net", ACTION=="add", DRIVERS=="?*", ATTR{address}=="eth1-MAC", ATTR{type}=="1", KERNEL=="eth*", NAME="eth1"删除以上eth0的信息,将eth1的信息中的eth1-〉eth0# PCI device 0x8086:0x100f (e1000)
SUBSYSTEM=="net", ACTION=="add", DRIVERS=="?*", ATTR{address}=="eth1-MAC", ATTR{type}=="1", KERNEL=="eth*", NAME="eth0"再将ifcfg-eth0中的MAC地址改成上面eth1-MAC地址,然后配置IP等信息,重启服务器,就可以了。

相关文章推荐
- 给Centos系统设置静态IP
- VMware中CentOS设置静态IP
- VMWare中CentOS静态设置IP
- CentOS6.5中的网络配置(静态IP设置)
- 在Centos中设置静态Ip
- centos设置静态IP
- Linux VMWare虚拟机设置静态IP并且能上网的设置方法(以CentOS为例)
- centos6.5静态IP和DNS设置
- VMware中CentOS设置静态IP
- CentOS虚拟机设置静态ip
- centos虚拟机NAT静态IP设置
- CentOS 静态IP设置
- CentOS设置静态IP
- Centos下设置静态IP
- centos6.5静态IP和DNS设置
- centos静态IP设置
- VMWare中CentOS 静态IP设置
- centos静态ip设置
- CentOS下桥接模式设置静态IP的方法
- Centos 6 设置静态 IP 地址