Android图片添加阴影效果的两种方式
2017-02-16 19:27
447 查看
给图片添加阴影效果,这是很常见的需求。第一种方法是自定义drawable,使用layer-list定义两个图片,代码如下:
show_view.xml:
2
3
4
5
6
7
8
9
10
11
12
13
14
15
16
17
18
19
20
21
1
2
3
4
5
6
7
8
9
10
11
12
13
14
15
16
17
18
19
20
21
在main.xml中定义一个textview作为待显示控件,将show_view.xml设为这个testview的背景,main.xml的代码如下:
2
3
4
5
6
7
8
9
10
11
12
1
2
3
4
5
6
7
8
9
10
11
12
运行程序显示效果如下:
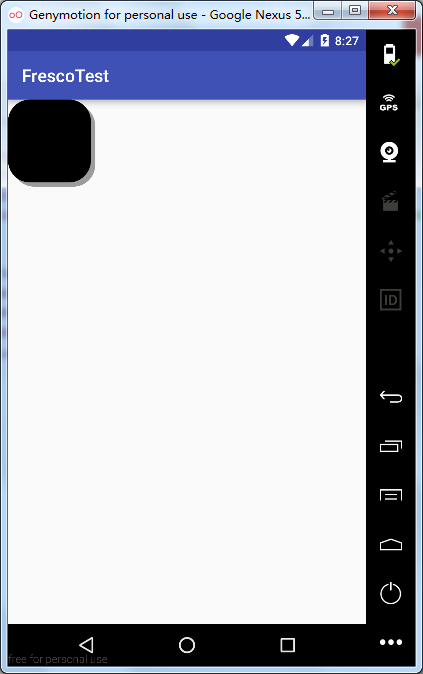
看着还可以,但是这里面有一个缺陷,大家细看就会发现这个阴影是实边的,没有虚化的效果,这样就不够真实,影响用户体验。下面我们来看第二种方法。
第二种方式就是自定义view,代码里通过setShadowLayer绘制图片阴影,代码如下:
CustomShadowView类:
2
3
4
5
6
7
8
9
10
11
12
13
14
15
16
17
18
19
20
21
22
23
24
25
26
27
28
29
30
31
1
2
3
4
5
6
7
8
9
10
11
12
13
14
15
16
17
18
19
20
21
22
23
24
25
26
27
28
29
30
31
再将CustomShadowView类加到main.xml中,代码如下:
2
3
4
5
6
7
8
9
10
11
12
13
14
1
2
3
4
5
6
7
8
9
10
11
12
13
14
运行即可看到以下效果:
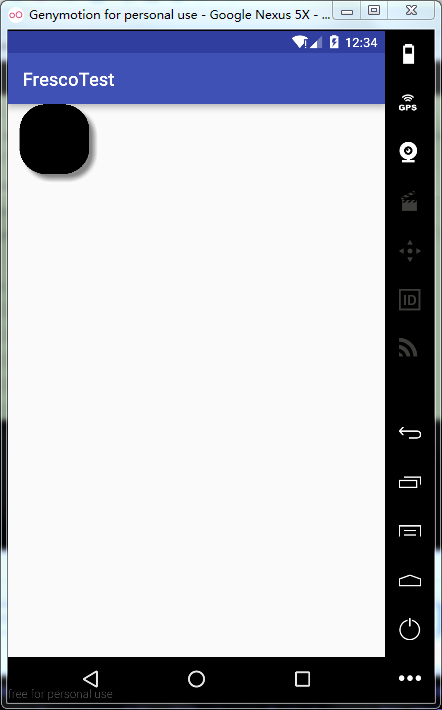
可以看到这种方法绘制出的阴影有虚化效果,多了立体感和层次感,所以更推荐使用。
show_view.xml:
<?xml version="1.0" encoding="utf-8"?>
<layer-list xmlns:android="http://schemas.android.com/apk/res/android">
<!-- 阴影图片,android:left表示阴影图片左边到背景图片左边的距离
android:top表示阴影图片上边到背景图片上边的距离-->
<item   android:left="5dp"
android:top="5dp">
<shape>
<corners android:radius="25dp"/>
<solid android:color="#60000000"/>
</shape>
</item>
<!-- 背景图片,android:right表示阴影图片右边到背景图片右边的距离
android:bottom表示阴影图片下边到背景图片下边的距离-->
<item   android:bottom="5dp"
android:right="5dp">
<shape>
<corners android:radius="25dp"/>
<solid android:color="#000000"/>
</shape>
</item>
</layer-list>
1
2
3
4
5
6
7
8
9
10
11
12
13
14
15
16
17
18
19
20
21
1
2
3
4
5
6
7
8
9
10
11
12
13
14
15
16
17
18
19
20
21
在main.xml中定义一个textview作为待显示控件,将show_view.xml设为这个testview的背景,main.xml的代码如下:
<?xml version="1.0" encoding="utf-8"?>
<RelativeLayout xmlns:android="http://schemas.android.com/apk/res/android"
xmlns:tools="http://schemas.android.com/tools"
android:layout_width="match_parent"
android:layout_height="match_parent"
tools:context="com.example.liusiyutaloner.frescotest.MainActivity">

<TextView
android:layout_width="100dp"
android:layout_height="100dp"
android:background="@drawable/shadow_view"/>
</RelativeLayout>
1
2
3
4
5
6
7
8
9
10
11
12
1
2
3
4
5
6
7
8
9
10
11
12
运行程序显示效果如下:
看着还可以,但是这里面有一个缺陷,大家细看就会发现这个阴影是实边的,没有虚化的效果,这样就不够真实,影响用户体验。下面我们来看第二种方法。
第二种方式就是自定义view,代码里通过setShadowLayer绘制图片阴影,代码如下:
CustomShadowView类:
package com.example.liusiyutaloner.frescotest;

import android.content.Context;
import android.graphics.Canvas;
import android.graphics.Color;
import android.graphics.Paint;
import android.graphics.RectF;
import android.util.AttributeSet;
import android.view.View;

public class CustomShadowView extends View {
private Paint mPaint;

public CustomShadowView(Context context, AttributeSet attrs) {
super(context, attrs);
mPaint = new Paint();
mPaint.setColor(Color.BLACK);
this.setLayerType(View.LAYER_TYPE_SOFTWARE, null);
}

@Override
protected void onDraw(Canvas canvas) {
super.onDraw(canvas);
//绘制阴影,param1:模糊半径;param2:x轴大小:param3:y轴大小;param4:阴影颜色
mPaint.setShadowLayer(10F, 15F, 15F, Color.GRAY);
RectF rect = new RectF(0 , 0, 200, 200);
canvas.drawRoundRect(rect, (float)75, (float)75, mPaint);
}

}12
3
4
5
6
7
8
9
10
11
12
13
14
15
16
17
18
19
20
21
22
23
24
25
26
27
28
29
30
31
1
2
3
4
5
6
7
8
9
10
11
12
13
14
15
16
17
18
19
20
21
22
23
24
25
26
27
28
29
30
31
再将CustomShadowView类加到main.xml中,代码如下:
<?xml version="1.0" encoding="utf-8"?>
<RelativeLayout xmlns:android="http://schemas.android.com/apk/res/android"
xmlns:tools="http://schemas.android.com/tools"
android:layout_width="150dp"
android:layout_height="150dp"
tools:context="com.example.liusiyutaloner.frescotest.MainActivity">

<com.example.liusiyutaloner.frescotest.CustomShadowView
android:layout_gravity="center"
android:layout_width="125dp"
android:layout_height="125dp"
android:layout_centerHorizontal="true" />
</RelativeLayout>
1
2
3
4
5
6
7
8
9
10
11
12
13
14
1
2
3
4
5
6
7
8
9
10
11
12
13
14
运行即可看到以下效果:
可以看到这种方法绘制出的阴影有虚化效果,多了立体感和层次感,所以更推荐使用。

相关文章推荐
- Android图片添加阴影效果的两种方式
- Android图片添加阴影效果的两种方式
- android实现图片闪烁动画效果的两种实现方式(实用性高)
- Android 给图片、文字、控件、布局添加阴影效果(悬浮效果)
- android中添加图片的两种方式,对图片的自由裁切
- Android------Button 添加声音效果(两种方式)
- Android------Button 添加声音效果(两种方式)
- Android------Button 添加声音效果(两种方式)
- Android实现图片添加阴影效果的2种方法
- Android使用XML的方式为背景添加渐变,描边,圆角的效果
- Android2.2 Luncher2扩展(仿Ipad DockBar、HTC预览图、批量添加快捷方式、启用3D效果等)
- android中给TextView或者Button的文字添加阴影效果
- android 动态向Gallery中添加图片及倒影&&3D效果
- 【Android UI设计与开发】第14期:顶部标题栏(五)两种方式实现仿微信标题栏弹窗效果
- 为图片添加阴影效果---css3(box-shadow)
- android带有文字的图片按钮的两种实现方式
- [Android开发实战]Android添加快捷方式到桌面的两种方式
- 【Android Training - 09】高效地显示Bitmap图片 [ Lesson 3 - 两种缓存Bitmap的方式 ]
- Android 图片合成:添加蒙板效果 不规则相框 透明度渐变效果的实现