Vue.js 系列教程 2:组件,Props,Slots
2017-02-13 15:19
996 查看
原文:intro-to-vue-2-components-props-slots
译者:nzbin
这是关于 JavaScript 框架 Vue.js 五个教程的第二部分。在这一部分,我们将学习组件,Props 以及 Slots。这不是一个完整的指南,而是基础知识的概述,所以你可以了解 Vue.js 以及它的用途。

组件, Props, Slots (你在这!)
Vue-cli (耐心等待!)
Vuex (耐心等待!)
动画 (耐心等待!)
大小网站通常由不同的部分组成,并且抽象成更小的部分更容易布局、重用、并使得我们的代码更清晰。为了避免在冗长的多层次的页面中搜寻标签,我们可以这样构建组件:
这是一个简单的例子,但是你可以看到这种组合方式在开始构建网站结构时的用途。如果你要维护这些代码,你可以很容易的了解程序的结构并且找到每一部分。
Vue 有多种创建组件的方式。让我们从易到难,而复杂的例子就是一个普通的 Vue 程序。
代码正常运行,但用处不大,因为它只能使用一次,我们还没有向不同的组件传递信息。从父组件向子组件传递数据的方式称为 props。
下面是我能做的最简单的例子,所以非常容易理解。记住 HTML 中的
在下面的代码中,
See the Pen simple props by Sarah Drasner (@sdras) on CodePen.
现在我们可以在程序中随意使用这个组件:
See the Pen simple props by Sarah Drasner (@sdras) on CodePen.
我们也可以向 props 中添加验证,这和 React 中的
在下面的例子中,我在开发模式中加载 Vue ,并且故意在 prop 验证中输入一个非法类型。你可以看到控制台报错。(这非常有帮助,你可以使用 Vue 的开发工具发现错误).
See the Pen simple props with validation by Sarah Drasner (@sdras) on CodePen.
对象应该作为一个工厂函数返回,你也可以传递一个自定义验证函数,这非常有用,因为可以检查不符合业务、输入或者其它逻辑的数值。对于如何使用每一种类型,有一篇写的很好的 指南.
没有必要在在 props 中给子组件传递数据,也可以使用状态或静态值:
See the Pen child component using and not using props by Sarah Drasner (@sdras) on CodePen.
区别在于你是否传递了一个属性并绑定它:
没有使用状态
vs
使用状态
到现在为止,我们已经用字符串在子组件中创建了内容,如果使用 babel 的话,你可以在所有浏览器中使用 ES6 (我强烈建议),可以使用 模板字面量 来避免难以阅读的拼接字符串:
See the Pen rjwJdY by Sarah Drasner (@sdras) on CodePen.
虽然有些作用,但是字符串中的内容仍然有限制。最后,在这个评论列表中,我们希望有照片和作者的名字,你可能已经猜到过多的信息会非常拥挤。而字符串中没有语法高亮效果。
考虑到所有这些事情,我们将创建一个模板。我们会用特殊的 script 标签包裹常规的HTML,然后使用 id 引用它来创建一个组件。当文本和元素很多的时候,这种方式更清晰:
See the Pen Photo App post with Vue.js by Sarah Drasner (@sdras) on CodePen.
假如我们有一个程序实例,使用相同的组件
然后在程序实例中,我们可以在在
See the Pen Slots Example by Sarah Drasner (@sdras) on CodePen.
slots 中也可以有默认内容。如果要在 slot 中写内容,而不是写
如果你没有在 slot 中填充其它内容,就会显示默认文本,这是非常有用的!鼓掌吧。
你也可以使用具名 slot 。如果一个组件中有两个 slot, 可以通过添加 name 属性区分它们
请看以下示例:
子组件模板
父组件模板
渲染结果
就我个人而言,如果我一次使用多个 slot,我会将所有的都名字,这对于其他的维护人员来说非常清晰,但 Vue 提供的这个灵活的 API 也很好。
主要的 Vue App HTML:
白色组件的 HTML:
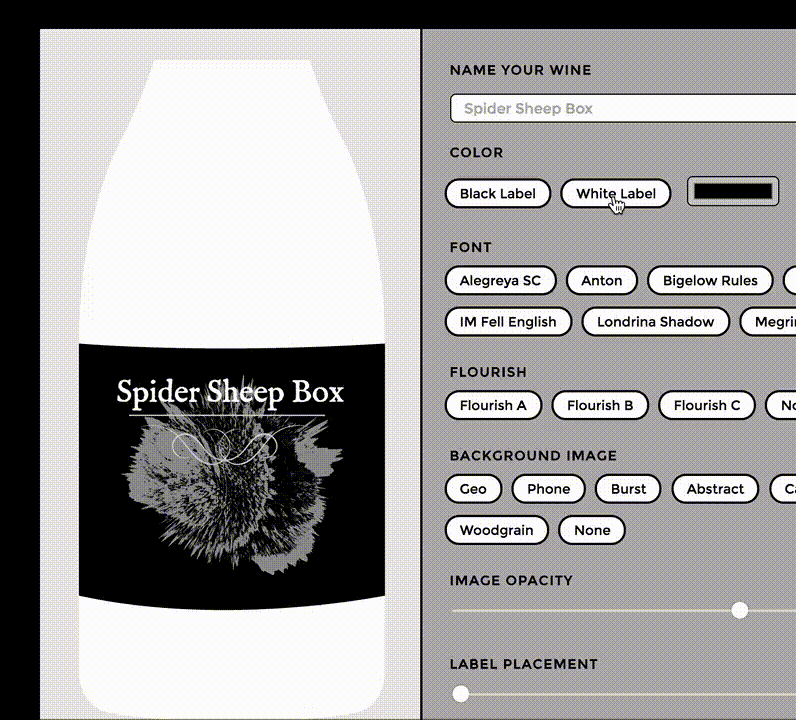
(这个演示案例非常大,所以最好在一个单独的窗口或者标签页浏览)
See the Pen Vue Wine Label Maker by Sarah Drasner (@sdras) on CodePen.
现在,我们已经将所有的 SVG 图片数据放置在程序中,但是实际上它放置在每个组件的
现在所有内容都在一个 slot 中,但是我们也可以使用多个 slot,并通过命名区分它们:
我们可以通过引用的相同的 slot 很容易地在不同的组件之间切换,但是如果希望能够来回切换还要保持每个组件的独立状态会怎样?目前,当我们切换黑白标签的时候,模板切换了但内容保持不变。但也许有一种情况,我们希望黑色标签和白色标签是完全不同的。你可以把它们包在称为
检查上面例子的异常——创建一个黑色标签,然后一个不同的白色标签,并在它们之间切换。你会看到,每个状态都被保存下来,并且彼此不同:
See the Pen Vue Wine Label Maker- with keep-alive by Sarah Drasner (@sdras) on CodePen.
我喜欢这个 API 的功能。
这很好,但为了简单起见,我们总是把所有内容放置在一个或两个文件中。当建立网站时,如果将单独的组件放在不同的文件中,并在需要的时候导入进来,这样的组织性更强。实际上在真实的 Vue 开发中通常是这么做的,我们将在下一部分介绍。接下来谈论 Vue-cli,构建过程和状态管理 vuex!
译者:nzbin
这是关于 JavaScript 框架 Vue.js 五个教程的第二部分。在这一部分,我们将学习组件,Props 以及 Slots。这不是一个完整的指南,而是基础知识的概述,所以你可以了解 Vue.js 以及它的用途。
系列文章:
渲染, 指令, 事件组件, Props, Slots (你在这!)
Vue-cli (耐心等待!)
Vuex (耐心等待!)
动画 (耐心等待!)
组件和传递数据
如果你熟悉 React 或者 Angular2,组件思想和传递状态对你并不陌生。如果不是, 让我们先了解一些主要概念。大小网站通常由不同的部分组成,并且抽象成更小的部分更容易布局、重用、并使得我们的代码更清晰。为了避免在冗长的多层次的页面中搜寻标签,我们可以这样构建组件:
<header></header>
<aside>
<sidebar-item v-for="item in items"></sidebar-item>
</aside>
<main>
<blogpost v-for="post in posts"></blogpost>
</main>
<footer></footer>
这是一个简单的例子,但是你可以看到这种组合方式在开始构建网站结构时的用途。如果你要维护这些代码,你可以很容易的了解程序的结构并且找到每一部分。
Vue 有多种创建组件的方式。让我们从易到难,而复杂的例子就是一个普通的 Vue 程序。
app.$mount('#app');

var app = new Vue({
el: 'hello',
template: '<h1>Hello World!</h1>'
});
代码正常运行,但用处不大,因为它只能使用一次,我们还没有向不同的组件传递信息。从父组件向子组件传递数据的方式称为 props。
下面是我能做的最简单的例子,所以非常容易理解。记住 HTML 中的
:text是 Vue 绑定的缩写。我们在指令部分的最后提到过。绑定可以用于所有方面,但是在这个实例中,这样做的好处是不需要把状态放在 mustache 模板中, 比如
{{ message }}。在下面的代码中,
Vue.component是组件,
new Vue称为实例。一个程序中可以有多个实例。通常情况下,我们会有一个实例和多个组件,因为实例是主要应用程序。
Vue.component('child', {
props: ['text'],
template: `<div>{{ text }}<div>`
});

new Vue({
el: "#app",
data() {
return {
message: 'hello mr. magoo'
}
}
});
<div id="app"> <child :text="message"></child> </div>
See the Pen simple props by Sarah Drasner (@sdras) on CodePen.
现在我们可以在程序中随意使用这个组件:
<div id="app">
<child :text="message"></child>
<child :text="message"></child>
</div>
See the Pen simple props by Sarah Drasner (@sdras) on CodePen.
我们也可以向 props 中添加验证,这和 React 中的
PropTypes类似。这个功能很好,因为它是自描述的,并且如果与我们的期望值不同会返回错误,但只有在开发模式中才显示 :
Vue.component('child', {
props: {
text: {
type: String,
required: true
}
},
template: `<div>{{ text }}<div>`
});
在下面的例子中,我在开发模式中加载 Vue ,并且故意在 prop 验证中输入一个非法类型。你可以看到控制台报错。(这非常有帮助,你可以使用 Vue 的开发工具发现错误).
Vue.component('child', {
props: {
text: {
type: Boolean,
required: true
}
},
template: `<div>{{ text }}<div>`
});
See the Pen simple props with validation by Sarah Drasner (@sdras) on CodePen.
对象应该作为一个工厂函数返回,你也可以传递一个自定义验证函数,这非常有用,因为可以检查不符合业务、输入或者其它逻辑的数值。对于如何使用每一种类型,有一篇写的很好的 指南.
没有必要在在 props 中给子组件传递数据,也可以使用状态或静态值:
Vue.component('child', {
props: {
count: {
type: Number,
required: true
}
},
template: `<div class="num">{{ count }}</div>`
})

new Vue({
el: '#app',
data() {
return {
count: 0
}
},
methods: {
increment() {
this.count++;
},
decrement() {
this.count--;
}
}
})
<div id="app">
<h3>
<button @click="increment">+</button>
Adjust the state
<button @click="decrement">-</button>
</h3>
<h2>This is the app state: <span class="num">{{ count }}</span></h2>
<hr>
<h4><child count="1"></child></h4>
<p>This is a child counter that is using a static integer as props</p>
<hr>
<h4><child :count="count"></child></h4>
<p>This is the same child counter and it is using the state as props</p>
</div>See the Pen child component using and not using props by Sarah Drasner (@sdras) on CodePen.
区别在于你是否传递了一个属性并绑定它:
没有使用状态
<child count="1"></child>
vs
使用状态
<child :count="count"></child>
到现在为止,我们已经用字符串在子组件中创建了内容,如果使用 babel 的话,你可以在所有浏览器中使用 ES6 (我强烈建议),可以使用 模板字面量 来避免难以阅读的拼接字符串:
Vue.component('individual-comment', {
template:
`<li> {{ commentpost }} </li>`,
props: ['commentpost']
});

new Vue({
el: '#app',
data: {
newComment: '',
comments: [
'Looks great Julianne!',
'I love the sea',
'Where are you at?'
]
},
methods: {
addComment: function () {
this.comments.push(this.newComment)
this.newComment = ''
}
}
});
<ul> <li is="individual-comment" v-for="comment in comments" v-bind:commentpost="comment" ></li> </ul> <input v-model="newComment" v-on:keyup.enter="addComment" placeholder="Add a comment" >
See the Pen rjwJdY by Sarah Drasner (@sdras) on CodePen.
虽然有些作用,但是字符串中的内容仍然有限制。最后,在这个评论列表中,我们希望有照片和作者的名字,你可能已经猜到过多的信息会非常拥挤。而字符串中没有语法高亮效果。
考虑到所有这些事情,我们将创建一个模板。我们会用特殊的 script 标签包裹常规的HTML,然后使用 id 引用它来创建一个组件。当文本和元素很多的时候,这种方式更清晰:
<!-- This is the Individual Comment Component -->
<script type="text/x-template" id="comment-template">
<li>
<img class="post-img" :src="commentpost.authorImg" />
<small>{{ commentpost.author }}</small>
<p class="post-comment">"{{ commentpost.text }}"</p>
</li>
</script>
Vue.component('individual-comment', {
template: '#comment-template',
props: ['commentpost']
});See the Pen Photo App post with Vue.js by Sarah Drasner (@sdras) on CodePen.
Slots
这样好多了。但是如果两个组件的内容或者样式略有不同时会怎样?我们可能会通过 props 将所有不同的内容及样式传递到组件,每次切换所有的东西,或者我们可以复制组件并创建不同的版本。但是如果可以重用组件,并用相同的数据或功能填充它们,那就太好了。这就是 slots 的有用之处。假如我们有一个程序实例,使用相同的组件
<app-child>两次。在每个子组件内部,我们需要一些相同的内容以及不同的内容。对于要保持一致的内容,我们使用一个标准的 p 标签,而对于要切换的内容,我们放在空的
<slot></slot>标签中。
<script type="text/x-template" id="childarea">
<div class="child">
<slot></slot>
<p>It's a veritable slot machine!<br>
Ha ha aw</p>
</div>
</script>
然后在程序实例中,我们可以在在
<app-child>组件标签中传递内容,它会自动填充到 slots 中:
<div id="app">
<h2>We can use slots to populate content</h2>
<app-child>
<h3>This is slot number one</h3>
</app-child>
<app-child>
<h3>This is slot number two</h3>
<small>I can put more info in, too!</small>
</app-child>
</div>
See the Pen Slots Example by Sarah Drasner (@sdras) on CodePen.
slots 中也可以有默认内容。如果要在 slot 中写内容,而不是写
<slot></slot>,你可以这样填充:
<slot>I am some default text</slot>
如果你没有在 slot 中填充其它内容,就会显示默认文本,这是非常有用的!鼓掌吧。
你也可以使用具名 slot 。如果一个组件中有两个 slot, 可以通过添加 name 属性区分它们
<slot name="headerinfo"></slot>,并且通过特定的名称访问 slot
<h1 slot="headerinfo">I will populate the headerinfo slot!</h1>。这非常有用。如果有多个命名的 slot 而有一个没有命名,Vue 命名的内容填充到命名的 slot 中,而剩余的内容将填充到未命名的 slots 中。
请看以下示例:
子组件模板
<div id="post">
<main>
<slot name="header"></slot>
<slot></slot>
</main>
</div>
父组件模板
<app-post>
<h1 slot="header">This is the main title</h1>
<p>I will go in the unnamed slot!</p>
</app-post>
渲染结果
<main>
<h1>This is the main title</h1>
<p>I will go in the unnamed slot!</p>
</main>
就我个人而言,如果我一次使用多个 slot,我会将所有的都名字,这对于其他的维护人员来说非常清晰,但 Vue 提供的这个灵活的 API 也很好。
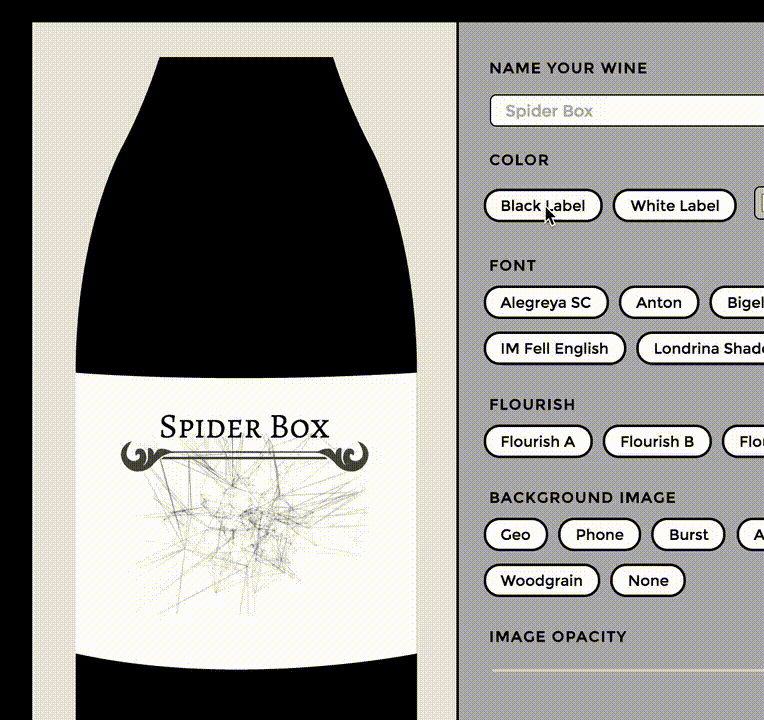
Slot 示例
另外,我们给不同的组件设置特殊的样式,并保持所有的内容相同,因此可以迅速和容易地改变了外观。在下面的葡萄酒标签制造商中,其中一个按钮将根据用户的选择切换组件和颜色,酒瓶背景、标签和文本将全部切换,同时保持内容不变。const app = new Vue({
...
components: {
'appBlack': {
template: '#black'
}
}
});主要的 Vue App HTML:
<component :is="selected">
...
<path class="label" d="M12,295.9s56.5,5,137.6,0V409S78.1,423.6,12,409Z" transform="translate(-12 -13.8)" :style="{ fill: labelColor }"/>
...
</component>

<h4>Color</h4>
<button @click="selected ='appBlack', labelColor = '#000000'">Black Label</button>
<button @click="selected ='appWhite', labelColor = '#ffffff'">White Label</button>
<input type="color" v-model="labelColor" defaultValue="#ff0000">
白色组件的 HTML:
<script type="text/x-template" id="white">
<div class="white">
<slot></slot>
</div>
</script>
(这个演示案例非常大,所以最好在一个单独的窗口或者标签页浏览)
See the Pen Vue Wine Label Maker by Sarah Drasner (@sdras) on CodePen.
现在,我们已经将所有的 SVG 图片数据放置在程序中,但是实际上它放置在每个组件的
<slot>中。我们可以根据使用情况切换不同的内容或样式,这是一个非常好的功能。你可以看到,通过创建一个更改组件的“selected”值的按钮,允许用户自己决定使用哪个组件。
现在所有内容都在一个 slot 中,但是我们也可以使用多个 slot,并通过命名区分它们:
<!-- main vue app instance -->
<app-comment>
<p slot="comment">{{ comment.text }}</p>
</app-comment>

<!-- individual component -->
<script type="text/x-template" id="comment-template">
<div>
<slot name="comment"></slot>
</div>
</script>
我们可以通过引用的相同的 slot 很容易地在不同的组件之间切换,但是如果希望能够来回切换还要保持每个组件的独立状态会怎样?目前,当我们切换黑白标签的时候,模板切换了但内容保持不变。但也许有一种情况,我们希望黑色标签和白色标签是完全不同的。你可以把它们包在称为
<keep-alive></keep-alive>的特殊组件中,这样切换的时候会保持独立的状态。
检查上面例子的异常——创建一个黑色标签,然后一个不同的白色标签,并在它们之间切换。你会看到,每个状态都被保存下来,并且彼此不同:
<keep-alive>
<component :is="selected">
...
</component>
</keep-alive>
See the Pen Vue Wine Label Maker- with keep-alive by Sarah Drasner (@sdras) on CodePen.
我喜欢这个 API 的功能。
这很好,但为了简单起见,我们总是把所有内容放置在一个或两个文件中。当建立网站时,如果将单独的组件放在不同的文件中,并在需要的时候导入进来,这样的组织性更强。实际上在真实的 Vue 开发中通常是这么做的,我们将在下一部分介绍。接下来谈论 Vue-cli,构建过程和状态管理 vuex!

相关文章推荐
- Vue.js 系列教程 2:组件,Props,Slots
- Vue.js 系列教程 2:组件,Props,Slots
- Vue.js 系列教程 2:组件,Props,Slots
- Vue.js 系列教程 2:组件,Props,Slots
- Vue.js 系列教程 2:组件,Props,Slots
- Vue.js 系列教程 2:组件,Props,Slots
- [js高手之路] vue系列教程 - 组件定义与使用上部(7)
- [js高手之路] vue系列教程
- Vue.js 系列教程 5:动画
- Vue.js入门系列教程(一)
- [js高手之路] vue系列教程 - vue的事件绑定与方法(2)
- Vue.js 系列教程 4:Vue
- Vue.js 系列教程 1:渲染,指令,事件
- Vue.js 系列教程 4:Vue
- [js高手之路] vue系列教程
- Vue.js学习系列(四十三)-- 使用props传递数据
- Vue.js 系列教程 3:Vue-cli,生命周期钩子
- Vue.js的小片段——Vue中一个组件的v-for(props,is="todo-item")
- JS组件系列——又一款MVVM组件:Vue(二:构建自己的Vue组件)
- [js高手之路] vue系列教程 - 实现留言板todolist(3)