jQuery提示插件 qTip简单使用
2017-02-04 14:38
603 查看
简介:
qtip是Jquery的一款提示插件,使用比较简单,在Activiti工作流的流程追溯页面使用到qtip插件。
使用步骤:
1、 下载qtip插件
http://qtip2.com/download
2、 下载的插件目录

3、 一般情况下,将jquery.qtip.min.css和jquery.qtip.min.js放入项目中使用即可
4、 在页面引入css和js
<link rel="stylesheet" href="${appName}/res/jquery.qtip.min.css">
<script type="text/javascript" src="${appName}/res/jquery.qtip.min.js"></script>5、 需要加qtip提示的代码片段(图片映射代码)
qtip是Jquery的一款提示插件,使用比较简单,在Activiti工作流的流程追溯页面使用到qtip插件。
使用步骤:
1、 下载qtip插件
http://qtip2.com/download
2、 下载的插件目录
3、 一般情况下,将jquery.qtip.min.css和jquery.qtip.min.js放入项目中使用即可
4、 在页面引入css和js
<link rel="stylesheet" href="${appName}/res/jquery.qtip.min.css">
<script type="text/javascript" src="${appName}/res/jquery.qtip.min.js"></script>5、 需要加qtip提示的代码片段(图片映射代码)
<map id="imgHref" name="imgHref">
<area id="usertask1" name="部门经理【审批】" type="userTask" shape="rect" coords="(97.0,167.0,233.0,222.0)" xposition="97.0px" yposition="167.0px" target="_blank" data-hasqtip="0" aria-describedby="qtip-0">
<area id="exclusivegateway1" name="Exclusive Gateway" type="exclusiveGateway" shape="rect" coords="(144.0,249.0,184.0,289.0)" xposition="144.0px" yposition="249.0px" target="_blank">
<area id="usertask2" name="人事【审批】" type="userTask" shape="rect" coords="(112.0,311.0,217.0,366.0)" xposition="112.0px" yposition="311.0px" target="_blank" data-hasqtip="1">
<area id="exclusivegateway2" name="Exclusive Gateway" type="exclusiveGateway" shape="rect" coords="(144.0,391.0,184.0,431.0)" xposition="144.0px" yposition="391.0px" target="_blank">
<area id="usertask3" name="经理联合【审批】" type="userTask" shape="rect" coords="(96.0,465.0,234.0,520.0)" xposition="96.0px" yposition="465.0px" target="_blank" data-hasqtip="2">
<area id="parallelgateway1_start" name="Parallel Gateway" type="parallelGateway" shape="rect" coords="(142.0,655.0,182.0,695.0)" xposition="142.0px" yposition="655.0px" target="_blank">
<area id="usertask5" name="人事【报备】" type="userTask" shape="rect" coords="(5.0,711.0,110.0,766.0)" xposition="5.0px" yposition="711.0px" target="_blank" data-hasqtip="3">
<area id="usertask6" name="部门【报备】" type="userTask" shape="rect" coords="(214.0,711.0,319.0,766.0)" xposition="214.0px" yposition="711.0px" target="_blank" data-hasqtip="4">
<area id="usertask7" name="销假" type="userTask" shape="rect" coords="(109.0,855.0,214.0,910.0)" xposition="109.0px" yposition="855.0px" target="_blank" data-hasqtip="5">
<area id="exclusivegateway3" name="Exclusive Gateway" type="exclusiveGateway" shape="rect" coords="(144.0,575.0,184.0,615.0)" xposition="144.0px" yposition="575.0px" target="_blank">
<area id="usertask8" name="提交申请" type="userTask" shape="rect" coords="(112.0,75.0,217.0,130.0)" xposition="112.0px" yposition="75.0px" target="_blank" data-hasqtip="6">
<area id="parallelgateway1_end" name="Parallel Gateway" type="parallelGateway" shape="rect" coords="(144.0,775.0,184.0,815.0)" xposition="144.0px" yposition="775.0px" target="_blank">
<area id="startevent1" name="Start" type="startEvent" shape="rect" coords="(147.0,5.0,182.0,40.0)" xposition="147.0px" yposition="5.0px" target="_blank">
<area id="endevent1" name="End" type="endEvent" shape="rect" coords="(144.0,955.0,179.0,990.0)" xposition="144.0px" yposition="955.0px" target="_blank">
</map>
6、qtip在jquery内的使用
$(function(){
$("area[type='userTask']").each(function (){
var nodeId=$(this).attr('id');
var processInstanceId="${proc_inst_id_}";
$(this).qtip({
content:{
text:function (event,api){
$.ajax({
url:'${appName}/workflow/workflowProcess/getActivityApprovalInfo.ajax',
data:{proc_inst_id_:processInstanceId,task_def_key_:nodeId}
})
.then(function(content) {
if(content.length>0){
var content_text="<table border='1' width='260px;' height='50px;' style='text-align: center;font-size:12px;'>";
for(var i=0;i<content.length;i++){
content_text+="<tr><td width='115px;'>审批人:</td><td>"+content[i].assignee_+"</td></tr><tr><td>审批时间:</td><td>"+content[i].end_time_Disp+"</td></tr>"
+"<tr><td>审批意见:</td><td>"+content[i].comment_message+"</td></tr>";
}
content_text+="</table>";
api.set('content.text', content_text);
}else{
api.set('content.text', "<div>暂无审批记录</div>");
}
}, function(xhr, status, error) {
api.set('content.text', status + ': ' + error);
});
return '正在加载...';
}
},
position:{
target: 'mouse',
adjust: { mouse: false }
}
});
});
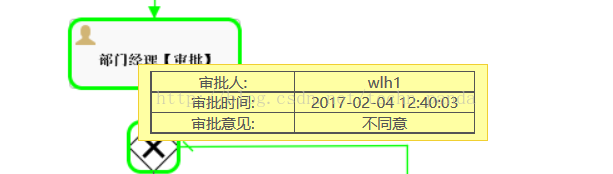
});7、实现的效果

相关文章推荐
- jQuery使用方法
- [Javascript]用jquery的ContextMenu插件设置右键菜单
- $.extend()方法和(function($){...})(jQuery)
- JQuery中Ztree插件的运用
- jQuery插件autocomplete使用详解
- jQuery遮罩插件jQuery.blockUI.js简介
- jquery之验证插件jquery.validate.js
- 前端,不要太过依赖JQuery库(三)
- 在看 jquery 源码中发现的一些优化方向
- jQuery窗口拖动功能的实现代码
- js框架jquery实现分页效果代码下载
- jquery滚动条加载数据
- jQuery实现页面滚动时动态加载内容的方法
- jquery-animate基本用法
- 7月31日--旋转木马幻灯片
- jquery之窗口拖动
- jquery之滚楼
- jQuery中mouseout控制div层时受其他标签影响问题
- jquery之仿京东菜单
- jquery之鼠标移动[沸腾京东]