Git分布式版本控制系统
2017-01-26 17:53
337 查看
笔者QQ:572891887
Linux架构交流群:471443208
1.1Git诞生历史
我想大家还记得Linus torvalds在1991年时发布了Linux操作系统吧,从那以后Linux系统变不断发展壮大,因为Linux系统开源的特性,所以一直接受着来自全球Linux技术爱好者的贡献,志愿者们通过邮件向Linus发送着自己编写的源代码文件,然后由Linus本人通过手工的方式将代码合并,但这样不仅没有效率,而且真的是太痛苦了。一直到2002年,Linux系统经过十余年的不断发展,代码库已经庞大到无法再让Linus通过手工的方式管理了,但是Linus真的很不喜欢CVS或者Subversion版本控制系统,于是商业公司BitMover决定将其公司的BitKeeper分布式版本控制系统授权给Linux开发社区来免费使用,当时的BitKeeper可以比较文件内容的不同,还能够将出错的文档还原到历史某个状态,Linus终于放下了心里的石头。

分布式版本控制流程图
CVS和Subversion属于传统的版本控制系统,而分布式版本控制系统最大的特点是不需要每次提交都把文件推送到版本控制服务器,而是采用分布式版本库的机制,使得每个开发人员都够从服务器中克隆一份完整的版本库到自己计算机本地,不必再完全依赖于版本控制服务器,使得源代码的发布和合并更加方便,并且因为数据都在自己本地,不仅效率提高了,而且即便我们离开了网络依然可以执行提交文件、查看历史版本记录、创建分支等等操作,真的是开发者的福音啊。
就这样平静的度过了三年时间,但是Linux社区聚集着太多的黑客人物,2005年时,那位曾经开发Samba服务程序的Andrew因为试图破解BitKeeper软件协议而激怒了BitMover公司,当即决定不再向Linux社区提供免费的软件授权了,此时的Linus其实也早已有自己编写分布式版本控制系统的打算了,于是便用C语言花了2周创建了Git分布式版本控制系统,并上传了Linux系统的源代码。

git_logo
Git不仅是一款开源的分布式版本控制系统,而且有其独特的功能特性,例如大多数的分布式版本控制系统只会记录每次文件的变化,说白了就是只会关心文件的内容变化差异,而Git则是关注于文件数据整体的变化,直接会将文件提交时的数据保存成快照,而非仅记录差异内容,并且使用SHA-1加密算法保证数据的完整性。
Git为了提高效率,对于没有被修改的文件,则不会重复存储,而是创建一个链接指向之前存储过的文件。

git提交流程图
在正式使用前,我们还需要弄清楚Git的三种重要模式,分别是已提交、已修改、已暂存
已提交(committed):表示数据文件已经顺利提交到Git数据库中。
已修改(modified):表示数据文件已经被修改,但未被保存到Git数据库中。
已暂存(staged):表示数据文件已经被修改,并会在下次提交时提交到Git数据库中。
提交前的数据文件可能会被随意修改或丢失,但只要把文件快照顺利提交到Git数据库中,那就可以完全放心了,流程为:
1.在工作目录中修改数据文件。
2.将文件的快照放入暂存区域。
3.将暂存区域的文件快照提交到Git仓库中。

git工作模式
1.2Git环境准备
[root@git-node1 ~]# cat /etc/redhat-release #查看系统版本CentOS Linux release 7.1.1503 (Core)
[root@git-node1 ~]# uname -r
#查看内核版本
3.10.0-229.el7.x86_64
[root@git-node1 ~]# getenforce #确认Selinux关闭状态
Disabled
[root@git-node1 ~]# systemctl stop firewalld
#关闭防火墙
[root@git-node1 ~]# ifconfig eth0|awk -F '[ ]+' 'NR==2{print $3}'
#查看当前主机IP地址
192.168.56.115
1.3Git安装部署
Git是分布式的版本控制系统,我们只要有了一个原始Git版本仓库,就可以让其他主机克隆走这个原始版本仓库,从而使得一个Git版本仓库可以被同时分布到不同的主机之上,并且每台主机的版本库都是一样的,没有主次之分,极大的保证了数据安全性,并使得用户能够自主选择向那个Git服务器推送文件了,其实部署一个git服务器是非常简单的。[root@git-node1 ~]#
yum install git #安装Git
[root@git-node1 ~]#
git config --global user.name "xubusi"
#配置git使用用户
[root@git-node1 ~]# git config --global user.email "xubusi@mail.com"
#配置git使用邮箱
[root@git-node1 ~]#
git config --global color.ui true
[root@git-node1 ~]#
git config --list
user.name=xubusi
user.email=xubusi@mail.com
color.ui=true
1.4Git常用命令
add#添加文件内容至索引
bisect #通过二分查找定位引入 bug
的变更
branch #列出、创建或删除分支
checkout #检出一个分支或路径到工作区
clone #克隆一个版本库到一个新目录
commit #记录变更到版本库
diff #显示提交之间、提交和工作区之间等的差异
fetch #从另外一个版本库下载对象和引用
grep #输出和模式匹配的行
init #创建一个空的 Git
版本库或重新初始化一个已存在的版本库
log #显示提交日志
merge #合并两个或更多开发历史
mv #移动或重命名一个文件、目录或符号链接
pull #获取并合并另外的版本库或一个本地分支
push #更新远程引用和相关的对象
rebase #本地提交转移至更新后的上游分支中
reset #重置当前HEAD到指定状态
rm #从工作区和索引中删除文件
show #显示各种类型的对象
status #显示工作区状态
tag #创建、列出、删除或校验一个GPG签名的
tag 对象
1.5Git基本操作
1.5.1Git提交数据
我们可以简单的把工作目录理解成是一个被Git服务程序管理的目录,Git会时刻的追踪目录内文件的改动,另外在安装好了Git服务程序后,默认就会创建好了一个叫做master的分支,我们直接可以提交数据到了[root@git-node1 ~]#
mkdir xubusi #创建本地工作目录
[root@git-node1 ~]#
cd xubusi/ #进入本地工作目录
[root@git-node1 xubusi]#
git init #初始为git工作目录
Initialized empty Git repository in /root/xubusi/.git/
[root@git-node1 xubusi]# touch readme #创建文件
[root@git-node1 xubusi]#
git status #查看git状态
# Untracked files:
# (use "git add <file>..." to include in what will be committed)
#
readme.txt #发现新建的readme.txt文件
…
[root@git-node1 xubusi]#
git add readme.txt #git添加文件至暂存区
[root@git-node1 xubusi]#
git status #再次查看状态
# Changes to be committed:
# (use "git rm --cached <file>..." to unstage)
#
new file: readme.txt#发现新建立的文件readme.txt已经变绿
…
[root@git-node1 xubusi]#
git commit -m "the first commit"
#git cmmit提交暂存取文件至git版本仓库
[master (root-commit) dde9e40] the first commit
1 file changed, 1 insertion(+)
create mode 100644 readme.txt
1.5.2Git移除数据
有些时候会向把已经添加到暂存区的文件移除,但仍然希望文件在工作目录中不丢失,换句话说,就是把文件从追踪清单中删除。[root@git-node1 xubusi]#
touch database #建立文件
[root@git-node1 xubusi]#
git add database #添加文件至暂存区
[root@git-node1 xubusi]# git status
#查看当前git状态
# On branch master
# Your branch is ahead of 'origin/master' by 4 commits.
# (use "git push" to publish your local commits)
#
# Changes to be committed:
# (use "git reset HEAD <file>..." to unstage)
#
# new file: database
[root@git-node1 xubusi]#
git rm --cached database #将文件从git暂存区域的追踪列表移除(并不会删除当前工作目录内的数据文件)
rm 'database'
[root@git-node1 xubusi]#
git status #此时文件已经是未追踪状态了
# On branch master
# Untracked files:
# (use "git add <file>..." to include in what will be committed)
#
# database
no changes added to commit (use "git add" and/or "git commit -a")
#如果想将文件数据从git暂存区和工作目录一起删除,可以做如下操作。
[root@git-node1 xubusi]#
git add database
#再将database文件提交到git暂存区
[root@git-node1 xubusi]#
git rm -f database #但如果在删除之前数据文件已经被放入到暂存区域的话,git会担心你误删未提交的文件而报错信息,此时可追加强制删除-f参数。
rm 'database'
[root@git-node1 xubusi]#
ls #查看工作区也没database文件
LICENSE deployhelp.md readme.txt
[root@git-node1 xubusi]#
git status #查看当前状态
# On branch master
no changes added to commit (use "git add" and/or "git commit -a")
1.5.3Git移动数据
[root@git-node1 xubusi]#git mv readme.txt test.txt #git如果要修改文件名称,则使用git
mv命令
[root@git-node1 xubusi]# git status
#查看状态发现下次提交会有一个改名操作
# On branch master
# Changes to be committed:
# (use "git reset HEAD <file>..." to unstage)
#
# renamed: readme.txt -> test.txt
[root@git-node1 xubusi]#
git commit -m "changed name" #提交到git版本仓库
[master 88f3791] changed name
2 files changed, 31 deletions(-)
delete mode 100644 1
rename readme.txt => test.txt (100%)
#其实可以如下方法改名
[root@git-node1 xubusi]# mv test.txt readme.txt
#先修改名称
[root@git-node1 xubusi]# git rm test.txt
#然后删除git版本仓库内的文件快照
rm 'test.txt'
[root@git-node1 xubusi]#
git add readme.txt #最后再将新的文件添加进入
[root@git-node1 xubusi]#
git commit -m "changed the file name"
#提交至git版本仓库
[master 2caa209] changed the file name
1 file changed, 0 insertions(+), 0 deletions(-)
rename test.txt => readme.txt (100%)
1.5.4Git历史记录
[root@git-node1 xubusi]# git log#查看提交历史记录
commit 2caa2090efa1aaf5c32524a13c500c1524e0a5ee
Author: xubusi <xubusi@mail.com>
Date: Sat Jan 16 18:32:53 2016 +0800
changed the file name
commit 88f379175b5ead7e0d84e47bd6db6f5a3b072921
Author: xubusi <xubusi@mail.com>
Date: Sat Jan 16 18:31:03 2016 +0800
changed name
commit 76c486fcf5d70b6a443ba9e7dad209c6722c8bee
Author: xubusi <xubusi@mail.com>
Date: Sat Jan 16 18:22:39 2016 +0800
tet
[root@git-node1 xubusi]#
git log -2 #查看最近几条记录
commit 2caa2090efa1aaf5c32524a13c500c1524e0a5ee
Author: xubusi <xubusi@mail.com>
Date: Sat Jan 16 18:32:53 2016 +0800
changed the file name
commit 88f379175b5ead7e0d84e47bd6db6f5a3b072921
Author: xubusi <xubusi@mail.com>
Date: Sat Jan 16 18:31:03 2016 +0800
changed name
[root@git-node1 xubusi]#
[root@git-node1 xubusi]#
git log -p -1 #-p显示每次提交的内容差异,例如仅查看最近一次差异
commit 2caa2090efa1aaf5c32524a13c500c1524e0a5ee
Author: xubusi <xubusi@mail.com>
Date: Sat Jan 16 18:32:53 2016 +0800
changed the file name
diff --git a/readme.txt b/readme.txt
new file mode 100644
index 0000000..a9b574e
--- /dev/null
+++ b/readme.txt
@@ -0,0 +1,3 @@
+1 hehe
+Create new mode two
+Create new branch is linux
diff --git a/test.txt b/test.txt
deleted file mode 100644
index a9b574e..0000000
--- a/test.txt
+++ /dev/null
@@ -1,3 +0,0 @@
-1 hehe
-Create new mode two
-Create new branch is linux
[root@git-node1 xubusi]#
git log --stat -2#--stat简要显示数据增改行数,这样能够看到提交中修改过的内容,对文件添加或移动的行数,并在最后列出所有增减行的概要信息
commit 2caa2090efa1aaf5c32524a13c500c1524e0a5ee
Author: xubusi <xubusi@mail.com>
Date: Sat Jan 16 18:32:53 2016 +0800
changed the file name
readme.txt | 3 +++
test.txt| 3 ---
2 files changed, 3 insertions(+), 3 deletions(-)
commit 88f379175b5ead7e0d84e47bd6db6f5a3b072921
Author: xubusi <xubusi@mail.com>
Date: Sat Jan 16 18:31:03 2016 +0800
changed name
1| 31 -------------------------------
readme.txt |3 ---
test.txt| 3 +++
3 files changed, 3 insertions(+), 34 deletions(-)
[root@git-node1 xubusi]#
git log --pretty=oneline #--pretty根据不同的格式展示提交的历史信息
2caa2090efa1aaf5c32524a13c500c1524e0a5ee changed the file name
88f379175b5ead7e0d84e47bd6db6f5a3b072921 changed name
76c486fcf5d70b6a443ba9e7dad209c6722c8bee tet
[root@git-node1 xubusi]#
git log --pretty=fuller -2 #以更详细的模式输出提交的历史记录
commit 2caa2090efa1aaf5c32524a13c500c1524e0a5ee
Author: xubusi <xubusi@mail.com>
AuthorDate: Sat Jan 16 18:32:53 2016 +0800
Commit: xubusi <xubusi@mail.com>
CommitDate: Sat Jan 16 18:32:53 2016 +0800
changed the file name
commit 88f379175b5ead7e0d84e47bd6db6f5a3b072921
Author: xubusi <xubusi@mail.com>
AuthorDate: Sat Jan 16 18:31:03 2016 +0800
Commit: xubusi <xubusi@mail.com>
CommitDate: Sat Jan 16 18:31:03 2016 +0800
changed name
还可以使用format参数来指定具体的输出格式,这样非常便于后期编程的提取分析哦,常用的格式有:
%s
提交说明。
%cd
提交日期。
%an
作者的名字。
%cn
提交者的姓名。
%ce
提交者的电子邮件。
%H
提交对象的完整SHA-1哈希字串。
%h
提交对象的简短SHA-1哈希字串。
%T
树对象的完整SHA-1哈希字串。
%t
树对象的简短SHA-1哈希字串。
%P
父对象的完整SHA-1哈希字串。
%p
父对象的简短SHA-1哈希字串。
%ad
作者的修订时间。
[root@git-node1 xubusi]#
git log --pretty=fomat:"%h %cn"#查看当前所有提交记录的简短SHA-1哈希字串与提交着的姓名
fomat:2caa209 xubusi
fomat:88f3791 xubusi
fomat:76c486f xubusi
1.5.5Git还原数据
[root@git-node1 xubusi]#echo "Git is a version control system" >> readme.txt#追加一段话
[root@git-node1 xubusi]# git add readme.txt
#添加至暂存区
[root@git-node1 xubusi]#
git commit -m "introduction software"
#提交至git版本仓库
[master 4bf5b29] introduction software
1 file changed, 1 insertion(+)
此时觉得写得不妥,想还原某一次提交的文件快照
[root@git-node1 xubusi]#
git log --pretty=oneline #提交的历史信息
4bf5b296db9678f1851b896ed040fe37e6d7efb5 introduction software
2caa2090efa1aaf5c32524a13c500c1524e0a5ee changed the file name
88f379175b5ead7e0d84e47bd6db6f5a3b072921 changed name
Git服务程序中有一个叫做HEAD的版本指针,当用户申请还原数据时,其实就是将HEAD指针指向到某个特定的提交版本,但是因为Git是分布式版本控制系统,为了避免历史记录冲突,故使用了SHA-1计算出十六进制的哈希字串来区分每个提交版本,另外默认的HEAD版本指针会指向到最近的一次提交版本记录,而上一个提交版本会叫HEAD^,上上一个版本则会叫做HEAD^^,当然一般会用HEAD~5来表示往上数第五个提交版本。
[root@git-node1 xubusi]#
git reset --hard HEAD^ #还原历史提交版本上一次
HEAD is now at 2caa209 changed the file name
[root@git-node1 xubusi]#
cat readme.txt #查看文件内容(已经还原)
Create new branch is linux
刚刚的操作实际上就是改变了一下HEAD版本指针的位置,就是你将HEAD指针放在那里,那么你的当前工作版本就会定位在那里,要想把内容再还原到最新提交的版本,先看查看下提交版本号
[root@git-node1 xubusi]#
git log --pretty=oneline
2caa2090efa1aaf5c32524a13c500c1524e0a5ee changed the file name
88f379175b5ead7e0d84e47bd6db6f5a3b072921 changed name
怎么搞得?竟然没有了Introduction software这个提交版本记录?
原因很简单,因为我们当前的工作版本是历史的一个提交点,这个历史提交点还没有发生过Introduction software更新记录,所以当然就看不到了,要是想“还原到未来”的历史更新点,可以用git
reflog命令来查看所有的历史记录:
[root@git-node1 xubusi]#
git reflog #查看未来历史更新点
2caa209 HEAD@{0}: reset: moving to HEAD^
4bf5b29 HEAD@{1}: commit: introduction software
2caa209 HEAD@{2}: commit: changed the file name
[root@git-node1 xubusi]#
git reset --hard 4bf5b29 #找到历史还原点的SHA-1值后,就可以还原(值不写全,系统会自动匹配)
HEAD is now at 4bf5b29 introduction software
[root@git-node1 xubusi]# cat readme.txt #查看文件内容(已经还原)
Create new branch is linux
Git is a version control system
如是只是想把某个文件内容还原,就不必这么麻烦,直接用git checkout命令就可以的,先写一段话
[root@git-node1 xubusi]#
echo "Some mistkes words" >> readme.txt
[root@git-node1 xubusi]# cat readme.txt #查看内容
Git is a version control system
Some mistkes words
我们突然发现不应该写一句话的,可以手工删除(当内容比较多的时候会很麻烦),还可以将文件内容从暂存区中恢复
[root@git-node1 xubusi]#
git checkout -- readme.txt
[root@git-node1 xubusi]# cat readme.txt
Git is a version control system
这其中是有一套规则,如果暂存区中有该文件,则直接从暂存区恢复,如果暂存区没有该文件,则将还原成最近一次文件提交时的快照。
1.6Git管理分支结构
分支即是平行空间,假设你在为某个手机系统研发拍照功能,代码已经完成了80%,但如果将这不完整的代码直接提交到git仓库中,又有可能影响到其他人的工作,此时我们便可以在该软件的项目之上创建一个名叫“拍照功能”的分支,这种分支只会属于你自己,而其他人看不到,等代码编写完成后再与原来的项目主分支合并下即可,这样即能保证代码不丢失,又不影响其他人的工作。
一般在实际的项目开发中,我们要尽量保证master分支是非常稳定的,仅用于发布新版本,平时不要随便直接修改里面的数据文件,而工作的时候则可以新建不同的工作分支,等到工作完成后在合并到master分支上面,所以团队的合作分支看起来会像上面图那样。

生产代码提交方式
1.6.1Git创建分支
[root@git-node1 xubusi]#git branch linux
#创建分支
[root@git-node1 xubusi]#
git checkout linux #切换分支
Switched to branch 'linux'
[root@git-node1 xubusi]#
git branch #查看当前分支情况,当前分支前有*号
* linux
master
[root@git-node1 xubusi]#
echo "Create new branch is linux" >> readme.txt
#我们对文件追加一行字符串
[root@git-node1 xubusi]#
git add readme.txt #提交到暂存区
[root@git-node1 xubusi]#
git commit -m "new branch" #提交到git版本仓库
[linux 8bf5757] new branch
1 file changed, 1 insertion(+)
[root@git-node1 xubusi]#
git checkout master #我们在提交文件后再切回master分支
Switched to branch 'master'
[root@git-node1 xubusi]#
cat readme.txt #查看文件内容,发现并没有新追加的字符串
1 hehe
1.6.2Git合并分支
现在,我们想把linux的工作成果合并到master分支上了,则可以使用”gitmerge”命令来将指定的的分支与当前分支合并

git合并分之示意图
[root@git-node1 xubusi]# git branch
#查看是否在master分支
linux
* master
[root@git-node1 xubusi]#
git merge linux #合并Linux分支至master
Updating 185d668..8bf5757
Fast-forward
readme.txt | 1 +
1 file changed, 1 insertion(+)
[root@git-node1 xubusi]#
cat readme.txt #查看合并后的readme文件
1 hehe
Create new branch is linux
[root@git-node1 xubusi]#
git branch -d linux #确认合并完成后,可以放心地删除Linux分支
Deleted branch linux (was 8bf5757).
[root@git-node1 xubusi]#
git branch #删除后,查看branch,只剩下master分支了
* master
1.6.3Git分支冲突
但是Git并不能每次都为我们自动的合并分支,当遇到了内容冲突比较复杂的情况,则必须手工将差异内容处理点,比如这样的情况:
git分支冲突示意图
[root@git-node1 xubusi]#
git checkout -b linux #创建分支并切换到该分支
[root@git-node1 xubusi]#
git branch #查看分支
* linux
master
[root@git-node1 xubusi]#
vim readme.txt #编辑readme文件
[root@git-node1 xubusi]#
git add readme.txt #在Linux分支添加readme至暂存区
[root@git-node1 xubusi]#
git commit -m "create two" #在Linux分支提交readme
[linux 13a42ad] create two
1 file changed, 1 insertion(+), 2 deletions(-)
[root@git-node1 xubusi]#
git checkout master #切换到master分支
Switched to branch 'master'
[root@git-node1 xubusi]#
git branch #查看是否切换至master分支
linux
* master
[root@git-node1 xubusi]#
vim readme.txt #编在master分支上修改readme文件同一行的内容
[root@git-node1 xubusi]#
git add readme.txt #添加至暂存区
[root@git-node1 xubusi]#
git commit -m 'create to master'
#提交至Git版本仓库
[master 75bd55c] create to master
1 file changed, 1 insertion(+)
[root@git-node1 xubusi]#
git merge linux #合并Linux分支(冲突)
Auto-merging readme.txt
CONFLICT (content): Merge conflict in readme.txt
Automatic merge failed; fix conflicts and then commit the result.
#那么此时,我们在master与linux分支上都分别对中readme文件进行了修改并提交了,那这种情况下Git就没法再为我们自动的快速合并了,它只能告诉我们readme文件的内容有冲突,需要手工处理冲突的内容后才能继续合并
[root@git-node1 xubusi]# cat readme.txt
#冲突内容如下
#Git用< <<<<<<,=======,>>>>>>>分割开了各个分支冲突的内容,我们需要手工的删除这些符号,并将内容修改
1 hehe
<<<<<<< HEAD
=======
>>>>>>> linux
Create new branch is linux
[root@git-node1 xubusi]#
git add readme.txt #再次添加至暂存区
[root@git-node1 xubusi]#
git commit -m 'config' #提交至git版本仓库
[master eb9bb83] config
[root@git-node1 xubusi]#
git branch -d linux #最后删除Linux分支结束
Deleted branch linux (was 13a42ad).
[root@git-node1 xubusi]#
git branch #检查是否删除完毕
* master
1.7Git管理标签
当版本仓库内的数据有个大的改善或者功能更新,我们经常会打一个类似于软件版本号的标签,这样通过标签就可以将版本库中的某个历史版本给记录下来,方便我们随时将特定历史时期的数据取出来用,另外打标签其实只是像某个历史版本做了一个指针,所以一般都是瞬间完成的。[root@git-node1 ~]#
cd xubusi/ #进入git版本控制系统
[root@git-node1 xubusi]#
git tag v1.0 #当前提交内容打一个标签(方便快速回滚)
[root@git-node1 xubusi]#
git tag #查看当前所有的标签
v1.0
[root@git-node1 xubusi]#
git show v1.0 #查看当前1.0版本的详细信息
commit 4bf5b296db9678f1851b896ed040fe37e6d7efb5
Author: xubusi <xubusi@mail.com>
Date: Sat Jan 16 19:02:14 2016 +0800
introduction software
diff --git a/readme.txt b/readme.txt
index a9b574e..412b267 100644
--- a/readme.txt
+++ b/readme.txt
@@ -1,3 +1,4 @@
1 hehe
Create new mode two
Create new branch is linux
+Git is a version control system
[root@git-node1 xubusi]#
git tag v1.2 -m "version 1.2 release is test"
#创建带有说明的标签,-a指定标签名字,-m指定说明文字
[root@git-node1 xubusi]#
git tag -d v1.0 #我们为同一个提交版本设置了两次标签,删除之前的v1.0
Deleted tag 'v1.0' (was 4bf5b29)
[root@git-node1 xubusi]#
git tag #再次查看,v1.0已经被删除
v1.2
1.8GitLab安装部署
1.安装和配置必要的依赖关系Install and configure the necessary dependencies
如果你安装postfix发送邮件,请选择“网站设置”中。而不是使用后缀也可以用邮件或 配置自定义SMTP服务器。如果你想使用的进出口,请 配置为SMTP服务器。
在CentOS7,下面的命令将在系统防火墙打开HTTP和SSH访问。
yum install curl openssh-server postfix
systemctl enable sshd postfix
systemctl start sshd postfix
firewall-cmd --permanent --add-service=http
systemctl reload firewalld
2.
添加gitlab包服务器安装包Add the GitLab package server and install the package
curl -sS https://packages.gitlab.com/install/repositories/gitlab/gitlab-ce/script.rpm.sh | sudo bash
yum install gitlab-ce
3.
配置并启动gitlab Configure and start GitLab
gitlab-ctl reconfigure
gitlab-ctl status
gitlab-ctl stop
gitlab-ctl start
4.
浏览到主机名和登录Browse to the hostname and login
Username:
root
Password:
5iveL!fe
1.8.1GitLab配置ssh
gitlab搭配ssh默认端口引发的血战问题如下:

仔细发现故障情况
[root@git-node1 xubusi]#
sed -i 's/#Port 22/Port 52113/g' /etc/ssh/sshd_config#如果是默认的22,就必须修改,否则不生效,我这里改为了52113
[root@git-node1 xubusi]#
systemctl restart sshd #重启sshd服务
[root@git-node1 xubusi]#
grep "ssh_port" /etc/gitlab/gitlab.rb
#修改gitlab里面的ssh_prot端口为自己服务器的sshd端口,声明gitlab.yml中的配置会被这个给覆盖
gitlab_rails['gitlab_shell_ssh_port'] = 52113
[root@git-node1 xubusi]# gitlab-ctl reconfigure
#gitlab重新加载配置文件即可
解决后效果,做一个对比,细心的朋友肯定能发现
gitlab和github其实pull和push是一样的,所以我会在下面介绍如何用github来pull和push
1.9GitHub托管服务
Github顾名思义是一个Git版本库的托管服务,是目前全球最大的软件仓库,拥有上百万的开发者用户,也是软件开发和寻找资源的最佳途径,Github不仅可以托管各种Git版本仓库,还拥有了更美观的Web界面,您的代码文件可以被任何人克隆,使得开发者为开源项贡献代码变得更加容易,当然也可以付费购买私有库,这样高性价比的私有库真的是帮助到了很多团队和企业。大多数用户都是为了寻找资源而爱上Github的,首先进入网站,点击注册(Sign up):
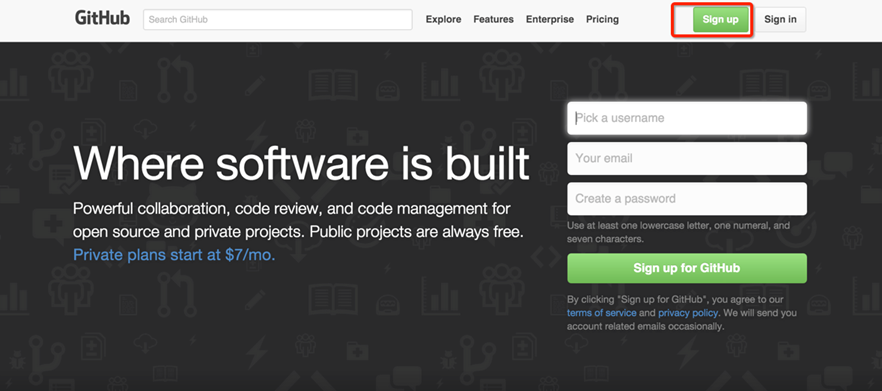
如果没有注册的朋友点击注册

填写注册信息

选择仓库类型,默认免费,点击底下finish sign up注册

我们的GitHub账号注册完成
我们在向Github推送文件时,可以选择SSH协议模式,在本机生成密钥
[root@git-node1 ~]#
ssh-keygen #生成密钥命令
Generating public/private rsa key pair.
Enter file in which to save the key (/root/.ssh/id_rsa):
Enter passphrase (empty for no passphrase):
Enter same passphrase again:
Your identification has been saved in /root/.ssh/id_rsa.
Your public key has been saved in /root/.ssh/id_rsa.pub.
The key fingerprint is:
00:93:62:97:fd:a8:7a:7b:33:0f:2d:81:e1:11:17:b2 root@git-node1.com
The key's randomart image is:
+--[ RSA 2048]----+
| =+o.|
| o +B.|
| . oE .o |
| . +...|
| o.. S|
| .o |
| . o . |
| . . +o|
| ..o +.|
+-----------------+
[root@git-node1 ~]#
cat ~/.ssh/id_rsa.pub #查看公钥
ssh-rsa AAAAB3NzaC1yc2EAAAADAQABAAABAQCXv4xsa4l9fvKCDTWMvG0meoMveklG/beOvkw9xVnmFVhTg4qOCVhLXaaQtR1PJnKVhMok1vtYZu+ldAMHsSmHMuUCK2KMNFrZZaEloMeCNRkFY2vhY5XHuUBK2NjwgLjDXCYtIU40UmlFCU974ybWZJaCteIoHstLLQPoG/5PF5gqBOCeNLxkpq35jJTO9JvexeBMr2hG7NSzg9uZEDyRPUwEVY2yYZkq7hlAnR5H4f1X6HPePc64ZWLT3ZyddlK/9EXDLPu2VLMC7lj5mTGrJlQ54TU3dqSYQXzIV88GsdqxfZj8xbb9JOUZJK4KjAvqUkVmtaVFTTM77zCPUJSN
root@git-node1.com

点击setting账户配置
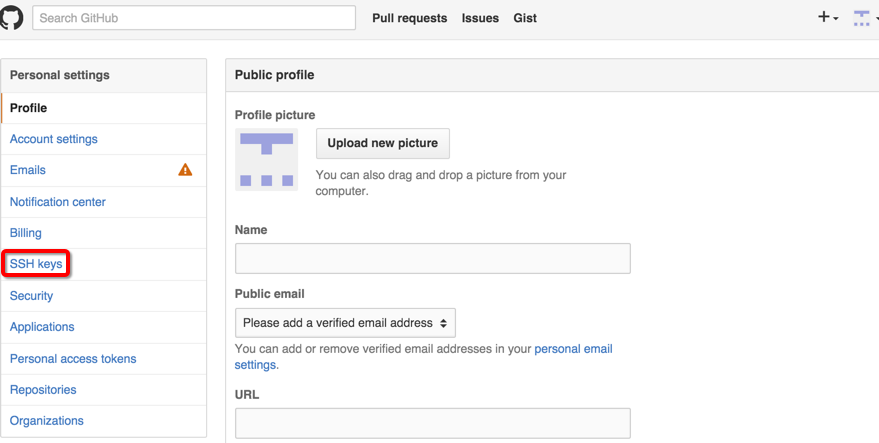
点击SSH keys

添加git服务器上生成的公钥id_rsa.pub点击Add
key添加

查看ssh公钥信息

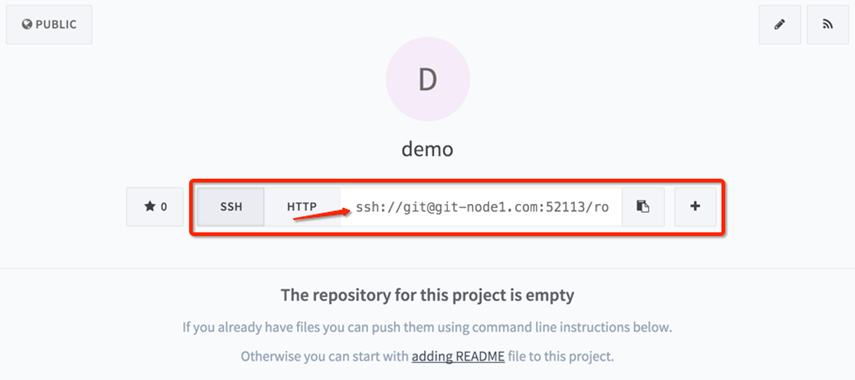
准备工作已经完毕,右上角点击创建一个新的仓库

填写仓库的信息

创建成功后会跳转到该仓库,选择ssh模式,复制版本仓库克隆地址
[root@git-node1 ~]#
git clone git@github.com:xubusi3/demo.git
#手动克隆测试
Cloning into 'demo'...
remote: Counting objects: 3, done.
remote: Total 3 (delta 0), reused 0 (delta 0), pack-reused 0
Receiving objects: 100% (3/3), done.
[root@git-node1 ~]#
cat demo/README.md
#查看详细信息
# demo
描述信息--可以不写
[root@git-node1 ~]#
cd demo/
#进入github
clone下来的仓库
[root@git-node1 demo]#
echo "test is git" >>test.txt
#添加新文件
[root@git-node1 demo]#
git add test.txt #添加到git暂存区
[root@git-node1 demo]#
git commit -m "add test file"
#提交到git版本仓库
[master 66cace0] add test file
1 file changed, 1 insertion(+)
create mode 100644 test.txt
[root@git-node1 demo]#
git remote #查看本机列表
origin
[root@git-node1 demo]#
git push -u origin master#然后将本地的Git仓库同步到远程Github服务器上(第一次请加上参数-u,代表关联本地与远程)
Counting objects: 4, done.
Compressing objects: 100% (2/2), done.
Writing objects: 100% (3/3), 281 bytes | 0 bytes/s, done.
Total 3 (delta 0), reused 0 (delta 0)
To git@github.com:xubusi3/demo.git
1b836ba..66cace0 master -> master
Branch master set up to track remote branch master from origin.
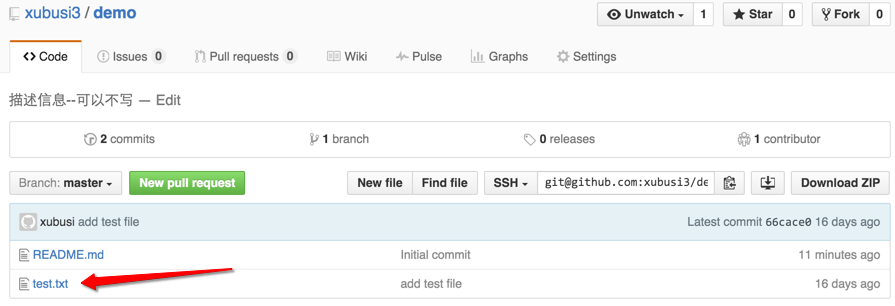
刷新一下web,果然看到版本仓库已经同步了
1.10Git客户端工具
https://www.sourcetreeapp.com/Git和Mercurial的Windows或Mac的客户端
笔者QQ:572891887
Linux架构交流群:471443208

相关文章推荐
- 分布式版本控制系统Git常用命令
- 分布式版本控制系统Git(二):github
- Git 分布式版本控制系统
- Git分布式版本控制系统之初体验
- git——分布式版本控制系统
- git分布式版本控制系统
- Git 分布式版本控制系统(四) ---分支管理
- Git(分布式版本控制系统)
- Git分布式版本控制系统
- 分布式版本控制系统Git的使用总结
- Git是一个分布式的版本控制系统 你明白了吗?不我不需要这样的解释
- Windows 下 Dropbox + Git 构建分布式多人协作版本控制系统
- Git分布式版本控制系统 基本介绍
- 分布式版本控制系统Git------git工作区和主要对象
- linux(debian) git(分布式版本控制系统) 的使用
- Git 分布式版本控制系统 基本命令行操作
- GIT分布式版本控制系统
- 分布式版本控制系统之Git诞生