AndroidStudio Gradle第三依赖统一管理(by 星空武哥)
2017-01-12 14:27
465 查看
转载请标注原创地址:http://blog.csdn.net/lsyz0021/article/details/54377150
AndroidStudio由于使用了gradle的进行项目构建,使我们开发app方便很多,今天我就给大家列出几点是用gradle的方便之处。
一、AndroidStudio Gradle第三依赖统一管理
二、AndroidStudio Gradle基于友盟的多渠道打包
三、AndroidStudio安全管理签名文件keystroe和签名密码
这三篇文章很好的讲解了gradle的在打包和项目依赖管理的优点,大家可以参考一下,来提高自己的开发效率,增强签名文件的安全性。
在很多时候我们使用AndroidStudio开发安卓App的时候都会引入第三方的库,在一个project下我们可以有很多的module,每一个module就是一个app,但是每个module在进行第依赖第三方的时候,有可能依赖第三方的版本不同,记住每次使用的版本号也不太可能,所以统一管理第三方依赖就尤其的重要。
我们可以将依赖的第三方集中放入到一个gradle中,然后在需要使用的的module中将其引入即可,这样很方便的进行的了不同版本的管理了。
首先我们在project下新建一个叫“config.gradle”的文件(名字随便起),然后将要的所有第三方依赖库进行配置。
这样我们就配置好了所有的依赖库了,接下来就是要需要的依赖库引入到我们的module中了。
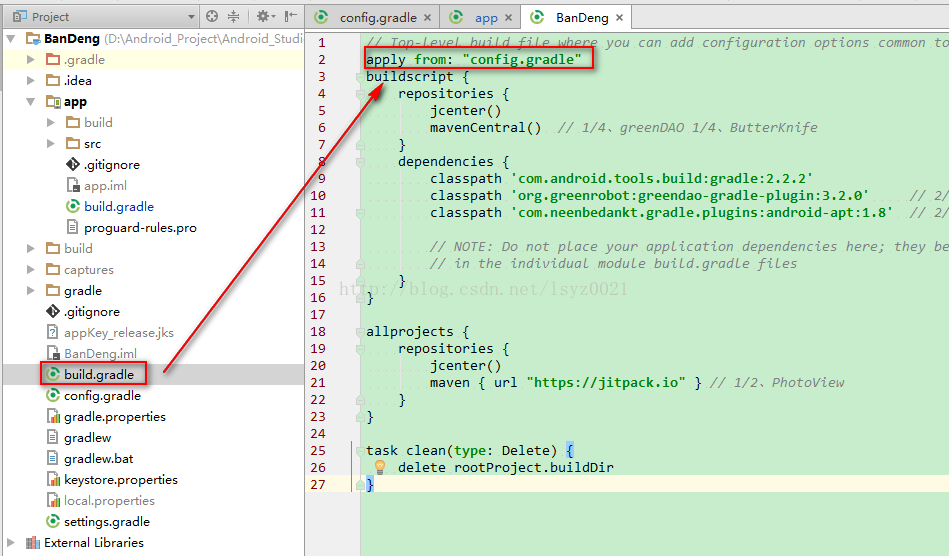
1、在我们的project中的build.gradle中添加
2、在我们的module的build.gradle中引入
这是引入之前的gradle
改造之后的gradle
这样是不是很方便的管理依赖的第三方了。
[b]拿出微信 扫码关注下面的微信订阅号,及时获取更多推送文章
[/b]

AndroidStudio由于使用了gradle的进行项目构建,使我们开发app方便很多,今天我就给大家列出几点是用gradle的方便之处。
一、AndroidStudio Gradle第三依赖统一管理
二、AndroidStudio Gradle基于友盟的多渠道打包
三、AndroidStudio安全管理签名文件keystroe和签名密码
这三篇文章很好的讲解了gradle的在打包和项目依赖管理的优点,大家可以参考一下,来提高自己的开发效率,增强签名文件的安全性。
在很多时候我们使用AndroidStudio开发安卓App的时候都会引入第三方的库,在一个project下我们可以有很多的module,每一个module就是一个app,但是每个module在进行第依赖第三方的时候,有可能依赖第三方的版本不同,记住每次使用的版本号也不太可能,所以统一管理第三方依赖就尤其的重要。
我们可以将依赖的第三方集中放入到一个gradle中,然后在需要使用的的module中将其引入即可,这样很方便的进行的了不同版本的管理了。
首先我们在project下新建一个叫“config.gradle”的文件(名字随便起),然后将要的所有第三方依赖库进行配置。
ext {

android = [
compileSdkVersion: 23,
buildToolsVersion: "24.0.2",
minSdkVersion    : 15,
targetSdkVersion : 23,
versionCode      : 1,
versionName      : "1.0"
]

dependVersion = [
support: "23.4.0"
]

dependencies = [
// ------------- Android -------------
supportV4            : "com.android.support:support-v4:${dependVersion.support}",
appcompatV7          : "com.android.support:appcompat-v7:${dependVersion.support}",
design               : "com.android.support:design:${dependVersion.support}",
junit                : "junit:junit:4.12",
//------------- 测试 -------------
espresso             : "com.android.support.test.espresso:espresso-core:2.2.2",

// ------------- 网络请求 -------------
okhttp               : 'com.squareup.okhttp3:okhttp:3.3.1',
retrofit             : 'com.squareup.retrofit2:retrofit:2.1.0',

// ------------- 图片加载 -------------
fresco               : 'com.facebook.fresco:fresco:0.11.0',
animatedGif          : 'com.facebook.fresco:animated-gif:0.12.0',
picasso              : 'com.squareup.picasso:picasso:2.5.2',
photoView            : 'com.github.chrisbanes:PhotoView:1.3.1',

// ------------- RxAndroid -------------
rxAndroid            : 'io.reactivex:rxandroid:1.2.1',
rxJava               : 'io.reactivex:rxjava:1.2.2',

// ------------- json解析 -------------
fastJson             : 'com.alibaba:fastjson:1.1.54.android',
gson                 : 'com.google.code.gson:gson:2.8.0',

// ------------- log打印工具 -------------
logger               : 'com.orhanobut:logger:1.15',

greendao             : 'org.greenrobot:greendao:3.2.0',

// ------------- ButterKnife -------------
butterknife          : 'com.jakewharton:butterknife:8.4.0',
butterknifeCompiler  : 'com.jakewharton:butterknife-compiler:8.4.0',

// ------------- LeakCanary -------------
leakcanaryAndroid    : 'com.squareup.leakcanary:leakcanary-android:1.5',
leakcanaryAndroidNoOp: 'com.squareup.leakcanary:leakcanary-android-no-op:1.5',
]
}
这样我们就配置好了所有的依赖库了,接下来就是要需要的依赖库引入到我们的module中了。
1、在我们的project中的build.gradle中添加
apply from: "config.gradle"
2、在我们的module的build.gradle中引入
这是引入之前的gradle
apply plugin: 'com.android.application'
android {
compileSdkVersion 23
buildToolsVersion "24.0.2"

defaultConfig {
applicationId "com.bandeng.bandeng"
minSdkVersion 15
targetSdkVersion 23
versionCode 1
versionName "1.0"
testInstrumentationRunner "android.support.test.runner.AndroidJUnitRunner"
}
buildTypes {
release {
minifyEnabled false
proguardFiles getDefaultProguardFile('proguard-android.txt'), 'proguard-rules.pro'
}
}
}
dependencies {
compile fileTree(dir: 'libs', include: ['*.jar'])
androidTestCompile("com.android.support.test.espresso:espresso-core:2.2.2", {
exclude group: 'com.android.support', module: 'support-annotations'
})
compile "com.android.support:appcompat-v7:23.4.0"
testCompile "junit:junit:4.12"
compile "com.android.support:design:23.4.0"
}
改造之后的gradle
apply plugin: 'com.android.application'

android {
compileSdkVersion rootProject.ext.android.compileSdkVersion
buildToolsVersion rootProject.ext.android.buildToolsVersion

defaultConfig {
applicationId "com.bandeng.bandeng"
minSdkVersion rootProject.ext.android.minSdkVersion
targetSdkVersion rootProject.ext.android.targetSdkVersion
versionCode rootProject.ext.android.versionCode
versionName rootProject.ext.android.versionName
testInstrumentationRunner "android.support.test.runner.AndroidJUnitRunner"
}
buildTypes {
release {
minifyEnabled false
proguardFiles getDefaultProguardFile('proguard-android.txt'), 'proguard-rules.pro'
}
}
}
dependencies {
compile fileTree(dir: 'libs', include: ['*.jar'])
androidTestCompile(rootProject.ext.dependencies.espresso, {
exclude group: 'com.android.support', module: 'support-annotations'
})
compile rootProject.ext.dependencies.appcompatV7
testCompile rootProject.ext.dependencies.junit
compile rootProject.ext.dependencies.design
// 网络请求
compile rootProject.ext.dependencies.okhttp
compile rootProject.ext.dependencies.retrofit
// 图片加载
compile rootProject.ext.dependencies.picasso
// RxJava
compile rootProject.ext.dependencies.rxAndroid
compile rootProject.ext.dependencies.rxJava
// json解析
compile rootProject.ext.dependencies.gson
// log打印工具
compile rootProject.ext.dependencies.logger
}
这样是不是很方便的管理依赖的第三方了。
[b]拿出微信 扫码关注下面的微信订阅号,及时获取更多推送文章
[/b]

相关文章推荐
- AndroidStudio Gradle第三依赖统一管理
- AndroidStudio Gradle第三依赖统一管理的实现方法
- AndroidStudio使用进阶二:搭建自己的maven私服,并使用Gradle统一依赖管理
- AndroidStudio使用进阶二:搭建自己的maven私服,并使用Gradle统一依赖管理
- AndroidStudio Gradle基于友盟的多渠道打包(by 星空武哥)
- Gradle依赖的统一管理
- Gradle依赖的统一管理
- [置顶] AndroidStudio中使用Git-高级篇(二)——新建分支和拉取请求(by 星空武哥)
- Android 使用 Gradle 统一配置依赖管理
- Gradle依赖的统一管理
- Gradle依赖的统一管理
- 安卓Studio学习笔记---Gradle依赖库的统一管理
- Gradle依赖的统一管理
- 使用gradle的自定义Property实现Android项目的配置和依赖统一管理
- Android 多渠道打包 Gradle统一依赖管理
- AndroidStudio中使用Git-高级篇——新建分支(branch)和拉取请求(Pull request) (by 星空武哥)
- Gradle依赖的统一管理
- AndroidStudio中使用Git上传项目到github(非常详细,非常全面)(by 星空武哥)
- Gradle依赖的统一管理
- Gradle依赖的统一管理