android自定义View基础系列一(模仿365日历PC版加载动画)
2016-12-28 10:54
543 查看
前言:
前段时间公司业务不忙,每天无所事事,明明知道有很多要学的东西,却又不知道从何做起,感觉很不踏实,于是想管理规划下自己的时间。精挑细选下,看中了365日历,每天安排好时间,每个时间段学什么做什么,做起事来有条不紊,感觉充实多了。建议小伙伴们也要选择一种合适的时间管理工具,管理规划好时间,fighting。sorry,跑题了。
今天刷新日历,由于网络一时不畅,看到了加载动画,打算做个练练手,附一张静态图看效果:
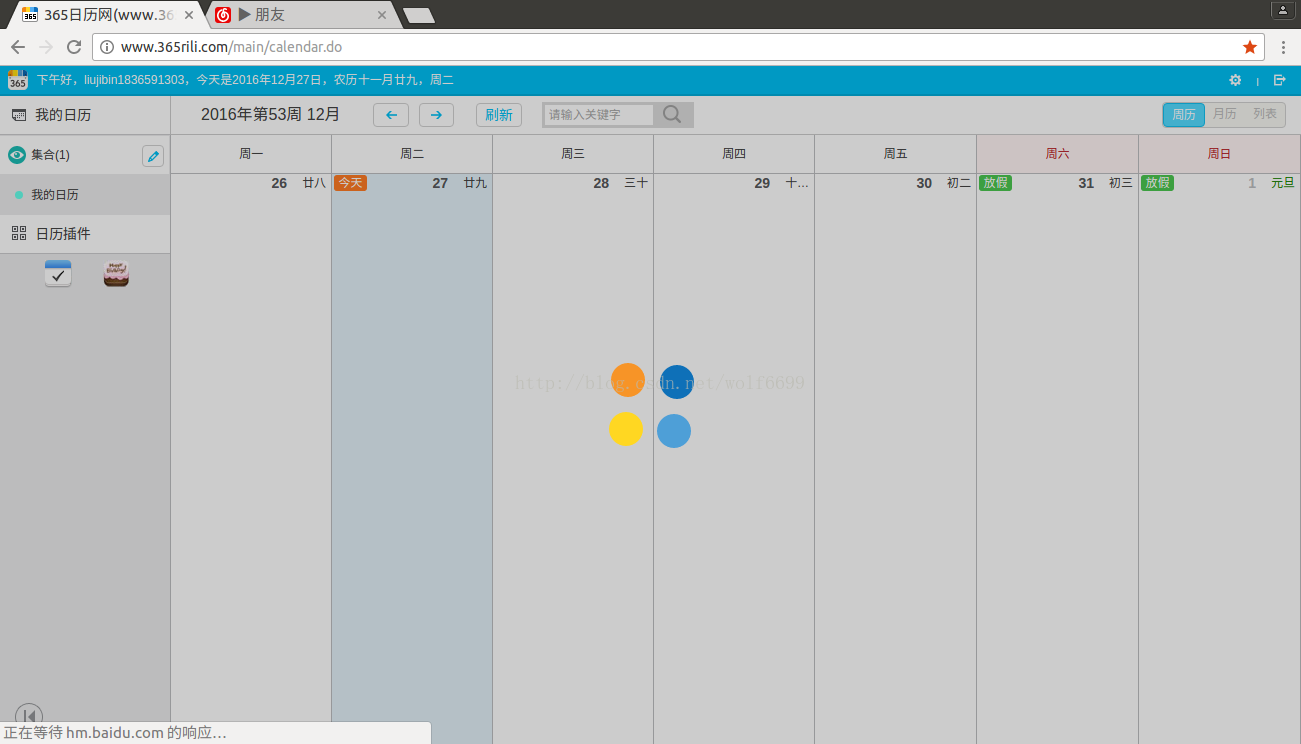
就四个小球旋转,往里往外晃动。
概要:
本文都是一些绘图的基本知识,主要会涉及到绘图里面的一个旋转画布的概念,可以自己去了解下相关内容,文中不会做太详细的介绍。
正文:
首先分析一下需要自定义的属性:小球的半径radiu,四个球的颜色值,每个球偏移中心轴的距离。
我们先自定义好属性:
自定义一个View,获取对应的属性:
然后将自定义的VIew引入到我们的布局文件中,设置对应的属性值:
我们还需要在onMeasure中测量View的宽高,以便确定中心点的位置:
好了,到这里我们的准备工作已经完成,我们把View的中心点作为x,y轴的中心轴,四个球分别在x轴正负,y轴正负偏移相同距离。首先我们先绘制静态的小球:
现在我们在静态小圆的基础上实现圆偏移的动态效果,定义偏移值,和偏移判断:
下面我们在添加画布旋转的效果,这里设置一个变化比例:
附上View的完整代码:
public class MyView extends View {
/*小圆半径*/
private int radiu;
/*四个球颜色值*/
private int color_one;
private int color_two;
private int color_three;
private int color_four;
/*偏移中心轴距离*/
private int offset;
//绘图工具
private Paint mPaint;
//View的宽高 private int mWidth,mHeight;
/*增还是减*/ private boolean isChanging = false; /*变化的值*/ private int offsetChange;
/*旋转的比例值*/ private int percent = 0;
public MyView(Context context) {
this(context,null);
}
public MyView(Context context, AttributeSet attrs) {
this(context, attrs,0);
}
public MyView(Context context, AttributeSet attrs, int defStyleAttr) {
super(context, attrs, defStyleAttr);
TypedArray ta = context.obtainStyledAttributes(attrs,R.styleable.MyViewAttrs,defStyleAttr,0);
radiu = ta.getInt(R.styleable.MyViewAttrs_radiu,30);
color_one = ta.getColor(R.styleable.MyViewAttrs_color_one, Color.BLACK);
color_two = ta.getColor(R.styleable.MyViewAttrs_color_two, Color.BLACK);
color_three = ta.getColor(R.styleable.MyViewAttrs_color_three, Color.BLACK);
color_four = ta.getColor(R.styleable.MyViewAttrs_color_four, Color.BLACK);
offset = ta.getInt(R.styleable.MyViewAttrs_offset,50);
ta.recycle();
mPaint = new Paint();
mPaint.setStrokeWidth(3);
mPaint.setAntiAlias(true);
offsetChange = offset;
}
@Override protected void onMeasure(int widthMeasureSpec, int heightMeasureSpec) { super.onMeasure(widthMeasureSpec, heightMeasureSpec); int widthSize = MeasureSpec.getSize(widthMeasureSpec); int widthMode = MeasureSpec.getMode(widthMeasureSpec); int heightSize = MeasureSpec.getSize(heightMeasureSpec); int heightMode = MeasureSpec.getMode(heightMeasureSpec); if(widthMode == MeasureSpec.EXACTLY){ mWidth = widthSize; }else{ mWidth = (int)TypedValue.applyDimension(TypedValue.COMPLEX_UNIT_DIP,400,getResources().getDisplayMetrics()); } if(heightMode == MeasureSpec.EXACTLY){ mHeight = heightSize; }else{ mHeight = (int)TypedValue.applyDimension(TypedValue.COMPLEX_UNIT_DIP,400,getResources().getDisplayMetrics()); } setMeasuredDimension(mWidth,mHeight); }
@Override
protected void onDraw(Canvas canvas) {
super.onDraw(canvas);
percent+=2; canvas.rotate(percent,mWidth/2,mHeight/2);
/*四个球*/
mPaint.setColor(color_one);
canvas.drawCircle(mWidth/2-offsetChange,mHeight/2,radiu,mPaint);
mPaint.setColor(color_two);
canvas.drawCircle(mWidth/2+offsetChange,mHeight/2,radiu,mPaint);
mPaint.setColor(color_three);
canvas.drawCircle(mWidth/2,mHeight/2-offsetChange,radiu,mPaint);
mPaint.setColor(color_four);
canvas.drawCircle(mWidth/2,mHeight/2+offsetChange,radiu,mPaint);
if(isChanging){//递减
if(offsetChange > offset){
offsetChange --;
}else{
isChanging = false;
}
}else{//递加
if(offsetChange < offset + 30){
offsetChange ++;
}else{
isChanging = true;
}
}
postInvalidateDelayed(40);
}
}
源码:
csdn地址:http://download.csdn.net/detail/liujibin1836591303/9723215
前段时间公司业务不忙,每天无所事事,明明知道有很多要学的东西,却又不知道从何做起,感觉很不踏实,于是想管理规划下自己的时间。精挑细选下,看中了365日历,每天安排好时间,每个时间段学什么做什么,做起事来有条不紊,感觉充实多了。建议小伙伴们也要选择一种合适的时间管理工具,管理规划好时间,fighting。sorry,跑题了。
今天刷新日历,由于网络一时不畅,看到了加载动画,打算做个练练手,附一张静态图看效果:
就四个小球旋转,往里往外晃动。
概要:
本文都是一些绘图的基本知识,主要会涉及到绘图里面的一个旋转画布的概念,可以自己去了解下相关内容,文中不会做太详细的介绍。
正文:
首先分析一下需要自定义的属性:小球的半径radiu,四个球的颜色值,每个球偏移中心轴的距离。
我们先自定义好属性:
<?xml version="1.0" encoding="utf-8"?>
<resources>
<declare-styleable name="MyViewAttrs">
<!--小圆半径-->
<attr name="radiu" format="integer"></attr>
<!--四个圆的颜色-->
<attr name="color_one" format="color"></attr>
<attr name="color_two" format="color"></attr>
<attr name="color_three" format="color"></attr>
<attr name="color_four" format="color"></attr>
<!--偏移中心点的距离-->
<attr name="offset" format="integer"></attr>
</declare-styleable>
</resources>
自定义一个View,获取对应的属性:
/*小圆半径*/
private int radiu;

/*四个球颜色值*/
private int color_one;
private int color_two;
private int color_three;
private int color_four;

/*偏移中心轴距离*/
private int offset;

//绘图工具
private Paint mPaint;

public MyView(Context context) {
this(context,null);
}

public MyView(Context context, AttributeSet attrs) {
this(context, attrs,0);
}

public MyView(Context context, AttributeSet attrs, int defStyleAttr) {
super(context, attrs, defStyleAttr);

TypedArray ta = context.obtainStyledAttributes(attrs,R.styleable.MyViewAttrs,defStyleAttr,0);
radiu = ta.getInt(R.styleable.MyViewAttrs_radiu,30);
color_one = ta.getColor(R.styleable.MyViewAttrs_color_one, Color.BLACK);
color_two = ta.getColor(R.styleable.MyViewAttrs_color_two, Color.BLACK);
color_three = ta.getColor(R.styleable.MyViewAttrs_color_three, Color.BLACK);
color_four = ta.getColor(R.styleable.MyViewAttrs_color_four, Color.BLACK);
offset = ta.getInt(R.styleable.MyViewAttrs_offset,50);
ta.recycle();

mPaint = new Paint();
mPaint.setStrokeWidth(3);
mPaint.setAntiAlias(true);
}
然后将自定义的VIew引入到我们的布局文件中,设置对应的属性值:
<?xml version="1.0" encoding="utf-8"?>
<LinearLayout xmlns:android="http://schemas.android.com/apk/res/android"
xmlns:custom="http://schemas.android.com/apk/res/demo.bys.com.testmyview4"
android:orientation="vertical"
android:layout_width="match_parent"
android:layout_height="match_parent">

<demo.bys.com.testmyview4.MyView
android:layout_width="wrap_content"
android:layout_height="wrap_content"
custom:radiu="60"
custom:color_one="#FF7F00"
custom:color_two="#FFFF00"
custom:color_three="#63B8FF"
custom:color_four="#0000EE"
custom:offset="100"/>

</LinearLayout>
我们还需要在onMeasure中测量View的宽高,以便确定中心点的位置:
//View的宽高
private int mWidth,mHeight;
@Override
protected void onMeasure(int widthMeasureSpec, int heightMeasureSpec) {
super.onMeasure(widthMeasureSpec, heightMeasureSpec);

int widthSize = MeasureSpec.getSize(widthMeasureSpec);
int widthMode = MeasureSpec.getMode(widthMeasureSpec);
int heightSize = MeasureSpec.getSize(heightMeasureSpec);
int heightMode = MeasureSpec.getMode(heightMeasureSpec);

if(widthMode == MeasureSpec.EXACTLY){
mWidth = widthSize;
}else{
mWidth = (int)TypedValue.applyDimension(TypedValue.COMPLEX_UNIT_DIP,400,getResources().getDisplayMetrics());
}

if(heightMode == MeasureSpec.EXACTLY){
mHeight = heightSize;
}else{
mHeight = (int)TypedValue.applyDimension(TypedValue.COMPLEX_UNIT_DIP,400,getResources().getDisplayMetrics());
}

setMeasuredDimension(mWidth,mHeight);
}
好了,到这里我们的准备工作已经完成,我们把View的中心点作为x,y轴的中心轴,四个球分别在x轴正负,y轴正负偏移相同距离。首先我们先绘制静态的小球:
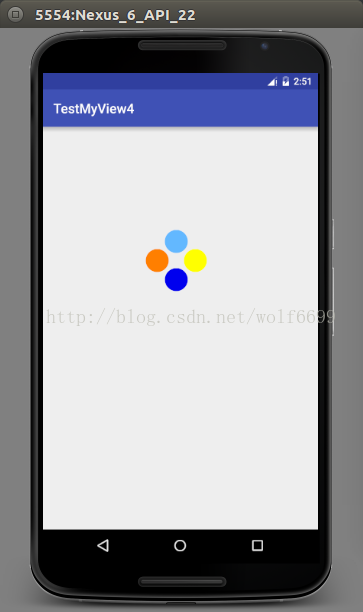
/*四个球*/
mPaint.setColor(color_one);
canvas.drawCircle(mWidth/2-offset,mHeight/2,radiu,mPaint);

mPaint.setColor(color_two);
canvas.drawCircle(mWidth/2+offset,mHeight/2,radiu,mPaint);

mPaint.setColor(color_three);
canvas.drawCircle(mWidth/2,mHeight/2-offset,radiu,mPaint);

mPaint.setColor(color_four);
canvas.drawCircle(mWidth/2,mHeight/2+offset,radiu,mPaint);
效果如图:
现在我们在静态小圆的基础上实现圆偏移的动态效果,定义偏移值,和偏移判断:
/*增还是减*/
private boolean isChanging = false;

/*变化的值*/
private int offsetChange;
/*四个球*/
mPaint.setColor(color_one);
canvas.drawCircle(mWidth/2-offsetChange,mHeight/2,radiu,mPaint);

mPaint.setColor(color_two);
canvas.drawCircle(mWidth/2+offsetChange,mHeight/2,radiu,mPaint);

mPaint.setColor(color_three);
canvas.drawCircle(mWidth/2,mHeight/2-offsetChange,radiu,mPaint);

mPaint.setColor(color_four);
canvas.drawCircle(mWidth/2,mHeight/2+offsetChange,radiu,mPaint);

if(isChanging){//递减
if(offsetChange > offset){
offsetChange --;
}else{
isChanging = false;
}
}else{//递加
if(offsetChange < offset +
4000
30){
offsetChange ++;
}else{
isChanging = true;
}
}

postInvalidateDelayed(30);偏移变化范围定为30,判断递增,递减,将小球的偏移值换成变化中的偏移值。此时就实现了小球动态远离/靠近的效果,没有动态图,就不贴了。下面我们在添加画布旋转的效果,这里设置一个变化比例:
/*旋转的比例值*/
private int percent = 0;
这里我们2度一叠加:
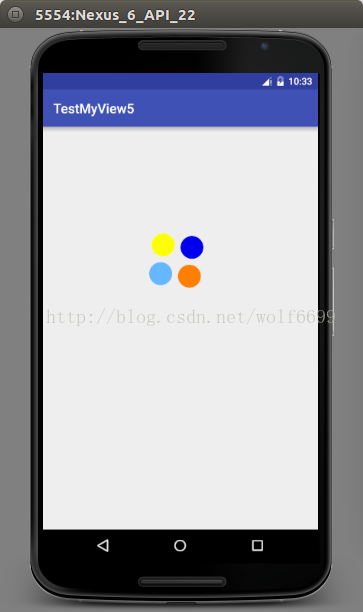
percent+=2;
canvas.rotate(percent,mWidth/2,mHeight/2);
最终实现了效果,在linux系统动态效果图不好搞,只能上个静态图,后面会附上源码:
附上View的完整代码:
public class MyView extends View {
/*小圆半径*/
private int radiu;
/*四个球颜色值*/
private int color_one;
private int color_two;
private int color_three;
private int color_four;
/*偏移中心轴距离*/
private int offset;
//绘图工具
private Paint mPaint;
//View的宽高 private int mWidth,mHeight;
/*增还是减*/ private boolean isChanging = false; /*变化的值*/ private int offsetChange;
/*旋转的比例值*/ private int percent = 0;
public MyView(Context context) {
this(context,null);
}
public MyView(Context context, AttributeSet attrs) {
this(context, attrs,0);
}
public MyView(Context context, AttributeSet attrs, int defStyleAttr) {
super(context, attrs, defStyleAttr);
TypedArray ta = context.obtainStyledAttributes(attrs,R.styleable.MyViewAttrs,defStyleAttr,0);
radiu = ta.getInt(R.styleable.MyViewAttrs_radiu,30);
color_one = ta.getColor(R.styleable.MyViewAttrs_color_one, Color.BLACK);
color_two = ta.getColor(R.styleable.MyViewAttrs_color_two, Color.BLACK);
color_three = ta.getColor(R.styleable.MyViewAttrs_color_three, Color.BLACK);
color_four = ta.getColor(R.styleable.MyViewAttrs_color_four, Color.BLACK);
offset = ta.getInt(R.styleable.MyViewAttrs_offset,50);
ta.recycle();
mPaint = new Paint();
mPaint.setStrokeWidth(3);
mPaint.setAntiAlias(true);
offsetChange = offset;
}
@Override protected void onMeasure(int widthMeasureSpec, int heightMeasureSpec) { super.onMeasure(widthMeasureSpec, heightMeasureSpec); int widthSize = MeasureSpec.getSize(widthMeasureSpec); int widthMode = MeasureSpec.getMode(widthMeasureSpec); int heightSize = MeasureSpec.getSize(heightMeasureSpec); int heightMode = MeasureSpec.getMode(heightMeasureSpec); if(widthMode == MeasureSpec.EXACTLY){ mWidth = widthSize; }else{ mWidth = (int)TypedValue.applyDimension(TypedValue.COMPLEX_UNIT_DIP,400,getResources().getDisplayMetrics()); } if(heightMode == MeasureSpec.EXACTLY){ mHeight = heightSize; }else{ mHeight = (int)TypedValue.applyDimension(TypedValue.COMPLEX_UNIT_DIP,400,getResources().getDisplayMetrics()); } setMeasuredDimension(mWidth,mHeight); }
@Override
protected void onDraw(Canvas canvas) {
super.onDraw(canvas);
percent+=2; canvas.rotate(percent,mWidth/2,mHeight/2);
/*四个球*/
mPaint.setColor(color_one);
canvas.drawCircle(mWidth/2-offsetChange,mHeight/2,radiu,mPaint);
mPaint.setColor(color_two);
canvas.drawCircle(mWidth/2+offsetChange,mHeight/2,radiu,mPaint);
mPaint.setColor(color_three);
canvas.drawCircle(mWidth/2,mHeight/2-offsetChange,radiu,mPaint);
mPaint.setColor(color_four);
canvas.drawCircle(mWidth/2,mHeight/2+offsetChange,radiu,mPaint);
if(isChanging){//递减
if(offsetChange > offset){
offsetChange --;
}else{
isChanging = false;
}
}else{//递加
if(offsetChange < offset + 30){
offsetChange ++;
}else{
isChanging = true;
}
}
postInvalidateDelayed(40);
}
}
源码:
csdn地址:http://download.csdn.net/detail/liujibin1836591303/9723215

相关文章推荐
- Android Studio调试功能使用总结【转】
- Android 显示 PDF 文件
- Xamarin.Android之布局文件智能提示问题
- Android设计模式——里氏替换原则
- Android 判断当前语言环境是否是中文环境
- Android之Fragment源码级彻底解析上
- Gradle构建Android项目
- Android AutoLayout全新的适配方式 堪称适配终结者
- Android ART运行时与Dalvik虚拟机
- Android iBeacon 开发
- Android开发从入门到放弃(8)使用ListView显示一个简单的列表
- Ubuntu 14.04 32位 搭建Android开发环境
- Android上面通过URL来启动本地应用
- RK3288 7寸MIPI屏配置出现错误
- Android中使用Thread造成内存泄露的分析和解决
- Android——apk反编译
- Android从零开始-AndroidManifest.xml解析
- Android混淆 笔记
- 15 个 Android 通用流行框架大全(转)
- android系统应用安装