Python--day5--常用模块
2016-12-27 19:09
369 查看
介绍:
本文主要是学习python常用模块的记录,后面记录的不是很详细,以后再补。

2016年12月27日

目录:
模块介绍
json & pickle
time & datetime模块 &月历
random模块
OS
SYS
shutil
shelves
xml
yaml
ConfigParser
hashlib
subprocess
logging
模块
就是用一堆代码实现某个功能的代码集合。
模块分三种:
自定义模块
内置标准模块(标准库)
开源模块
开源模块网站 : pypi.python.org
调用模块
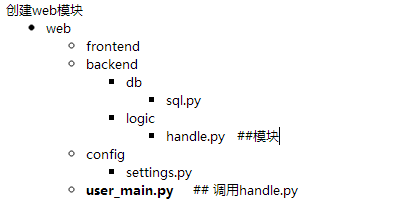
调用
from backend.logic import handle ##这样导入目录必须是包的状态,也就是包下面 有一个 __init__.py
handle.home()
sql.py
json&pickle 序列化
json 用于字符串和python数据类型间进行转化 r w
pickle 用于python特有的类型和python的数据类型间进行转换 rb wb 支持更复杂的调用函数
都提供了4个功能: dumps\dump\loads\load
例子
time
import time
时间元祖
获取当前时间
random模块
随机数
random.randint(a, b), 用于生成一个指定范围内的整数。其中参数a是下限,参数b是上限,生成的随机数n: a <= n <= b
random.randrange([start], stop[, step]) 从指定范围内,按指定基数递增的集合中 获取一个随机数。如:random.randrange(10, 100, 2),结果相当于从[10, 12, 14, 16, ... 96, 98]序列中获取一个随机数。
os模块
os.popen("dir").read() 执行命令,暂时保存到一个地方
SYS模块
shutil 文件 文件夹 处理模块
shutil.copyfileobj(fsrc, fdst[, length])
将文件内容拷贝到另一个文件中,可以部分内容
def copyfileobj(fsrc, fdst, length=16*1024):
"""copy data from file-like object fsrc to file-like object fdst"""
while 1:
buf = fsrc.read(length)
if not buf:
break
fdst.write(buf)
shutil.copyfile(src, dst)
拷贝文件
shutil.copymode(src, dst)
仅拷贝权限。内容、组、用户均不变
shutil.copystat(src, dst)
拷贝状态的信息,包括:mode bits, atime, mtime, flags
shutil.copy(src, dst)
拷贝文件和权限
shutil.copy2(src, dst)
拷贝文件和状态信息
shutil.ignore_patterns(*patterns)
shutil.copytree(src, dst, symlinks=False, ignore=None)
递归的去拷贝文件例如:copytree(source, destination, ignore=ignore_patterns('*.pyc', 'tmp*'))shutil.rmtree(path[, ignore_errors[, onerror]])
递归的去删除文件
shutil.move(src, dst)
递归的去移动文件
shutil.make_archive(base_name, format,...)创建压缩包并返回文件路径,例如:zip、tarbase_name: 压缩包的文件名,也可以是压缩包的路径。只是文件名时,则保存至当前目录,否则保存至指定路径,
如:www =>保存至当前路径
如:/Users/wupeiqi/www =>保存至/Users/wupeiqi/
format: 压缩包种类,“zip”, “tar”, “bztar”,“gztar”
root_dir: 要压缩的文件夹路径(默认当前目录)
owner: 用户,默认当前用户
group: 组,默认当前组
logger: 用于记录日志,通常是logging.Logger对象
shutil 对压缩包的处理是调用 ZipFile 和 TarFile 两个模块来进行的
shelve
是一个简单的k,v 将内存数据通过文件持久化的模块,支持pickle
import shelve
d = shelve.open('shelve_test') #打开一个文件
class Test(object):
def __init__(self,n):
self.n = n
t = Test(123)
t2 = Test(123334)
name = ["alex","rain","test"]
d["test"] = name #持久化列表
d["t1"] = t #持久化类
d["t2"] = t2
d.close()
xml模块
实现不同语言或程序直接进行数据交换 <>
yaml http://pyyaml.org/wiki/PyYAMLDocumentation configparser模块
用于生成和修改常见配置文档。
hashlib模块
加密操作
subprocess模块
logging
提供了标准的日志接口。
分5个级别
debug() info() warning() error() critical()
本文主要是学习python常用模块的记录,后面记录的不是很详细,以后再补。
2016年12月27日
目录:
模块介绍
json & pickle
time & datetime模块 &月历
random模块
OS
SYS
shutil
shelves
xml
yaml
ConfigParser
hashlib
subprocess
logging
模块
就是用一堆代码实现某个功能的代码集合。
模块分三种:
自定义模块
内置标准模块(标准库)
开源模块
开源模块网站 : pypi.python.org
调用模块
调用
from backend.logic import handle ##这样导入目录必须是包的状态,也就是包下面 有一个 __init__.py
handle.home()
sql.py
import sys
import  os.path
base_dir=os.path.dirname(os.path.dirname(os.path.dirname(os.path.abspath(__file__)))) ##获得目录
sys.path.append(base_dir)  ##修改库的目录
from  config    import settings
def  db_auth(configs):
if  configs.DATABASE["user"]  ==  'root'  and  configs.DATABASE["password"] == "123":
print("OK")
return True
else:
print("error")
def s(table,column):
if  db_auth(settings):
if table == 'user':
user_info = {
"001":['hequan',24,'engineer'],
"002":['he123', 44, 'beijing'],
"003":['he456', 55, 'hebei'],
}
return  user_info
else:
print("cuowu.......")handle.pyimport sys
import os.path
base_dir=os.path.dirname(os.path.dirname(os.path.dirname(os.path.abspath(__file__))))
sys.path.append(base_dir)
from back.db.sql import s
def home():
print("welcome to home page")
q_data = s("user",'xxx')
print("query res: {}".format(q_data))
def movie():
print("welcome to movie page")
def tv():
print("welcome to tv page")settings.pyDATABASE ={
"engine":"mysql",
"host":"localhost",
"port":3306,
"user":"root",
"password":"123",
}user_main.pyfrom back.logic import handle
handle.home()
结果
welcome to home page
OK
query res: {'003': ['he456', 55, 'hebei'], '001': ['hequan', 24, 'engineer'], '002': ['he123', 44, 'beijing']}json&pickle 序列化
json 用于字符串和python数据类型间进行转化 r w
pickle 用于python特有的类型和python的数据类型间进行转换 rb wb 支持更复杂的调用函数
都提供了4个功能: dumps\dump\loads\load
例子
pickle写入
import  pickle
f =open("user.txt","wb")    ##json  只是w
info={
"user":"123",
"hequan":'123'
}
f.write(pickle.dumps(info))
f.close()

读取
import pickle
f= open("user.txt",'rb')
data =pickle.loads(f.read())
print(data)
dumps 与 dump的 区别
pickle.dump(info,f)    ##写入
data =pickle.load(f)   ##读取
time
import time
时间元祖
| 序号 | 字段 | 值 |
|---|---|---|
| 0 | 4位数年 tm_year | 2008 |
| 1 | 月 tm_mon | 1 到 12 |
| 2 | 日 tm_day | 1到31 |
| 3 | 小时 tm_hour | 0到23 |
| 4 | 分钟 tm_min | 0到59 |
| 5 | 秒 tm_sec | 0到61 (60或61 是闰秒) |
| 6 | 一周的第几日 tm_wday | 0到6 (0是周一) |
| 7 | 一年的第几日 tm_yday | 1到366 (儒略历) |
| 8 | 夏令时 tm_isdst | -1, 0, 1, -1是决定是否为夏令时的旗帜 |
import  time
localtime = time.localtime(time.time())
print(localtime)
time.struct_time(tm_year=2016, tm_mon=12, tm_mday=27, tm_hour=16, tm_min=46, tm_sec=44, tm_wday=1, tm_yday=362, tm_isdst=0)

获取格式化时间
localtime = time.asctime(time.localtime(time.time()))
print(localtime)
Tue Dec 27 16:47:56 2016

格式化日期
print(time.strftime("%Y-%m-%d  %H:%M:%S",time.localtime()))
2016-12-27  16:49:16

月历
import calendar
cat = calendar.month(2017,1)
print(cat)
January 2017
Mo Tu We Th Fr Sa Su
1
2  3  4  5  6  7  8
9 10 11 12 13 14 15
16 17 18 19 20 21 22
23 24 25 26 27 28 29
30 31

datetime

import datetime
date = datetime.datetime.now()
print(date)
2016-12-27 16:54:42.472913
random模块
随机数
random.randint(a, b), 用于生成一个指定范围内的整数。其中参数a是下限,参数b是上限,生成的随机数n: a <= n <= b
random.randrange([start], stop[, step]) 从指定范围内,按指定基数递增的集合中 获取一个随机数。如:random.randrange(10, 100, 2),结果相当于从[10, 12, 14, 16, ... 96, 98]序列中获取一个随机数。
os模块
os.popen("dir").read() 执行命令,暂时保存到一个地方
os.getcwd() 获取当前工作目录,即当前python脚本工作的目录路径
os.chdir(
"dirname"
) 改变当前脚本工作目录;相当于shell下cd
os.curdir 返回当前目录: (
'.'
)
os.pardir 获取当前目录的父目录字符串名:(
'..'
)
os.makedirs(
'dirname1/dirname2'
) 可生成多层递归目录
os.removedirs(
'dirname1'
) 若目录为空,则删除,并递归到上一级目录,如若也为空,则删除,依此类推
os.mkdir(
'dirname'
) 生成单级目录;相当于shell中mkdir dirname
os.rmdir(
'dirname'
) 删除单级空目录,若目录不为空则无法删除,报错;相当于shell中rmdir dirname
os.listdir(
'dirname'
) 列出指定目录下的所有文件和子目录,包括隐藏文件,并以列表方式打印
os.remove() 删除一个文件
os.rename(
"oldname"
,
"newname"
) 重命名文件
/
目录
os.stat(
'path/filename'
) 获取文件
/
目录信息
os.sep 输出操作系统特定的路径分隔符,win下为
"\\",Linux下为"
/
"
os.linesep 输出当前平台使用的行终止符,win下为
"\t\n"
,Linux下为
"\n"
os.pathsep 输出用于分割文件路径的字符串
os.name 输出字符串指示当前使用平台。win
-
>
'nt'
; Linux
-
>
'posix'
os.system(
"bash command"
) 运行shell命令,直接显示
os.environ 获取系统环境变量
os.path.abspath(path) 返回path规范化的绝对路径
os.path.split(path) 将path分割成目录和文件名二元组返回
os.path.dirname(path) 返回path的目录。其实就是os.path.split(path)的第一个元素
os.path.basename(path) 返回path最后的文件名。如何path以/或\结尾,那么就会返回空值。即os.path.split(path)的第二个元素
os.path.exists(path) 如果path存在,返回
True
;如果path不存在,返回
False
os.path.isabs(path) 如果path是绝对路径,返回
True
os.path.isfile(path) 如果path是一个存在的文件,返回
True
。否则返回
False
os.path.isdir(path) 如果path是一个存在的目录,则返回
True
。否则返回
False
os.path.join(path1[, path2[, ...]]) 将多个路径组合后返回,第一个绝对路径之前的参数将被忽略
os.path.getatime(path) 返回path所指向的文件或者目录的最后存取时间
os.path.getmtime(path) 返回path所指向的文件或者目录的最后修改时间
SYS模块
sys.argv 命令行参数
List
,第一个元素是程序本身路径
sys.exit(n) 退出程序,正常退出时exit(
0
)
sys.version 获取Python解释程序的版本信息
sys.maxint 最大的
Int
值
sys.path 返回模块的搜索路径,初始化时使用PYTHONPATH环境变量的值
sys.platform 返回操作系统平台名称
sys.stdout.write(
'please:'
)
val
=
sys.stdin.readline()[:
-
1
]
shutil 文件 文件夹 处理模块
shutil.copyfileobj(fsrc, fdst[, length])
将文件内容拷贝到另一个文件中,可以部分内容
def copyfileobj(fsrc, fdst, length=16*1024):
"""copy data from file-like object fsrc to file-like object fdst"""
while 1:
buf = fsrc.read(length)
if not buf:
break
fdst.write(buf)
shutil.copyfile(src, dst)
拷贝文件
shutil.copymode(src, dst)
仅拷贝权限。内容、组、用户均不变
shutil.copystat(src, dst)
拷贝状态的信息,包括:mode bits, atime, mtime, flags
shutil.copy(src, dst)
拷贝文件和权限
shutil.copy2(src, dst)
拷贝文件和状态信息
shutil.ignore_patterns(*patterns)
shutil.copytree(src, dst, symlinks=False, ignore=None)
递归的去拷贝文件例如:copytree(source, destination, ignore=ignore_patterns('*.pyc', 'tmp*'))shutil.rmtree(path[, ignore_errors[, onerror]])
递归的去删除文件
shutil.move(src, dst)
递归的去移动文件
shutil.make_archive(base_name, format,...)创建压缩包并返回文件路径,例如:zip、tarbase_name: 压缩包的文件名,也可以是压缩包的路径。只是文件名时,则保存至当前目录,否则保存至指定路径,
如:www =>保存至当前路径
如:/Users/wupeiqi/www =>保存至/Users/wupeiqi/
format: 压缩包种类,“zip”, “tar”, “bztar”,“gztar”
root_dir: 要压缩的文件夹路径(默认当前目录)
owner: 用户,默认当前用户
group: 组,默认当前组
logger: 用于记录日志,通常是logging.Logger对象
shutil 对压缩包的处理是调用 ZipFile 和 TarFile 两个模块来进行的
shelve
是一个简单的k,v 将内存数据通过文件持久化的模块,支持pickle
import shelve
d = shelve.open('shelve_test') #打开一个文件
class Test(object):
def __init__(self,n):
self.n = n
t = Test(123)
t2 = Test(123334)
name = ["alex","rain","test"]
d["test"] = name #持久化列表
d["t1"] = t #持久化类
d["t2"] = t2
d.close()
xml模块
实现不同语言或程序直接进行数据交换 <>
yaml http://pyyaml.org/wiki/PyYAMLDocumentation configparser模块
用于生成和修改常见配置文档。
#!/usr/bin/env python
# -*- coding: utf-8 -*-
import configparser
config = configparser.ConfigParser()
config["DEFAULT"] = {'ServerAliveInterval': '45',
'Compression': 'yes',
'CompressionLevel': '9'}
config['bitbucket.org'] = {}
config['bitbucket.org']['User'] = 'hg'
config['topsecret.server.com'] = {}
topsecret = config['topsecret.server.com']
topsecret['Host Port'] = '50022'     # mutates the parser
topsecret['ForwardX11'] = 'no'  # same here
config['DEFAULT']['ForwardX11'] = 'yes'
with open('example.ini', 'w') as configfile:
config.write(configfile)
[DEFAULT]
serveraliveinterval= 45
compression = yes
compressionlevel = 9
forwardx11 = yes
[bitbucket.org]
user = hg
[topsecret.server.com]
host port = 50022
forwardx11 = no
hashlib模块
加密操作
subprocess模块
logging
提供了标准的日志接口。
分5个级别
debug() info() warning() error() critical()
import logging

logging.warning("user [alex] attempted wrong password more than 3 times")
logging.critical("server is down")

#输出
WARNING:root:user [alex] attempted wrong password more than 3 times
CRITICAL:root:server is down

import logging

logging.basicConfig(filename='example.log',level=logging.INFO)
logging.debug('This message should go to the log file')
logging.info('So should this')
logging.warning('And this, too')

相关文章推荐
- Python 之路 Day5 - 常用模块学习
- Python3内置模块详解1 (Python 之路 Day5 - 常用模块学习 )
- Python 之路 Day5 - 常用模块学习
- 第五篇 Python常用的模块(day5-day6)
- Day5 - Python基础5 常用模块学习
- Python 之路 Day5 - 常用模块学习
- Python 常用模块
- python常用模块
- Python常用模块种类的系统介绍及与操作系统相关的调用和操作
- Python常用模块种类的系统介绍及与操作系统相关的调用和操作
- 常用的python模块
- python基础31[常用模块介绍]
- [转载]Python学习笔记三(常用模块)
- [转]常用的python模块及安装方法
- Python常用模块
- Python里的OS模块常用函数说明
- [转]常用的python模块及安装方法
- Python常用模块种类的系统介绍及与操作系统相关的调用和操作
- 我接触到的常用python模块
- Python常用模块I与操作系统相关的调用和操作