kubernetes 1.5安装dashboard,heapster
2016-12-23 14:20
465 查看
Installing Kubernetes 1.5 on all nodes
不知道为什么blog格式全乱了,看起来很累,也不知道怎么改,所以这篇文章会被重新分成三篇。以下是连接地址:
第一个 集群安装: http://blog.csdn.net/wenwst/article/details/54409205第二个dashboard 安装: http://blog.csdn.net/wenwst/article/details/54410012
第三个 heapster 安装: http://blog.csdn.net/wenwst/article/details/54601110
系统配置:
Linux 3.10.0-327.36.3.el7.x86_64 #1 SMP Mon Oct 24 16:09:20 UTC 2016 x86_64 x86_64 x86_64 GNU/Linux
配置前系统 操作:
Last login: Mon Dec 26 22:26:56 2016
[root@localhost ~]# systemctl disable firewalld
Removed symlink /etc/systemd/system/dbus-org.fedoraproject.FirewallD1.service.
Removed symlink /etc/systemd/system/basic.target.wants/firewalld.service.
[root@localhost ~]# systemctl stop firewalld
[root@localhost ~]#
配置主机名:
hostnamectl --static set-hostname centos-master
确定selinux是关闭的:
/etc/selinux/config

SELINUX=disabled
-----------------------------------------可选--------------------------
把下面两行加入到/etc/hosts中
61.91.161.217 gcr.io
61.91.161.217 www.gcr.io
--------------------------------------------------------------------------
以下在所有的节点上安装:
Kubernetes 1.5
方法1:来源于官网配置
在centos系统yum中加入:
cat <<EOF > /etc/yum.repos.d/kubernetes.repo
[kubernetes]
name=Kubernetes
baseurl=http://yum.kubernetes.io/repos/kubernetes-el7-x86_64
enabled=1
gpgcheck=0
repo_gpgcheck=0
EOF
yum install -y socat kubelet kubeadm kubectl kubernetes-cni
---这里需要注意,根据自己的实际情况选择,如果在下一步下载镜 像的速度太慢,可以加上---
在docker的启动文件 /lib/systemd/system/docker.service中加入--registry-mirror="http://b438f72b.m.daocloud.io"
详细如下:
[root@localhost ~]# vi /lib/systemd/system/docker.service
[Unit]
Description=Docker Application Container Engine
Documentation=https://docs.docker.com
After=network.target

[Service]
Type=notify
# the default is not to use systemd for cgroups because the delegate issues still
# exists and systemd currently does not support the cgroup feature set required
# for containers run by docker
ExecStart=/usr/bin/dockerd --registry-mirror="http://b438f72b.m.daocloud.io"
ExecReload=/bin/kill -s HUP $MAINPID
# Having non-zero Limit*s causes performance problems due to accounting overhead
# in the kernel. We recommend using cgroups to do container-local accounting.
LimitNOFILE=infinity
LimitNPROC=infinity
LimitCORE=infinity
# Uncomment TasksMax if your systemd version supports it.
# Only systemd 226 and above support this version.
#TasksMax=infinity
TimeoutStartSec=0
# set delegate yes so that systemd does not reset the cgroups of docker containers
Delegate=yes
# kill only the docker process, not all processes in the cgroup
KillMode=process

[Install]
WantedBy=multi-user.target
~
让docker开机启动
systemctl enable docker
启动docker
systemctl start docker
让kubelet开机启动
systemctl enable kubelet
启动kubelet
systemctl start kubelet
----------------------
systemctl enable docker;systemctl start docker;systemctl enable kubelet;systemctl start kubelet
---------------------------------------------
下载镜像:
images=(kube-proxy-amd64:v1.5.1 kube-discovery-amd64:1.0 kubedns-amd64:1.9 kube-scheduler-amd64:v1.5.1 kube-controller-manager-amd64:v1.5.1 kube-apiserver-amd64:v1.5.1 etcd-amd64:3.0.14-kubeadm kube-dnsmasq-amd64:1.4 exechealthz-amd64:1.2 pause-amd64:3.0 kubernetes-dashboard-amd64:v1.5.0 dnsmasq-metrics-amd64:1.0)
for imageName in ${images[@]} ; do
docker pull jicki/$imageName
docker tag jicki/$imageName gcr.io/google_containers/$imageName
docker rmi jicki/$imageName
done
--------------------------------------------------
注意--
虽然我们在这里安装下载了weaveworks/weave-kube:1.8.2 但还是要注意安装weaveworks的yaml文件中对应的版本。
特别是在安装dns时候,kubeadm会自动安装,因此没有yaml,那么使用下面的命令进行查看:
kubectl --namespace=kube-system edit deployment kube-dns
--------------------------------------------------
这两个是网络
docker pull weaveworks/weave-kube:1.8.2

docker pull weaveworks/weave-npc:1.8.2
这两个是监控
docker pull kubernetes/heapster:canary
docker pull kubernetes/heapster_influxdb:v0.6
docker pull gcr.io/google_containers/heapster_grafana:v3.1.1
以上的操作在每一个节点都要执行,镜像也要在每一个节点上下载。
接下来配置集群:
在你的master服务器上面运行:
kubeadm init --api-advertise-addresses=192.168.7.206 --pod-network-cidr 10.245.0.0/16
上面的192.168.7.206是我的master的地址。
这个命令不可以运行两回。 也就是只能运行一次。如果再次运行,需要执行 kubeadm reset.
输出 内容如下:
[root@centos-master ~]# kubeadm init
[kubeadm] WARNING: kubeadm is in alpha, please do not use it for production clusters.
[preflight] Running pre-flight checks
[init] Using Kubernetes version: v1.5.1
[tokens] Generated token: "60a95a.93c425347a1695ab"
[certificates] Generated Certificate Authority key and certificate.
[certificates] Generated API Server key and certificate
[certificates] Generated Service Account signing keys
[certificates] Created keys and certificates in "/etc/kubernetes/pki"
[kubeconfig] Wrote KubeConfig file to disk: "/etc/kubernetes/kubelet.conf"
[kubeconfig] Wrote KubeConfig file to disk: "/etc/kubernetes/admin.conf"
[apiclient] Created API client, waiting for the control plane to become ready
[apiclient] All control plane components are healthy after 81.803134 seconds
[apiclient] Waiting for at least one node to register and become ready
[apiclient] First node is ready after 2.002437 seconds
[apiclient] Creating a test deployment
[apiclient] Test deployment succeeded
[token-discovery] Created the kube-discovery deployment, waiting for it to become ready
[token-discovery] kube-discovery is ready after 22.002704 seconds
[addons] Created essential addon: kube-proxy
[addons] Created essential addon: kube-dns

Your Kubernetes master has initialized successfully!

You should now deploy a pod network to the cluster.
Run "kubectl apply -f [podnetwork].yaml" with one of the options listed at: http://kubernetes.io/docs/admin/addons/
You can now join any number of machines by running the following on each node:

kubeadm join --token=60a95a.93c425347a1695ab 192.168.7.206
这个拷下来,后面有用。
在上面的操作中,已经初始化了master. 最后一行是token,后面将用来增加结点。
接下来安装结点:
在所有的结点运行下面的命令:
kubeadm join --token=60a95a.93c425347a1695ab 192.168.7.206
运行完输出 信息如下:
[root@centos-minion-1 kubelet]# kubeadm join --token=60a95a.93c425347a1695ab 192.168.7.206
[kubeadm] WARNING: kubeadm is in alpha, please do not use it for production clusters.
[preflight] Running pre-flight checks
[tokens] Validating provided token
[discovery] Created cluster info discovery client, requesting info from "http://192.168.7.206:9898/cluster-info/v1/?token-id=60a95a"
[discovery] Cluster info object received, verifying signature using given token
[discovery] Cluster info signature and contents are valid, will use API endpoints [https://192.168.7.206:6443]
[bootstrap] Trying to connect to endpoint https://192.168.7.206:6443 [bootstrap] Detected server version: v1.5.1
[bootstrap] Successfully established connection with endpoint "https://192.168.7.206:6443"
[csr] Created API client to obtain unique certificate for this node, generating keys and certificate signing request
[csr] Received signed certificate from the API server:
Issuer: CN=kubernetes | Subject: CN=system:node:centos-minion-1 | CA: false
Not before: 2016-12-23 07:06:00 +0000 UTC Not After: 2017-12-2
111dc
3 07:06:00 +0000 UTC
[csr] Generating kubelet configuration
[kubeconfig] Wrote KubeConfig file to disk: "/etc/kubernetes/kubelet.conf"

Node join complete:
* Certificate signing request sent to master and response
received.
* Kubelet informed of new secure connection details.

Run 'kubectl get nodes' on the master to see this machine join.
在master上面运行kubectl get nodes
[root@centos-master ~]# kubectl get nodes
NAME              STATUS         AGE
centos-master     Ready,master   14m
centos-minion-1   Ready          5m
centos-minion-2   Ready          45s
网上有一个命令是:
kubectl taint nodes --all dedicated-
[root@centos-master ~]# kubectl taint nodes --all dedicated-
taint key="dedicated" and effect="" not found.
taint key="dedicated" and effect="" not found.
taint key="dedicated" and effect="" not found.
执行这个命令好像
这个命令好像是可以让master上面也可以运行pod。
但执行没有效果。
kubectl get nodes
[root@centos-master ~]# kubectl get nodes
NAME              STATUS         AGE
centos-master     Ready,master   21m
centos-minion-1   Ready          13m
centos-minion-2   Ready          8m
还是这个样子。
然后:
[root@centos-master new]# kubectl --namespace=kube-system get pod
NAME                                    READY     STATUS    RESTARTS   AGE
dummy-2088944543-9zfjl                  1/1       Running   0          2d
etcd-centos-master                      1/1       Running   0          2d
kube-apiserver-centos-master            1/1       Running   0          2d
kube-controller-manager-centos-master   1/1       Running   0          2d
kube-discovery-1769846148-6ldk1         1/1       Running   0          2d
kube-proxy-34q7p                        1/1       Running   0          2d
kube-proxy-hqkkg                        1/1       Running   1          2d
kube-proxy-nbgn3                        1/1       Running   0          2d
kube-scheduler-centos-master            1/1       Running   0          2d
weave-net-kkdh9                         2/2       Running   0          42m
weave-net-mtd83                         2/2       Running   0          2m
weave-net-q91sr                         2/2       Running   2          42m
现在,需要安装pod network.
执行下面命令:
kubectl apply -f https://git.io/weave-kube 这个命令里面的镜像可能无法下载,那么,按以下的方法来做。
[root@centos-master new]# vi weave-daemonset.yaml
apiVersion: extensions/v1beta1
kind: DaemonSet
metadata:
name: weave-net
namespace: kube-system
spec:
template:
metadata:
labels:
name: weave-net
annotations:
scheduler.alpha.kubernetes.io/tolerations: |
[
{
"key": "dedicated",
"operator": "Equal",
"value": "master",
"effect": "NoSchedule"
}
]
spec:
hostNetwork: true
hostPID: true
containers:
- name: weave
image: weaveworks/weave-kube:1.8.2
command:
- /home/weave/launch.sh
livenessProbe:
initialDelaySeconds: 30
httpGet:
host: 127.0.0.1
path: /status
port: 6784
securityContext:
privileged: true
volumeMounts:
- name: weavedb
mountPath: /weavedb
- name: cni-bin
mountPath: /opt
- name: cni-bin2
mountPath: /host_home
- name: cni-conf
mountPath: /etc
resources:
requests:
cpu: 10m
- name: weave-npc
image: weaveworks/weave-kube:1.8.2
resources:
requests:
cpu: 10m
securityContext:
privileged: true
restartPolicy: Always
volumes:
- name: weavedb
emptyDir: {}
- name: cni-bin
hostPath:
path: /opt
- name: cni-bin2
hostPath:
path: /home
- name: cni-conf
hostPath:
path: /etc
注意上面的镜像地址,如果前面下载的镜像不对,最好找好相应版本的镜像。
kubectl apply -f weave-daemonset.yaml
安装完后,显示pod:
[root@localhost ~]# kubectl --namespace=kube-system get pod
NAME                                    READY     STATUS    RESTARTS   AGE
dummy-2088944543-xjj21                  1/1       Running   0          55m
etcd-centos-master                      1/1       Running   0          55m
kube-apiserver-centos-master            1/1       Running   0          55m
kube-controller-manager-centos-master   1/1       Running   0          55m
kube-discovery-1769846148-c45gd         1/1       Running   0          55m
kube-dns-2924299975-96xms               4/4       Running   0          55m
kube-proxy-33lsn                        1/1       Running   0          55m
kube-proxy-jnz6q                        1/1       Running   0          55m
kube-proxy-vfql2                        1/1       Running   0          20m
kube-scheduler-centos-master            1/1       Running   0          55m
weave-net-k5tlz                         2/2       Running   0          19m
weave-net-q3n89                         2/2       Running   0          19m
weave-net-x57k7                         2/2       Running   0          19m
安装dashboard过程如下:
下载安装yaml文件:
wget https://rawgit.com/kubernetes/dashboard/master/src/deploy/kubernetes-dashboard.yaml[/code][root@centos-master new]# cat kubernetes-dashboard.yaml # Copyright 2015 Google Inc. All Rights Reserved. # # Licensed under the Apache License, Version 2.0 (the "License"); # you may not use this file except in compliance with the License. # You may obtain a copy of the License at # # http://www.apache.org/licenses/LICENSE-2.0 # # Unless required by applicable law or agreed to in writing, software # distributed under the License is distributed on an "AS IS" BASIS, # WITHOUT WARRANTIES OR CONDITIONS OF ANY KIND, either express or implied. # See the License for the specific language governing permissions and # limitations under the License. # Configuration to deploy release version of the Dashboard UI. # # Example usage: kubectl create -f <this_file> kind: Deployment apiVersion: extensions/v1beta1 metadata: labels: app: kubernetes-dashboard name: kubernetes-dashboard namespace: kube-system spec: replicas: 1 selector: matchLabels: app: kubernetes-dashboard template: metadata: labels: app: kubernetes-dashboard # Comment the following annotation if Dashboard must not be deployed on master annotations: scheduler.alpha.kubernetes.io/tolerations: | [ { "key": "dedicated", "operator": "Equal", "value": "master", "effect": "NoSchedule" } ] spec: containers: - name: kubernetes-dashboard image: gcr.io/google_containers/kubernetes-dashboard-amd64:v1.5.0 imagePullPolicy: Always ports: - containerPort: 9090 protocol: TCP args: # Uncomment the following line to manually specify Kubernetes API server Host # If not specified, Dashboard will attempt to auto discover the API server and connect # to it. Uncomment only if the default does not work. # - --apiserver-host=http://my-address:port livenessProbe: httpGet: path: / port: 9090 initialDelaySeconds: 30 timeoutSeconds: 30 --- kind: Service apiVersion: v1 metadata: labels: app: kubernetes-dashboard name: kubernetes-dashboard namespace: kube-system spec: type: NodePort ports: - port: 80 targetPort: 9090 selector: app: kubernetes-dashboard
上面加红加粗标注的镜像地址可以提前下载到master服务器上面。kubectl create -f https://rawgit.com/kubernetes/dashboard/master/src/deploy/kubernetes-dashboard.yaml[/code] 查看到kubernetes-dashboard-3095304083-w3fjd
已经运行。[root@centos-master new]# kubectl get pod --all-namespaces NAMESPACE NAME READY STATUS RESTARTS AGE kube-system dummy-2088944543-9zfjl 1/1 Running 0 2d kube-system etcd-centos-master 1/1 Running 0 2d kube-system kube-apiserver-centos-master 1/1 Running 0 2d kube-system kube-controller-manager-centos-master 1/1 Running 0 2d kube-system kube-discovery-1769846148-6ldk1 1/1 Running 0 2d kube-system kube-proxy-34q7p 1/1 Running 0 2d kube-system kube-proxy-hqkkg 1/1 Running 1 2d kube-system kube-proxy-nbgn3 1/1 Running 0 2d kube-system kube-scheduler-centos-master 1/1 Running 0 2d kube-system kubernetes-dashboard-3095304083-w3fjd 1/1 Running 0 31m kube-system weave-net-kkdh9 2/2 Running 0 1h kube-system weave-net-mtd83 2/2 Running 0 48m kube-system weave-net-q91sr 2/2 Running 2 1h
查看节点端口为:31551[root@centos-master new]# kubectl describe svc kubernetes-dashboard --namespace=kube-system Name: kubernetes-dashboard Namespace: kube-system Labels: app=kubernetes-dashboard Selector: app=kubernetes-dashboard Type: NodePort IP: 10.96.35.20 Port: <unset> 80/TCP NodePort: <unset> 31551/TCP Endpoints: 10.40.0.1:9090 Session Affinity: None No events.
安装heapster
yaml文件来自于github.[root@localhost heapster]# cat grafana-deployment.yaml apiVersion: extensions/v1beta1 kind: Deployment metadata: name: monitoring-grafana namespace: kube-system spec: replicas: 1 template: metadata: labels: task: monitoring k8s-app: grafana spec: volumes: - name: grafana-storage emptyDir: {} containers: - name: grafana image: gcr.io/google_containers/heapster_grafana:v3.1.1 ports: - containerPort: 3000 protocol: TCP volumeMounts: - mountPath: /var name: grafana-storage env: - name: INFLUXDB_HOST value: monitoring-influxdb - name: GRAFANA_PORT value: "3000" # The following env variables are required to make Grafana accessible via # the kubernetes api-server proxy. On production clusters, we recommend # removing these env variables, setup auth for grafana, and expose the grafana # service using a LoadBalancer or a public IP. - name: GF_AUTH_BASIC_ENABLED value: "false" - name: GF_AUTH_ANONYMOUS_ENABLED value: "true" - name: GF_AUTH_ANONYMOUS_ORG_ROLE value: Admin - name: GF_SERVER_ROOT_URL # value: /api/v1/proxy/namespaces/kube-system/services/monitoring-grafana/ value: /
grafana-deployment.yaml 中的image我们在上面已经下载过
docker pull gcr.io/google_containers/heapster_grafana:v3.1.1[root@localhost heapster]# cat grafana-service.yaml apiVersion: v1 kind: Service metadata: labels: # For use as a Cluster add-on (https://github.com/kubernetes/kubernetes/tree/master/cluster/addons) # If you are NOT using this as an addon, you should comment out this line. kubernetes.io/cluster-service: 'true' kubernetes.io/name: monitoring-grafana name: monitoring-grafana namespace: kube-system spec: # In a production setup, we recommend accessing Grafana through an external Loadbalancer # or through a public IP. # type: LoadBalancer type: NodePort ports: - port: 80 targetPort: 3000 selector: k8s-app: grafana
influxdb-deployment.yaml 中的image也是下载过的。[root@localhost heapster]# cat influxdb-deployment.yaml apiVersion: extensions/v1beta1 kind: Deployment metadata: name: monitoring-influxdb namespace: kube-system spec: replicas: 1 template: metadata: labels: task: monitoring k8s-app: influxdb spec: volumes: - name: influxdb-storage emptyDir: {} containers: - name: influxdb image: kubernetes/heapster_influxdb:v0.6 volumeMounts: - mountPath: /data name: influxdb-storage[root@localhost heapster]# cat influxdb-service.yaml apiVersion: v1 kind: Service metadata: labels: task: monitoring # For use as a Cluster add-on (https://github.com/kubernetes/kubernetes/tree/master/cluster/addons) # If you are NOT using this as an addon, you should comment out this line. kubernetes.io/cluster-service: 'true' kubernetes.io/name: monitoring-influxdb name: monitoring-influxdb namespace: kube-system spec: # type: NodePort ports: - name: api port: 8086 targetPort: 8086 selector: k8s-app: influxdb
heapster-deployment.yaml 文件内容
[root@localhost heapster]# cat heapster-deployment.yaml
apiVersion: extensions/v1beta1
kind: Deployment
metadata:
name: heapster
namespace: kube-system
spec:
replicas: 1
template:
metadata:
labels:
task: monitoring
k8s-app: heapster
version: v6
spec:
containers:
- name: heapster
image: kubernetes/heapster:canary
imagePullPolicy: Always
command:
- /heapster
- --source=kubernetes:https://kubernetes.default
- --sink=influxdb:http://monitoring-influxdb:8086
image也是下载过的。[root@localhost heapster]# cat heapster-service.yaml apiVersion: v1 kind: Service metadata: labels: task: monitoring # For use as a Cluster add-on (https://github.com/kubernetes/kubernetes/tree/master/cluster/addons) # If you are NOT using this as an addon, you should comment out this line. kubernetes.io/cluster-service: 'true' kubernetes.io/name: Heapster name: heapster namespace: kube-system spec: ports: - port: 80 targetPort: 8082 selector: k8s-app: heapster
六个文件准备好了以后。
直接kubectl create -f grafana-deployment.yaml -f grafana-service.yaml -f influxdb-deployment.yaml -f influxdb-service.yaml -f heapster-deployment.yaml -f heapster-service.yaml
查看pod:[root@localhost heapster]# kubectl get pod --namespace=kube-system NAME READY STATUS RESTARTS AGE dummy-2088944543-xjj21 1/1 Running 0 2h etcd-centos-master 1/1 Running 0 2h heapster-2193675300-j1jxn 1/1 Running 0 1h kube-apiserver-centos-master 1/1 Running 0 2h kube-controller-manager-centos-master 1/1 Running 0 2h kube-discovery-1769846148-c45gd 1/1 Running 0 1h kube-dns-2924299975-96xms 4/4 Running 0 1h kube-proxy-33lsn 1/1 Running 0 1h kube-proxy-jnz6q 1/1 Running 0 1h kube-proxy-vfql2 1/1 Running 0 1h kube-scheduler-centos-master 1/1 Running 0 2h kubernetes-dashboard-3000605155-8mxgz 1/1 Running 0 1h monitoring-grafana-810108360-h92v7 1/1 Running 0 1h monitoring-influxdb-3065341217-q2445 1/1 Running 0 1h weave-net-k5tlz 2/2 Running 0 1h weave-net-q3n89 2/2 Running 0 1h weave-net-x57k7 2/2 Running 0 1h
查看服务:[root@localhost heapster]# kubectl get svc --namespace=kube-system NAME CLUSTER-IP EXTERNAL-IP PORT(S) AGE heapster 10.98.45.1 <none> 80/TCP 1h kube-dns 10.96.0.10 <none> 53/UDP,53/TCP 2h kubernetes-dashboard 10.108.45.66 <nodes> 80:32155/TCP 1h monitoring-grafana 10.97.110.225 <nodes> 80:30687/TCP 1h monitoring-influxdb 10.96.175.67 <none> 8086/TCP 1h
查看grafana的详细信息:[root@localhost heapster]# kubectl --namespace=kube-system describe svc monitoring-grafana Name: monitoring-grafana Namespace: kube-system Labels: kubernetes.io/cluster-service=true kubernetes.io/name=monitoring-grafana Selector: k8s-app=grafana Type: NodePort IP: 10.97.110.225 Port: <unset> 80/TCP NodePort: <unset> 30687/TCP Endpoints: 10.32.0.2:3000 Session Affinity: None No events.
看到开放端口为30687
通过节点IP加端口号访问:
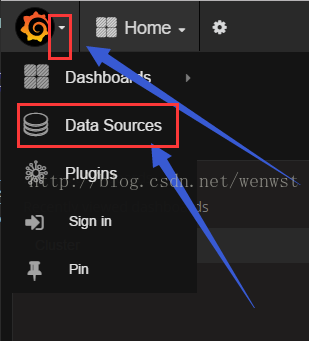
点图标:
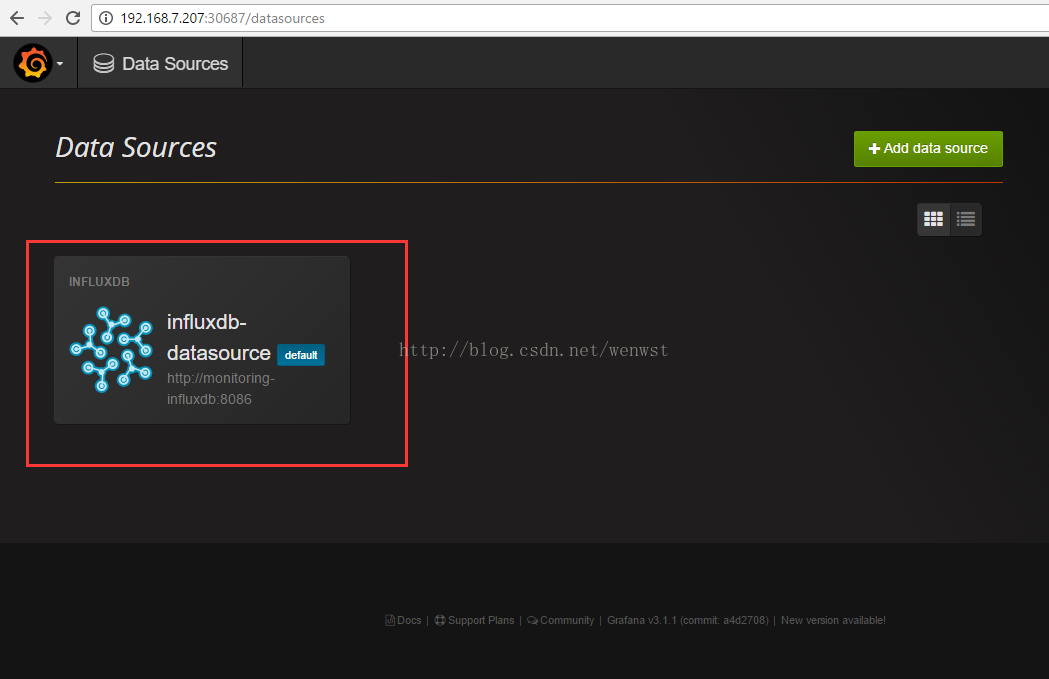
点默认;
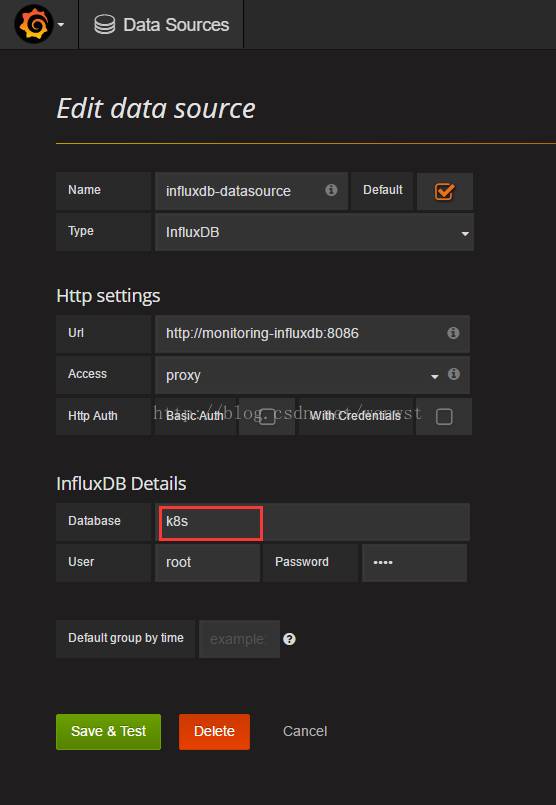
然后确认是k8s就可以了:
接下来:
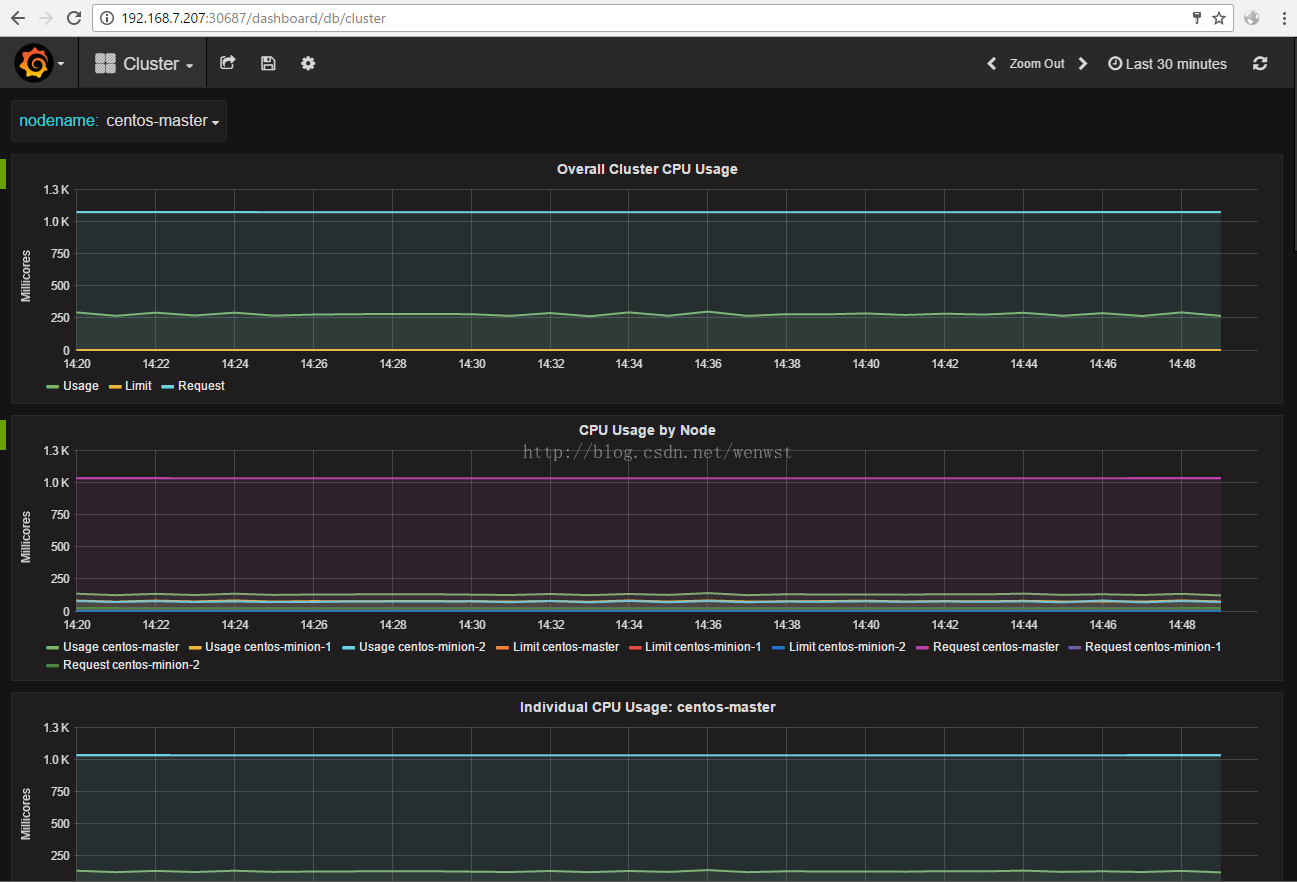
图形出来了:


相关文章推荐
- Effective Objective-C 2.0 学习记录(三)
- 安卓Android通过字段映射创建sqlite数据库,操作数据库,创建表,增、删、改查,通用方法,轻松编程(by寒冬)
- smali语言
- Python中用format函数格式化字符串的用法
- 支付宝AR抢红包
- Qt Creator快捷键
- 用pl/sql游标实现约瑟夫环
- 2.2 Git 基础 - 记录每次更新到仓库
- 不定期更新
- 基于工厂的DB类
- Python MySQLdb连接数据库之phpmyadmin报错解决方法
- Linux Socket网络编程 分别使用TCP协议 和 UDP协议
- 终点亦是起点
- 微课程--Android--Activity组建与Intent
- SQL Server 2000 ——系统表和系统视图
- centos yum安装ftp 及解决vsftp错误500 OOPS: cannot change directory:/home/**
- A*寻路算法源码
- python中文乱码总结
- vbs脚本加密
- 软件目录结构规范